


Mimosa x Orange Punch + Swiss Sativa x Super Skunk x NL





Tent
Grow Pro 3.0
Grow Tent

Fan
Monkey Fan
Ventilation Fans

Filt
Prima Klima
Air Filter



Indoor
Room Type
Topping
weeks 1, 3-4
Transplantation
weeks 1, 3-5
ScrOG
weeks 5-7, 9-11
Defoliation
weeks 7
13 liters
Pot Size
Start at Harvest
1
Week 1. Vegetation2y ago


18 hrs
Light Schedule
24 °C
Day Air Temp
6.5
pH
No Smell
Smell
180 PPM
TDS
60 %
Air Humidity
22 °C
Solution Temp
23 °C
Substrate Temp
22 °C
Night Air Temp
1 liters
Pot Size
40 cm
Lamp Distance
Horst After three weeks of seedling phase, the first week of vegetation is almost over. Four of the six plants were repotted for the first time. They are still drooping their leaves a bit from the repotting, but they will completely overcome the stress afterwards. The soil at the bottom is from the repotting and was removed right after taking the photo. The plan is to keep four of the 6 plants. Plagron light, with pH-regulated water + CalMag. No nutrients, as there are still enough nutrients available from the repotting. I water after repotting until some drainage is visible and from now on I only water when the pot is very light. I'm going from seedling pots to about 1.5-liter pots, then to about 5-6 liter pots, and for flowering to 12-15 liter pots. The TSW2000 is set to 25%.
3 likes
1 comment
Share
Used techniques
Topping
Technique
Transplantation
Technique
2
Week 2. Vegetation2y ago


18 hrs
Light Schedule
24 °C
Day Air Temp
6.5
pH
No Smell
Smell
340 PPM
TDS
60 %
Air Humidity
22 °C
Solution Temp
23 °C
Substrate Temp
21 °C
Night Air Temp
1.5 liters
Pot Size
40 cm
Lamp Distance
Nutrients 4
Premium Mycorrhizae
1.3 mll

CalMag Pro
0.5 mll

Silic Rock
1 mll
Horst Now you can clearly see the difference, 3 of the plants germinated relatively quickly (24h to 48h), while the other 3 only after 4 to 5 days. This means that the 3 plants that germinated quickly are ahead of the others in size and side branch development. All the plants are doing well, which is why they have all been topped already. I haven't fertilized yet, as there are still enough nutrients from the repotting last week. I use Silic rock from Plagron and Great White Premium Mycorrhizae once every 2 weeks. The TSW2000 is still at 25%, and I will start gradually increasing it to 50% power sometime in the 3rd week of growth (since 3 plants are lagging due to delayed germination, probably not until the end of the 3rd week).
2 likes
2 comments
Share
3
Week 3. Vegetation2y ago


18 hrs
Light Schedule
24 °C
Day Air Temp
6.2
pH
No Smell
Smell
340 PPM
TDS
53 %
Air Humidity
22 °C
Solution Temp
23 °C
Substrate Temp
21 °C
Night Air Temp
5 liters
Pot Size
40 cm
Lamp Distance
Nutrients 4

TriPart Bloom
0.25 mll

TriPart Grow
0.75 mll

TriPart Micro
1 mll
Horst Week 3 – Addendum
Since I didn't have time over the weekend, this entry is a bit late.
I repotted the ladies into 5L fabric pots. I mixed in diatomaceous earth with the soil – a natural source of silicon, which is why I'm skipping Plagron Silic Rock for now to test out the diatomaceous earth. Additionally, diatomaceous earth acts as a preventive measure against pests, as the fossilized shells of the diatoms cause mechanical damage to insect larvae and are supposed to dry them out.
Unfortunately, my Monkey Fan gave up and blew the fuse. As a result, the dark phase was an hour longer than planned on one day – but that's still within the safe zone regarding unwanted flowering. The blown fuse caused the ventilation and heating to be out for about 7 hours. The "Church" in the back left wasn't too thrilled about it, but the rest stayed relaxed.
Also, my pH meter has given up the ghost, which temporarily led to slightly too acidic watering (around 5.9). However, the soil is stable enough after repotting to easily compensate for small pH fluctuations.
Fertilization:
At the beginning of week four, I fertilized for the first time according to the Terra Aquatica scheme – but only with 50% of the recommended amount. The exception is T.A. Micro, which I give once a week.
Training:
All plants have been topped at least once – the larger ones multiple times.
Watering Method:
One of the pictures also shows my "comparison pot" 😄
It's filled with dry soil and serves as my reference. When the real pots are a bit heavier than the comparison pot, it's time for water. Even after all these years, I still occasionally find it hard to gauge the right weight for the optimal watering time with smaller pots like the 1.5s or 5 liters. That's where a comparison pot is really worth its weight in gold.
Light:
The TSW2000 was increased to 30% at the beginning of week 4 and will be gradually raised to 50%.
2 likes
comments
Share
Used techniques
Topping
Technique
Transplantation
Technique
4
Week 4. Vegetation1y ago




18 hrs
Light Schedule
24 °C
Day Air Temp
6.4
pH
No Smell
Smell
340 PPM
TDS
53 %
Air Humidity
22 °C
Solution Temp
23 °C
Substrate Temp
21 °C
Night Air Temp
13 liters
Pot Size
45 cm
Lamp Distance
Nutrients 1
CalMag Pro
0.75 mll
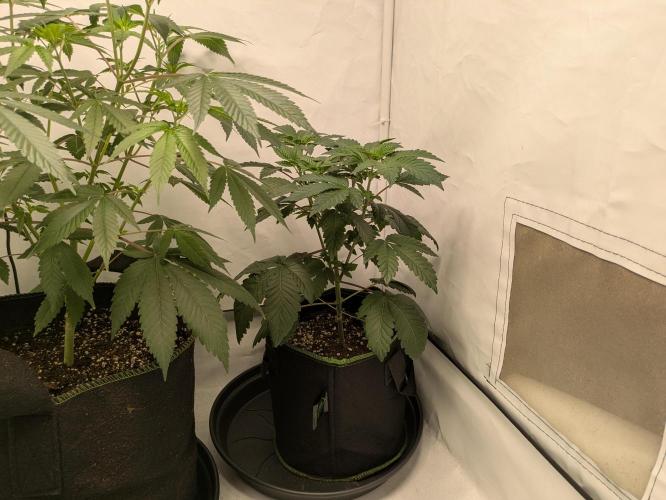
Horst Week 4 – End (for the two larger plants)
The two larger girls are now at the end of their fourth week and are currently in their final pots – about 12-15 liters in capacity. The two smaller plants are about a week younger, so they're still smaller and have fewer side branches. They'll also be going into their final pots over the course of the week.
Setup Update:
Light: TSW2000 is now running at 50% power.
Nutrients: Currently no nutrients, as there are enough nutrients from the fresh repotting.
Humidity: Unfortunately, the humidifier has given up the ghost. Since the humidity is stable at 50%, I don't see any need for action at the moment. At this stage, that's perfectly fine – it only becomes critical during the seedling phase or towards the end of flowering/drying.
Flowering Plan: Technically, the two larger ones could already be sent into flowering, but I'm going to wait another week so the two smaller ones can catch up. Once all four are in their final pots, I'll install a scrog net and send them all into flowering together.
Growth & Observations: Normally, I make sure the plants are about the same height, but that was a bit tricky with this grow. Due to the different germination times, there have been size differences from the start. Technical issues also added to the challenge – especially the Church in the back right struggled with this at first and visibly felt unwell. However, she has recovered well and is showing stable growth again.
Extras:
During repotting, diatomaceous earth was used again – so this grow is essentially a test run.
4 likes
comments
Share
Used techniques
Topping
Technique
Transplantation
Technique
5
Week 5. Vegetation1y ago


18 hrs
Light Schedule
24 °C
Day Air Temp
6.3
pH
No Smell
Smell
320 PPM
TDS
50 %
Air Humidity
23 °C
Solution Temp
23 °C
Substrate Temp
22 °C
Night Air Temp
13 liters
Pot Size
45 cm
Lamp Distance
Nutrients 1
CalMag Pro
0.75 mll
Horst Week 5 – End (for the big ones) / Week 4 – End (for the smaller ones)
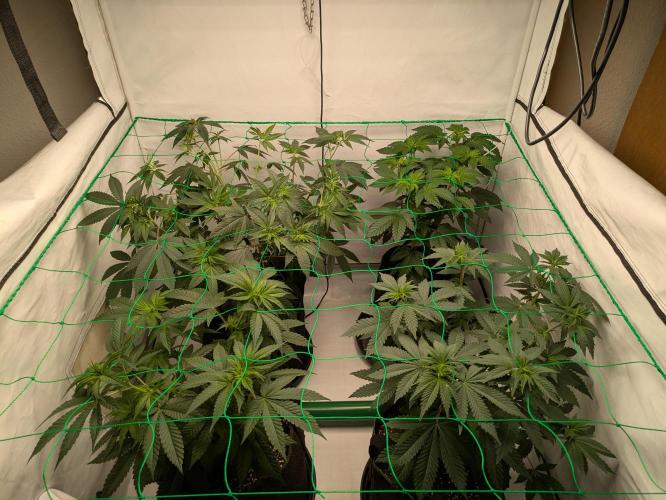
All the plants are now in their final pots. During the shots, the scrog net was installed, and just a day later, I sent the girls into flowering. Normally, I combine the installation of the scrog net directly with a proper lollipopping because after the net is up, it’s not as easy to reach the lower parts of the plants. Due to the complications during this grow, I’m giving the plants a conscious recovery phase after each intervention (repotting, topping, installing the net, etc.) to avoid unnecessary stress.
In one of the photos, you can see that the smallest plant – which also had the longest germination time – was raised on a few books so that it matches better in height with the others. I could have topped the bigger plants even more and at the same time given the smaller ones more growth time, but the tent is already pretty full. Normally, I send the plants into flowering with about 50% of the space in the scrog net still free, so they can spread nicely during the stretch phase. This time, I had to adjust the timing a bit.
Substrate update: I usually use Plagron Grow Mix for repotting into the final pots, but unfortunately, it was sold out at the grow shop. So this time, I resorted to BioBizz Light Mix – because that was the only one left :D –. It actually turned out well because I usually have more time between repotting and flowering to give a transition feeding (more nitrogen, first light flowering nutrient components). Since the repotting this time was quite close to the transition for two plants and the Light Mix is less pre-fertilized than, for example, an Allmix or Growmix, it fits perfectly: I can then give a transition nutrient mix during the transition week to optimally prepare the plants for flowering.
1 like
comments
Share
Used techniques
ScrOG
Technique
Transplantation
Technique
6
Week 6. Flowering1y ago


18 hrs
Light Schedule
24 °C
Day Air Temp
6.3
pH
No Smell
Smell
980 PPM
TDS
50 %
Air Humidity
23 °C
Solution Temp
23 °C
Substrate Temp
21 °C
Night Air Temp
13 liters
Pot Size
40 cm
Lamp Distance
Nutrients 4
TriPart Bloom
1 mll
TriPart Grow
1.5 mll
TriPart Micro
1.5 mll
Horst Week 6 – Start of the Flowering Phase / Transition Week (12/12)
This week marks the transition into flowering – the lighting has been switched to 12/12. The scrog net is installed, and I've started to consistently weave the plants in to manage the stretch of the first two flowering weeks a bit.
Fertilization & Soil:
Since I used BioBizz Light Mix for the final pots in this grow (Plagron Grow Mix was unfortunately sold out at the grow shop), it was absolutely necessary to give a transition fertilizer mix this week. The Light Mix works great, but it's only lightly pre-fertilized – and I always like to give an adjusted fertilizer mix during the transition week anyway, because the needs in this phase are specific... but this time it was even more important than usual.
Scrogging & Stretch:
I'm continuously weaving the plants into the net to control the stretch. Normally, I don't let the plants get this big or work with fewer plants, but this time two girls are significantly larger than the rest. So I'm just focusing on filling the holes in the net as evenly as possible and I'm satisfied...
Lollipopping:
At the end of the first flowering week, the first lollipopping was done. That's standard for me – either at the end of the first or at the beginning of the second flowering week, and then weekly. This way I prevent popcorn buds and the energy of the plants flows into the upper, well-lit buds in the canopy.
Photos:
The pictures this week were taken after weaving and before the dark phase.
Mycorrhiza:
Normally, I give mycorrhiza regularly until the sixth week, about every two weeks. Unfortunately, my supply has run low (bad planning again 😅) and I missed an interval. I will definitely buy more, as it's actually standard for my grows – the plants can manage without it, but the typical boost from the mycos is missing.
Lighting:
The TSW2000 continues to run at 50% and will only be increased to 75% in week 3 of flowering.
1 like
comments
Share
Used techniques
ScrOG
Technique
7
Week 7. Flowering1y ago


18 hrs
Light Schedule
23 °C
Day Air Temp
6.3
pH
No Smell
Smell
390 PPM
TDS
50 %
Air Humidity
23 °C
Solution Temp
23 °C
Substrate Temp
21 °C
Night Air Temp
13 liters
Pot Size
40 cm
Lamp Distance
Nutrients 1
CalMag Pro
0.75 mll
Horst Week 7 – Flowering Week 2
This week, no nutrients were given, only CalMag. The plants continue to develop well and show the first clear signs of buds. The typical smell is also slowly starting to unfold.
Scrogging & Space Situation:
Active weaving into the scrog net continued. Unfortunately, the canopy isn't completely even this time, mainly due to the size differences among the plants – additionally, the tent has become quite full with four plants combined with the longer veg phase. However, the weaving helps to keep the stretch controlled, even if it looks a bit more uneven than usual.
Lollipopping & Defoliation:
As every week, lollipopping was done at the bottom of the plants to remove unwanted shoots, leaves, and buds in the lower, lightless area. Normally, I don't defoliate above the net, but since it's very tight in this grow, I removed a few leaves above the scrog net this time to allow a bit more light to the lower shoots. This way, they can still make their way up into the well-lit area.
Light Setup:
TSW2000 at 50% power
Diatomaceous Earth:
Just before watering, a handful of diatomaceous earth was sprinkled on the soil surface again. I’ve rarely had problems with pests, but I like the preventive effect of diatomaceous earth and will continue to monitor its use. I use it when repotting or every two weeks.
1 like
1 comment
Share
Used techniques
ScrOG
Technique
Defoliation
Technique
8
Week 8. Flowering1y ago


18 hrs
Light Schedule
22 °C
Day Air Temp
6.7
pH
No Smell
Smell
800 PPM
TDS
50 %
Air Humidity
23 °C
Solution Temp
23 °C
Substrate Temp
21 °C
Night Air Temp
13 liters
Pot Size
40 cm
Lamp Distance
Nutrients 4

Bud Candy
1 mll
TriPart Bloom
2.1 mll
TriPart Grow
0.7 mll
Horst Week 8 – Flowering Week 3
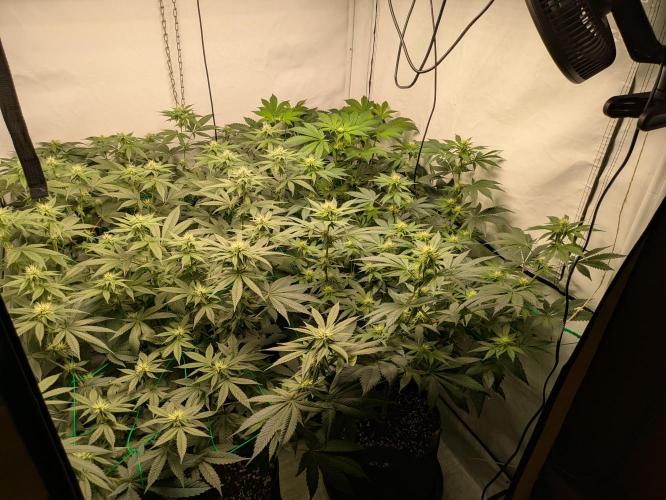
The canopy isn't perfectly even, but it's sufficiently filled – given the starting situation with different plant sizes, it's absolutely acceptable. The plants themselves look healthy and seem to be doing well overall.
Watering Behavior & Outlier Plant:
As often happens, there's one plant that significantly outperforms the others in terms of growth, thirst, and development. Because of this, I once missed that its soil had become too dry for my standards – however, after a good watering, it recovered very well and is currently doing better than ever.
Fertilization:
This week, fertilization was done according to the flowering schedule from Terra Aquatica.
Bud Candy was used instead of CalMag.
Temperatures & Climate:
Average 22 °C during the day, about 21 °C at night.
It's a bit cool, but still in the acceptable range.
The greenhouse heater on the floor isn't quite able to keep the tent consistently above 23 °C, but at least it ensures that the root area stays a bit warmer – measured above the canopy at the buds.
Circulation Fan:
Another circulation fan has given up the ghost – so this time I consciously decided to invest more money, hoping that the new one will be more durable. The first impression is very positive: solidly built and remarkably quiet.
3 likes
6 comments
Share
9
Week 9. Flowering1y ago




18 hrs
Light Schedule
23 °C
Day Air Temp
6.5
pH
No Smell
Smell
280 PPM
TDS
50 %
Air Humidity
22 °C
Solution Temp
24 °C
Substrate Temp
21 °C
Night Air Temp
13 liters
Pot Size
40 cm
Lamp Distance
Nutrients 1
Bud Candy
1 mll
Horst Week 9 – Flowering Week 4
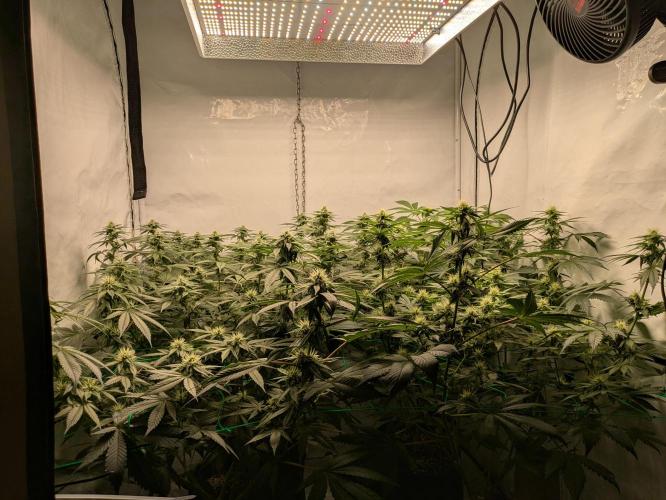
This week, only Bud Candy was added to the pH-regulated water – no other nutrients.
Regarding the situation in the tent:
The plants are doing well overall, developing evenly and currently needing little attention. As is often the case in the middle flowering weeks, I'm on Cruise Control – checking in daily, but otherwise letting things run their course.
The Church in the back right:
This plant has been my little problem child from the start – the most sensitive to stress, especially regarding the light outage during the veg phase.
It develops overall slower and forms fewer pistils than the rest.
Normally, I would have sorted it out – as I usually do in such cases – but since I originally wanted to keep only 4 out of 6 plants (I gave away 2), I consciously decided to give it a chance.
Despite its lag, it is developing solidly, though not spectacularly.
1 like
1 comment
Share
Used techniques
ScrOG
Technique
10
Week 10. Flowering1y ago


18 hrs
Light Schedule
25 °C
Day Air Temp
6.5
pH
Weak
Smell
890 PPM
TDS
60 %
Air Humidity
23 °C
Solution Temp
24 °C
Substrate Temp
23 °C
Night Air Temp
13 liters
Pot Size
30 cm
Lamp Distance
Nutrients 4
Bud Candy
1 mll
TriPart Bloom
2.1 mll
TriPart Grow
0.7 mll
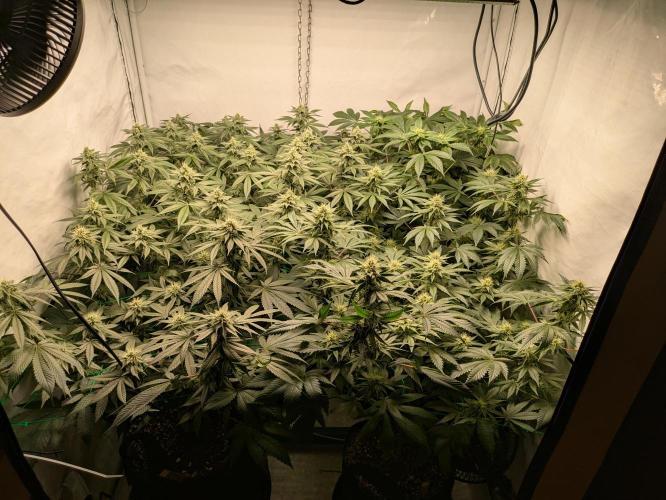
Horst Week 10 – Flowering Week 5
The TSW200 is still at 75%. At the beginning of week 6, the light will be turned up to 100%.
I'm testing the Terra Aquatica (TriPart) feeding schedule for the first time in this grow, combined with BioBizz Light Mix (out of necessity) – so a soil with less pre-fertilization than, for example, Plagron Growmix, which I usually use for the final pots.
Because of this, I've fertilized more often than ever before. The plants are looking healthy and strong so far, and the PPM values of the drain are consistently in a range where you could/should continue to fertilize without any issues.
Still, I’m keeping an eye on that – normally I prefer a water-water-water-fertilizing schedule to avoid salt buildup.
The Church in the back right is slowly catching up in terms of flower production. It's nice to see that despite her lag, she is still developing well.
As every week, I lollipopped under the canopy, meaning: I removed new flower sites and small shoots in the lower area so that the energy continues to go into the well-lit main buds.
Additionally, I lightly worked in a handful of diatomaceous earth into the soil surface before watering. The plants are still showing no pest problems, and I'm already considering using diatomaceous earth in my upcoming grows as well.
likes
comments
Share
Used techniques
ScrOG
Technique
11
Week 11. Flowering1y ago


18 hrs
Light Schedule
25 °C
Day Air Temp
6.5
pH
Normal
Smell
890 PPM
TDS
60 %
Air Humidity
23 °C
Solution Temp
24 °C
Substrate Temp
22 °C
Night Air Temp
13 liters
Pot Size
30 cm
Lamp Distance
Nutrients 4
Bud Candy
1 mll
TriPart Bloom
2.1 mll
TriPart Grow
0.7 mll
Horst Week 11 – Flowering Week 6
The grow is entering the final stretch – as often happens in the last weeks of flowering, there’s not much left to actively do. This week consisted of the usual checks, watering, and lollipopping. The bud density isn’t increasing much anymore, but the already formed buds are visibly growing in size, girth, and thus weight – exactly what you wish for at this point.
The smell is getting more intense, and the Church as well as the Mimosa Orange Punch are now giving off a really delicious terpene profile.
This week, fertilization was done for the last time. Starting from Flowering Week 7, there will only be water with magnesium-sulfur additive, in this case in the form of Advanced Nutrients – Big Bud.
The diatomaceous earth experiment is also coming to an end here. From now on, no new diatomaceous earth will be added to the soil, because:
the plants no longer need the extra silicon in late flowering,
and there is already enough diatomaceous earth in the soil to continue preventing any potential pest infestations.
Regarding diatomaceous earth, I can really share positive impressions from this run: Despite the humid climate of the last few weeks and a small thrip infestation on my houseplants, the grow tent remained completely unaffected. Since my tent is in the apartment, there’s a consistently humid-warm environment due to frequent watering every 2–3 days – normally a paradise for pests. However, it seems that larvae and co. didn’t stand a chance thanks to the diatomaceous earth-treated soil.
A new challenge in this grow was the high humidity, especially at night, where it occasionally exceeded 65%. I’m currently responding with increased air circulation, meaning: more ventilation than usual. So far, everything looks good, but in the long run, I’ll probably need to get a dehumidifier. In the past, I’ve only grown seasonally, during times when humidity was easier to control – but since I want to grow year-round in the future, humidity management will come up more often. 😉
2 likes
comments
Share
Used techniques
ScrOG
Technique
12
Week 12. Harvest1y ago
Happy Harvest Day!


8/10
Rated
Woche 12 – Vorzeitige Ernte durch Luftfeuchtigkeitsprobleme
Leider war die vergangene Woche bei uns geprägt von Dauerregen, was zu anhaltend hoher Luftfeuchtigkeit im Zelt geführt hat – teilweise über 65 %, nachts sogar noch höher.
Da ich aktuell keinen Luftentfeuchter zur Verfügung habe, konnte ich nur zu Beginn der Woche noch mit Ausdünnung des Canopys reagieren, um die Luftzirkulation zu verbessern.
Trotzdem wollte ich nicht das Risiko eingehen, den kompletten Grow durch Schimmel oder Budrot zu verlieren – deshalb habe ich mich schweren Herzens dazu entschlossen, die Damen ca. zwei Wochen früher als geplant zu ernten.
Die Pflanzen hätten schätzungsweise noch 10–14 Tage gebraucht, um voll auszureifen. Durch die verkürzte Reifezeit schätze ich den Ertragsverlust auf ca. 20–30 %, da gerade die letzten zwei Wochen der Blüte entscheidend sind für das Endgewicht der Buds.
Positiv hervorzuheben ist:
Kein Schimmel, keine Budrot, keine Auffälligkeiten an den Blüten.
Die Damen riechen sehr lecker und intensiv, das Terpenprofil hat sich trotz der vorzeitigen Ernte schön entwickelt.
Da diese Entscheidung nun auch meinen Jahresplan durcheinanderbringt, habe ich mich dazu entschlossen, den nächsten Grow mit Automatics zu machen.
Es wird erst mein zweiter Automatic-Run, da ich eigentlich die Kontrollmöglichkeiten bei Photos sehr schätze.
Ich bin zwar kein großer Fan der typischen Eigenarten von Autos (z. B. empfindlich gegenüber Stress, fehlende Wachstumssteuerung), aber ich freue mich darauf, mal wieder etwas anderes auszuprobieren – gerade auch, weil sich damit mein Zeitplan etwas flexibler anpassen lässt.
Ein weiteres Update:
Ab dem nächsten Grow werde ich mit einer Umkehrosmoseanlage arbeiten, da das Leitungswasser bei mir aus ziemlich alten Rohren kommt.
Ich bin gespannt, wie deutlich die Damen auf das sauber gefilterte Wasser reagieren werden – und ob man den Unterschied im Wuchs, bei der Nährstoffaufnahme oder beim Endergebnis merken wird. Ich halte euch auf dem Laufenden!
Show more
Translate
Spent 79 days
Ger Veg Flo Har
2
Plants
1 m²
Grow Room size
Easy
Difficulty
Day air temperature
Air humidity
PPM
PH
Light schedule
Solution temperature
Night air temperature
Substrate temperature
Pot size
Lamp distance


Horst Week 12 – Early Harvest Due to Humidity Issues
Unfortunately, last week was marked by continuous rain, which led to persistently high humidity in the tent – sometimes over 65%, and even higher at night. Since I currently don’t have a dehumidifier available, I could only respond at the beginning of the week by thinning out the canopy to improve air circulation.
Still, I didn’t want to take the risk of losing the entire grow to mold or bud rot – so I reluctantly decided to harvest the ladies about two weeks earlier than planned.
The plants would have needed an estimated 10–14 more days to fully mature. Due to the shortened ripening time, I estimate the yield loss to be around 20–30%, as the last two weeks of flowering are crucial for the final weight of the buds.
On a positive note:
🔸 No mold, no bud rot, no issues with the flowers.
🔸 The ladies smell very delicious and intense, and the terpene profile has developed nicely despite the early harvest.
Since this decision also disrupts my annual plan, I’ve decided to do the next grow with automatics. This will be my second automatic run, as I really appreciate the control options with photos.
I’m not a big fan of the typical quirks of autos (e.g., sensitivity to stress, lack of growth control), but I’m looking forward to trying something different again – especially since it allows me to adjust my schedule a bit more flexibly.
Another update:
Starting with the next grow, I will be using a reverse osmosis system, as the tap water comes from pretty old pipes. I’m curious to see how noticeably the ladies will react to the clean filtered water – and whether the difference will be noticeable in growth, nutrient uptake, or the final result. I’ll keep you posted!
4 likes
comments
Share
Equipment Reviews








12
Week 12. Harvest1y ago
Happy Harvest Day!


7/10
Rated
Woche 12 – Vorzeitige Ernte durch Luftfeuchtigkeitsprobleme
Leider war die vergangene Woche bei uns geprägt von Dauerregen, was zu anhaltend hoher Luftfeuchtigkeit im Zelt geführt hat – teilweise über 65 %, nachts sogar noch höher.
Da ich aktuell keinen Luftentfeuchter zur Verfügung habe, konnte ich nur zu Beginn der Woche noch mit Ausdünnung des Canopys reagieren, um die Luftzirkulation zu verbessern.
Trotzdem wollte ich nicht das Risiko eingehen, den kompletten Grow durch Schimmel oder Budrot zu verlieren – deshalb habe ich mich schweren Herzens dazu entschlossen, die Damen ca. zwei Wochen früher als geplant zu ernten.
Die Pflanzen hätten schätzungsweise noch 10–14 Tage gebraucht, um voll auszureifen. Durch die verkürzte Reifezeit schätze ich den Ertragsverlust auf ca. 20–30 %, da gerade die letzten zwei Wochen der Blüte entscheidend sind für das Endgewicht der Buds.
Positiv hervorzuheben ist:
Kein Schimmel, keine Budrot, keine Auffälligkeiten an den Blüten.
Die Damen riechen sehr lecker und intensiv, das Terpenprofil hat sich trotz der vorzeitigen Ernte schön entwickelt.
Da diese Entscheidung nun auch meinen Jahresplan durcheinanderbringt, habe ich mich dazu entschlossen, den nächsten Grow mit Automatics zu machen.
Es wird erst mein zweiter Automatic-Run, da ich eigentlich die Kontrollmöglichkeiten bei Photos sehr schätze.
Ich bin zwar kein großer Fan der typischen Eigenarten von Autos (z. B. empfindlich gegenüber Stress, fehlende Wachstumssteuerung), aber ich freue mich darauf, mal wieder etwas anderes auszuprobieren – gerade auch, weil sich damit mein Zeitplan etwas flexibler anpassen lässt.
Ein weiteres Update:
Ab dem nächsten Grow werde ich mit einer Umkehrosmoseanlage arbeiten, da das Leitungswasser bei mir aus ziemlich alten Rohren kommt.
Ich bin gespannt, wie deutlich die Damen auf das sauber gefilterte Wasser reagieren werden – und ob man den Unterschied im Wuchs, bei der Nährstoffaufnahme oder beim Endergebnis merken wird. Ich halte euch auf dem Laufenden!
Show more
Translate
Spent 79 days
Ger Veg Flo Har
2
Plants
Normal
Difficulty
Day air temperature
Air humidity
PPM
PH
Light schedule
Solution temperature
Night air temperature
Substrate temperature
Pot size
Lamp distance


Horst Week 12 – Early Harvest Due to Humidity Issues
Unfortunately, last week was marked by continuous rain, which led to persistently high humidity in the tent – at times over 65%, even higher at night. Since I currently don't have a dehumidifier available, I could only respond at the beginning of the week by thinning out the canopy to improve air circulation.
Still, I didn't want to take the risk of losing the entire grow to mold or bud rot – so I reluctantly decided to harvest the ladies about two weeks earlier than planned.
The plants would have needed an estimated 10–14 more days to fully mature. Due to the shortened ripening time, I estimate the yield loss to be around 20–30%, as the last two weeks of flowering are crucial for the final weight of the buds.
Positives to highlight:
🔸 No mold, no bud rot, no abnormalities on the flowers.
🔸 The ladies smell very delicious and intense, the terpene profile has developed nicely despite the early harvest.
Since this decision also disrupts my annual plan, I've decided to do the next grow with automatics. This will be my second automatic run, as I really appreciate the control options with photos.
I'm not a big fan of the typical quirks of autos (e.g., sensitivity to stress, lack of growth control), but I'm looking forward to trying something different again – especially since it allows me to adjust my schedule a bit more flexibly.
Another update:
Starting with the next grow, I will be using a reverse osmosis system, as my tap water comes from quite old pipes. I'm curious to see how noticeably the ladies will react to the clean filtered water – and whether the difference will be noticeable in growth, nutrient uptake, or the final result. I'll keep you posted!
3 likes
2 comments
Share
Equipment Reviews
13 comments
Sort by
popularity
popularity
newest
oldest

GERGrowDesigns commentedweek 22y ago
Good Luck and keep up Growing :D
likes 3

Horst commented2y ago
@GERGrowDesigns, thx! and happy growing to you too!👍
like 1

Hike1 commentedweek 71y ago
Very interesting and well-written. Since I'm only in my third grow and thus have little experience, I enjoy learning from reports like this. I also find your approach of doing lollipopping weekly very interesting. In my previous grows, I always lollipopped at the beginning of flowering and then around day 40 of flowering, which unfortunately led to having many popcorn buds alongside the larger buds at the top by the end, and everything was quite overgrown.
likes 2
Horst commented1y ago
@Hike1,
Thanks, I'm really glad you can take something away from this!
Normally, I'm even a bit more radical with Lollipopping – so I'm usually more consistent with clearing the bottom. But during this grow, a few unexpected things happened, and I didn't want to stress the ladies too much. Transplanting, Scrog net, minor technical issues – it was all a bit more than usual, so this time I approached it a bit more relaxed and reserved.
Also, there's quite a lot going on for me right now, and honestly, the tent is only getting the absolute minimum attention 😅 – just a check once a day... Water, nutrients... that's about all I can manage right now 😅. Still, I'm quite satisfied so far, and the girls are making the best of it!
like 1

Stony_German commented1y ago
@Hike1, If there had been such access to information earlier, I could have avoided many mistakes. Back then, I could only rely on books, but luckily I had a mentor who taught me most of it. It's really great to be able to exchange ideas here. If you ever have questions, I'm always happy to help.
likes
Hike1 commented1y ago
@Horst, first of all, I apologize for my very late response. I have been online here quite a bit, but somehow I overlooked that I also received replies like yours. Yes, I am now in my 4th grow and I'm still learning. So far, I'm quite satisfied and I'm considering maybe doing such a report in the future as well.
likes
Stony_German commentedweek 81y ago
Nice grow. The ladies look healthy and happy. I know the struggle with the oscillating fans. I've definitely burned through about 20 of them. Only since they've had EC motors do they last longer than a year. Of all the ones I've ever had, the one from AC Infinity is the only one that still works perfectly after 2 years, just like on day one. In second place for me would be the Spiderfarmer; it gave up the oscillation after 1.5 years, but it still works. I'm not an AC Infinity nerd writing this because I have everything from that company. I only have their fan, and it really is a class above all the others, even in terms of quiet operation. I can recommend it despite the price.
like 1
Horst commented1y ago
@Stony_German,
Thanks! And yeah, the topic of oscillating fans is really a never-ending story… 😅
Back in the day, I had completely different conditions – bigger setup, more space, so I never needed those small clip-on oscillators. But now with the compact tent, I’m basically reliant on them due to space reasons – and I’ve only had bad experiences so far. Those things usually give up after a few weeks.
The current one I’m using is from Growstar, and so far I’m really satisfied – it runs quietly, doesn’t make any fuss. The only downside is the relatively high price. But if it lasts longer for that, I’m okay with it.
I find it super valuable that you share brand recommendations and your own experiences – that kind of info is worth its weight in gold, especially for equipment that often seems “unspectacular” but is totally crucial in everyday life.
I’m not an AC Infinity fanboy, but I have to say: what I’ve tested from them so far has been really solid.
likes

GhostTerpZ commentedweek 81y ago
Looks good 💪 💪 💪
like 1

pinegump commentedweek 121y ago
Good luck with your gro! 🙏😄
likes

Max_Fis20 commentedweek 11y ago
We all see the hanging leaves after repotting. They usually perk up within a day... yours look vibrant!
likes

the end.
Enjoying this diary? Follow for more updates!

Prefer the old Diary view?
Go back to the old Diary view