
Gorilla Glue (Fastbuds)+ Quantum Boards


VEG
Fission 300W Light Emitting Diodes/240W
Custom
FLO
Fission 300W Light Emitting Diodes/480W
Custom

Indoor
Room Type
Defoliation
weeks Technique
11 l
Pot Size
Start at Harvest
1
Week 1. Vegetation7y ago


0.99 cm
Height
18 hrs
Light Schedule
30 °C
Day Air Temp
5.9
pH
No Smell
Smell
200 PPM
TDS
24 °C
Night Air Temp
11.4 l
Pot Size
120 cm
Lamp Distance
Nutrients 4

GreenDream 1 Grow
1 mll

CMX
0.13 mll

GroStorm
1 mll
ProfessorSkiSlopes INTRODUCTION
==============
Hi there, this is effectively my first grow - I have no experience with Hybridised feminised seeds, or Autoflowers, or Tents, or Carbon filters, or extraction fans, or LED lights, or humidity control, or Temp control, or coco feeding with a nutrient armoury comprising seven products. This entire endeavor is being done on the back of massive amounts of Internet research, looking at other diaries on here, and the commitment of a large part of my resources in both time and money. It took months of research to come to the choice of Quantum Boards, Fastbuds seeds, Coco, Flairform nutrient range , and a closed tent controlled ducted, humidity/temp controlled environment as being my best arrangement for optimum massive sticky bud production. However, the lack of practical experience is a huge factor, so I expect to see mistakes, possibly catastrophes. I also see huge advantage in LST but for my first grow I've decided to let them just go natural and try LST on my next grow.
AIMS FOR THIS GROW AND THIS DIARY
================================
I will do my best to make this a detailed, complete and informational diary with high quality imagery and video. and I will do my best to make this an attentively monitored grow and give it everything I have to get the best result I can. I would ideally like to get 8 plants with 3-5 ounces each (however unlikely for my first grow) this will be the ongoing goal for my grows using this setup.
Welcome and thank you for joining me. All comments, questions and suggestions are highly welcome.
GROW SETUP
============
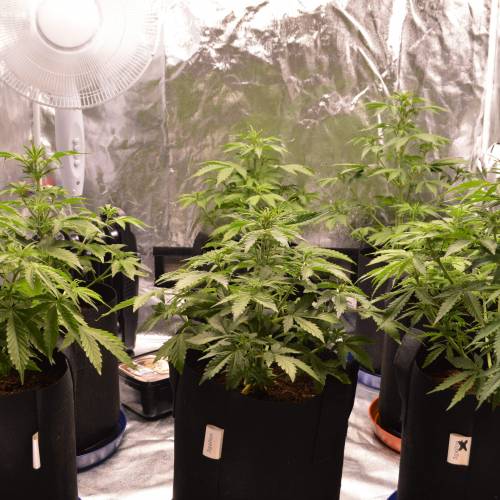
Gorilla Glue Auto plants from Fastbuds, in a 1.2m by 1.2m by 2m grow tent.
They are growing in 13.6 Litres airpots. Each Airpot has 2 Litres of Canna expanded clay balls in the base, followed by a 20/80 mix of growstones (essentially synthetic perlite) and Canna pro plus coco coir. The concentration of growstones is stratified, with a larger density of growstones in the bottom quarter, less in the next quarter, less in the next, and the top quarter is pure coco with no growstones.
The lighting is four quantum q288 boards, each has 288 samsung LM301b diodes for a total of 1156 diodes, at 3500k running at a combined 480watts for a total PPDF of 1176 umol. This is a DIY clone version of the HLG-550 and was purchased from Kingbrite on Alibaba for $400USD including International Express DHL Shipping. The quality of the light and its components are all high quality genuine parts.
The Coco was given an initial pre-treatment watering with a 20% strength Flairform nutrient mix in distilled water with 20% strength Cal-Mag additive and full strength rooting additive and 40% strength kelp extract. This had a PH of 5.9 (unadjusted) and a PPM of 200. The watering was done to an approx 20% run off. The growstones were rinsed with ph balanced water before being mixed with the coco.
GERMINATION
============
The seeds were germinated using the tissue paper technique. They were left to germinate and then transplanted directly into their final pots. They were probably in the tissue a bit too long, and the tap roots got to around 3cm, so I made narrow holes in the coco and placed the tap root into the hole, and left the unopened cotyledon/seed hull just above the surface of the coco. This seems to have worked well and as soon as the first light cycle came on the cotyledons opened and photosynthesis turned things a great minty green.
ENVIRONMENT
=============
The light have been set to approx 1/2 intensity for this initial seedling stage (260w) and the lights have been suspended 80cm above the canopy. This is my first experience with LED lights so I've been experimenting with heights and intensities to try and dial-in the ideal settings. For the first several days the lights were hung at 120cm at 380w.
Air circulation is provided is via a tent-pole mounted (re-purposed ordinary household stand) fan. I used a laboratory lab clamp and drilled a hole in the fan plastic stand housing to mount the fan on the clamp, this positions the fan far enough out from the corner of the tent to allow the fan to fully oscillate through 90 degrees and rotate from one side of the tent to the other.
Air Ventilation will be provided via a (170m3/hr) 100mm booster fan that ducts (via 100mm ducting) to a second tent which has a carbon filter and centrifugal exhaust fan which ducts out of the room and into the roof space. The light doesn't throw out much heat (compared to a HID) so I'm just leaving the top of the door unzipped to ventilate at the moment and that is working fine for now.
Humidity/Temp monitoring is provided by a wireless monitoring station with 3 wireless monitors. I have one in each of my tents and one in the grow room itself, and the monitoring station is in my bedroom, allowing me to keep an eye on the growing environmentals whenever I like without needing to open up the growroom or the tents. (You can get one of these on ebay for around $30 USD with 3 remote sensors).
PH monitoring is done via a bluelabs PH Pen. This cost ten times as much as the cheap PH pen I was using, but it is worth every cent to have reliable quick PH reading capabilities. (Just search bluelabs on google, they retail for around $90 USD).
REMAINING GOALS
================
1) Water quality management via a Reverse Osmosis water filter system.
2) Temperature control via simple temperature controller and fan heater (this will be managed at room level rather than tent level)
3) Plant leaf temperature monitoring via Infrared thermometer Gun.
4) Humidity control via controller and humidifier/dehumidifier setup.
3 likes
3 comments
Share
2
Week 2. Vegetation7y ago


7.62 cm
Height
18 hrs
Light Schedule
30 °C
Day Air Temp
5.9
pH
No Smell
Smell
200 PPM
TDS
41 %
Air Humidity
24 °C
Night Air Temp
11.4 l
Pot Size
1 l
Watering Volume
60 cm
Lamp Distance
Nutrients 4
GreenDream 1 Grow
1 mll
CMX
0.25 mll
GroStorm
2 mll
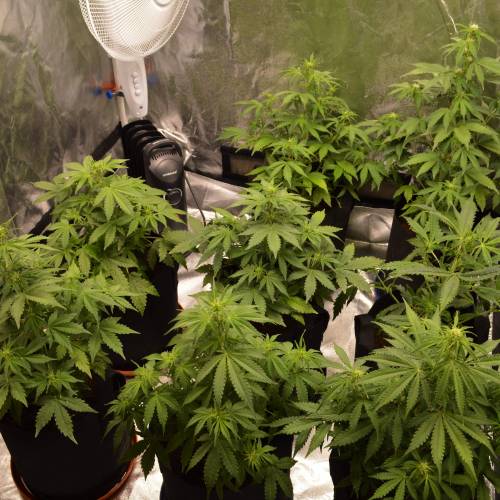
ProfessorSkiSlopes Week two seems to be proceeding well. I did lose one plant due to a white moth caterpillar, which was an unexpected fine hiding under one of the leaves. I thoroughly checked all the other plants and found one more caterpillar which hadn't had a chance to do much damage and so it was removed. I don't see any other pests (after careful checking) so I won't worry about any sprays or treatments unless I see further issues.
Other than that the remaining eight plants seem to be doing very well. Two of the eight have been a little slow to develop second set leaves, but the other six are all developing at a similar good rate. I've been experimenting with lowering the lights and reducing the intensity of the lights, trying to find the optimal growth settings. The plants have received two waterings so far both with 20% strength nutrient. I will tentatively increase the strength over coming feedings. I expect the first full watering to run-off will be around week 3.
Still haven't connected up the exhaust fan, and so the tent is still venting via a partially unzipped door. The light is remarkably cool, so thus far temperatures have been within ideal ranges., however I'm sure the plants will appreciate the fresh airflow the exhaust fan brings. I am venting into a second tent which is currently being setup with an identical growing arrangement (except for the genetics, which will be Fastbuds Zkittles.
2 likes
comments
Share
3
Week 3. Vegetation7y ago


7.62 cm
Height
18 hrs
Light Schedule
30 °C
Day Air Temp
5.9
pH
No Smell
Smell
600 PPM
TDS
50 %
Air Humidity
24 °C
Night Air Temp
11.4 l
Pot Size
1 l
Watering Volume
140 cm
Lamp Distance
Nutrients 4
GreenDream 1 Grow
1.5 mll
CMX
0.25 mll
GroStorm
2 mll
ProfessorSkiSlopes The third week has seen the plants hit their stride and seem to be growing at optimal rate. The second week of growth seemed to slow down and the plants did not seem to be thriving, so I assessed that at 24 inches above the seedlings and 380watt and a tent temp of 25c during day cycle that the light was probably to intense, and the tent temp was a little too low. So I raised the lights to the top of the tent (2m high tent) and I turned up the intensity to a full 480watt. This should result in an overall lower light intensity at seedling canopy, and the increase in light wattage increases the light body temp from about 30c to 40c. This led to an overall rise in tent temp to around 27 in the light cycle, and the intensity drop allowed the plants to start to rapidly accelerate in growth rate and they are looking about as healthy and deeply coloured as I imagine they could possibly be. Feels like the tent is dialed in now, and its just about time for a full feed to a 10/20% run off. These lights are proving themselves to be as exceptional as all the claims stated.
1 like
comments
Share
4
Week 4. Vegetation7y ago


7.62 cm
Height
18 hrs
Light Schedule
28 °C
Day Air Temp
5.9
pH
No Smell
Smell
600 PPM
TDS
50 %
Air Humidity
18 °C
Night Air Temp
11.4 l
Pot Size
1 l
Watering Volume
140 cm
Lamp Distance
Nutrients 4
GreenDream 1 Grow
1.5 mll
CMX
0.25 mll
GroStorm
2 mll
ProfessorSkiSlopes With the lighting height and intensity optimised I started closing up the tent and letting its air entirely depend entirely on the ducting system I had created. They then started to show signs of some struggling and even wilting. In the end I isolated the cause was to much humid air and lack of air replacement (I was trying to vent two tents via a booster fan ducting connection and a single carbon filter venting to the roof space). I could see that this air system was just not cutting it, and despite not wanting to invest more, the advantages of having each tent equipped with its own 4"carbon filer and 200m3 centrifugal fan were instantly obvious after setting it up on this tent. Ultimately I realised that setting each tent up with its own ventilation was the unavoidable choice for ongoing optimal growth and achieving the highest quality and quantity yield.
My infrared temperature gun is showing the leaf temp to be around 23c during lights on cycle. Ideally I want this up around 27-29c (apparently HIDs put out a lot of heat and infrared which like the Sun, raises the leaf temp up the range required by the plants for the photosynthesis processes to operate optimally. With cooler LED lights, other options can become a requirement in order to bring the leaf temp up to that required for optimal photosynthesis Once I have the two tents fully operational I'm hoping that will give a temp increase in the growroom that will lift the leaf temp. If it doesn't I will consider the option of venting back into the growroom to effectively create a recycling air system within the growroom and thereby the tents. If this still isn't enough eventually I may look at thermostat controlled heating in the grow room, however this would be an expensive cost so I will avoid it if at all possible via other means.
From here on out my main focus will hopefully only really need to be on providing a good wet/dry cycle with optimal strength nutrient feedings, and occasional lower leaf and sugar leaf defoliating combined with some moderate (autoflower level) LST.
Day 26 The plants suffered a dry-out of the coco. They got pretty wilty for several hours. I was not expecting the plants to have consumed so much in such a short time after there first water to run off (5 days) but this is my first time using coco with perlite, and the clay balls for drainage, so the pots feel a lot heavier when dry than my last grow, so I will be much more vigilent about feeding from now on! They're still recovering 48hours later, but they have maintained a pretty good growth rate despite the drought.
Day 26 Feeding was
Roots 1ml/l
Greendream1 2ml/l
CMX 0.3ml/l
Grostorm 2.5ml/l
Day 26 The ambient room temp has dropped enough now that I've temporarily brought in a heater to warm the tent. This is brought it up to an air temp around 28c during the light cycle. This is just the start of winter so I'll be probably changing the tent to vent back into the grow room instead of the ceiling space, and starting the second tent in the same room. This might necessitate a dehumidifier. The alternative is some sort of small heater in each tent I think. My only other grow was under a HID in summer and I spent the whole time fighting overheating. In comparison his situation is very much the opposite.
Day 27 - Little bit of leaf tip burn - Last nutrient feed was likely a bit strong. Will not increase strength at next feed. Will flush if symptoms increase.
End of week 4 summary - Tent is fully operational, circulation, ventilation, lighting are all great. Temp is going to need some work. I think I will put the extractor fan on humidity control to minimise heat lost to venting, and put in a small oil filled heater on temp control inside the tent. This avoids the need for recycling the air and subsequent dehumidification issues. I am also considering putting a 50w electric blanket under the tent. Media and pots are excellent, and nutrient levels have been good, with a slight overfeed on the last feed. Wet/Dry cycle is quicker than I expected at 5 days after first full feed, and I allowed a drought to happen. I will be much more vigilant over the media saturation from now on.
2 likes
comments
Share
Grow Questions

ProfessorSkiSlopesstarted grow question 7y ago
Hi there, does anyone have any idea what the slight mottling is on the leaves of two of my plants. There are close-up pictures under Day 27 in Week 4. The discolouration is present across multiple leaves, but seems to only be happening to two plants out of 8. Thanks!
Solved
Leaves. Color - Mottling
likes

skyboundanswered grow question 7y ago
I suspect the mottling is a combo deficiency between Ca and K, though I'd go so far as to say that both look minor so maybe not try to fix either. If you're using nutrient salts you can isolate a specific element to tweak, but most nute brands have multiple things mixed in the bottles so if you tweak any thing, you end up tweaking several things which will cause other problems.
If interested, I made a tutorial for using Hydro Buddy to reverse engineer your nutrients, then you would be able to play around with tweaking the nutes in theory before actually changing anything in practice.
https://www.420magazine.com/community/threads/making-your-own-nutrient-concentrates.455187/
5
Week 5. Vegetation7y ago


30 cm
Height
18 hrs
Light Schedule
27 °C
Day Air Temp
6.0
pH
No Smell
Smell
600 PPM
TDS
50 %
Air Humidity
18 °C
Solution Temp
22 °C
Substrate Temp
18 °C
Night Air Temp
11.4 l
Pot Size
1 l
Watering Volume
85 cm
Lamp Distance
Nutrients 4
GreenDream 1 Grow
2 mll
CMX
0.3 mll
GroStorm
2 mll
ProfessorSkiSlopes Day 28 - Full watering/feed to run-off 10%-20% at same strength as previous. (50% of maker recommended strength for coco use + cmx + root enhancer + kept extract organic additive)
Day 31 - Decided lower lights by around 30cm 120cm to about 90cm. After about 8 hours the plants all suddenty wilted. They stay wilted through the night cycle as well, so I raised the lights back to where they were and they have bounced back, so I won't suddenly drop the lights by as much. If I do lower them it will be incremental.
Day 32 - Bought a six fin 800w oil heater for the tent. Am going to place this under the oscillating fan and set it aiming to keep the tent around the 25-27c range. Hopefully this has the tent sorted for the rest of the grow. The humidity has been high lately due to the weather, so this might be about the only factor left to address, and I will look at getting a dehumidifier for the grow room if needed.
Day 33 - Full watering to run-off 10%-20% at same strength as previous. (50% of maker recommended strength for coco use + cmx + root enhancer + kept extract organic additive)
- Ordered humidity controller for extractor fan.
- Ordered Temperature controller for Heater
- Ordered IP Camera for remote monitoring
Tent is now running fully sealed and using passive inlet and carbon filtered extraction to roof space. Plants are around 20-40cm high and the lights are 85cm above the canopy on full 480w.
Day 33 - I have reduced the Light intensity from 480w to 420w. This seemed to really get a good response from the plants. I think as they've grown taller and the light intensity has quietly increased at the newly heightened canopy level the plants have been getting stressed.
Day 34 - I've reduced then light intensity from 420w to 280w. I am new to the quantum boards and the concept of "too much light" so working out how much intensity, how much distance and so forth for the different stages of plants growth. I have a gut feeling 280w at 80cm might be a touch under-powered but I'll give it a full light-cycle or two to judge leaf growth and colour and make a call on whether or not to increase it or leave it as is.
Day 35 - I found plants wilting during hthe night cycle without fan air circulation. So I've set the oscillating fan to run during night hours.
Day 35 - I've turned up the heater a touch to bring the tent temp to around 26c. Infrared gun shows leaf temps to be around 24-25c which ideally I want to get to 27-29c - I'll aim for this metric once the other environmental factors are sorted (ventilation seems sorted so mainly just dialing in the light intensity).
* I'm looking forward to setting up the heater on temperature controller, and putting the carbon filter ventilation on humidity control, and then mounting an IP camera in the tent. This should all be here in around 2 weeks. I'm looking forward to being able to view the temp/humidity and see the plants live without having to actually open the grow room.
* The infrared temp gun is proving invaluable in testing leaf, coco and pot temperatures around the tent, which is giving a great view of how the heat from the heater/fan arrangement is being distributed - it shows a less than 1-2c degree variance across the tent which is just great.
* Hopefully week 6 to come will be one with a lot less wilting incidents and the week that this tent achieves a somewhat final and stable environment optimised for plant growth and happiness. But so far every time I think I've got things perfected, another variable comes into play and I need to tweak something. Maybe by the end of this harvest I will have the whole process refined to a smoother less reactionary process.
3 likes
6 comments
Share
6
Week 6. Flowering7y ago


30 cm
Height
18 hrs
Light Schedule
27 °C
Day Air Temp
6.0
pH
No Smell
Smell
600 PPM
TDS
75 %
Air Humidity
25 °C
Solution Temp
22 °C
Substrate Temp
18 °C
Night Air Temp
11.4 l
Pot Size
1 l
Watering Volume
80 cm
Lamp Distance
Nutrients 4
GreenDream 1 Grow
3 mll
CMX
0.38 mll
GroStorm
1.88 mll
ProfessorSkiSlopes Day 36 - The plants are wilting from the top down a few hours before night cycle, and throughout the night cycle and a few hours into the day cycle (as they struggle back to what is a mostly healthy demeanour) . They are not just doing the slight nightly droop. Looking back I can see its been happening since around day 27, and I initially thought it was a watering issue, that didn't fix it. I thought it was a night air circulation/ventilation issue so I tried turning the fan off and on, and the ventilation on/off - no fix yet. So I'm looking at it possibly being too much light still, or a PH issue.
Today I lowered the light wattage to 200w. This seems very low, but I'm willing to give it a try. The plants are due for a watering today or tomorrow so I'll also consider watering half the plants with a higher end PH feed (6.5ish), and the other half with a lower PH range feed (5.5ish) and see if they show improvement in either half, unless the light reduction seems to be showing positive results.
I am hoping my decision to stratify the air-rocks with a higher concentration of air rocks in the lower half of the pot, slightly less in the next layer, and then just straight coco in the top layer of the pot hasn't introduced some wierd PH imbalance/oddness in the medium.
Day 37 - I flushed two of the plants with PHed tap water just after lights out on the last dark cycle to see if this helped the wilt. It didn't seem to do much. I've built a frame for the lights that spreads the four boards apart light the original HLG-550, this will give a much nicer light distribution. I've also researched the wilt issue, and I get the sense the plants are hitting the wall of their limit for photosynthesis abilities each day and are shutting down. However the underlying cause for this is still unclear.
I'm tempted to try distilling some water and checking the PH of some samples of the coco. Its time to water the plants, the coco is pretty dry going by pot weight. I'm not sure if I should switch to flowering nutrient regime, or stick with one more of the veg feed so I can isolate my changes and be able to see if the light cycle/spread changes fixed the issue. I will get photos of the wilting and hopefully someone else can weigh in if I can't find the solution myself, It's a bit heartbreaking after all the time refining this setup.
To be clear the issue is dramatic top down wilting around 2-3 hours before lights out to slightly varying degrees across all simultaneously, lasting all night and not coming right till an hour or two into the next light cycle.
Adjusting circulation/ventilation/light saturation has not mitigated it in any real way. Research suggests shortening the light cycle by 1-2 hours from 18 to 16-17 might alleviate the issue. As mentioned the lights have been spread to give better distribution, and they are now running at 240w at a height of 80cm. Ventilation and circulation are 24/7.
I have checked other grower diaries and see several good harvests where growers were up to full strength nutrients at week 6, so I've decided I'm going to try a higher strength feed today and see how that affects the wilt. I've had the plants on 1/2 strength or less until now as my focus has been on not over-feeding or over-watering, however given they are at week 6, I may have gone to far in the other direction.
It's 5 hours into the light cycle. I am about to give the plants a 3/4 strength feed (+3/4 strength additives) and if the wilt continues unabated, I'll try reducing the light cycle by 1/2-1 hours per cycle incrementally and see how that goes.
I am starting another diary, using an identical 4x4 QB Coco/Airpot setup, with 9 Fastbuds Zkittles. The difference with the second tent is that I've used a straight 30/70 perlite/coco mix over a base of clay balls and not the stratified air-rocks. I will be interested to see how it goes in comparison to this endeavour.
DAY 38 - After giving them the increased strength feed I casually checked the PPM of the run off and fuck-me-blind if they weren't reading an insane 2000+ PPM across all the plants, except the two which I'd flushed which were reading just over 1000 PPM each. I've never given them more than 1/2 strength nutrients, but looking back I can see now that I wasn't watering to enough run-off at all my waterings. Having to water 8 plants with 11.4 litre airpots, using two 10 litre mixing containers left me a bit short to get the amount needed to get a good full run-off and I guess I skipped the extra hassle of making more nutrient ,too many times, and it led to plain old simple nutrient build-up and lock-out and wilting. I've now flushed each plant with PHed tap water with around 12 litres per pot and the PPM readings of the run-off have dropped to around 450-650 over all the plants. It's now 3.30am and I'm buggered and done for the night. Flushing 8 plants simultaneously has required the co-opting of the shower, the bath-tub, the kitchen and laundry sinks and the filling and PHing of around 90 litres of water using a new 23 litre container (with tap) which although far more efficient than previous watering has been a 4-5 hour job.
So all the messing around with light intensity, and air ventilation and circulation has been a bit of a needless (yet not unproductive learning exercise) dance. At this stage I'm fairly certain the wilting was all from improper watering habits - A mistake I shall not repeat with this tent or the new Zkittles tent. Live and Learn I guess. I only hope this last few weeks of wilting has not had a massive impact on the total final yield, and this flushing and improvement in watering practice will see the plants still have time in their finite autoflower lives to build on some structure to support a fair yield.
This entire endeavour is much harder than simply assembling the "best" components, growing cannabis certainly is a skill that needs practical experience and a reasonable level of attentive common-sensed focus, it would appear.
DAY 39 - The plants have suddenly started growing again, going back to the tent at the start of the light cycle today revealed a startling increase in height and overall health of the plants. I've held of any further flushing or feeding to see how they go over the next day before I take anymore steps, however after the last 11 days of "fear and wilting" I can't say how satisfying and relieving it has been to find the actual cause and to have implemented a remedy. After all the (8hrs+) of research into the wilting issue, I have to say, not one single source mentioned testing run-off PPM or salt build-up as a potential cause. I'm glad I didn't just go for a light reduction, which may have mitigated the wilting without addressing the underlying cause and would have allowed me to travel further down that path of destruction, possibly even to fatal catastrophe.
Day 40 - Noticed some slight wilting on most of the plants near the end of the last light cycle, with a couple showing wilting still half way into the dark cycle, so I am giving the plants another 3+ Litre flush with PH water just after lights on (aiming to take runoff PPM down to the same as the flush water PPM). This will be followed by a 3/4 strength feed. Hopefully this will see the end of the salt build-up saga and a return to normal growth. In the meantime I will go create my Zkittles diary for my second tent, and upload the setup photos taken so far.
They required one more flush to get the PPM down to the level of the in-going PH'ed water. I then feed thgem as per previous paragraph. The photos from Day 40 show them as they looked just after all this. Wow what a learning curve the last few weeks have been. I feel foolish for allowing the situation to happen, and looking back at my diary I can see I made many assumptions about the ever-increasing signs of nutrient build-up and thusly carried on quite blindly allowing it to happen. All this said I can't help but be quite pleased with ultimately finding the cause, and then successful remedying it. Most importantly I feel like the whole experience really gave me a much more tacit understanding of some the complex dynamics involved in the tent environment, and that should anything else arise I now have a much better handle on how to isolate and identify any future imbalances in my growing systems. In other words, I am making mistakes, but I am also learning from them. I have also found my details (almost OCD) note taking in this diary have been invaluable in assessing and reviewing the problem.
Day 41 - Hooray the plants are all growing again, and showing signs of new growth on all tips. The flush has brought the pots back to normality. Hopefully they will boom off from here on out.
3 likes
6 comments
Share
7
Week 7. Flowering7y ago


48 cm
Height
18 hrs
Light Schedule
27 °C
Day Air Temp
5.9
pH
No Smell
Smell
1100 PPM
TDS
65 %
Air Humidity
25 °C
Solution Temp
24 °C
Substrate Temp
18 °C
Night Air Temp
11.4 l
Pot Size
1 l
Watering Volume
60 cm
Lamp Distance
Nutrients 6

GreenDream 1 Bloom
3.37 mll
CMX
0.38 mll
GroStorm
1.88 mll
ProfessorSkiSlopes Day 42 - Plants are still recovering from the nutrient build-up catastrophe but are at least now showing signs of growth, and have stopped wilting. The next feed will be flowering nutrients: this is overdue but the whole flush disaster put off the nutrient change while I attempted to stabilise the pot environment. The plants are between 35cm and 57cm, with four of them being close to 48cm.
Day 43 - Half way through day 42 light cycle I tried setting the grow room air system to recycling mode, by taking the ducting to the ceiling space off the Y joiner between the two tents. This allowed the carbon filtered air from the tents to flow back into the room and thusly back into the tents. Given winter is coming fast I wanted to see how the heat retention would be and what sort of humidity increase I could expect. I came back to a fairly warm, humd room at the start of Day 43 light cycle, and some very wilty unhappy plants. They perked up around 3 hours into the light cycle. It seems easy to assume it was the air quality change, the humidity did climb from around 65-70 to 80-85, but I don't have enough experience to know if its humidity or some lingering issue with the pot nutrient build up and final flush 4 days ago (as the wilt is identical to the wilting I got during the nutrient build-up). I am tempted to give the plants their well overdue flowering feed, but the pots are still pretty damp and feel quite heavy, like around 1/3 to 1/2 still full. They did get an almighty amount of water over 3 days during the flush (4 days ago), and my gut feeling is I should let them dry more before giving them more water and nutrients. As hard as it is, I'm going to hold back on feeding until them pots are drier.
I will continue to battle on with this grow, although I must admit, part of me feels like just starting over. Luckily I have my second tent, so I am ok-ish to just keep-on keeping on with this grow and see where it goes. On the good side, I've managed since re-ducting back out to the roof space and tweaking the heater setup to get a constant 26c in both tents. The tent humidity is still around 70%, while the grow room humidity is around 60%. I have the extraction fan on full (198m3/hr), and the heater is shut-off as local ambient temp is around 19c so I don't need it turned on as the grow light produces sufficient heat to keep the tent air at 27c. I idly wonder if the high humidity from the recycling experiment temporarily stopped the plants transpiring, and that this caused the wilting, and now the 10% higher humidity in the tent is the result of them transpiring like mad to catch up.
Here's hoping they suck that moisture out of the coco over the rest of the light cycle and get the pots dry enough to water, all without any further wilting. Crossing my fingers. I've just noticed while taking the photos that if I turn down the quantum boards to half power I get better photos that are showing a more true to life colour.
DAY 44 - Well the plants were even more wilty today, looking really very unhappy. I guess my decision from day 43 was not the best choice. So as soon as the lights came on I proceeded with a 3/4 strength watering of the full gamut of flowering nutrient and additives. I watered through to a solid 30% run-off with 27c water. The plants are still wilting 8 hours into the daylight cycle. They must have got really dehydrated. I am so confused because the pots are not weighing as dry, and the top layer of coco is damp, so ithe plants don't feel dry.
The 3/4 strength flowering nutrient feed I gave them today had a PH of 5.9 and a PPM of 1100. I watered each pot with approx 3.8 Litres of nutrient mix each, and I got about 1.1L in run-off per pot. The runoff had a PPM of 45-550 across all 8 plants. Because of the wilting, I've left them under 60% light intensity for the first half the light cycle.
FOOTNOTE: To be brutally honest, I'm quite close to just chucking these plants are restarting the grow from scratch. I have more gorilla glue seeds about to arrive. I will give it another day or two, but fair warning, this diary may be concluded early. *sad face*
Day 45 - The plants are looking better and seem to be recovering from the previous catastrophes. I'm feeling better.
Day 46 - Wow the plants are looking way better, I'm seeing growth and a lovely deepening in their colour. I'm feeling really happy, and I think the plants have earned a reprieve from my earlier potential death sentence. I can't wait to see how they continue to grow now that their environment seems to be somewhat sorted out. I've started weighing a sample pot daily so I can measure the actual water consumption daily. When the plants wilted from dryness, they were weighing in at 5.2kg. After watering on Day 44 they went up to 7.7kg Today when I checked the pot weight it was at 6.2kg. Based on this I can see they are consuming around 0.7kg of water per day, so I will be watering them tomorrow and it looks like they are going to be on a 3 day watering cycle or less from here on out! It was very confusing because all the advice out there said don't water until the top inch of your coco gets dry but mine never did that. So I'm making the assumption the drying advice comes from HID environments which typically run hotter than LED environments.
Day 47 - The plants did a big wilt over the day 46 night cycle again so I gave them another 75% strength feed today, but even as I did it I could tell they weren't dry enough to justify the wilt. The humidity is very high in my grow room, and it gets even higher (over 80%) during the night cycle, so I think maybe humidity could be the cause of this wilting (It's been so bad I've actually had "rain"on the sides of the tent and have been having to wipe down the inside tent walls so it doesn't run down and under the tent floor tray. So today I implemented a dehumidifier in the grow room. I set it to auto-operate for 50% humidity and over the next few hours it dropped the room humidity from 65% to 50% and kept it there. This saw the tent drop 75-80% humidity down to 65% which feels much more reasonable. The dehumidifier has also increased the ambient room temp which in turn increased the tent temp, which brought it to about my ideal range, so I don't have to use the oil fin heater at the moment, and possibly might not need it at all. I am extremely pleased with the effects of the dehumidifier and will be very interested to see if it eliminates the ongoing wilting.
The watering today was 3000ml per plant, with an approx run-off of 500ml per plant. The PH of the solution was 6.2, and the PPM was 1050. The solution temp was 24c, and the run-off PPM was around 550-750 across the plants. I purchased a 30L brewers barrel which has a tap on it. It made mixing 27L of solution a relative breeze, and it was easy to mix in the nutrient and the open top allowed me to mix the solution by stirring, as well as easily check the PH/PPM. The tap on the bottom made filling the smaller watering container super-easy, and I highly recommend this as a great way to go for people needing to mix large amounts of nutrient solution and who can't find big enough containers to mix in. Look for beer brewing supply houses, they stock a range of large containers that are ideal for the job!
Overall thought the plants seem to be deepening in colour and showing all the signs of a big turn-around in their fortunes. I am content at this stage with the state of the tent. I am looking forward to taking out the heater, and the big fan, and putting in the two clip-on pole fans I ordered, and having 100% floor space to dedicate to the plants. Also the IP cameras arrived, and I can now monitor the two tents from my phone, and this is really excellent as it alerted me to yesterdays wilting, and is a great way to check them at night I''m not sure if the IR leds in the camera will affect the growth but I don't think the autoflowers will mind (but I will do some research just in case).
Day 48 - The plants are still wilting during the night cycle, some worse than others, but it seems to be lessening over the days since recovery actions were taken, and now that the dehumidifier is operational in the grow room and the two pole-grip fans are setup in the tent, I can't see any other environmental variables to optimise at this stage, as far as I can tell, I have now reached maximum optimisation of this tent, I literally can't think of anything else I could do to improve their situation, so from here on out I will just continue to feed on as best a wet/dry cycle as I can, and I guess we will see how the plants go till harvest! About the only configurable option I'll be tweaking ios the nutrient strength which is at 75% right now. I'll look to bump that to 100% on the next feed. My assumption about the wilting is that it is simply weakened plants not able to handle a full day of sun yet, and that it will continue to lessen as the grow proceeds barring any further screw-ups. About the only thing I may try if wilting persists is dropping an hour or two from the light cycle till they stop the wilt.
2 likes
14 comments
Share
8
Week 8. Flowering7y ago


56 cm
Height
18 hrs
Light Schedule
24 °C
Day Air Temp
6.5
pH
Normal
Smell
1050 PPM
TDS
65 %
Air Humidity
24 °C
Solution Temp
24 °C
Substrate Temp
18 °C
Night Air Temp
11.4 l
Pot Size
0.9 l
Watering Volume
60 cm
Lamp Distance
Nutrients 7
GreenDream 1 Bloom
3.37 mll
CMX
1 mll
GroStorm
1.88 mll
ProfessorSkiSlopes WEEK 8
Day 50 - The plants got dry quicker than normal. I forgot to compensate for the new dehumidifier in the grow-room. When I checked today a test pots was only 5.02kg in weight. They were watered with 3.3L each of 75% strength nutrient, with a double strength CalMag additive. The PPM was 950, the PH was 6.9 and the runoff across all the pots was 550-650 ppm. The water was 24c. I noticed what I believe is calcium and magnesium deficiency across the plants, so I did the same strength feed as 3 days ago, but this time increased the CalMag to the maximum manufacturer recommended dose of 1ML/L (I was using max 0.375ml) prior to this. This additive has 2% Mag and 6% Cal. I also bumped the PH up to 6.9 to ensure maximum magnesium absorption. Up until now all my feeds have been between 5.9 and 6.2, and I read the Mag really needs 6.4 and above. If this fixes things then I might start varying the PH of my feeds to ensure the plants get all the micronutrients. I might also start foliar sprays of Cal/Mag. After watering the test pot weighing in at 7.7kg so it took on 2.7kg of weight approx.
The fans seem to be working well. I rearranged them to both be on back poles, and for their oscillation to follow that of a pair of windscreen wipers, this ensures all of the plants get direct air movement and circulation.
The Dehumidifier is obviously working, and really helping the plants get larger amounts of water/nutirent. The wilt issue is still noticeable but has generally been decreasing since the nutrient build-up/flush events. So I put the wilt down to simply being stressed plants taking time to recover. Overall the growth rates have accelerated massively, and the leaf colours have continued to deepen and the wilt has continued to lessen, and is really only showing during the light cycle on one plant now. I hope this higher PH, higher magnesium/calcium feed will go some way to accelerating their recovery as well. The bud sites continue to thicken up and the plants are looking better every day. I am very happy with the current environment, and the progress of the plants since their difficulties.
I also defoliated today, I removed enough fan leaves from each plant to allow the stem and branches of each plant to be seen, so I aimed mainly at any leaves growing inward, and any fan leaves that showed bud that was below it. This has opened up all the limbs to more light and more air circulation.
I expect a 3 day watering cycle from here on in, so next watering day will likely be day 15. I might move to 100% strength for that feed if they don't show any overfeeding signs before then. The next feed will likely be at PH 6.5 to allow magnesium absorption. After that I think I might alternate PH 6.1 and PH 6.5 feeds if not implement regular foliar cal/mag feeds.
Day 51 - The plants seem to have responded really well to the CalMag Boost and higher PH feed. They haven't shown any further wilting since then, and they seem to all be deepening in colour and their leaves are all standing out without the limp bend I've become so familiar with. I defoliated the remaining plants today, and all the bud sites are now visible and getting light. I am very happy with the current state of the tent and the recovery/progress of the plants now. They seem to be doing well. The humidity is fairly constant during the light cycle at 60-65% and the air temp is hovering around 25-27c and I'm happy with both of these metrics.
Day 52 - Plants continue to deepen in their green colour and have shown almost no wilting since the last feed. I'm really happy with the condition improvement.
Day 53 - Fed the plants with another 75% strength feed (except CMX at 100%). Started adding silica supplement. Solution details: PH: 6.3 PPM: 1050 Temp: 24c. Run off PPM: 650-800. Volume per plant: 3.5L Run off per plant: 750ml. The PPM of the run off has been increasing by around 200ppm per feed since the plants were flushed. So it seems they aren't consuming all that they are being given. To avoid a build-up and lock-out I will feed at 50% on the next watering.
Day 54 - The plants continue to move into flowering and deepen in their colour. They have shown almost no wilting this week.
Day 55 - The plants continue to thicken their flowers and to grow more foliage. They are probably due for another light defoliation any day now. There is a definite sweet smell to the tent now.
Day 56 - The plants continue to grow well. They could do with a watering today, but I don't have time so it will happen tomorrow right after lights on.
2 likes
1 comment
Share
9
Week 9. Flowering7y ago


56 cm
Height
18 hrs
Light Schedule
24 °C
Day Air Temp
6.5
pH
Normal
Smell
1050 PPM
TDS
65 %
Air Humidity
24 °C
Solution Temp
24 °C
Substrate Temp
18 °C
Night Air Temp
11.4 l
Pot Size
0.9 l
Watering Volume
60 cm
Lamp Distance
Nutrients 7
GreenDream 1 Bloom
2.25 mll
CMX
0.5 mll
GroStorm
1.25 mll
ProfessorSkiSlopes Week 9
Day 57 - Fed the plants with a 50% strength nutrient solution (PPM: 950 PH: 6.4 Temp: 24c Run-off PPM: 850 Volume given per plant: 3300ml Run-off per plant: 650ml). The run-off PPM count has increased by 200 per watering over the last 3 waterings and was at 800 on the last feed, so I decided to drop the strength of the nutrient from 75% to 50% as the PPM increase indicates they aren't consuming all they are getting.
Day 58 - The plants continue to do well in their recovery from the mistakes I made earlier in the grow. The epsom salt foliar spray, and increase in CalMag additive has really improved their colour and stature. The silica additive seems to be giving them a noticeable "plumpness" in their leaves and a resilience to wilting. It was a good idea to reduce their nutrient strength, and they seem to have responded well to it being dropped to 50% as of the last watering. I will keep it at 50% or below from now on, dependent on the run-off PPM readings. I switched the room to recycling ventilation, so the tents now vent back into the grow room. This has increased the tent temperature by around 3 degrees, and the humidity is being kept in check by the dehumidifier running in the grow room. I will probably keep the room in recycling mode through the next three months of winter until the ambient temperature starts to rise.
Day 59 - The plants continue to grow well and the smell in the tent is getting stronger. I defoliated a couple of plants and will continue over the next few days to remove fan leaves from the rest to maximise the light getting to the budsites. I've just noticed the plants getting a little lighter in their green colouring (looking at this weeks photos) so it makes me think I might need to make the epsom salt foliar spray a regular supplement.
Day 60 - Foliar Spray with 4g/L Magnesium Sulphate solution. I've decided to change the photography style and put the show plant against a grey background and take closeups of the main cola so that the development of the buds is more easily seen.
Day 61 - Fed the plants with a 50% strength nutrient solution (PPM: 950 - PH: 6.2 - Temp: 23c - Run-off PPM: 1000 - Volume given per plant: 3800ml - Volume Run-off per plant: 600-800ml). Pot Weights prior to watering: 4.8-5.6KG, Pot weights after watering: 7.8-8.0KG.
Day 62 - Lowered lights by 5cm.
Day 63 - Given the run-off PPM has kept increasing and is now above the PPM of the solution going in, I've decided to do a flush with FloraKleen on Day 65, and then feed with a 75% strength solution. The plants have been yellowing a bit, so I'm not sure if I've been underfeeding them at 50% and the build up is from selectively unused nutrients, either way, I feel like a flush and reset would be good right now.
End of Week 9 - I'm finding it tricky to decide exactly how much to feed the plants, I'm sure they should be wanting more than a 50% strength solution as apparently Gorilla Glue likes higher levels of nutrient and yet the run-off PPM has steadily increased over all of the 75% and subsequent 50% feeds. Hopefully the flush and higher strength nutrient sees them looking a little healthier as they seem to be looking a little off colour.
5 likes
7 comments
Share
10
Week 10. Flowering7y ago


56 cm
Height
18 hrs
Light Schedule
24 °C
Day Air Temp
6.5
pH
Normal
Smell
1050 PPM
TDS
65 %
Air Humidity
24 °C
Solution Temp
24 °C
Substrate Temp
18 °C
Night Air Temp
11.4 l
Pot Size
0.9 l
Watering Volume
60 cm
Lamp Distance
Nutrients 7
GreenDream 1 Bloom
2.25 mll
CMX
0.5 mll
GroStorm
1.25 mll
ProfessorSkiSlopes WEEK 10
Day 65 - Today I flushed the plants with a drenching to 20% run-off of 2.25ml/L of FloraKleen added to PH'ed tap water (PH 6.3). This product is designed to release any nutrient build-up in the coco, and hopefully will reset the pots so I can give them a fresh start nutrient-wise. I gave each pot about 4.2L of solution each, with about 1L of run-off from each pot. The PPM of the FloraKleen solution was 250ppm (which is the PPM of the tap water, so it appears FloraKleen doesn't have any salts in it). The PPM of the run-off was around 650-750. I'm going to leave them for a day or two, and then give them a 75% strength feed and see how they go. They've been getting a bit light in colour lately, so I'm not sure if I've been underfeeding them. The run-off PPM has been increasing by 200 per feed for the last several feeds. That's even after dropping the nutrient strength from 75% to 50%. I'm a bit confused, because the plants seem to be behaving like they aren't getting enough food, yet the run-off PPM levels seem to suggest they aren't consuming all they are getting. At the moment I'm pretty much guessing as I go along. Given the plants have only got another 3 weeks or so to go before harvest, I'd like to make sure they have enough energy to pump up their buds before they are harvested. I guess we will see if a 75% feed after this flush is too much or just right after its done.
I wént through the plants after the flush and gave them a solid defoliating and removed most of the sugar leaves, this has left pretty much all the bud-sites exposed to light now, and the tent looks great as all the buds are visible now and I have to say, despite the fact the plants aren't anywhere near the weight and size they could have been, it is still a gorgeous sight to behold.
Day 66 - The plants seem to have responded well to the flush. I think I will feed them a 75% strength feed tomorrow.
Day 67 - My wattage meters arrived today. They are fantastic and they were extremely simple to install as they are just placed inline, in between the main power cable and the light. I can now see the wattage the light is running at without having to reference the wattage meter I have on the main power supply to both tents. It also looks cool. You can see it in the group shot from day 68. Given the low cost of these meters I'm surprising they aren't more common and that HLG don't build them into their branded lights. It should be on the list for every QB user I think! (they cost $7 USD each on eBay, from china).
Day 68 - Fed the plants with a 50% strength solution. Feed them 3.8L each. They had about 10-20% run-off. Solution had a PH of 6.3 and a PPM of 846 (EC 1.68) The run-off had a PPM of 1050. I also lowered the lights by 5cm to a height of 45cm above the canopy. After doing some more research about how/when to feed plants when using coco I've decided to switch from watering based on a wet/dry cycle (that typically saw me watering every three days) to a daily watering schedule. I will still water to 20% run-off. The research I did last time seemed to suggest periodic watering was best, but after this latest research I found many people water daily. This seems like it would have a lot of advantages, including being able to track the run-off PPM levels each day. This should allow me to dial in the nutrient levels much better, and should stop nutrient concentration level swings in the pots that must be occurring during the wet/dry cycle. I wish the advice out there was more consistent LOL. I'm also switch my Zkittles grow to daily waterings.
Day 69 - Fed with 50% strength nutrient solution. Ph=6.1 PPM=780 EC=1.6 Temp=12c Volume given 15L. Runoff PPM=860, EC = 1.6 Volume runoff = 7.5L - Total amount fed to each plant is 930ml. Runoff per plant = 930ml per plant.
Day 70 - No feed. End of week 10!
8 likes
4 comments
Share
11
Week 11. Flowering7y ago


56 cm
Height
18 hrs
Light Schedule
24 °C
Day Air Temp
6.5
pH
Normal
Smell
1050 PPM
TDS
65 %
Air Humidity
24 °C
Solution Temp
24 °C
Substrate Temp
18 °C
Night Air Temp
11.4 l
Pot Size
0.9 l
Watering Volume
60 cm
Lamp Distance
Nutrients 7
GreenDream 1 Bloom
2.25 mll
CMX
0.5 mll
GroStorm
1.25 mll
ProfessorSkiSlopes WEEK 11
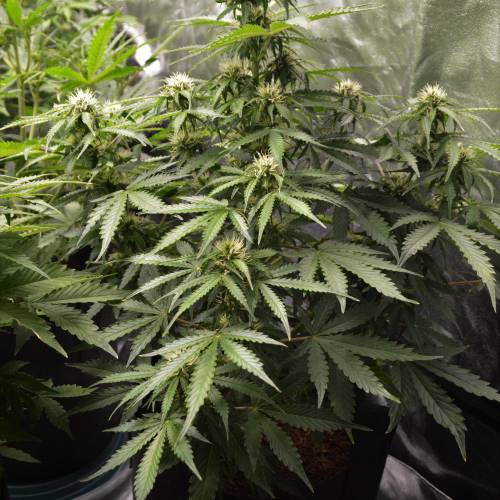
Day 71 The change in the buds each day is amazing. Everyday they seem more swollen, more silver with trichines or just more beautiful.
Day 72 Feed with 50% solution as per Day 69. PH=6.3, PPM=825, EC=1.6, Temp=13c, Volume Given 24L, Run-off PPM 846. Run-off vol was Around 7litres, so take up per plant was about 2.1L each
Day 73 Feed with 50% solution as per Day 69, Volume given 15L
Day 74 No Feed. This weeks pictures are a series of bud-porn taken over the three days from today. I tried to show exactly how the buds look, and how the plants themselves are.
Day 75 Decided to start flushing the plants now as they are very close to harvest I feel. So In will feed with just water from here on out. Today I fed with PHéd tap water (PH=6.2) with a PPM of 174. Volume given 26L with 7L runoff = 2.4L taken up by each plant. Run-off PPM=610 and EC 0.34
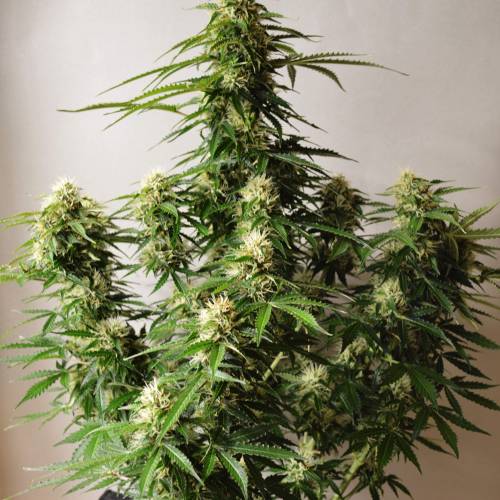
Day 76 No Feed. Sudden change in buds, they seem to be responding to the flush are suddenly expanding and swelling in the bracts. I've tried to capture the detail in todays photos by moving the light source to give better reflection. Wow these plants just pack on the weight at the end like crazy.
Day 77 Fed with PHéd tap water (PH=6.3) and EC 0.4 Volume given 20L, Runoff 4L. Makes 2L per plant taken up. Run-off EC was 0.4 The buds are suddenly even more densely coated in a sea of trichomes. The sight is glorious. Amazing how all the plants (sans 1) have come together at the end of the grow to be in almost perfect synchronicity flower-wise. the bud changes since flush seem to be happening across all the plants simultaneously. Its great. The sight is just beautiful.
2 likes
comments
Share
12
Week 12. Flowering7y ago


56 cm
Height
18 hrs
Light Schedule
24 °C
Day Air Temp
6.5
pH
Normal
Smell
1050 PPM
TDS
65 %
Air Humidity
24 °C
Solution Temp
24 °C
Substrate Temp
18 °C
Night Air Temp
11.4 l
Pot Size
0.9 l
Watering Volume
60 cm
Lamp Distance
Nutrients 7
GreenDream 1 Bloom
2.25 mll
CMX
0.5 mll
GroStorm
1.25 mll
ProfessorSkiSlopes WEEK 12
Day 78 Fed with water taken to a PH of 6.3
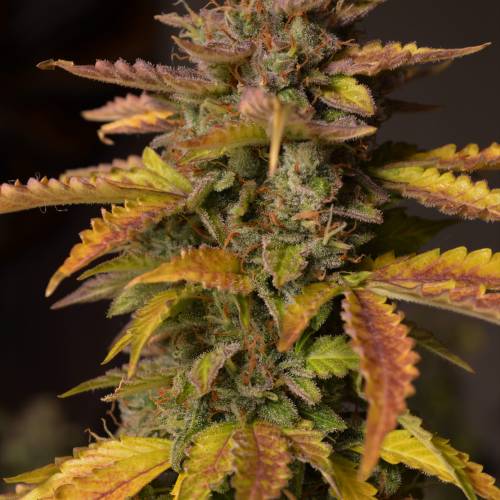
Day 79 The plants are takening of an evermore purple'ish tone to the buds, as the leaves fad to yellow.. it is quite a stunning sight to the eye after such a long period of green.
Day 80 Fed with water taken to PH 6.3
Day 81 The smell has become much more pronounced over the last few days.
Day 82 The tent smells amazing and looks like autumn. I will harvest in the next day or two I think.
Day 83 One last water with tap water
Day 84 The plants appear ready to be harvested. They've had a good flush and look incredible colours now. All the bracts are swollen and they seem to have hit their peak. I'm going to harvest in the next 24 hours.
7 likes
comments
Share
13
Week 13. Harvest7y ago
Happy Harvest Day!


10/10
Rated
Well, the harvest was nothing short of incredible. I really had no sense of how much bud was actually sitting on the plants, until I decided to harvest, and started taking each plant one by one to disassemble them into individual branches, and then trim off the leaf. Each plant was an absolute joy to manicure, and each plant was composed entirely of mature fully developed frosty swollen buds from top to bottom. There was no popcorn, or any fluff buds at all. The photos for this harvest week were taken moments before each plant was taken for harvesting. The final image is one taken from above, over all of the manicured buds on stems. Each plants worth of stems is organised into piles., Each of the 8 piles of buds represents one of the plants that were until very recently, growing in this tent.
Just from looks alone so far, I would say 95%+ of all of the buds are fully matured, dense, trichome laden examples of the optimal Gorilla Glue Bud. They took on some amazing autumn colours during the final week flush, and the intense petrol like sweet smell was almost overpowering when one was sat amongst all of the colas.
All in all, I think there is far more bud here than I ever predicted based on the grow I had. Even after all the mistakes and catastrophes, and even after stunting, wilting, nute lockouts and every other newbie mistakes, I think I managed to dial in the environment well enough in the last half of the growing cycle to product was looks to be, by far and without exception, the single largest pile of exceedingly high quality dense dank nugs that I personally have ever had the pleasure of beholding. Fucking Excellent.
The dry bud weight was 562 grams, so just over 20oz from 8 plants ao 1.17g per watt, which is below my target range of 1.6-2.6g per watt, but given the issues during the grow, and the fact it was my first, I am still stoked.
Show more
Translate
Spent 85 days
Ger Veg Flo Har
70.25 g
Bud dry weight per plant
8
Plants
1.4 m²
Grow Room size
Easy
Difficulty

Energetic, Euphoric, Giggly
Positive effects

Dry eyes, Dry mouth
Negative effects

Diesel, Earthy, Pungent
Taste
Height
Day air temperature
Air humidity
PPM
PH
Light schedule
Solution temperature
Night air temperature
Substrate temperature
Pot size
Lamp distance


ProfessorSkiSlopes For my first grow I'm really happy with an outcome of just over 20oz (562g) of really great buds. This strain grew really well and the whole grow process was a total pleasure. I look forward to many more Fastbuds grows in the future. My next one that is just about to go down is Blackberry! The Quantum lights are amazing, and a really great investment!
14 likes
8 comments
Share
Equipment Reviews


49 comments
Sort by
popularity
popularity
newest
oldest

Fast_Buds  commentedweek 17y ago
What a great looking diary so far!
Thanks for growing faster with us, let us know if you need anything 💚
likes 2
ProfessorSkiSlopes commented7y ago
Thank you @Fast_Buds! I hope I can do your fine genetics justice.
likes 2
Fast_Buds commented7y ago
@ProfessorSkiSlopes, I'm sure you can! Our genetics are in good hands=)
likes 2
ProfessorSkiSlopes commentedweek 137y ago
Come over tomorrow hehehe I'll roll a few fatties for you, and even make you a coffee *grin*
like 1

Puffer_Bill commentedweek 97y ago
Looking very buddy in your camp.👊🏼😎👊🏼
like 1
ProfessorSkiSlopes commented7y ago
@Puffer_Bill, Thank you! It really is starting to look great now when I open the tent. It's amazing how fast the plants go into flower and suddenly there are buds everywhere! The next 3 or so weeks are going to be really fun to watch them thicken out!
like 1
Puffer_Bill commented7y ago
@ProfessorSkiSlopes,
Definitely an exciting time now.
👊🏼😎👍🏼
like 1

ivik80 commentedweek 87y ago
Looking good mate!
Glad to see you have dialed in the MG issues, good idea to take the ph up a bit so MG will be taken care of easier.
I always have different PH on each feeding just to be sure all nutes will be taken up during a 1 week period at least. I try to keep it around 6.5 but I play around that. Once perhaps 6.3, next 6.5, then 6,7 and then back to 6.3 or 6.5 and so on... I try to at least never feed same ph after each other.
like 1
ProfessorSkiSlopes commented7y ago
@ivik80, That's a great idea. I've decided to the same myself, and will look to bounce the PH between 6.0 and 6.5 over each week, and then drop in a 5.8 or 6.7 a couple times a month.. I'll fine tune it as I go. I was aiming for 6.1 on every watering, and I think it was causing some issues with micronutrient uptake. It would be great to be able to get the run-off analysed and be able to see exactly how much of each nutrient they are consuming... I wonder if there are any test-kits or similar out there to do this.. hmmm.
likes
ivik80 commented7y ago
@ProfessorSkiSlopes,
No idea, I use organics so I cannot even look at PPM or EC.
I never heard of anyone being able to do that but it seems like something really good if it is possible?
like 1
Fast_Buds commentedweek 77y ago
Hey there!
You're babies are looking just fine.
Great work, I'm sure you are learning a lot with this hehe.
Trial and error is always the best way to gain knowledge. Well done.
I'm sure things will be a bit easier from here on out 🙌🏼
like 1
ProfessorSkiSlopes commented7y ago
@Fast_Buds, Cheers guys. The plants have come along way on the road to recovery in the last 3 days since I asked for your help.. So cross-fingers the grow is a easier from here on out, and that my mistakes so far will still allow for a reasonable yield. The Gorilla Glue certainly can take a hard life and bounce back that's for sure. Thank you for taking the time to check this diary for me.
like 1
Fast_Buds commented7y ago
@ProfessorSkiSlopes, No problem!! We're here if you need anything🙌🏼
like 1
Puffer_Bill commentedweek 67y ago
Yours are looking good. 😎👍🏼
( not sure about the leaf droop )
My first grow was GG4. It was quite resilient. From 4 plants I got over 16oz. Not including the buds I nibbled along the way. I over vegged them so ended up super cropping bending breaking etc... they took all the stress I gave them.
like 1
ProfessorSkiSlopes commented7y ago
@Puffer_Bill, Cheers for the comment :) The plants have been looking great until this wilt thing. I've built a frame for the quantum boards that spreads them apart using the same dimensions as the original HLG-550 which should give better light distribution, and I'm going to try dropping an hour or so from the light cycle to try and mitigate the wilt. being autoflowers these guys have limited time to be at their optimum, and this wilt during the last 2-3 hours of the light cycle feels like it must be affecting end yield. I guess we will see!
likes
ivik80 commentedweek 137y ago
Nice harvest mate!
So when should I come over and try out the new smoke? :D
like 1
ivik80 commentedweek 57y ago
Hi
Why do you want such a high leaf temp?
likes
ProfessorSkiSlopes commented7y ago
@ivik80, It really is! I did a quick scan and there are already a couple of sunset/sunrise sketches out there, but the more I think about it, the more I think this is definitely a worthwhile project to investigate. Everything could be controlled from the potentiometer interface, and it would just need some sort of clock shield for the arduino, and it could manage the intensity of the light 24/7 - it would be good to have an LCD shield as well so it could display things like the time, and the intensity, so it could be spot checked in the tent. Having it do datalogging back to a PC or SD card would be good as well. Then the next step would be to interface it with the ventilation and circulation fans, and any cooling/heating equipment, along with any humidifying/dehumidifying gear. One could even implement moisture meters in all the pots, or even pressure sensors under the pots to watch weight, and it could then alert when watering/feeding was needed/optimal.. its all a very exciting field for future improvements to indoor operations that's for sure! - The great thing is that there is already a lot of work out there in this direction with Arduino, so its not even like it would have to be done from scratch. I look forward to investigating it once I have a few more harvests under my belt, and I have the practical experience to implement something more advanced than manual/thermostat/humidistat control.
likes
ivik80 commented7y ago
@ProfessorSkiSlopes,
Ah man that sounds really nice, seems to be a lot of different fun stuff one could do with it.
Like the weight of pot idea for watering!
Ok then, I'll wait for you to make it all work and then you can show me what to buy and send over some scripts :)
I'll copy/paste whatever u get going :D
like 1

vito_f commented7y ago
@ivik80, yes, check arduino or better yet get a nodemcu v2 and look at the blynk library and free iphone ios app. nodemcu is a very very small arduino-clone with builtin wifi (it costs about 2-5 €/$). there are other multipurpose arduinos (clones) with wifi.
blynk is a framework you can easily add to your sketch. blynk /arduino then connects to either a free cloud server hosted with them or (as i did, as a docker container in parallel to an openvpn server on a NAS) you can run it locally on a small server, so everything stays private. What is nice, the server feeds your arduino the current time now, also it can collect all kind of sensor data in your growroom. You can then build a dashboard app, all kinds of graphs easily in a matter of minutes and program your own light scheduler. it is amazingly awesome. ALso cool: once everything is installed you can update your sketches via wifi, feed videos or webcam shots of your growroom into the app, override the light status in your app, emergency heat shut down, push notifications, all kind of stuff. its nerdy AF, but also a very fun tech project if you're savvy. you can even let the units talk to each other, which i have not tried, build individual humidity/temp-nodes per tent or pot.
adding or simulating a potentiometer would be a step depending on your tech setup then.
likes 2
Show More (15)

Cheezy commentedweek 137y ago
What a beautiful harvest! Congrats!
likes
ProfessorSkiSlopes commented7y ago
@Cheezy, Thank you very much! :) I really enjoyed growing these plants even though I made a bunch of mistakes, I learnt heaps from doing it, and it was a brilliant smoke (a bit to much sativa for me but still great).
like 1
Cheezy commented7y ago
@ProfessorSkiSlopes, there is so much to be learnt by the experience of growing! There's already so much I would do different next time and I'm not even half way through my first grow :P
I'm looking forward to seeing how what you've learned benefits you in your next grow!
likes

smoking_hills9 commentedweek 137y ago
Wow😲 Amazing results. 👍
likes
ProfessorSkiSlopes commented7y ago
@smoking_hills9, Thank you very much! I'm pretty sure I could get the yield up by another 30% with a more experienced grow. This grow was my first and had a few catastrophes. I've learnt a bit from this and subsequent grows, and I have another 10 Gorilla Glue seeds that I will be using to test my hypothesis after I get another 2 or 3 grows under my belt.
like 1
ivik80 commentedweek 107y ago
Another great week I see, they are looking really good mate!
Not many weeks left I guess :)
likes
ProfessorSkiSlopes commented7y ago
@ivik80, Thank you :) Yep should only be 3 weeks or so to go now.. I'm really looking forward to seeing all the buds frost up!! I'm crossing my fingers for a 16oz harvest, but I'm estimating anywhere from 12-18 at this stage.. but I guess we will see... hopefully I can still break the 1g/w level with this (anything but perfect) grow!
likes

GreenHouseLab commentedweek 107y ago
GG always produces monster colas!!! It's evident here...
likes
ProfessorSkiSlopes commented7y ago
@GreenHouseLab, It certainly does! I can see where is gets the name Gorilla... the shape of the plant almost looks like a gorilla with its arms up and flexed.. Can't wait to see these buds as they sticky up!
likes
ivik80 commentedweek 57y ago
Btw, I wrote a PM/chat to you earlier about the lights, did u see it?
likes
ProfessorSkiSlopes commented7y ago
@ivik80, Do you mean the comment on the VPD? Where do look for private messages?
likes

Wilson_McNugget commentedweek 137y ago
Nice grow Ski Slopes...I was taking a look at some of the winning diaries for newbie of the month...looks like you had a pretty nice result....
likes

Auto_GrowZ commentedweek 97y ago
Hey. Just curious.. at week 9 do you still have the hlg Qb's dimmed down to 50% ?
likes
ProfessorSkiSlopes commentedweek 97y ago
Hi there. The lights are at full 480w now, I started transitioning them around week 3-4 and increased them to full over a period of around 4 weeks. Sorry I didn't make specific notes of when I increased the lights, and this grow had several issues which caused me to slow down the light increase, but if you check my new diary Zkittles, I'm just beginning the increase from 240w at week 3 and I will be taking more detailed notes of exactly when I increase the intensity. Basically the aim is to slowly increase it as the mass of plant material increases and as they increase in height so that they are always getting basically as muc as they can handle without stressing... I'm still working out exactly when to do it, and will be letting the plants guide me.
likes

the end.
Enjoying this diary? Follow for more updates!


Prefer the old Diary view?
Go back to the old Diary view