
Purple Queen


VEG
Fission 300W Light Emitting Diodes/60W
Custom
FLO
Fission 300W High-Intensity Discharge/315W
Custom

Indoor
Room Type
LST
weeks Technique
HST
weeks Technique
Topping
weeks Technique
Defoliation
weeks Technique
19 l
Pot Size
Start at Harvest
1
Week 1. Vegetation8y ago


3 cm
Height
18 hrs
Light Schedule
26 °C
Day Air Temp
5.8
pH
No Smell
Smell
160 PPM
TDS
40 %
Air Humidity
20 °C
Night Air Temp
0.3 l
Pot Size
30 cm
Lamp Distance
Nutrients 1
EM1
1 mll
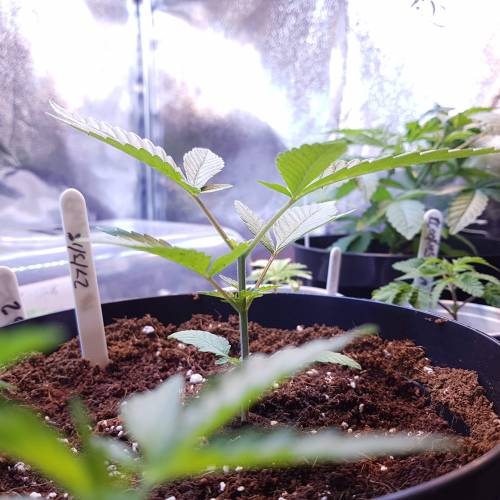
TheFoxFarmer Week 1 Veg PQ
Next up is the second brand new strain by Royal Queen Seeds, Purple Queen! Definitely a strain I'm looking forward to growing. She's gonna be a stunner 😍
As usual she was started in a wet paper towel in an open plastic bag. This was put in a dark place until she popped a nice root and was ready to be transplanted.
She was transplanted into a plastic cup with coco & perlite and sprayed with 5.8pH water with EM1. I use tap water that is 150-190ppm. This is all she was given (in light feedings), and will be started on a light nutrient feed at the start of her 2nd week.
Thanks for following and happy growing! 🐺
7 likes
8 comments
Share
2
Week 2. Vegetation8y ago


5 cm
Height
18 hrs
Light Schedule
26 °C
Day Air Temp
5.8
pH
No Smell
Smell
250 PPM
TDS
40 %
Air Humidity
20 °C
Night Air Temp
0.3 l
Pot Size
30 cm
Lamp Distance
Nutrients 5
EM1
1 mll

TriPart Grow
0.3 mll

TriPart Micro
0.3 mll
TheFoxFarmer Week 2 Veg
This girl is looking good so far. This week she's been introduced to Cal-Mag and the base nutrients at a low strength feeding; you don't want to overdose her feed and burn her delicate roots straight away as it could kill her. I find it's best to first give a very low feeding and see how she gets on. You can then increase it gradually from there and add other nutrients/additives.
She's looking happy and healthy, next week she'll be transplanted and topped ✂️
Thanks for following and happy growing! 🐺
6 likes
2 comments
Share
3
Week 3. Vegetation8y ago


10 cm
Height
18 hrs
Light Schedule
26 °C
Day Air Temp
5.8
pH
No Smell
Smell
400 PPM
TDS
40 %
Air Humidity
22 °C
Night Air Temp
0.3 l
Pot Size
30 cm
Lamp Distance
Nutrients 8
EM1
1 mll
Molasses
0.793 mll
Epsom salts
0.079 mll
TheFoxFarmer Week 3 Veg
This girl's been a bit of a slow feeder, which could be from over wetting the coco when she was young and only had a small root structure. This week she was fed the full veg nutrients, with silicon, Epsom Salts and molasses included.
I like to transplant around day 20, but this girls cup wasn't dry enough to transplant this week so you'll have to look forward to that next week!
Overall she's looking happy and healthy.
Thanks for following and happy growing! 🐺
6 likes
2 comments
Share
4
Week 4. Vegetation8y ago


10 cm
Height
18 hrs
Light Schedule
24 °C
Day Air Temp
5.8
pH
No Smell
Smell
400 PPM
TDS
40 %
Air Humidity
21 °C
Night Air Temp
3 l
Pot Size
30 cm
Lamp Distance
Nutrients 8
EM1
1 mll
Molasses
0.793 mll
Epsom salts
0.079 mll
TheFoxFarmer Week 4 Veg
This girl's had a busy week. She's been transplanted into a 3ltr plastic pot and topped back to her 3rd node. Her nutrients were watered down slightly to prevent her from too much shock and burning root tips. I also water in less volume to encourage her roots to grow sooner in search of water/nutrients.
Once her new growth came through, I started bending her over before tying her up next week. She's a very flexible girl with all the silicone in her. That's one of the reasons why it's great in veg.
Thanks for following and happy growing! 🐺
4 likes
2 comments
Share
5
Week 5. Vegetation8y ago


12 cm
Height
18 hrs
Light Schedule
24 °C
Day Air Temp
5.8
pH
No Smell
Smell
400 PPM
TDS
40 %
Air Humidity
22 °C
Night Air Temp
3 l
Pot Size
30 cm
Lamp Distance
Nutrients 8
EM1
1 mll
Molasses
0.793 mll
Epsom salts
0.079 mll
TheFoxFarmer Week 5 Veg
Again, sorry for the late updates guys, it's been a hectic couple of weeks for work.
This week I got the string round her. When tying the main stem, ensure you tie her from the top, not half way up or the bottom. I've seen a few people tie their girls half way up the plant and basically pull their plant to a 45 degree angle. This is wrong. The aim is to bend her, not make her lean. Making this mistake causes major stress to the roots. If you tie at the top and she still leans a little, simply tie the very base of her and pull in the opposite direction to straighten her stem. Doing this takes any stresses away from the roots.
She's looking very happy and healthy. This girl also has flat stems. They're considerably thick for her size, but they're not the typical round stem I'm used to seeing with most strains. This isn't something I've not seen or heard of with certain strains before, but I've never experienced it personally so it's pretty cool and strange to see.
Thanks for following and happy growing! 🐺
4 likes
2 comments
Share
6
Week 6. Vegetation8y ago


22 cm
Height
18 hrs
Light Schedule
26 °C
Day Air Temp
5.8
pH
No Smell
Smell
400 PPM
TDS
40 %
Air Humidity
22 °C
Night Air Temp
3 l
Pot Size
30 cm
Lamp Distance
Nutrients 8
EM1
1 mll
Molasses
0.793 mll
Epsom salts
0.079 mll
TheFoxFarmer Week 6 Veg
This week the Purple Queen was left to get bigger and stronger. She was given a maintenance flush on day 37, to remove any excess build up of salts in the coco. I flushed around 10ltr of water (with EM1), which reduced the coco's ppm to approx 100ppm. She was then topped up with a full strength veg feed to give her a fresh feeding.
Later in the week she was given a second round of LST. Her four main tops were tied down to open her up for better light penetration, and to encourage the lower growth to meet the top of the canopy and strengthen up.
Thanks for following and happy growing! 🐺
6 likes
comments
Share
7
Week 7. Vegetation8y ago


27 cm
Height
18 hrs
Light Schedule
26 °C
Day Air Temp
5.8
pH
No Smell
Smell
400 PPM
TDS
40 %
Air Humidity
22 °C
Night Air Temp
18.93 l
Pot Size
20 cm
Lamp Distance
Nutrients 8
EM1
1 mll
Molasses
0.793 mll
Epsom salts
0.079 mll
TheFoxFarmer Week 7 Veg
This week the Purple Queen was given her new throne to sit in for the rest of her reign. Her final pot is a 5gal Root Pouch. Sorry I couldn't get the usual root porn pics, it's not always easy one handed! She hadn't quite filled her pot, but she had plenty of healthy white roots nonetheless.
After being transplanted she was LST'd to open her for better light penetration. I also pluck any big leaves covering the centre, so all branches and internodes in the centre have direct light for quicker growth.
She's looking great so far in the veg tent. She'll now be vegged for another week to get her to size before being thrown in the flower tent.
Thanks for following and happy growing! 🐺
8 likes
comments
Share
8
Week 8. Vegetation8y ago


30 cm
Height
18 hrs
Light Schedule
26 °C
Day Air Temp
5.8
pH
No Smell
Smell
400 PPM
TDS
40 %
Air Humidity
22 °C
Night Air Temp
18.93 l
Pot Size
20 cm
Lamp Distance
Nutrients 8
EM1
1 mll
Molasses
0.793 mll
Epsom salts
0.079 mll
TheFoxFarmer Week 8 Veg
This girl was left to veg for the week before going into flower on Day 56 Veg/0 flower.
Each day I was bending her tallest branches down, just to open her up and stretch her out a bit before she goes into the flower tent. She's looking very happy and healthy and has become a beautiful bush.
Thanks for following and happy growing! 🐺
6 likes
4 comments
Share
9
Week 9. Flowering8y ago


40 cm
Height
12 hrs
Light Schedule
24 °C
Day Air Temp
5.9
pH
No Smell
Smell
600 PPM
TDS
40 %
Air Humidity
21 °C
Night Air Temp
18.93 l
Pot Size
35 cm
Lamp Distance
Nutrients 9
EM1
1 mll
Molasses
0.793 mll
Epsom salts
0.159 mll
TheFoxFarmer Week 1 Flower
This girl is finally in the flower tent! In order to transition her into flower, her base nutrients are levelled at a 1:1:1 ratio, just until she starts to slow her stretch and build her flowers. Cal-Mag and Epsom Salts have been increased now that she will be requiring them in higher amounts with the faster growth during stretch.
On day 7 she was given a thorough leaf strip and lollipop to prevent her from getting tall. As it's only the one 315w CMH under all four girls, it's important for me to keep on top of this for maximum bud sites and bigger buds throughout the whole plant.
She's a very healthy looking girl with nice thick branches. Looking forward to seeing her flowers.
Thanks for following and happy growing! 🐺
7 likes
comments
Share
10
Week 10. Flowering8y ago


50 cm
Height
12 hrs
Light Schedule
24 °C
Day Air Temp
5.9
pH
No Smell
Smell
600 PPM
TDS
40 %
Air Humidity
21 °C
Night Air Temp
18.93 l
Pot Size
35 cm
Lamp Distance
Nutrients 9
EM1
1 mll
Molasses
0.793 mll
Epsom salts
0.159 mll
TheFoxFarmer Week 2 Flower
A slow stretcher but very thick branched, this girl has recovered very well this week. Even though she has pistils appearing all over the place, she's still expected to stretch a considerable amount more. She's obviously taller, but from how little she's stretched this week I can tell her main stretch is gonna come in her third week.
For most of the week she was fed the same as last week's nutrients, until day 13, where she was fed the above. The base nutrients are now leaning towards the bloom ratio.
She soon grew a full canopy of foliage by the end of the week, and was stretched out properly with string too (as you've seen in my flower tent previously). She's a very healthy girl who's loving life under the CMH. I've currently got her raised a bit higher on the bench than the others, to get her a little closer to the light until she stretches more. My light is never at the highest it can go in the tent. I find it's better not to grow to your absolute maximum height, and always allow for extra stretch plus a bit more just in case. You can always lower the plant or raise the light accordingly.
I'm liking the look of this girl so far, with her thick branches and beautiful growth. Looking forward to seeing her flowers grow.
Thanks for following and happy growing! 🐺
4 likes
comments
Share
11
Week 11. Flowering8y ago


60 cm
Height
12 hrs
Light Schedule
24 °C
Day Air Temp
6.0
pH
Weak
Smell
700 PPM
TDS
40 %
Air Humidity
21 °C
Night Air Temp
18.93 l
Pot Size
30 cm
Lamp Distance
Nutrients 11
EM1
1 mll
Molasses
0.793 mll
Epsom salts
0.159 mll
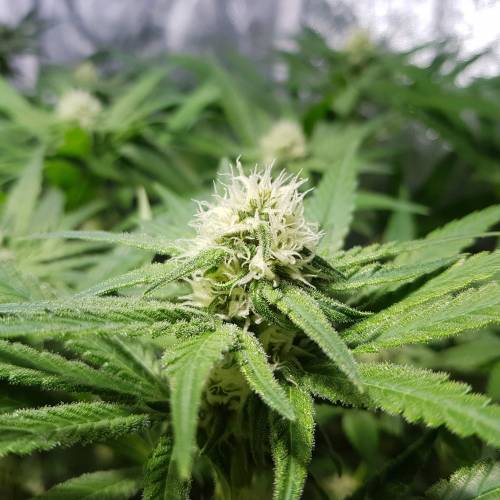
TheFoxFarmer Week 3 Flower
To start the week off she was given a maintenance flush. This is the last m/flush she'll be given, until she starts her 2+ week flush at the end of her cycle. It's just as, if not more important than the first m/flush, as there could be more leftover nutrients than the first from being given heavier strength feedings. It's a good way to flush out the excess nutrients that can no longer be uptaken by the plant, and replace them with a fresh bloom feed so she can keep building her flowers. She clearly needs it as she already has good sized top buds for this early stage of flower. Silicon has been reduced to the norm now she's over her main stretch, and the base nutrients have been adjusted based around a 1:2:3 ratio, but favouring ﹰFloraﹰBloom. I've started using Green leaf nutrinets Bud Explosion in small amounts, to increase bud sites and calyx production. Their Sweet Candy is also now being included; this should improve the flavour and aroma. I'm doing a proper test with these on a clone from the Bubble Kush that I made a diary for, as this is a fairer test because I can compare to her first run.
Along with her great calyx production, she's now starting to produce plenty of trichomes, and will soon frost up well throughout flower. Overall, a very happy and healthy looking girl so far.
Thanks for following and happy growing! 🐺
4 likes
comments
Share
12
Week 12. Flowering8y ago


60 cm
Height
12 hrs
Light Schedule
26 °C
Day Air Temp
6.0
pH
Weak
Smell
850 PPM
TDS
40 %
Air Humidity
24 °C
Night Air Temp
18.93 l
Pot Size
30 cm
Lamp Distance
Nutrients 12
EM1
1 mll
Molasses
0.793 mll
Epsom salts
0.159 mll
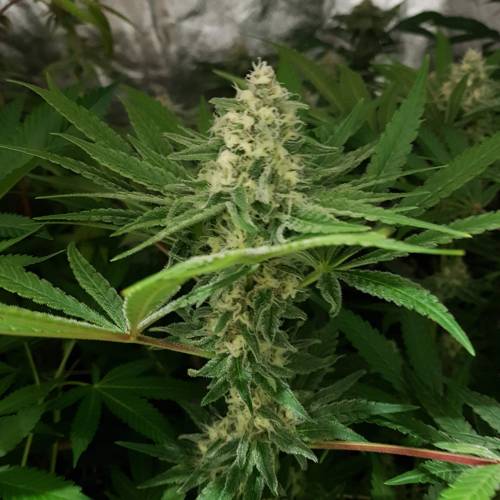
TheFoxFarmer Week 4 Flower
A few nutrient changes this week; I lowered nitrogen levels slightly by decreasing FloraMicro. She's not toxic, but rather hasn't got any need for high amounts of it now she's flowering well. For most of the week I increased bud explosion to 0.25g/ltr, but was then increased again to 0.3g/ltr on Day 28. Day 28 is the last day I feed silicon to ensure a proper flush by the end of the cycle. If fed too long into flower it can cause your buds to spark and not burn well.
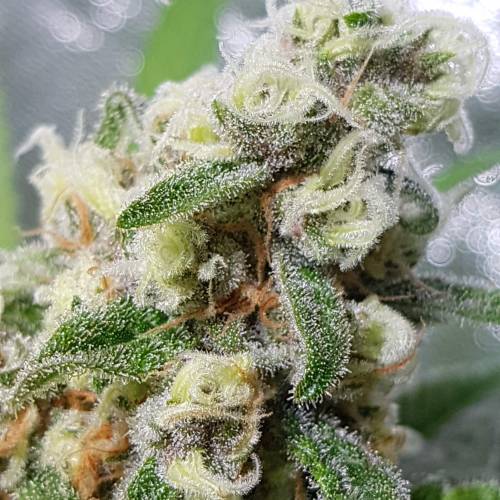
She's a very healthy girl and building thick and fast. She has very tight node spacing so she's stacked up beautifully. She's a hairy girl too, with a lot of thick pistils all over her bud sites. A strong smeller, with extremely fruity grape smells. I've also noticed she has green and purple calyx's, so I'm looking forward to seeing how purple this girl is in the end.
Thanks for following and happy growing! 🐺
5 likes
comments
Share
13
Week 13. Flowering8y ago


60 cm
Height
12 hrs
Light Schedule
27 °C
Day Air Temp
6.0
pH
Strong
Smell
850 PPM
TDS
40 %
Air Humidity
24 °C
Night Air Temp
18.93 l
Pot Size
30 cm
Lamp Distance
Nutrients 10
EM1
1 mll
Molasses
0.793 mll
Epsom salts
0.159 mll
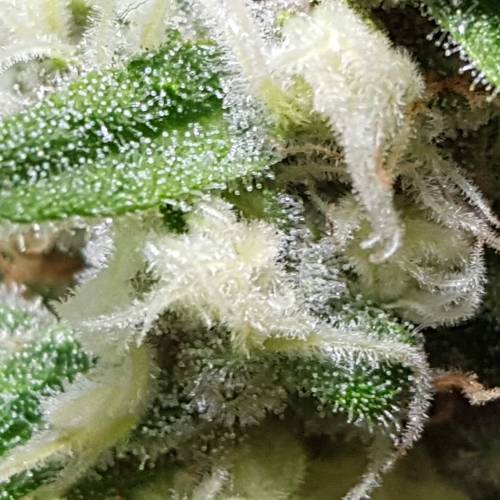
TheFoxFarmer Week 5 Flower
Nitrogen levels were lowered throughout the week and almost completely cut out by the end. Cal-Mag and Epsom Salts were stopped by day 35 to ensure a proper flush, and to cut out N as most Cal-Mag supplements include a decent amount of N. You don't want to be feeding Epsom Salts for too long into flower as the sulfur can impair the flavour after harvest. Bud Explosion has been increased slightly now that she's building calyx's at a fast rate. She's stacked incredibly well and her buds are getting bigger and thicker by the day. It's hard to see the meat of her buds due to her many thick white pistils, but she's currently a mix of green and purple calyx's. The thing not to forget when growing purple strains is that you may not get the most purple traits from some pheno's. This girl could still purple out later on in flower, but she may not. If you pop more than I have, then you have a higher chance of finding a really purple gem. This girls aroma is super strong and fruity. She smells of sweet grapes and berries with a floral tone.
Thanks for following and happy growing! 🐺
8 likes
1 comment
Share
14
Week 14. Flowering8y ago


60 cm
Height
12 hrs
Light Schedule
27 °C
Day Air Temp
6.0
pH
Strong
Smell
300 PPM
TDS
40 %
Air Humidity
24 °C
Night Air Temp
18.93 l
Pot Size
30 cm
Lamp Distance
Nutrients 7
Molasses
0.793 mll
Molasses
1.302 mll
EM1
1 mll
TheFoxFarmer Week 6 Flower
Up until flush, she was only given PK, sugars and sweeteners, and the microbes (listed above). Everything else has been stopped to ensure a proper flush. She started her flush on Day 40 as I want to get a nice fade on her after a long flush.
My girls are in coco and perlite, in fabric pots sat on benches so they dry out within 2 days. Because of this I can flush a lot of water through them without overwatering. Infact, the amount of water I put through them doesn't make a difference to how quickly they dry. Good air movement around the pots also helps them dry, and stops any stagnant air within the lower half of the tent and within the plants, preventing any moulds. When flushing, I first feed just enough water to create a run off into the tray so I can read the ppm and pH value. Doing this lets you know how your plant has been performing; whether she's been way off in pH and locked out by having a high/low pH and high ppm, or if she's been doing just fine with a pH range within tolerance and around the same ppm value or less than you've been feeding. This girl was in perfect health, with a good pH and ppm. After that, I flush up to 30ltr and then take a second reading from the last bit of run off. The ppm is the main thing I look at this time, to see how low I've taken it from the flush. Personally, I find the girls fade much sooner, and more overall by doing a bigger flush as it takes almost all of the nutrients out of the coco within a few days. That leaves the plant with nothing but her own stored nutrients to feed on for the next 2+ weeks. A better flush means a better, cleaner smoke.
She's stacked up and swelling by the day with huge buds. Not the frostiest strain I've ran, but still covered in trichomes and extremely strong scented. She smells of mixed berries and grapes 🍇 I can't wait to try!
Thanks for following and happy growing! 🐺
7 likes
6 comments
Share
15
Week 15. Flowering8y ago


60 cm
Height
12 hrs
Light Schedule
27 °C
Day Air Temp
6.0
pH
Strong
Smell
150 PPM
TDS
40 %
Air Humidity
24 °C
Night Air Temp
18.93 l
Pot Size
30 cm
Lamp Distance
Nutrients 1
EM1
1 mll
TheFoxFarmer Week 7 Flower
Still flushing away the nutrients left over in the coco and plucking a few leaves here and there, just to speed up the fading process by taking away some stored nutrients. She's getting fatter every day and smelling like a forest of the sweetest berries imaginable! I can tell this girl is gonna be full of flavour. By the end of the week she had turned a nice pale green/yellowish colour.
Thanks for following and happy growing! 🐺
9 likes
5 comments
Share
16
Week 16. Flowering8y ago


60 cm
Height
12 hrs
Light Schedule
27 °C
Day Air Temp
6.0
pH
Strong
Smell
150 PPM
TDS
40 %
Air Humidity
24 °C
Night Air Temp
18.93 l
Pot Size
30 cm
Lamp Distance
Nutrients 1
EM1
1 mll
TheFoxFarmer Week 8 Flower
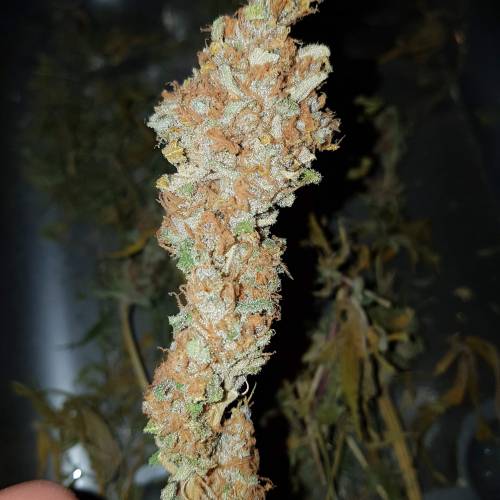
Last full week of flush (plus a couple days). She was taken down on Day 58 Flower after she'd faded enough. Most of her fans had died off and been plucked. I always cut them down approx half hour before the light is due to turn on. This is so the chlorophyll production is at its minimum, giving you the best flavour and smoke.
She's a stunning girl with fat juicy fruity cola's! 🍇🍓
Thanks for following and happy growing! 🐺
11 likes
7 comments
Share
16
Week 16. Harvest8y ago
Happy Harvest Day!


9/10
Rated
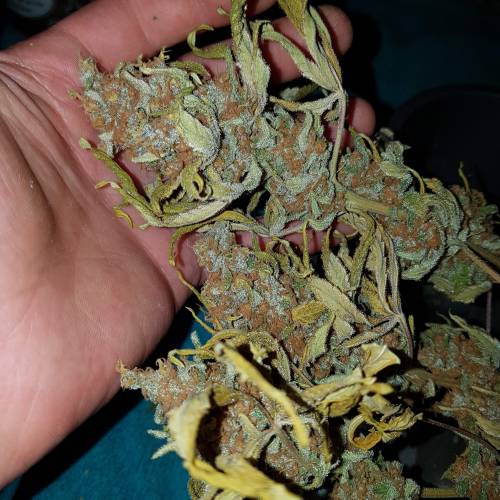
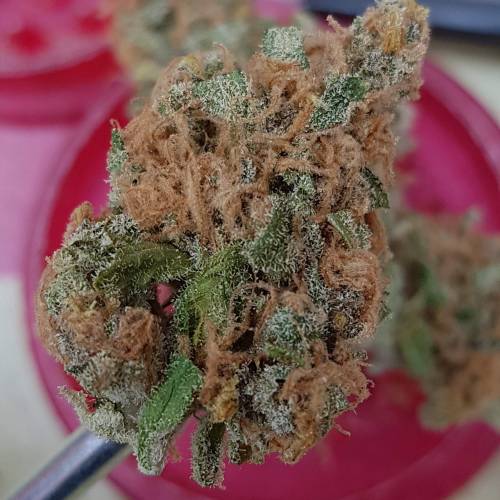
A stunning girl throughout. She produces huge cola's with a super berry flavour and aroma. My pheno wasn't the most purple, but still has purples within her buds and could probably be encouraged more from cooler temps. She had an average stretch and was easy to please. It's hard see her colours from how hairy she is with orange pistils, but she's still full of flavour and a great smoke. If you're a fan of berry/fruity flavours then this girl cannot be missed, she's one of, if not the best tasting berry strain I've grown in the Den. She's not the most effective for my back pain, but still does a good job and is an enjoyable smoke all day and night.
Show more
Translate
Spent 113 days
Ger Veg Flo Har
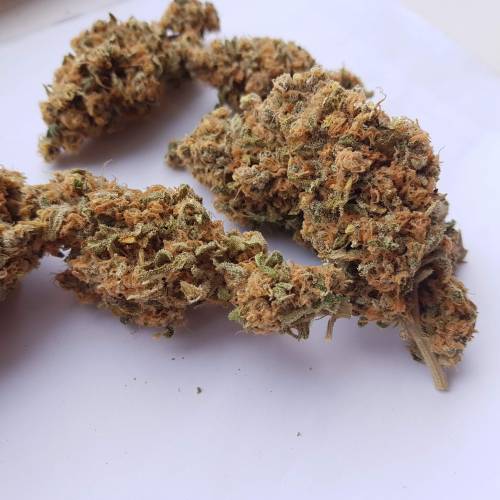
58.4 g
Bud dry weight per plant
1
Plants
0.24 m²
Grow Room size
Easy
Difficulty

Creative, Happy, Uplifted
Positive effects

Dry mouth
Negative effects

Berries, Fruity, Pine
Taste
Height
Day air temperature
Air humidity
PPM
PH
Light schedule
Night air temperature
Pot size
Lamp distance


TheFoxFarmer Thank you to RQS for creating and sending me this girl. She's fat, full of flavour and a pleasure to grow! Highly recommended even for a beginner. Thanks to all that follow, like and comment. Without you guys it'd be pretty boring so I appreciate all of your input!
She was harvested on Day 58 and left to dry for at least a week. I then gave her a dry trim and thrown the buds in a jar for curing. I put a couple of boveda 62% humidity packs in there too, to keep the moisture level correct. I'll soon be switching to Integra boost packs as they seem to get a better review and are purposely made for cannabis.
Because I have 4 seperate plants/strains in one tent, under one light, I've had to calculate these by dividing the conditions by 4 (4 plants in total sharing same conditions). This is the fairest and only way to work it out on average as a full tent.
Happy growing! 🐺
23 likes
13 comments
Share
Equipment Reviews


52 comments
Sort by
popularity
popularity
newest
oldest

CBD_Sweden commentedweek 18y ago
I grow this one too and will follow your diaries.
Good luck and happy growing.
likes 2

TheFoxFarmer commented8y ago
@CBD_Sweden, thanks mate ✌️ I hadn't seen it but I'll give yours a follow too bro 👊🐺
likes 2

GreenAutoConsumo commentedweek 164y ago
Buena variedad!!
likes 2

Joni2017 commentedweek 168y ago
It’s still a great job 😉👍
like 1
TheFoxFarmer commented8y ago
@Joni2017,for sure man I'm always extremely grateful to place anywhere in top 10.. But that's a poor mistake to make
like 1
Joni2017 commented8y ago
@TheFoxFarmer,do not worry man 😋, sure that @GrowDiaries explains what happened 😉👍
like 1
Joni2017 commentedweek 168y ago
Congrats🙌 Good job👏👏😉👍
like 1
TheFoxFarmer commented8y ago
Thanks @Joni2017 🙏 I appreciate that mate 🙌✌️👊🦊
like 1
TheFoxFarmer commented8y ago
@Joni2017, apparently I've been moved down to 2nd now, after being awarded 1st place on announcement! 😐🦊
likes

Lady_NugWitch commentedweek 168y ago
Stunning nugs.. just gorgeous. I wasn't aware of the cutting down before the lights turn on..makes sense. I've put mine in dark for 1-2 days before trim.
like 1
TheFoxFarmer commented8y ago
@Lady_NugWitch, cheers mate ✌️ I keep em drying in the dark for 6-12 days (however long it takes to dry) before dry trimming and curing ✂️ Once it's all in the jar I keep em curing in the dark too ✌️🐺
likes 2
Lady_NugWitch commented8y ago
@TheFoxFarmer, see i didn't know all that... i wet trim.. dry...and jar for cure.
like 1

OilyEliteOrganics commentedweek 168y ago
Nice frost .
like 1
TheFoxFarmer commented8y ago
@OilyEliteOrganics, cheers! 👊🦊
likes

biggreens420 commentedweek 168y ago
nice one fox nice looking buds been another great grow
like 1
TheFoxFarmer commented8y ago
@biggreens420, cheers bro, I appreciate that mate! 👊👊✌️🐺
likes
Lady_NugWitch commentedweek 168y ago
All of what I do tho, ends up in the dark, so it sounds like the same concept.. right Foxy?
like 1
TheFoxFarmer commented8y ago
@Lady_NugWitch, correct mate 👌👍 the reason behind it is because light degrades the trichomes, so keeping it in the dark keeps it fresher, tastier and gives a longer shelf life 👌✌️🐺
likes 2
biggreens420 commentedweek 168y ago
some nice chunky buds there fox nice and shiny
like 1
TheFoxFarmer commented8y ago
@biggreens420, cheers bro 👊🐺
like 1

Mr_Positivo commentedweek 158y ago
Such pretty buds, FF. I want to enjoy them with a pint of icecream!😀👍
like 1
TheFoxFarmer commented8y ago
@Mr_Positivo, 😂 I'm down for that! 🍧👌🐺
likes
biggreens420 commentedweek 158y ago
looking good fox she is certainly a tasty one and gets better in cure great pics
like 1
TheFoxFarmer commented8y ago
@biggreens420, thanks mate ✌️ I'm not usually the biggest fan berry flavours, but this girl's beaut 👌🍇🐺
like 1

BillMonroe commentedweek 148y ago
Looking great! :)
I am looking forward to getting CMH
like 1
TheFoxFarmer commented8y ago
@BillMonroe, cheers mate 👊 they're decent lights and can encourage some stunning winter colours throughout flush ✌️👊🐺
likes

Magnetous_tryko commentedweek 148y ago
Another super frosty bibi you have here mate!! Congrats!
like 1
TheFoxFarmer commented8y ago
@Magnetous, sorry mate I didn't see your comment! Cheers! 👊✌️🐺
likes
Mr_Positivo commentedweek 148y ago
Killing it, FF. Great description of your flushing process. Checking run off is one of my key metrics also. Good luck with your harvest.
Looking mighty fine.
like 1
TheFoxFarmer commented8y ago
@Mr_Positivo, cheers bro 👊 I agree mate, it's the only way to truly know what's going on in her root zone 👌🐺
likes

Greenscene commentedweek 138y ago
Fantastic description and even better photos keep it up
like 1
TheFoxFarmer commented8y ago
@@Greenscene, cheers man, sorry I didn't see your comment! 👊✌️🐺
likes

Herbalize commentedweek 88y ago
looking lovely as usual
good job my friend
like 1
TheFoxFarmer commented8y ago
@Herbalize, thank you brother 👊✌️🐺
like 1
biggreens420 commentedweek 88y ago
Looking nice fox shes bushing well ...iv just chopped a tester off mine and iv got to say this strain is on another level thc wise and shes getting some nice reddish purple coming through on the buds gonna be another keeper strain I think Iv put some pics of it up
like 1
TheFoxFarmer commented8y ago
@biggreens420, cheers Big G 👊 ooft sounds like a beauty mate 👌 I can't wait! ✌️🐺
like 1
biggreens420 commentedweek 58y ago
Congratulations on coming first nice one
like 1
TheFoxFarmer commented8y ago
@biggreens420, cheers bro, much appreciated 🙏✌️🐺
like 1

Snag420 commentedweek 48y ago
Growing PQ as well, good luck she’s coming along nicely 👊🏻
like 1
TheFoxFarmer commented8y ago
@Snag420, thanks ✌️ and to you 💪🐺
likes

bobo420 commentedweek 28y ago
Coming along nicely ;)
like 1
TheFoxFarmer commented8y ago
@bobo420, thanks ✌️🐺
like 1

the end.
Enjoying this diary? Follow for more updates!


Prefer the old Diary view?
Go back to the old Diary view