


Likes
3
Share

@therealgrowmie
Follow
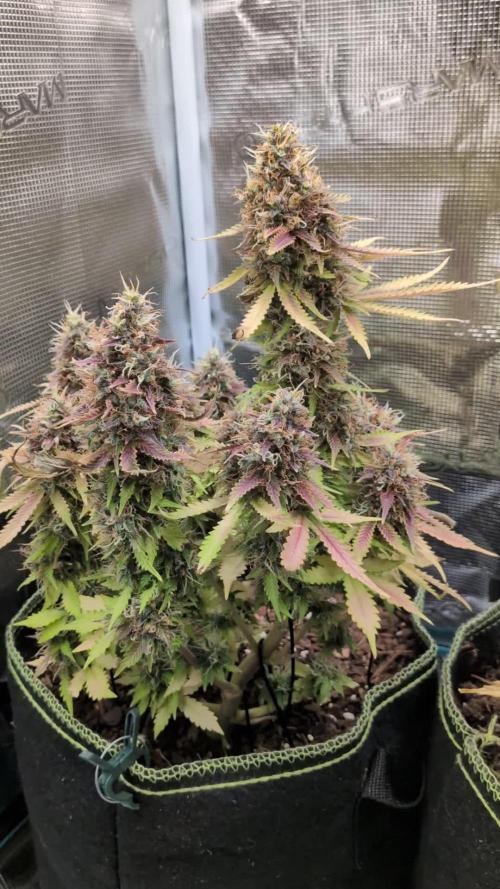
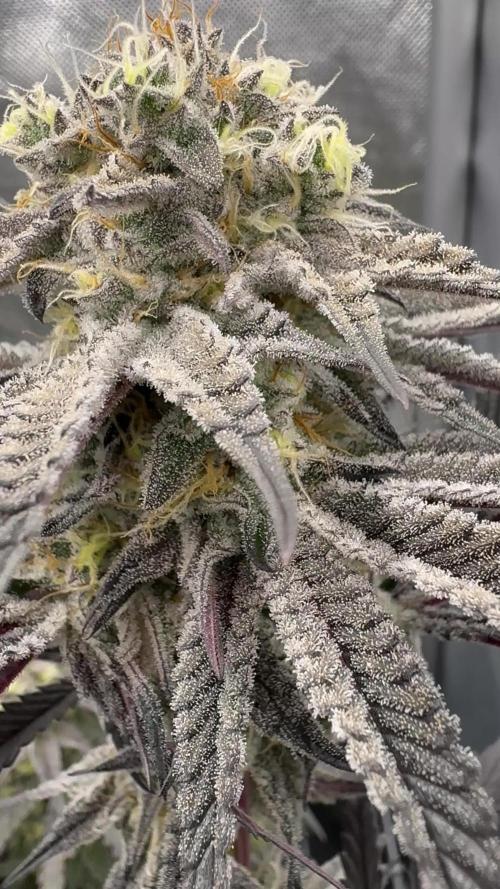
We’re now in the final stage of the grow. The plants are receiving plain water only, and we’re just watching and waiting for the right harvest window to open up.
Trichomes are still showing some clear heads, so I estimate we’ve got around 10 days left, give or take. That would bring us to a total of 14 weeks from sprout to harvest, which is definitely on the longer side for modern autoflowers — but every strain is different!
Leaves are fading fast, senescence is well underway, and everything is pointing towards the final phase. Now it’s all about patience, letting them finish strong to maximise flavour, smoothness, and yield.
---
Grow Conditions (still consistent):
💧 Watering: 1500ml every third day
🌱 Nutrients: None (flushing, previously BioBizz schedule)
💡 Light Intensity: ~1000 PPFD
🌡️ VPD: ~1.82 kPa
🌞 Temp: ~28°C
💦 RH: ~50%


Likes
4
Share


@Coolbeanism
Follow
This week was uneventful. I fed them Monday, Wednesday and Friday with Iguana Juice Grow @ 0.5oz/gal and gave them about 1/2gal each. I gave them a light watering each day to keep the top soil moist and add a bit of humidity. 2/4 are in pots about 150gal, one is in a 100gal or so, and one is in a 5ish gallon pot. They are just cruising along, enjoying the ride. See y'all in a week!

Likes
39
Share


@BelgianBudtender
Follow
Hey growmies,
It’s been 31 days since flipping to flower, my tent is filled with buds.
I think I managed to recover this plant, if you look back to week 10 and 11 you can see this plant was struggling, losing her dark green colour and yellowing.
I raised my lights, getting PPFD from 1100 down to 850, I have also started feeding organic nutrients.
The organic nutrients alone will feed my plants, but my soil needed a recharge, too.
I suspect a lot of the soil bacteria started dying back, so to try and replenish the ranks I topdressed with worm castings, and created a compost tea using molasses and organic worm castings.
Neem oil was not enough to get rid of the few thrips I had, so I opted for Spinosad, an organic bioinsecticide which is derived from the fermentation juices of a soil bacterium called Saccharopolyspora spinosa
I decided spinosad was the best option because it’s organic and safe to spray in flower, neem oil can’t go on flowers, reducing its effectiveness.
After just one dose of spinosad applied in a foliar spray, My garden is pest free, and it looks like the tea and organic fertiliser is also getting color back into my plant.
The smell so far is mainly skunk, no oranges (yet) but it's clear this run is back on track.
The trichomes are okay, I've had frostier strains, I can still see new calyxes growing, so she's definitely still putting on more weight, it might be to early to call anything
I also included some pictures of the clones, they really show what a difference ScrOGging makes, since the clones were topped once and let to grow naturally

Likes
6
Share


@Plantinator
Follow
Bud sites are getting ready now. I did a bit more LST and removed a few side shoots which never gonna make it due to lack of light.
I replaced the light, under the TS 1000 she was praying all day long.
On the previous run I had problems with the FC3000, it was turning itself off at random times. Mars Hydro was kindly sent me a replacement controller, so far it seems like this problem has been solved.
However, I tried to use the app again and it’s still shite. 💩😂 So I just use the light in manual mode. Such a shame for the extra features I cannot use.
For DLI I will use the following chart:
AUTO FLOWER LED LIGHT INTENSITY
Recommended LED PPF/PAR Values / DLI Based on 20 hrs. of light.
Seedlings 150 - 200 umol / DLI 10.80 - 14.4 moles per day
Veg up to 9" 450 umol / DLI 32.40 moles per day
Early bloom 500 umol / DLI 36.00 moles per day
Mid bloom 650 umol / DLI 46.80 moles per day
Late bloom 750 umol / DLI 54.00 moles per day
Ripen 400 umol / DLI 28.80 moles per day
*** Use extreme caution going 700 umol or higher @ 20 hrs/day this could cause leaf burn***
The only difference is that I will keep this run in 18/6, so I ignore the PAR values above.
IMO the best thing you can do is to read the leaves all the time and use the charts as a guidance.
Likes
62
Share


@Wolfgreensmoke
Follow
Esta semana el cambio en los cogollos es mas que visible. Se han bañado en resina y estan cogiendo colores morados tanto en las hojas como en el propio fruto la mayoria.
Al subirles el co2 a 1100 ppm estan consumindo mas agua y generando mas humedad e tenido que enchufar el deshumidificafor al maximo para mantener la humedad entre el 40 y el 50 por ciento.
El olor es impresionante para faltarle 1 mes por delante mas o menos... los tonos a naranja acida son claros... como si fueran orange sherbert 🤷♂️ pero desde luego no me quejo porque es muy pero que muy notorio.
La temperatura la mantendre entre 26 y 27 gradosasta las dos ultimas semana de lavado de raices que la bajare a 24 grados para que compacten los cogollos.
Y la EC la mantendre a 1.8 una semana mas y las fos ultimas semanas de aporte seran a 1.9 y 2.0 respectivamente.


Likes
85
Share


@Mr_und_Ms_Lue_Roots
Follow
Hallo zusammen,
wir stehen Anfang siebte Blütewoche und dieses wird für diesen Lauf auch die letzte sein, da wir erste Erfahrungen mit Budrot machen durften.
Allgemein waren die Daten die uns der Growhub angezeigt hat nicht alt zu verkehrt. Rückblickend war aber zu viel Masse und einige Bud´s zu tage gekommen und schlussendlich waren wir in der Feinabstimmung noch nicht im optimalen Bereich, ganz klar. Dennoch besteht auch bei uns noch Potenzial nach oben!
Gedanklich haben wir vieles vertiefen können und sind auch sehr froh über diese neue Erfahrung, auch wenn diese definitiv nicht positiv ist!
Zum Glück haben wir den Budrot Recht schnell ausfindig machen, großzügig Entfernen. Stetige Kontrollen haben wir geführt. Im Nachgang fing die Dame hinten Links durch Stress noch an zu HERM. Dahingehend haben wir im unteren Bereich für die letzten drei Tage auch unnützes herausgenommen. Auch zum Zeitpunkt der Feststellung des Budrot, haben wir jede Menge an Blattgut entfernt, um die R. Raumfeuchte auf mind. ca. 50 Prozent zu bekommen. Seit dem Feststellen, haben wir nur noch gespült mit Wasser.
Insgesamt sind wir dennoch froh, dass bis hierhin nicht alles im Abfall gelandet ist und zum Glück der Schaden nicht alt zu arg ist.
Negative Erfahrungen verbessern einen nur, wenn man natürlich nicht aufgibt. So etwas gehört leider auf dieser Ebene dazu, wir können ein Hacken dahinter machen.
Zudem hat es uns noch näher an unser recht aktuelles und erst benutztes Setup gebracht, was auch sehr viel Wert ist. 😉
So nun die Kulla Tränchen weggewischt und weiter geht es! Wir brauchen den Platz und kümmern uns erstmal darum xD
Revue gesehen, obwohl es an vielen Stellen nicht immer positiv war, ist unsere eigene Eischätzung zu diesem Tagebuch sehr positiv. Hier passierte viel und die Pflanzen sind doch auch wenn mit Umwegen an ihr Lebensziel gekommen. Wir steigen insgesamt eine Woche eher als angegebene mind. Blütezeit aus. Die Trichome sehen auch nicht schlecht aus, auch wenn wir sie selbst natürlich noch mind. Eine Woche noch gesehen hätten.
Der nächste Lauf wird besser, ganz sicher. Wir haben jetzt unser Zelt kennengelernt, die Anbauweise wird in Zukunft filigraner ausfallen ^^ Es war schon doch ganz gut gefüllt das Zelt xD
So nun das war es jetzt erstmal, wir wünschen allen Growmies ein mega entspanntes Wochenende und vielen Dank für euren Besuch!
VG
Processing
Likes
4
Share


@SakuraAsa
Follow
#3,#4→Growtent(60☓60☓120),MarsHydro TS1000
#1 Day16 Biogrow×1000(500ml-0.5ml)
#1 Day20 Re-pot
#2 Day16 Biogrow×1000(500ml-0.5ml)
#2 Day20 24H Re-pot Topping
#3 Day17 18/6 Topping
#4 Day14 18/6 Topping
#4 Day20 18/6 BioGrow / ☓1ml 1l

Likes
16
Share


@generosityjoe
Follow
Got the newly released FC-E3000 by Mars Hydro! Gonna grow my first Mephisto strain as well.
Can't wait to share my progress with everyone!
Edit.
Day 6 and everything is looking good.


Likes
2
Share


@vwfrisco96
Follow
~July 12th-July 18th~
🌡️Temp: 🌞78-84 , 🌚74-80
💨Humidity: 🌞65-85%, 🌚70-80%
💡Lights: 🌞18h/6h🌚, 24’ from 🌱,
PPFD approx-275
🌬️Airflow: 2 small oscillating fans and a 200cfm inline fan+carbon filter
~Day 15~ Plants are still showing signs of a deficiency or overwatering. I’ll continue to wait to water but will add nutes next time I do. The new growth on the 3 plants look good and the smallest sprouts growth is looking good. Started ph balancing and dechlorinating my humidifier water just in case.
~Day 16~Plants seem to finally be drying out after the overwatering, the growth on the 2 biggest plants has been stunted and the mutated plant is still growing funky. Smallest plant is growing well. Dialing in on the humidity and temps well. Close ups of the discolorations on the 2 largest plants in the photos.
~Day 17~ Old discoloration not gonna get better but it hasn’t spread anymore so that’s good. The plants are still growing slow though which gives time for the mutated plant and the sprout to catch up at least. Woke up to the mutated sprout producing resin like drops from its lower leaves and it had a noticeable smell to it almost similar to a concentrate smell of thc. Prepping the 2 bigger plants for transplant tomorrow, filled 2 fabric 3-gallon AC Infinity pots with about an 1-1.5in layer of perlite at the bottom then Happy Frog and Perlite mixed in a 75/25 ratio layered over top of that up to the holes. Put the plants in the hole still inside their original pots so I could adjust the lights and get them used to their new places.
~Day 18~ Woke up to not much change with the plants other than some small growth in the mutated plant and the small sprout. Definitely time for a transplant and some nutrients so I prepped them for transplant. I mixed up my GH Trio along with some GH Cal-Mag and Ph-down all in distilled water along with a separate spay bottle of rooting powder diluted with Ph balanced distilled water to spray in the hole and on the root mass. The plants were very hard to get out of the small pots and the roots were sticking to the sides while the dirt was falling out around them so I had to cut open the pots and manually set them in. Not too messy but I was scared for the plants, I watered them both approx 250ml of the new nutrient mix along with the other 2 plants who got less. Will check back tomorrow.
~Day 19~ All the plants have exploded with growth since yesterday, the 2 biggest plants have perked up and grown a lot while the mutated has sprouted even more leaves and the little sprout now has its second set of leaves coming in. Everything looks great and I have more confidence in the grow now that I know the nutrients and environment is good for them.
~Day 20~ Lot of new growth continues and the transplant and feed seems to have worked really well. More leaves keep appearing and the growth seems to be going at a much faster rate as they grow older. Getting the other 2 plants ready for transplant tomorrow and I will feed them all again.
Likes
19
Share


@Kannamar
Follow
02/03/2022 Bottom deposit has dropped 3 to 4 liters, again. pH was up to 6.2 and EC has dropped to 1.5 (I guess they consume well the nutrients, if it was only evaporation EC should rise). I decide to wait tomorrow to refill and adjust, pH will rise probably to 6.4.
I have now some doubts on the remaining space to rise up the light and defoliation of the bottom of the plant.
28/02/2022 Back from WE, everything fine, good smell already. Bottom deposit dropped 4L, pH up to 6.3 Ec dropped to 1.35. I just lowered the pH to 5.8 and tomorrow I fill again the bottom tank and adjust nutrients to 1.7 again.
26/02/22 Tank filled. Adapt nutrients solution to 1.7 EC then wait 24h, bottom solution dropped to 1.5 EC, set pH to 5.8. Will leave for 2 days and not attended... so that would be surprise to see Monday night how pH and EC have evolved!

Likes
15
Share


@Viccrazyweed
Follow
They are blooming!! Nice white hairs are showing off the centre and they have start creating a “budd”, I don’t really know since im a newbie but the leave colours are perfect, no excess or anything else shown since im watering with the correct PH
Both are truly beautiful, i think next time i will choose a single plant and treat it the beat i can, exposing her to anything i just learned here
I thought aswell that i could afford some “top candy” or “top bloom” but I don’t really know if it will improve a lot or if its worth the money
Better air flow during days due to new big fan working
Likes
6
Share


Likes
5
Share

@Timmytooturnt
Follow
Plants in containers seem to be 2 weeks ahead of plant in ground, marigolds dping great
Likes
2
Share


@DisTentAint4Campin
Follow
Struggled alot with this gal I snapped her I burned her with the dots but overall she prevailed to some pretty bud so I'm happy overall

Likes
22
Share


@Island
Follow
Semana 2 Flora:
Liguei o segundo painel, uma Quantum Board Lmb 301 da Samsumg - 120W / 3000K.
Continuo alimentando a planta apenas com água e fertilizantes orgânicos.
O desenvolvimento da planta foi enorme nessa primeira semana de flora, ja comecei a fazer umas desfoliações.
Translate by Google
Week 2 Flowering Stage:
I connected the second light, a Samsumg Quantum Board Lmb 301 - 120W / 3000K.
I continue to feed the plant only with water and organic fertilizers.
The development of the plant was huge in that first week of flora, I started to do some defoliation.
Hugs from Brazil

Processing
Likes
8
Share


@eldruida_lamota
Follow
Esa familia, estoy de nuevo por aquí, os traigo la última semana de crecimiento de estas candy caramelo de Zambezaseeds.
Estoy bastante contento las 3 son simétricas están creciendo en un tanque de 7 litros en los cuales aportamos el primer riego con nutrientes para solventar alguna carencia leve, sobre todo de nitrógeno pero nada como echarles de comer.
El ph está controlado, la temperatura no aumenta de 26 grados y la humedad la mantenemos por encima de 50%.
Cómo apreciáis, todo va sobre ruedas, veremos que tal se comportan de ahora en adelante, saludos fumetillas y buenos humos.
