


Likes
14
Share


@Thinkingreen_420
Follow
Vamos avanzando en la floración y en las 2 que van cogiendo ese tono morado empezaron a salir flores macho pienso que será por la genética las e inspeccionado bien y las demás no tienen nada hasta el momento, esperemos que todo vaya avanzando bien.
Saludos!!


Likes
7
Share


@Philippovic
Follow
Nach genau 84 Tagen war es nun soweit, gegen Ende hin wurde die Blueberry schön dunkel und entwickelte einen hervorragenden Duft!


Processing
Likes
18
Share


@ChefSpliff
Follow
Only week 2, so nothing exciting yet but the seedlings obviously are surviving the hardest part lol. I cant wait till these start booming in a week or so. Ive heard they grow fast as hell. Im excited to grow these autos right here. Looking strong. I will be LST right when the first true leaves grow in well to maximize yield as much as possible. Wont be topping it.

Likes
7
Share


@CanarianGrow92
Follow
Another week of flowering, this week we started with some ultra PK and also some sugars, the buds are already starting to get bigger so lets see next week! We will continue to give some ultra PK next week!

Likes
7
Share


@Rabidreject
Follow
UPDATE - Thurs 4th March
The week has been fine. I am going there today so you may get an update this evening.
Iv been posting on TheWeedTube also so I have much more videos explaining what’s going on.
Plants are looking great.
I got paid today so I bought an online fan to plug into the thermostat and pull fresh air in through a duct from a cooler part of the flat. In summer it won’t be as useful but to be honest I’ll probably just duct tape the sucky end of the duct to a small ac or Friday type thing, iv not really looked into it yet. Even a hillbilly cooking system would be better than nothing. ( filling a bucket up with ice, water and salt and put the end of the duct into that so it sucks in the cold air). We’ll see!
Update - Monday 8th March
All is well, I just want the buds to start swelling now. I found some awesome supports in Aldi. They are metal rings that the plant weaves through and has spikes that go into the pot rather than a scrog net being fixed in place. Therefore I can still move them and drain the run off.
Likes
10
Share


@Master_weeda
Follow
Bonjour à tous les padawans et maîtres jedis
Tout d'abord merci à @pyramidseeds de me permettre de faire cette culture en m'offrant les graines
Merci aussi à @lientec_led de m'offrir l'opportunité de tester sa toute nouvelle lampe Roccit 240w ainsi que organic nutrients pour l'engrais
MATÉRIEL CONFIGURATION
Box 80×80×160
Lampe led Lientec Roccit 240w
Ventilateur à pince 15 watts
Xiaomi Deerma humidificateurs 5L
Hygrometre thermomètre
Extracteur PROFAN 107 m3/h - 100
Prise programmable électronique ×2
1 pot carré noir 11 litres
Engrais organic nutrients
Substrat biobizz ligthmix
Fil de fer et pince coupante
Microscope
Petite balance de précision
CULTURE ÉTAPE PAR ÉTAPE
J'ai tout dabord fais germé ma graine avec le easy start de Royal queen seed et je suis agréablement surpris car franchement le taux de réussite est très élevé (18 graines sur 20) simple d'utilisation et très efficace.
Une fois la plantule sortie et d'une hauteur de 2 ou 3 centimètres je la prend délicatement et la place directement dans son pot définitif. Je préconise des pots allant entre 10 litres et 15 litres pour des autofloraisons cultivées en intérieur.
Le pot aura été préalablement préparé avec 80 grammes de big plant de organic nutrients que je mélange avec les 11 litres de substrat
Je dépose la plantule dans son pot définitif je recouvre un peu de avec de la terre je tasse légèrement et j'arrose pour garder le substrat humide pas plus
Je place ma lampe led 300watts à environ 90 centimètres de la plantule avec un cycle de lumière de 20/4 grace a un programmateur car c'est pour moi le cycle de lumière qui offre le meilleur rendement pour une autofloraison.
Jour 1 préparation du substrat je mélange 80 grammes de big plant de organic nutrients à mes 11 litres de substrat je transplante ma plantule et j'arrose avec 2 litres d'eau ph6.3 à laquelle j'ajoute 1 gramme par litre d'eau de mykoriza prenium de organic nutrients

Processing
Likes
7
Share


@Dunk_Junk
Follow
Flowering stretch almost done!!
She is a good sized plant for a tiny 1 litre airpot.


Likes
346
Share


@Canna96
Follow
This week went pretty well, other than she stretched like crazy and I am now getting worried about running out of vertical space. I also had a few of my bottom leaves get a few brown and yellow spots on them. I did post some pics and asked a question, thank you for the responses, much appreciated! I am thinking about adding my Spyder Farmer LED 100 Watt light into the tent for the nebula auto because it is about 23 inches shorter than the sour diesel. I believe it would only raise my temp about 2 degrees, and possibly lower the humidity by one or two percent. I must say my dehumidifier has been a freaking stud, running 24X7 and not complaining. I should look into adding another unit, it has been in the mid 90's and muggy for about a week. So far I have to say I am super impressed and excited with this setup, the genetics, and with growing this wonderful plant in general. Already planning ahead to my next grow, and what I can do better. I have been enjoying myself and I really appreciate everyone who has taken the time to answer my questions! I am having a blast and am excited to see what this lady will give up in a few weeks!

Likes
18
Share

@LueRootsGrowGermany
Follow
Bisher läuft alles ruhig. Sie wächst sehr gut und sieht stabil aus. Die Blätter entfalten sich wunderschön, die Blütenstempel schreiten hier schneller voran.
Zum Gießen: Sie trinkt sehr gut und nimmt mit der Zeit immer mehr Wasser auf. Anmerkungen: Noch immer gibt es tägliche Fraß Schäden! Neemöl habe ich bereits eingesetzt! Aber ich muss sagen, dass ich meine Frustration darüber deutlich reduziert habe. Insgesamt bin ich zufrieden! Ich wünsche euch allen eine schöne und erfolgreiche Woche! Beste Grüße, LueRootsGrowGermany

Likes
60
Share


@SooSan
Follow
J'ai divisée la 90x60x140 en 3 parties (et donc 3 Diaries) :
1️⃣
🏠 60x60x140
☀️ FC-E 4800 => puissance a 20%
🍁
1x Black Bomb / Philosopher Seed
2x Amnesia Lemon / PEV Seeds
1x Blueberry / PEV Seeds
1x Blueberry / 00 Seeds
1x Wappa / Paradise Seed
1x Dark Phoenix / Green House Seed
1x Quick Sherbet / Exotic Seeds
1x Mango Cream / Exotic Seeds
1x Banana Frosting / Sensi Seed
1x Hindu Kush / Sensi Seed
1x Fast Mix / Sweet Seed
📎 https://growdiaries.com/diaries/122084-grow-journal-by-soosan
2️⃣
🏠 30x60x90
☀️ TS1000 => puissance a 50%
🍁 4x Fast Mix - Sweet Seed
📎https://growdiaries.com/diaries/124052-grow-journal-by-soosan
3️⃣
🏠 30x60x50
☀️TS1000 => puissance a 50%
🍁 4x Quick Sherbet - Exotic Seed
📎 https://growdiaries.com/diaries/122080-grow-journal-by-soosan


Likes
97
Share


@Kitties_and_Colas
Follow
~_~_~_~_~_~_~_~_~_~_~_~_~_~_~_~_~_~_~_~_~_~_~_~_~_~_~_~_~_~_~_~_~_~_~_~_~_~_~_~_~_~_~_~_~_~_~_~_~_~_~_~_~_~_~_~_~_~_~_~_~_~_~_~_~_~_~_~_~_~_~_~_~_~_~_~_~_~_~_~_~_~_~_
❤️💡🌱😽💨
Everyone was up-potted 2 days ago and showing a little new growth since then. They're all very healthy looking, one has some slight yellowing which should disappear soon with our change but all plants are extremely small for their size.. we've been letting these dry out completely between watering so I'm convinced there's a genetic component to this. We've had a few other strains start extra slow for us in the past and one in particular that started slow and then took off like wildfire around week 5 so I'm not too concerned ..they're each using 3gal square (plastic) pots willed with fresh Promix-HP..they're getting a little bit of Big Bloom with smaller amounts of Grow Big with every other watering now and this has corrected the odd hue we noticed around wk3.. The Mars SP-3000 is about 2.5 away, it sounds far but despite the distance, node spacing is always really tight in that tent all through veg
We're hoping for some explosive growth this week now that everyone is officially settled, we're still on the fence as to how we'll train these but odds are we'll do our typical 4 way LST after topping and keep under their skirts bare..
..there no telling how long we'll veg these as size is always our determining factor but when the time comes, we plan to flower in this tent as well.. not too much else to report, its been an effortless week.. thanks as always for dropping by and happy harvests everyone!!
👊😺
~_~_~_~_~_~_~_~_~_~_~_~_~_~_~_~_~_~_~_~_~_~_~_~_~_~_~_~_~_~_~_~_~_~_~_~_~_~_~_~_~_~_~_~_~_~_~_~_~_~_~_~_~_~_~_~_~_~_~_~_~_~_~_~_~_~_~_~_~_~_~_~_~_~_~_~_~_~_~_~
8/17
We've gotten some fast growth in the last few days.. we figured they were just late to the party.. we topped all plants at the 3rd node yesterday and we'll eventually pull each plant 4 ways..apparently the "weird hue" is genetic, they all have a unique purple undertones..neat strain for sure.. we dropped the SP-3000 a few inches and they're praying to it almost around the clock..we're debating on building a 4x2 PVC scrog table for these girls if we find the time.. thanks for dropping by Growmies! Much love!❤️
⚡Mars Hydro/SP-3000⚡ Specifications ⚙️:
Diodes: Samsung LM301B / Osram 660nm (960 total!)
Driver: Meanwell 300watt 🔌 (300W±5% @AC120V-277V)
PPF: 824umol/S ☢️
PPE: 2.8 µmol/j 〰️〰️
Lifespan: 50k+ hrs ⌛
Weight: 10.1 lbs (4.6kg)
Veg Coverage: 3 x 5 ft 🌱
Flowering Coverage: 2 x 4 ft 🌼
-The SP-3000 uses an aluminum heatsink (no fan) and the driver can be placed outside the tent 🌡️⬇️
-IP65 waterproof ratings, tolerant to high humidity grow environments 💦 ..
-Up to 15 can be daisy-chained together and all controlled from a single light! 💡~💡~💡~💡~💡
~_~_~_~_~_~_~_~_~_~_~_~_~_~_~_~_~_~_~_~_~_~_~_~_~_~_~_~_~_~_~_~_~_~_~_~_~_~_~_~_~_~_~_~_~_~_~_~_~_~_~_~_~_~_~_~_~_~_~_~_~_~_~_~_~_~_~_~_~_~_~_~_~_~_~_~_~_~_~_~_~_~_~_

Likes
8
Share


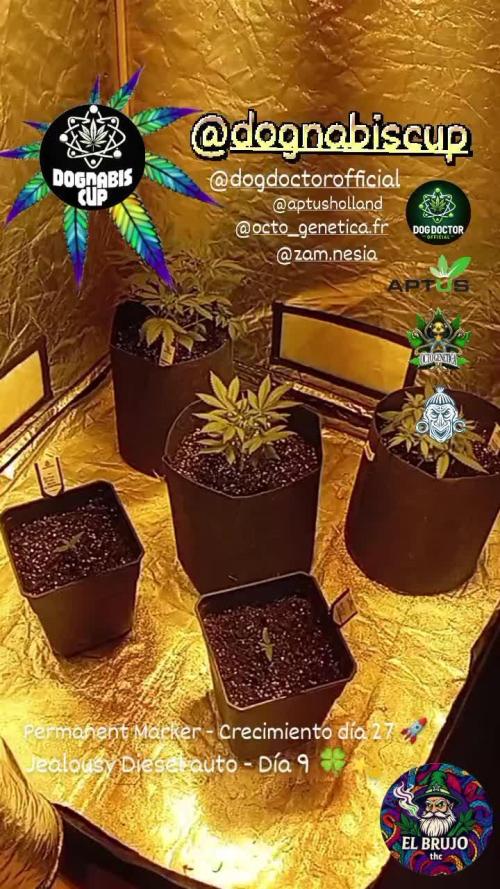
@DogDoctorOfficial
Follow
Mango Kush – Week 1 Flower (Week 5 from Seed)
Stretch, sibling rivalry, and fine-tuning the environment
Grower: Dog Doctor
Strain: Mango Kush – Pheno #1 & Pheno #2
Light Systems:
• ThinkGrow Model One LED (main canopy)
• ThinkGrow ICL300 (inner canopy lighting)
• Black Series 600W LED (shared space)
Ecosystem: TrolMaster-controlled, partially hand-watered
⸻
🌸 First Week Flower – Stretch Mode Engaged
We’ve flipped the Mango Kush girls into flower, and while there are still no visible pre-flowers yet, the stretch has begun.
• Pheno #1: Already tall and well-structured, pushing into her 8th–9th node with strong lateral branching.
• Pheno #2: Started later, but is rapidly catching up—shorter internodes, lush leaves, and a determination to match her sister in size before flowers set.
📸 Both got a full studio photo session this week—looking flawless and healthy from every angle.
⸻
🌡️ Current Conditions
• Room Temp: 31°C (a bit high, AC incoming)
• Humidity: 50.3%
• VPD: 2.23 kPa
• PPFD: 766 µmol/m²/s
• Soil EC: ~2.0
• Soil Temp: 25.6°C
• Watering: Daily (when soil dries to ~25% moisture)
⸻
⚠️ High Temperature Talk – Risks & Rewards
Risks:
• Higher temps speed up transpiration, meaning the plants take in water and nutrients faster, which can cause imbalances if not monitored.
• Combined with high VPD, temps can push plants close to stress thresholds.
Benefits (if managed well):
• Boosted metabolism → faster stretch and branch growth before bud set.
• With CO₂ at ~632 ppm, plants can tolerate slightly warmer temps without losing photosynthetic efficiency.
💡 Plan: An AC unit is on the way to lock temps into the sweet flower range of 26–28°C.
⸻
💧 Why Daily Watering Works Here
In these conditions, the Mango Kush girls are drinking daily. Letting the medium dry to about 25% before rewatering helps:
1. Prevent overwatering – Roots get oxygen between feedings.
2. Keep nutrients stable – Avoiding EC spikes/drops.
3. Match plant demand – Giving them exactly what they’re ready to drink.
Nutrients remain tat Aptus Holland recipe, now for flower, just with slightly increased volume to match their thirst.
⸻
🌱 Sibling Rivalry – Pheno #2’s Big Push
Pheno #2 may have started late, but she’s been stacking nodes and leaves like she’s got something to prove. At this rate, she might hit flower at nearly the same size as her big sister. This will be a fun side-by-side to watch—same genetics, different timelines.
⸻
💡 Inner Canopy Lighting – ThinkGrow ICL300
We’ve installed the ICL300, a bar-style LED designed to sit inside the canopy.
Why it matters for Mango Kush:
• Better Lower Buds – More intensity to shaded sites → denser flowers.
• Even Growth – Less height difference between top and bottom buds.
• Efficient Canopy Use – Every branch gets a fair shot at the light.
In multi-strain grows, inner canopy lights help prevent the smaller plants from being overshadowed, literally.
⸻
🔮 What’s Next
• AC arrives → temps stabilize → optimal VPD range.
• Expect pre-flower pistils to appear in the next 7–10 days.
• Watch Pheno #2’s progress—will she match #1 before the stretch is over?
• Continue using ICL300 to fill out the lower canopy for more even bud development.
⸻
📣 Thank you for following the Mango Kush journey!
We share every step so growers can learn, compare, and enjoy the process.
📲 Don’t forget to Subscribe and follow me on Instagram and YouTube @DogDoctorOfficial for exclusive content, real-time updates, and behind-the-scenes magic. We’ve got so much more coming, including transplanting and all the amazing techniques that go along with it. You won’t want to miss it.
• GrowDiaries Journal: https://growdiaries.com/grower/dogdoctorofficial
• Instagram: https://www.instagram.com/dogdoctorofficial/
• YouTube: https://www.youtube.com/@dogdoctorofficial
There’s a new series blooming—and it’s more than just plants. It’s about process, patience, and paying attention.
⸻
Explore the Gear that Powers My Grow
If you’re curious about the tech I’m using, check out these links:
• Genetics, gear, nutrients, and more – Zamnesia: https://www.zamnesia.com/
• Environmental control & automation – TrolMaster: https://www.trolmaster.eu/
• Advanced LED lighting – Future of Grow: https://www.futureofgrow.com/
• Root and growth nutrition – Aptus Holland: https://aptus-holland.com/
• Nutrient systems & boosters – Plagron: https://plagron.com/en/
• Soil & substrate excellence – PRO-MIX BX: https://www.pthorticulture.com/en-us/products/pro-mix-bx-mycorrhizae
• Curing and storage – Grove Bags: https://grovebags.com/
⸻
We’ve got much more coming as we move through the grow cycles. Trust me, you won’t want to miss the next steps, let’s push the boundaries of indoor horticulture together!
As always, this is shared for educational purposes, aiming to spread understanding and appreciation for this plant. Let’s celebrate it responsibly and continue to learn and grow together.
With true love comes happiness. Always believe in yourself, and always do things expecting nothing and with an open heart. Be a giver, and the universe will give back in ways you could never imagine.
💚 Growers love to all 💚
Likes
7
Share


@WeedleyScott
Follow
Die Pflanzen erholen sich sichtlich von den Strapazen der letzten Woche und zeigen nun eine gesunde Farbe sowie zahlreiche neue Blätter.. Ich gieße Aktuell mit 1L Wasser pro Pflanze und treibe sie nach Außen via Low Stress. Wenn diese am Rand sind lasse ich die Pflanzen an höhe gewinnen um eine schöne Krone zu erhalten.
Processing
Likes
9
Share


Likes
6
Share


@IQuSX
Follow
hi all topman! thank you humbolt for his supply of goods.
we used it to germinate seeds, so it turned out to be a 2 in 1 package!
I think this is great strain ^^

Likes
14
Share


@JUNGLE_B4RNS
Follow
The Sensi Seeds Research breeding project has created eleven cannabis seed varieties.
How? By combining new cannabis cultivars with a selection of strains from their long-established cannabis gene bank. For the first time in thirty-six years, they are opening the doors of the Sensi Seeds Research and Development Department.
Week #1
All seeds have germinated in 48 hours after soaking in water. The germ has grown in wet cotton for 24 hours and has grown 1 cm long. All the seedlings popped out from the soil the 02/12/19 after 48 hours in the cups. Making the germination ratio at 100%.
I was a bit worried to use the Mars-Hydro SP250 on seedlings, but at 75cm following manufacturer recommendations everything looks perfect.
Environment is under control, light, humidity, temperature, and airflow. Seedlings are not going looney and stretching for the light .
Using only pH’d water with some RootBooster at this stage to enhance roots development.
(I’m looking for a job in the cannabis industry as Master Grower, Mineralogist, Quality Control)
Likes
1
Share


@Ninjabuds
Follow
It’s day 27 from seed for all the plants in the photo sea of green. Let’s call it the battle of the strains summer 2025. All of the plants are starting to have visible differences. I’m already starting to tell witch plants are more sensitive than others.
Likes
7
Share


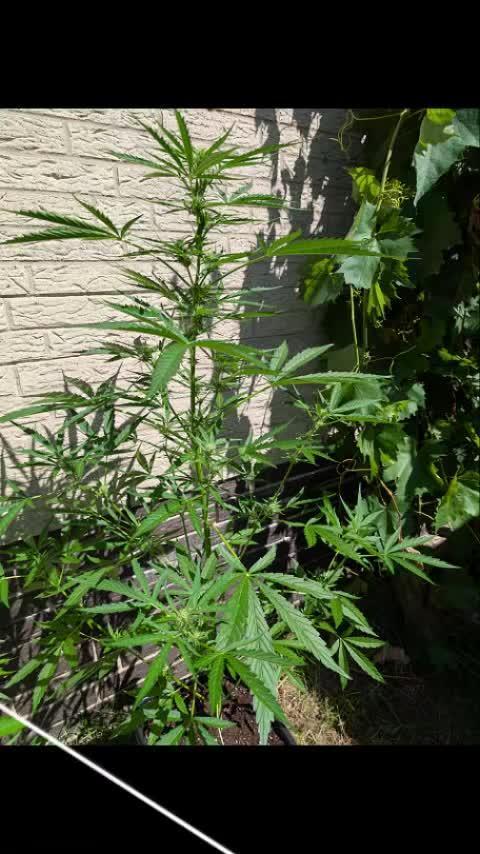
@FlavoursUk
Follow
Shes doing well, growing big and healthy. Buds are smelling strong and stacking up nicely. Purple looks beaut'. Cant wait to see the end product of this one. Stay tuned.
