


Likes
Comments
Share


@b_deal
Follow
This week was amazing guys. I literally watched the buds getting fat day by day. I am still feeding with a similar program and adding Aptus Regulator once per week to boost silica and some other minerals like molybdenum and boron. I'm flowering my plants in a hot environment with CO2 boost. PPFD is high to support these settings and thankfully my the pots aren't getting hot. No fungus gnats or any other pests, no root rot and bad smell. Everything is perfectly neat and buds are exploding. My expectations from this harvest is really high and I'll keep adding CO2 for another week.
Some fellow growers asked for CO2 and PPFD measurements. I am sharing these information on this week's pictures. I got my CO2 meter fixed and I tested the CO2 PPM in different places of the canopy. Typical value for this grow tent with this CO2 setup is around 1100-1350. Temperature is fluctuating between 28-31 and the average PPFD on the bud sites is 1100 micro moles.
I'm sharing CO2 measurements right under the fan, where you expect it to show the lowest value. Then I'll also share the CO2 PPM value coming out from the air pipe, which is normally attached to the grill of the fan. Direct output is now around 5500PPM and in the first two days, the meter shows 10000PPM which is the max value that it can reads. This bucket yeast CO2 reactor lasts for four days and I'm refreshing the mixture twice a week. This is huge CO2 with a fairly low cost compared to propane burners or CO2 tubes.
Edit: I refreshed the CO2 bucket today and got you guys a video of the direct output. The system is outputting more than 10000PPM of CO2 and the meter can't measure it for the first two days. This CO2 method is a killer one for tent grows. Very low cost for very high CO2 concentrations.
Hope these information helps. Happy growing 💪


Likes
21
Share


@GODSGIFT_2005_JM
Follow
🍼Greenhouse Feeding BioGrow
⛺️MARSHYDRO
The ⛺️ has a small door 🚪 on the sides which is useful for mid section groom room work. 🤩
☀️ by VIPARSPECTRA (models: P2000 & XS 2000)

Processing
Likes
51
Share


@Dunk_Junk
Follow
Wow what happened this week? Doubled her height!!! From 45cm to 88cm tall!!
She's gonna be a big girl I think!
Flowering underway now so the stretch should slow down next week 💪

Likes
16
Share


@Freddd
Follow
I am still figuring this out, but I am now watering this by holding her over one of my larger flowering reservoirs and pouring nutrient down the top till it comes out the bottom, I am doing that quite often during they. I am surprised that she is still growing. From the side she looks very sparse but from the top the leaves have arranged themselves to get the most light so she looks more bushy. Flowers are developing their purple colours and as you can see from the close up shot, the trichomes are many but very tiny which is interesting.
I still do not know if there is going to be much of a result or if she is just a pretty little bonsai plant only good for decoration. Time, as they say, will tell.
Likes
53
Share


@Boomer911
Follow
As we hit day 56 of my cannabis grow journey 7 plants 3 LST 3 Normal 1 Top. Let's catch up on how the Gorilla Glue strain is doing:
Plant Growth:
The Gorilla Glue plants are standing tall, measuring between 40-45cm, with the ones under low-stress training (LST) slightly shorter. Despite the unpredictable weather, they're thriving, boasting lush foliage and dense bud formations hinting at the upcoming harvest. It's clear that each plant has benefited from the TLC poured into their care.
Nutrient Regimen:
With flowering in full swing and the weather throwing curveballs, I've tweaked the nutrient mix to ensure the buds get the support they need. Alongside the usual Bio Bloom, Autogrow nutrients, SST Juice, Guano, and Worm castings tea, I've introduced Rockbastyk, a supplement tailored for the end of the flowering stage. It's all about giving them the best shot at success.
Observations:
The weather has been all over the place, with temperatures fluctuating like crazy. Despite this, the Gorilla Glue plants are soldiers, adapting to whatever nature throws at them. They've shown incredible resilience, proving that they're up for any challenge.
The Low-Stress Training (LST) plants are a prime example of this resilience, despite their shorter stature. Their buds are flourishing, filling every nook and cranny thanks to the LST technique. However, one plant got a bit too stressed and ended up stunted. I'm keeping a close eye on it, giving it the extra care it needs to bounce back.
The untouched plants are also holding their own, growing bigger with "fluffier" buds. It's fascinating to see how they compare to the manipulated ones.
As for the topped plant, it hit a rough patch with stunted growth initially. But it's bouncing back nicely now, sporting four main apex buds, albeit a tad behind schedule.
Last week, I did a major trim to tackle the bushy look that was getting out of hand. I made sure to only remove what was necessary, allowing for proper photosynthesis and nutrient distribution to continue uninterrupted.

Likes
8
Share


@Rich2083
Follow
Tapered off the nutrients over the last week, now down to just the bloom supplements for this week then just water to finish. Harvest is getting closer now and I'm so excited to get these babies cut, dried and cured!

Likes
25
Share


@OZDAOgrow
Follow
This week I've only been doing LST and minimal defoliation. Next week I'll be doing Bruce Banner topping, since it's a backlog, I'll be doing some experiments on it. I also used on one bush the training method - super cropping (video).
Likes
Comments
Share


@Phenophilgrow
Follow
Now we're Back on Track.
I've started to her to the Side, to form her. The Permanent Marker is a Hybrid which IS very clear Here. Long branches without enough flowerstems.
I tie the main's for a good 90 degree to go in the Kind of sog direction.
And, what i learned from Carl Kushman: Break the inside carefully of your stems. It will make the plant stronger. Believe me. Just feel small balls inside the stems and crush every other. With that technic you can Control the growing

Likes
17
Share


@Fitzwell
Follow
The start was easy as it gets just add water the first 20 days and LST every day. When i saw some of the lower leaves start to change color that's when i started to add nuits. after that it was just following the instructions foxfarm already had laid out for me. I cut back by half in the start of my feeds but by the end of my grow I was at full strength. Testing your run off is key. Cropking send me great seeds and genetics is a great foundation and starting point.
---------------------------------------------------------------------------------------------------------------------------------------------------------------------
I was very happy I got almost 5 ounces off one plant.


Processing
Likes
10
Share


@balansa
Follow
hey there :) so we’ve started flowering she looks good she is bigger and healthier then my previous Mexican babe and i am proud )) so i have cut off many fan leaves already twice but she is bushing. next week i will cut some fan leaves for the last time for the buds to get more light. so heads up !!! puff puff pass !!!!!
Processing
Likes
2
Share


@Mackinnon
Follow
Outdoors , hurricane came , moved indoors, frost temps , going to Finnish off indoors
Likes
7
Share


Likes
12
Share


@la_piper
Follow
ола
washing machine пересажены в горшки на пмж и включены в систему.
ppm 590.
ph 5.9.
полив: через час после включения света(7.00) помпа включается на 30минут и через 12часов ещё на 30минут

Likes
2
Share


@PapaTerps
Follow
Shake Back - Compound Genetics
Week 3 of Bloom
🌸 She has finished her stretch and has grown incredibly well considering she's only in a 5L. She has been vigorously developing her flower and is working hard on bulking now. Her aroma has appeared too, a fresh green apple scent with a gassy undertone. The temperatures have been up and down over the last week or so, so I've added the AlgAMix into her feed to help the plant deal with the fluctuating.👌🏻 From today, all the girls will be moved into a 8x4 tent, because the 5x5 has been hard to manage.
✂️ I've lollipopped her again after she finished her stretch, removing all leaves stems and budsites below the top 6 nodes from the canopy - these lower branches won't develop into anything and will more than likely cause problems later down the line. I've also removed a couple of the larger fan leaves from her center, to improve airflow and light penetration 💪🏻
💧 Watered every three days with 3L of RO water, with nutrients mixed individually, in order and then finally, I pH'd the solution to 6.3. I've increased some of her nutrients and added the Alg-A-Mix as a precaution to any temperature fluctuating that might occur this time of year. The Grow and Bloom nutrients won't change much from her, but the other supplemental nutrients will fluctuate depending on her needs.
💡 PPFD: ~850
♒ VPD: 1.38kPa
🌱 Days from seed: 86
🌸 Days in Bloom: 25

Likes
42
Share


@MadeInGermany
Follow
Info:
Unfortunately, I had to find out that my account is used for fake pages in social media.
I am only active here on growdiaries.
I am not on facebook instagram twitter etc All accounts except this one are fake.
Hi everyone :-) .
The clone is developing well and has beautiful roots.
This week it was poured once because it doesn't need much.
It was also topped once.
Otherwise everything was cleaned and checked.
Have fun and stay healthy 🙏🏻
You can buy this Nutrients at :
https://greenbuzzliquids.com/en/shop/
With the discount code: Made_in_Germany you get a discount of 15% on all products from an order value of 100 euros.
You can buy this Strain at :
https://sweetseeds.es/de/cream-caramel/
Type:
Cream Caramel
☝️🏼
Genetics:
Blue Black
x
Maple Leaf Indica
x
White Rhino
👍
Vega lamp:
2 x Todogrow Led
Quantum Board 100 W
💡
Bloom Lamp :
2 x Todogrow Led
Cxb 3590 COB 3500 K 205W
💡💡☝️🏼
Soil :
Canna Coco Professional +
☝️🏼
Nutrients :
Green Buzz Liquids :
Organic Grow Liquid
Organic Bloom Liquid
Organic more PK
More Roots
Fast Buds
Humic Acid Plus
Growzyme Big Fruits
Clean Fruits
Cal / Mag
Organic Ph - Pulver
☝️🏼🌱
Water:
Osmosis water mixed with normal water (24 hours stale that the chlorine evaporates) to 0.2 EC. Add Cal / Mag to 0.4 Ec Ph with Organic Ph - to 5.8 .
Likes
18
Share


@RFarm21
Follow
Semana 30 março - 5 abril
1 abril feeding day
Cheese #2: 1.6L agua
Calmag 0.5ml; bio bloom 2.5 ml; topmax 1.2ml ; bio heaven 2.5ml; acti-vera 2ml; bio grow 1ml pH 6.5
4 abril - cheese #2 feeding day:
Calmag 0.8ml; bio bloom 2.5ml; topmax 1.5ml; bioheaven 1ml; acti-vera 3ml; bio grow 2ml.
pH 6.4


Likes
6
Share

@Ninjabuds
Follow
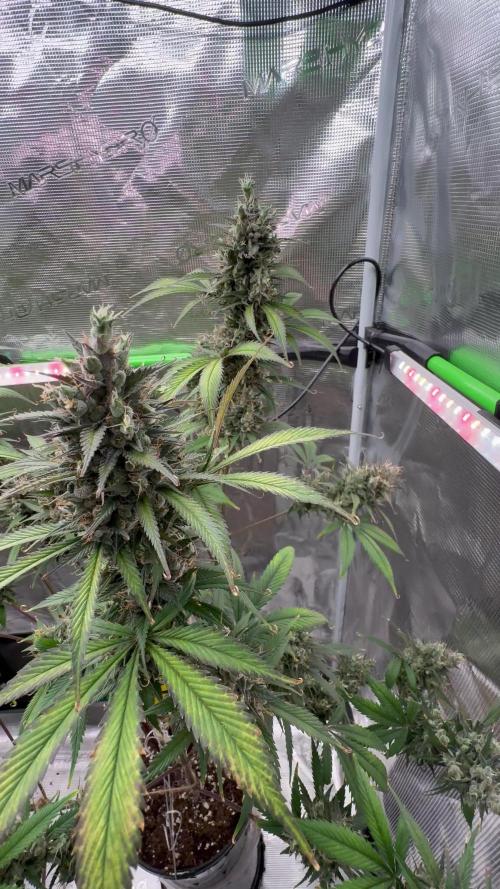
Gorilla cookies is a beast of a plant it can easily fill up a 4x4 with one plant if done right. Really thick white tricombs strong smells big colas. What else can you ask for a good plant all around