




Likes
12
Share

@Xpie77
Follow
GrowDiary Verslag: The Bird × Red Wine – Feminized F1 Pheno-Hunt (Week 6 Bloei)
Kweker: Xpie77
Datum: 11 januari 2026
Strain: The Bird (Sensi Seeds) × Red Wine (Seeds Genetics) – zelfgemaakte feminized F1-zaadjes
Aantal planten: 16 stuks
Huidige fase: Week 6 bloei
Foto-update (Week 6)
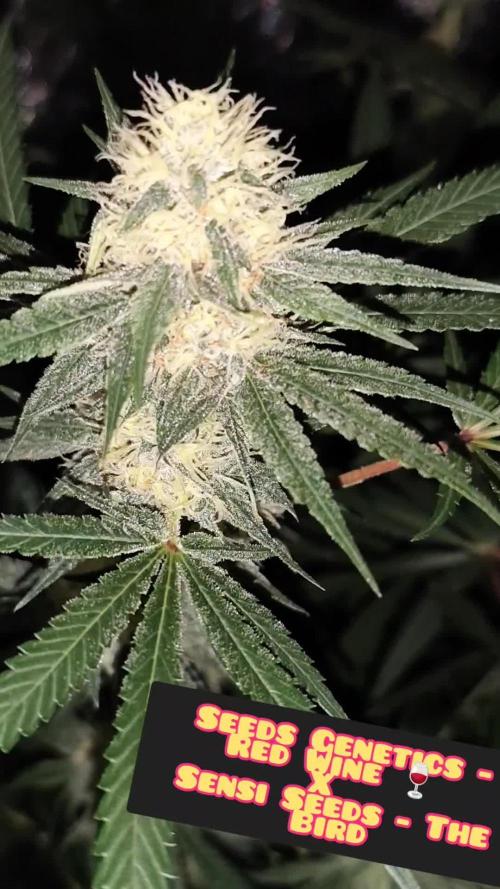
Hier een close-up van één van de buds in week 6 – kijk die insane trichome-laag! De hele top is bedekt met een dikke laag frost, alles glinstert onder het licht. Nog steeds voornamelijk groen, maar de pistillen worden dikker en donkerder, en er zit al een lichte paarse gloed in de calyxen bij sommige pheno’s. De echte paarse/blackout kleuren laten nog even op zich wachten, maar de resin-productie is nu al next level.
De bud ziet er super gezond en harsachtig uit – precies wat je wilt zien in week 6 van een indica-dominante kruising zoals deze.
Stand van zaken in Week 6
De 16 planten zijn in volle ontwikkeling en de bloei versnelt echt:
Bud-ontwikkeling: Buds zwellen flink op, calyxen worden groter en dikker. De toppen beginnen compact te worden.
Trichome-productie: Mega frost overal! Sugar leaves en buds zitten onder de hars – veel pheno’s lijken nu al harvest-ready qua trichomes (maar nog niet qua kleur/rijpheid).
Kleur: Nog grotendeels groen, met lichte paarse hints bij een paar planten. Ik hou de nachttemperatuur laag om de anthocyaninen te boosten – verwacht meer paars in week 7-8.
Aroma: Wordt steeds intenser in de tent: zoete druiven/bessen (Red Wine) met een gassy/funky punch (The Bird). Ruikt nu al als een premium strain.
Gezondheid: Topconditie. Bladeren donkergroen, geen tekorten, goede stretch voorbij, alles gelijkmatig.
Wat te verwachten de komende weken
Nog 2-4 weken bloei (afhankelijk per pheno: 8-10 weken totaal).
Buds harden verder op en trichomes gaan van helder → milky → amber (tijd om te checken met loep!).
Hopelijk meer kleurverkleuring bij de Red Wine-dominante pheno’s.
Beginnen met lichte flush richting het einde.
Conclusie
Week 6 is waar het echt spannend wordt – de frost is insane en de potentie schreeuwt eruit. Deze The Bird × Red Wine F1’s ontwikkelen zich prachtig, en met zoveel variatie in de 16 planten ga ik zeker een paar absolute killers vinden. Nog geen paars spektakel, maar de resin-laag maakt het al de moeite waard!
Stay tuned voor week 7/8 – dan komt de echte magie. 🍇✈️🐦
#TheBird #RedWine #F1PhenoHunt #FeminizedSeeds #ColloidalSilver #Week6Bloom #GrowDiaries #CannabisBreeding #Xpie77
Wat denken jullie: hoeveel weken nog tot harvest, en gaat het paars nog komen? Drop je voorspelling! 🔥


Likes
20
Share


@BABS_Babies
Follow
Starting to see fatter buds, brown hairs, and lots of trichomes. When looking through the jewelers loop they are all still clear. Not long now for the Wedding Cheesecake. She is in the middle. This will be her last feeding. Then I will start flushing next two weeks until she is ready to harvest.

Likes
53
Share


@SativaSteve88
Follow
All plants are nice and healthy and all have now been topped, i switched to flower end of week 7 as dont really want them getting much bigger i would of liked to of switched them over a week or so ago but had to give the 5 plants i stunted time to recover and catch up a bit in size with the final stretch now over the next couple of weeks they should all be at a decent size hopefully and fingers crossed they give me some nice smoke in the end, dont you just wish you could fast forward a few weeks sometimes, im dying to see these ladies late in flower getting fat haha roll on mid may ✌️

Likes
1
Share


@Highgrade_Harvests
Follow
Watching this plant grow has been really fun and taught me a lot about taking care of a plant and what to watch out for. Can't wait to see what i can do on my next grow already!


Likes
16
Share


@DrLaggis
Follow
🌱 Start: 17.07. 🌱
Hello everyone! This is my very first grow and I'm thrilled to share every step with you! 🎉 I'd appreciate any tips you might have to help me achieve the best results! 😊
Equipment:
I've geared up with an Indoor Grow Kit from MarsHydro along with some BioBizz supplements to ensure my plants get the best care. 🌿
🌼 Seeds:
I opted for Fast Buds seeds after hearing great things about them. They were delivered super fast—just two days! I’m especially excited to test the C4 strain. 🚀
I've begun soaking the seeds and setting up my space. Eagerly awaiting the transition to the next stage in a day or two! 🌱
📅 Update: 19.07.
All three of my C4 seeds sprouted 1-2 cm within just 1.5 days! 🌱 It’s often recommended that autoflowers be planted directly into their final home, so I'm following that advice.
I'm working on improving the air circulation in my tent to ensure the best environment for growth. 🌬️
I'm currently using 0.2L cups with big holes over the sprouts to maintain higher humidity during their initial two weeks. 💧
🎉 UPDATE 22.07. - THEY ARE ALIVE 🎉
My C4 sprouted on 20.07., and I'm overjoyed to soon share photos and a video of my little green buddy! 📸🎥
PS: My plant enjoys 2 hours of chill jazz music every day! HAHA 🎷🎶


Likes
Comments
Share

@420DeepGrow
Follow
📆 Semana 11
Las A5 Chaze entran en el tramo final. Con el lavado de raíz, ambas plantas empiezan a afinar aroma y resina: la de puntas secundarias se compacta más, y la de cola principal mantiene esa estructura clásica y firme.
Los tricomas siguen lechosos con algún toque cálido, y el olor terroso-especiado se vuelve más limpio y marcado.
🌿 Lavado final: transición suave hacia la madurez perfecta.
¡Seguimos creciendo fuerte 💪!
Likes
4
Share


@Tomasekm420
Follow
většina chloupků na květech není jantarová tak ještě nechávám dozrát tyto 3 kusy ze 4 semen namočených v jeden den
Processing
Likes
17
Share


@Silverback_Guerilla
Follow
12/31:
The first two are both coming along nicely, and the reserve/alternate seedling is catching up. 👍
Today was the first day in which I fed them some Big Bloom and Boomerang along with humic acid, pH'd to 6.1.
1/3:
I've been letting them dry out a bit for the last two days. They've got roots coming out the bottoms now...I'll probably transplant them into 5 gallon fabric pots tomorrow or the next day.
I ordered a 4' 180w tube light with 578 LEDs..it has a 360 degree beam with 3000k and a bunch of 660nm. It's waterproof, so no worries about keeping it beneath my canopy to illuminate the lower branches and hopefully increase the density of those buds that never get much top-lighting.
Today, I mounted my two new 24w UVA LED lights (395-405nm) to my frame. I'll run them 6 hours a day from the time I put the plants into my closet, until harvest. It is my understanding that exposure to UVA, particularly during the vegetative stage, triggers many different plant defense hormones, which speed growth and can increase heartiness to withstand constant exposure to UVB without suffering as much cellular damage as usual.
I'm also ordering a 2' Solacure FlowerPower UVB (285nm-310nm) next week to use during flowering to stress the plants and increase trichome production.
1/4:
I did a few foliar feedings with big bloom and fulvic acid today.
1/5:
Transplanting day. I dusted their roots with magic dust and transplant them into 5 gallon pots today. I had some excellent compost with biochar and myco that I mixed into their soil, too. I watered them in with about 2 quarts of their first taste of full strength veg nutes, plus mycorrhizal fungi, trichoderma, beneficial bacteria, and humic acid, then I sprayed them with biotabs boomboom spray when finished. The were moved into the closet under the quantum boards, UVA's, and a pair of MiracleLED blue bulbs. I'll start adding far-red spectra to the equation in the next few days.

Likes
5
Share


@Deltatigrou0169
Follow
Salut salut les Amis
Nous voilà déjà à la fin du mois, mes fifilles viennent de passer en pré-floraison depuis vendredi je suis trop content de mes fifilles.
J'ai commencé à leur mettre de l'engrais (PRO ORGANIC Grow et Bloom) pour la pré-floraison.
Je mettrai le (Bloom Booster) pour la floraison.
Je vous souhaite une bonne soirée à tous et à dans deux jours 😉🙃🙃


Likes
18
Share


@TheItalianGrower
Follow
Hi guys, the first week has come to end. Girls grow up well. I dropped the light about 10cm to avoid stretching.
I have used few nutrients but from next week I increase the dosage.
Stay tuned 😜😎

Likes
5
Share


@Cogollo_eu
Follow
From/Desde: 28/07/18 || To/Hasta: 03/08/18
From day/Desde día: 58 || To day/Hasta día: 64
-----WEEK SUMMARY-----
Flora time has come!!!!, the Lemon's Colas are awesome at time, it's internodal distances are excelent to form giant ARMS, an she will do it. I don't have too much photos of the Lemon from now on, i'm sorry for that.
The last day of this week (August 3rd) i will harvest the GlueBerry A & B shown in photo 5, and some days after i will harvest the Dinafem Critical + 2.0 Auto, also shown in that photo.
-----SUMARIO SEMANAL-----
Ha comenzado la floración, las colas que ya ha formado la Lemon son increíbles. Tienen una distancia internodal excelente para formar enormes brazos y así lo harán. No tengo muchas fotos de la Lemon de aquí en adelante (estoy intentado recuperar las fotos que envié por whatsapp, pero no hay muchas).
El último día de de esta semana (3 de agosto) cortaré las Glueberry A y B que se observan en la foto 5. 😱y unos días después la Critical 2.0 Auto de Dinafem que también se ve en esa foto.
Likes
28
Share


@OrganicPower
Follow
Week 5 flower going well. Nothing much to report. Increased the drip as she is taking in more water. Turned up the fans to 100% for maximum flow, and due to that, the tent got a bit warmer and a bit dryer so the exhaust fan and humidifier are working a bit harder. 75-77 deg F, 50-60% RH. Not sure if the lights are to intense or if it’s purple coming through, but at the highest tops there seems to be a bit of discolouration on the newest growth, just at the tips of the new buds. But I’m looking really close and it may be purple, not brown. I’ll keep an eye on it and turn the lights down if symptoms worsen. This plant is growing strong and getting chunky. Hopefully she keeps growing well until the end. Thanks for the views…keep calm and grow on!

Likes
10
Share


@jayizrollin
Follow
Fast buds genetics are freakin awesome, I can’t wait to try some more soon, Mephistopho is next though.
Total Weight was 78 grams Dry, I dried for 9 days, 65 degrees and avg of 50ish humidity, was perfect but it was stable.
Smells of candy gas, had a lot of larf and buds I just didn’t want to trim so I have 37grams of trim to get some keif out of. Thanks for checking out this awesome grow of mine!


Likes
4
Share


@Autower
Follow
End of week 10 and coming on well now smells starting to get strong now on these especially the papaya cookies she’s frosting well and the branches are starting to bend so will need to hold them up soon gorilla cookies #2 had some problems but hopefully will recover nicely onto next week and happy growing peace
Likes
8
Share


@HeartStrong_Garden
Follow
I'm really glad the second girl finally pulled through whatever was causing her to struggle to grow. Her leaves are coming in strong now. I've been letting the soil dry back a bit more in between watering. I just spray the bottle a total of 30 times now. 10 at a time to let the water soak instead of pooling and flowing away. No nutrients yet, her roots are probably still just in the Light Warrior soil. I do still put water in the self watering pots to add humidity to the tent and to "cook" the soil nutrients .
Likes
4
Share


@Growstopher
Follow
7.8.25. 10th week of flower started on 7.7. Harvest is Sunday can’t wait to chop this one down and start new grow! Only using sweetener and cal-mag-iron to finish up.
Thank you for looking at grow have good rest of week!
Sweetener- 2.5 ml
Cal-mag-iron- 2.5 ml
Ppm- 190
Ph- 6.36