
Likes
Comments
Share


@Ukfarmer420
Follow
So I thought the plants was going to be a flop but they turned it around, really long time tho for a auto flower, I could of ran photos with a better yield, but never the less these look like 10/10 nugs and smell amazing i can't wait to see how these look dried off.


Likes
6
Share


@Naujas
Follow
the girl was completely dry on the day of watering... it would be better to water the day before... but the spoons are already in the afternoon :) in a week the girl will probably get another leaf removal, her flowers have already started to grow :) good luck to everyone :).

Likes
11
Share


@Ash_Tafari
Follow
Been battling caterpillars & powdery mildew , gave them both a spray over night with some Lost Coast Therapy for the mildew & I will be spraying in another day or two with Monterey BT for the caterpillars, a lot of the mildew disappeared, about two more applications it should be totally gone.
This will literally be my last major outside grow
Likes
3
Share


@Xabii
Follow
Plant is doing good, transplanted it.
Values are average of the day.
DATE - EC(us/cm)
20250402 ~1000
20250403 ~1000
20250404 ~1000
20250405 ~1000
20250406 ~1000
20250407 1438
20250408 #
DATE - PH
20250402 ~6
20250403 ~6
20250404 ~6
20250405 ~6
20250406 ~6
20250407 6.00
20250408 #
DATE - ORP (mV)
20250402 #
20250403 #
20250404 #
20250405 #
20250406 #
20250407 386
20250408 #
DATE - °C - RH% (Tent Temp/RH)
20250402 24.5 47
20250403 23.9 43
20250404 24.2 40
20250405 24.3 39
20250406 23.9 38
20250407 24.1 49
20250408 25.7 48
DATE - °C (Reservoir)
20250402 #
20250403 #
20250404 #
20250405 #
20250406 #
20250407 19.4
20250408 #
DATE - CF
20250402 #
20250403 #
20250404 #
20250405 #
20250406 #
20250407 14.38
20250408 #

Likes
9
Share


@BLAZED
Follow
Week 1 (17-6 to 23-6)
17-6
Temps: 23.8 to 27.8 degrees
Humidity: 46% to 74%
Watering: #1: 73 ml. #2: 76 ml.
18-6
Temps: 24.4 to 28.1 degrees
Humidity: 56% to 75%
19-6
Temps: 23.1 to 26.9 degrees
Humidity: 53% to 69%
20-6
Temps: 23.4 to 27.7 degrees
Humidity: 46% to 73%
Watering: #1: 96 ml. #2: 93 ml.
21-6
Temps: 23.4 to 27.8 degrees
Humidity: 46% to 82%
22-6
Temps: 24.2 to 28.2 degrees
Humidity: 53% to 76%
23-6
Temps: 24.9 to 29.1 degrees
Humidity: 45% to 76%
Watering: #1: 108 ml. #2: 98 ml.
They seem happy and growing quite fast!

Likes
44
Share


@MadeInGermany
Follow
COMMENTED BY
MadeInGermany MadeInGermany 6 days ago
Unfortunately, I had to find out that my account is used for fake pages in social media.
I am only active here on growdiaries.
I am not on facebook instagram twitter etc All accounts except this one are fake.
Hello everybody :-)
Another nice week goes by.
The network for the ScrOG was stretched :-)
It is really strange how fast it grows in Aerophonic :-)
no comparison to all media 👍.
I will put it in bloom again in the coming days because the stretching at Aerophnic is extreme :-).
With training I stopped so she was only topped 2 times in total.
As always, the water was completely replaced every 10-12 days and everything was cleaned.
She was checked for health so nothing stands in the way of her :-)
Have fun with the update and stay healthy
You can buy this Strain at
www.Zamnesia.com
Type:
Runtz
☝️🏼
Genetics:
Zkittlez
X
Gelato
👍
Vega lamp: 2 x Todogrow LED CXB3590 COB 55 W
1 x Sanlight S2W 62 W
💡
Flower lamp : 2 x Todogrow LED CXB3590 COB 55 W
1 x Sanlight S2W 62 W
💡 ☝️
Grow Aero System : Growtool 0.8
☝️
Fertilizer:
Canna Aqua Vega A + B , Canna Aqua Flores A + B , Rizotonic, Cannazym, CANNA Boost, Pk 13/14, Canna Cal / Mag, Canna Ph - Grow, Canna Ph-Bloom
☝️🌱
Water:
Osmosis water mixed with normal water (24 hours stale that the chlorine evaporates) to 0.2 EG. Add Cal / Mag to 0.4 Ec Ph with ph- to 5.2 - 5.8
💦 💧
Likes
2
Share


@Jaschkoo0
Follow
I dryed them slow. I deleted the original report si i had to make a new one without all the data about watering and so.
Likes
9
Share

@RBG
Follow
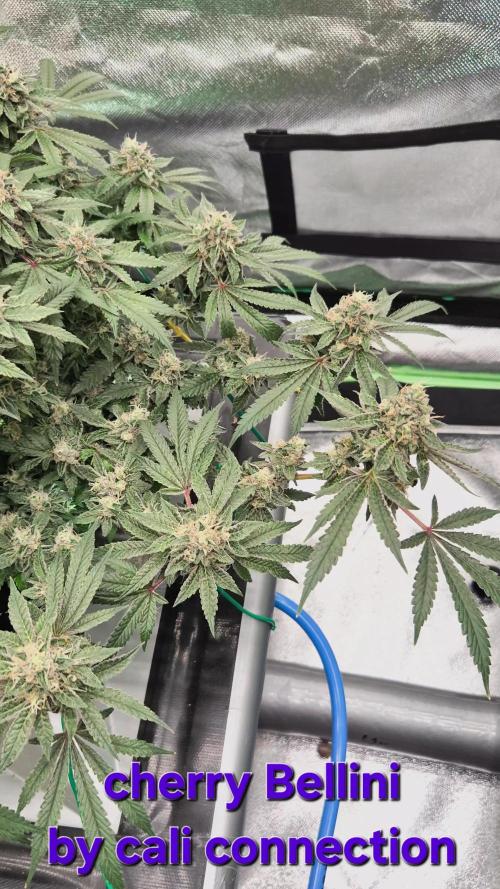
🌿 CherryBellini by The Cali Connection 🌿
Week 14
Flower week 8
Flower-day 1
3/12/25
( pisitils showed 25th of October) im timing from pisitils showed but diary runs from 12/12 light flip
No nutrients change today, I'm thinking about 2 weeks or so of feeding, maybe 2 more horti rawk doses before switching out to new millennium winter frost then onto flush with plain water/ph
Not sure, not sure. Maybe even give LA and Grape an extra week to get Bellini over the end instead of pulling a little early or pulling her as shes finishing up.
Next horti rawk dose probably saturday (48hr run ) then dump then new nutrients.
This is currently week7 day 1 flower from 6/12/25 ( pisitils first shown )
8/12/25
Will be dumping nutrients tomorrow, switching to winter frost by new millennium then onto flush
9/12/25
Dumped nutrients, winterfrost 500ml ( 10ml a gallon) will use for 7 days then flush for 10 or so
Processing
Likes
Comments
Share


Likes
3
Share


@Jamminbear
Follow
Flip the switch to 12/12. All ladies looking pretty good. @sereneoo22 Thank you for dropping by!! Water with Yucca/coco water/root wise Phos/ rootwise enzymes. Ph 6.2

Likes
12
Share


@CheeRz
Follow
Merry X-mas and happy holidays 🎁🎄. It is almost halftime and the development of the ladies is quite okay tho'. The buds started to get a bit frosty ❄️❄️❄️.

Likes
161
Share

@DogDoctorOfficial
Follow
Pow Pow Pow what can i say, i mean even the frogs here were hypnotized with this monstrosity size Mama she is all one can ask and so much more, wen harvesting these cutie pie beast Lady i felt the need to break her in small peaces , or smaller that the them baseball bats collas hihihi OMG them colas OMG .
She rested for 2 weeks in the rack with temps and RH at 60/60% and she was ready for trimming, trimming her was super easy since her frutes are compact and dense , end up with great trim that i will do extractions asap, have the felling she will give me great returns <3 <3 <3
A true pleasure and delight all the way from seed to harvest , now will came the big and final test and with it the smoke review hehehe, thank you SSSC for the opportunity and for everything and also big shout out to GD without the platform nothing of this wold have been possible <3 <3 <3
l
As always thank you all for stopping by, for the love and for it all , this journey of mine wold just not be the same without you guys, the love and support is very much appreciated and i fell honored and blessed with you all in my life <3 <3 <3
#aptus #aptusplanttech #aptusgang #aptusfamily #aptustrueplantscience #inbalancewithnature #trueplantscience #sssc #monstergirl #dogdoctorofficial #growerslove
With true love comes happiness <3 <3 <3 Always believe in your self and always do things expecting nothing and with an open heart , be a giver and the universe will give back to you in ways you could not even imagine so <3 <3 <3
Friendly reminder all you see here is pure research and for educational purposes only
<3 <3 <3 Growers Love To you All <3 <3 <3
Strain info :
About Auto Purple OG Punch cannabis seeds
To create Auto Purple OG Punch we crossed our feminized Purple Punch with an autoflower OG Kush. The original Purple Punch is a cross between Larry OG and Grandaddy Purple, illustrious and stable indica dominant THC-rich heavyweights!
The total grow cycle from autoflower seed to harvest is a short 9 weeks. You will be rewarded with a large yield of sticky resinous buds, up to 600g/m2 indoors. If you’re looking to grow a high quality indica auto made with cannabis cup winning genetics you will love Auto Purple OG Punch. THC content is always up-to/around 20%. Auto Purple OG Punch effects are intense, euphoric and relaxed. She also contains around 1% CDB which contributes to the very smooth, chilled smoke. Expect a mouthwatering blend of sweet tasting candy, dark fruit and hints of spice. A real connoisseur cocktail with powerful effects!
She normally reaches around 1m tall. But in optimized conditions with LED grow lights you can see occasional monster plants up to 2m tall with XXL yields. Auto Purple OG Punch is easy, potent and heavy yielding indoors. She also delivers well outdoors - such as the balcony or garden.
Auto Purple OG Punch is a perfect, powerful strain for a quiet relaxed day. The calming indica body effect is very satisfying and de-stressing


Likes
12
Share


@Jays_Not_Here_Man
Follow
The girls are starting to wrap up their cycle. I have been watching the trichomes closely, and we are getting very close


Likes
31
Share


@Mrs_Larimar
Follow
2024-04-25
the ove to the other Roo with stronger Light, pushed her massive,
so i have to transplant them into bigger Pots.
they have alittle N defiency, but soon its history, because they get 10l ore Soil now.
BREEDER INFO
Tangerine Snow F1 Fast Feminised is a 75% sativa, four-way cross of (Boost x Tangelo) with (Lavender x Power Plant).
This Fast F1 hybrid is bred from Cali genetics and boasts great citrus terps, high resin production for extracts,
high levels of THC, very good yields and excellent mould resistance.
Tangerine Snow F1 Fast can be grown indoors as well as outdoors. Indoor flowering times are between 8 - 10 weeks
while harvest time in northern latitudes is during September while in the southern hemisphere growers will be harvesting during March.
Recommended climate regions are hot, dry, humid and warm. These are tall, semi-branched plants that grow in excess of 200cm
and display a high degree of vigour with very good uniformity.
In common with many other heavily sativa-dominant strains, Tangerine Snow F1 Fast offers excellent resistance to mould
as well as to plant pests and diseases. The combination of citrus terps and plenty of resin makes thi
a very good extract strain with the 'washing' method delivering very good yields of hash.
The citrus terpene profile is reminiscent of mandarins and tangerines and also has sweet candy notes.
THC production has been lab-verified at a strong 24% while CBD is low. The effect is uplifting and energising,
perfect for use during the day and early evening.

Likes
13
Share


@Robownz_53
Follow
-Soil mix is FFOF with 20% perlite added
-Led light hung 30” over top of seedling set on 4/10 clicks

Likes
3
Share


@LAShugars
Follow
I thought I completed this harvest last year but noticed this morning it must not have saved.
She was one of the prettiest plants I’ve grown.
The bud was absolute 🔥 fire
Just finished the last of her rece


Processing
Likes
39
Share


@G4NJAG4NG
Follow
Day 57 Day 15 flower - what can I say? No issues reported so far, did some more defoliation below the scrog and tidied up some of the flower sites, removed a few of the old fan leaves and checked on Zkittlez OG, she is frosty already and starting to look really sparkly and beautiful 💎😍
The others are also showing some frost and bud development is going well!! Exciting times ahead!
290319 day 59 flower day 17 - no issues apart from slight heat stress for the girl in the middle, will adjust the light tomorrow to ease the stress. Bud candy just arrived so I will add 1ml/l on next feed tomorrow morning! Overall the bud sites have came through in numbers and are looking very strong and healthy, OG Zkittlez auto has turned into diamonds of trichomes and the others are following suite 😍 more updates to come! Hopefully skittlez is finished in the next 3 weeks! Also added a rotating flow to get good air flow in the tent, there were some dead spots.
020419 day 63 flower day 21
Likes
38
Share

@MadeInGermany
Follow
Flowering day 30
since time change
to 12 / 12 h
Hey guys :-)
Every day when I look into the tent, the sight and the smell are a dream 💚.
They are all developing very well.
There is no tip of the leaf that looks funny at the bottom or at the top 😃.
They were watered every 2 days with 1.3 l each (nutrients see table above).
They were all checked and checked for their health.
Stay healthy 💚🙏🏻
👇🏼👇🏼👇🏼👇🏼👇🏼👇🏼👇🏼👇🏼👇🏼👇🏼👇🏼👇🏼
You can buy this Nutrients at :
https://greenbuzzliquids.com/en/shop/
With the discount code: Made_in_Germany you get a discount of 15% on all products from an order value of 100 euros.
👇🏼👇🏼👇🏼👇🏼👇🏼👇🏼👇🏼👇🏼👇🏼👇🏼👇🏼👇🏼
You can buy this strain at :
https://www.exoticseed.eu/de/hanfsamen/hippie-therapy-cbd
Water 💧 💧💧
Osmosis water mixed with normal water (24 hours stale that the chlorine evaporates) to 0.2 EC. Add Cal / Mag to 0.4 Ec Ph with Organic Ph - to 5.8 - 6.5
MadeInGermany
