
Likes
Comments
Share


Likes
6
Share

@Pompeyblue
Follow
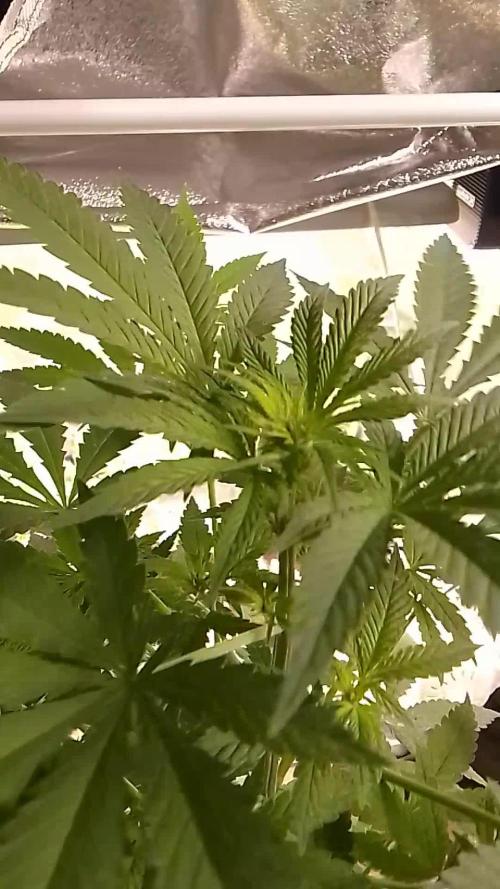
All going good not had much of a stretch happening
Got a few nice per-flower pistols appearing on them
Haven't done anything to them apart from took a few lower branches of for cuttings

Likes
12
Share


@JeyGanesha
Follow
Prossime settimane via....anche queste forbidden runtz sono pronte da conciare,🤣❤️💛💚... quest'ultima settimana la notte la sto lasciando fuori in balcone per fargli un buon sbalzo termico..,,.......
Ho tagliato anche quest'ultima forbidden runtz

Likes
10
Share

@HazeLiebhaber
Follow
📝 Blüte Tag 28
🚿 Seit heute gebe ich Phosphor und Boost zum Wasser dazu. Sonst alles wie in der Vorwoche.
🌡️ Temperatur 26-27°C
⛈️ RLF 55%


Likes
28
Share


@JeyGanesha
Follow
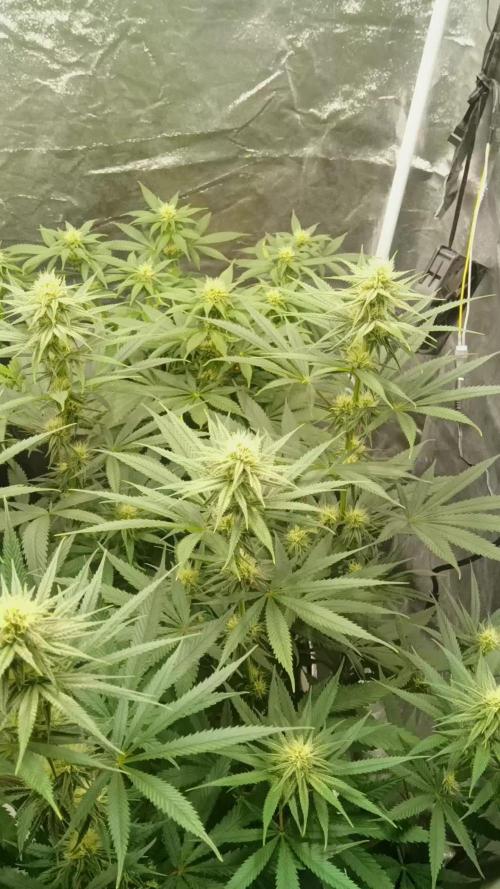
Questa settimana hanno avuto un cambio netto di colore e profumi,bellissima e sicuramente buonissima... Ancora una decina di giorni con solo acqua neutra e poi via a seccare e conciare

Processing
Likes
70
Share


@CBD_Sweden
Follow
2017-09-11. Kl 12.00. Week 3 starts. I have cleaned the whole room for the new week and gave the girls water and nutes. Added videos and pics. Girl is 11 cm high.
---------------------------------------------------------------------------------------------------------
2017-09-12. Kl 10.00. New pics and video.
--------------------------------------------------------
2017-09-13. Kl 22.00. Added new video.
----------------------------------------------------
2017-09-15. KL 10.00. New pics and video. The girl is 14 cm high.
---------------------------------------------------------------------------
2017-09-16. Kl 10.00. The girl is starting to grow little better now and i hope she is picking up the pace. Added new videos.

Processing
Likes
19
Share


@BudahBudz2020
Follow
Day 60 Notes
Today I water with 2lt tap water with
Bio Bizz Calmag 1ml per 2lt
Bio grow 3.5ml per 2lt
Bio bloom 2.5ml per 2lt
Bio heaven 2.5ml per 2lt
Monkey Nutrients Root shoot 5 drops per 2 Lt
I firstly bottom fed around 300-400ml
The pour the rest on the top..
Seeing some lovely growth
Day 61 Notes
really seeing them bud sites form now
Even seeing alot of trics


Likes
6
Share


@Terpio1500
Follow
Week 4
Last week was good gave the last defoliation for day 21. Adding a higher feed for her.
This plant has the least pistil production so I upped the light over it to see if it will help but it also seems like the slowest grower of the plants I’m running still looking good though no deficiency I see
Check out my IG for more content @therealterpio & check out my other dairies (Gelato Cake & the new)
Likes
16
Share

@sanibelisl
Follow
Well it been a week since the move indoors and she is just getting accustomed to the new surroundings. Things took a couple days pause and had no growth for the first few days but she seems to have finally started to fatten up her flowers again. She is drinking about a third less water than before but maybe that will pick up some more as well since her flowers are getting bigger. She is pretty sparse in terms of vegetation so will only remove leaves on a must need basis only. Watered her this morning and she received a low dose of calmag and bloom nutrients ( King Kola) by Emerald Harvest so should see an increase in flower size shortly. Have been increasing the duration of light each night and am currently at 18/6 have been toying with the idea of going to 20/4 and beyond to get the DLI up into flowering requirements. We are stuck at 450 PPFD so I don’t think I can her too many hours of light per day. I will be watering the other two girls later today with a update for them also.
Harvey Wallbanger. Miss Harvey is recovering well. Every day is better than yesterday and the past forty eight hours have been very good with her flowers starting to grow again. Trichomes and terpines have started to show up and she is going to be very sticky and have a pleasant sweet aroma. There are already fan leaves covered in trichomes and we have only just begun the process of flowering. She lost so much during the assault. She was going to be truly special. Maybe she will still be special we will see.
Vanilla Fizz. Ms. Fizz, alive and well. Had us scared for a while as she was slow to respond for a couple of days, no growth after her assault and subsequent relocation took its toll on her but happy to see things have turned around for her and now even doing better than expected. Prayers help. Flowers are growing and she has a certain perkiness to her that is inspiring after all that she’s been through. She is a bushy girl and removed a fair amount of foliage and will need to do some more later on some here some there. Trichomes and terpines arrive and are in abundance for both. Everything is covered in trichomes even fan leaves and smells like my Uncle John’s vanilla French toast and my Aunt Shelly’s Guava jelly, amazing!
*Update Day 68* 91 Grapes
She is doing well, blooming! Her flowers have decided to start growing and swelling in good ole Chem91 fashion, kind of just stacking up upon the flower below, and dense! Orange pistils have arrived and she is going to be pretty showing off an array of colors soon enough. With her being in flower mode and needing some extra energy decided to up the lights to 50 power despite my concerns for that being too high of power. We will see. I can always turn them back down if I see a problem. I hope to see a significant increase in flowering soon!
Vanilla Fizz. Ms. Fizz , we’re going to start calling her Ms. Fuzzy, she is so covered in trichomes! Bushy my goodness I have never had a plant with so much vegetation. I have seriously removed over a hundred leaves already and there will be more many more. But she is amazing in terms of smell, if you have ever smelled distant scent of a guava tree you would have an idea. Throw in just a little skunk and you nail it. She is going to be a sticky bitch to trim when the time comes.
Harvey Wallbanger. Miss Harvey, has the assault behind her now and the continuing rehab has proven to be beneficial. She had such perfect form and even after all the injuries she still shows off her balance. I picture her in a massive hotel lobby in a tropical destination in a corner where the elevators are. She was so perfect. Pinkish orange hairs now accompany her beauty as she displays the deepest of green fan leaves. Trichomes encapsulate the entire flower and she has a very floral scent. She seems to be the furthest along at the time. But we will see.


Likes
11
Share


@Tazard
Follow
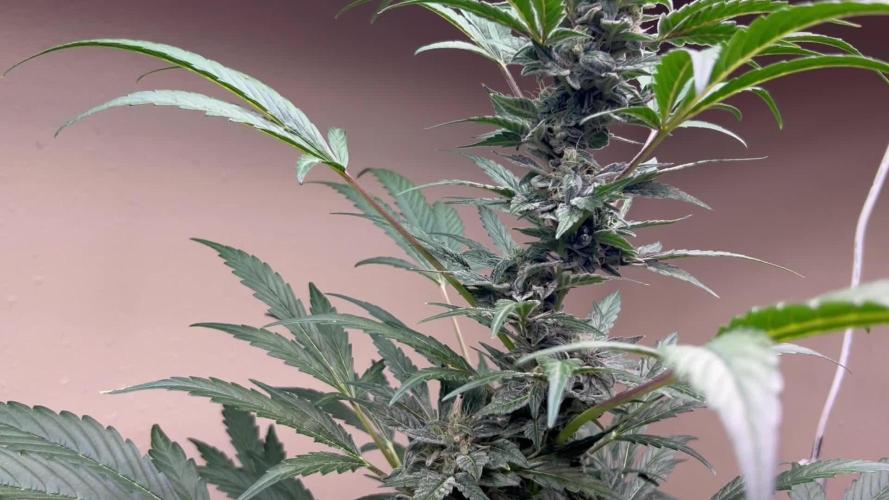
Talk about what a difference a week makes. The buds are really starting to stack this week and the smell is undescribable like lemon and haze.

Likes
22
Share


@ChachoGreenCrown
Follow
Excelente resultado el que hemos obtenido con estas cepas de kannabia, pero esta se lleva la palma.. para mi, es la favorita del cultivo. Ha sido la más fácil de cultivar, la que mejor se adapto en el espacio de cultivo.. bastante productiva y con una resina brutal.
Sabores cítrico y mango muy acentuado.. es una pasada fumar esta cepa.
Con esto damos por terminado el cultivo con kannabia.. disculpad la tardanza en publicar... tarde o temprano siemore cumplimos!
Hasta pronto amigos! Un saludo growers 💚👨🌾🏽


Likes
39
Share


@DjDaveAtHome
Follow
Doubled Airflow using two Marina 200 (28 gal/h x 2 = 54 gal/h) with four air stones per bucket. Liking what I see. Roots are better than they've ever been. Adjusted air space between basket bottom and surface of reservoir as there is more moist air now because of the increased bubbles (splashes).
Just turn the 18/6 lights off for 36 hours before bring back online at 12/12. Forty eight hours earlier they had a defoliation which filled in so quickly. Will compare tomorrow when the lights go back on.
Dinamed Plus from Dinafem Seeds (1) and Blueberry Headband (1)from Humboldt Seeds.
https://www.dinafem.org/en/dinamed-cbd-plus/
https://www.humboldtseeds.net/en/blueberry-headband/
Lighting
https://www.horticulturelightinggroup.ca/products/260w-qb-v2-led-kit
DWC Nutients
https://generalhydroponics.com/floraseries
FloraGro 1 ml/l
FloraBloom .5 ml/l
FloraMicro 1 ml/l
Diamond Nectar: N/A
https://generalhydroponics.com/diamond-nectar
Cal Mag: 2 ml/l
https://generalhydroponics.com/calimagic
SuperThrive: .5 ml/l
https://superthrive.com/
https://hylineproducts.com/products/hygrozyme/#one
Grozyme: 2.5 ml/ltr
Tarantula
https://www.advancednutrients.com/products/tarantula/
Epsom salts
Root Rot Tea
8 liters RO water
5 ml (1 tsp) organic sulphur free molasses
5 ml Alaskan Organic grow fertilizer (or something comparable)
5 ml Alaskan bloom fertilizer (or something comparable)
5 ml Seaweed or kelp fertilizer
Handful of composted horse pucky
(Worm castings, sea soil, Gaia General Purpose and Bat Guano Phosphate optional)
* add after brewing
1 ml Advanced Nutrients Tarantula


Likes
16
Share


@DeepSouthDank
Follow
Pheno #7 and #4 showed the most desired traits and will be running both indoors iagain the coming weeks under better conditions.
I didnt get as much photo's as promised but things have been hectic on all fronts, but I will do better next time ;)
Its a pitty we had some issues and not all phenos where in a position to show the true potentail. There for we are running the 5 with re-running outdoors this season. Along with some new beans :D

Likes
7
Share


@CrowMaster
Follow
Room full of clones that I’ve ran before no surprises…1000w x6 room, 6 plants per light…stripped the big fan leaves of hung whole plants up. After the 7 day dry gonna bring in the crew of trimmers and get this done in one day…I hate trimming and I need room empty again so I can plant clones I have rdy to go in so it’s faster just to pay trimmers…I’ll report back with yield…I can already say it’s gonna be 12-15 packs I’m always hitting 2+ a light with these strains….I don’t weigh it wet it wold take too long and wet weight don’t matter none unless you running some fresh frozen and need to do math on yields
Likes
Comments
Share


@GreeneScene
Follow
Day 15 Update : Decided to grab a tape measure to check canopy heights on a whim and discovered that my light was hanging 35 inches from “Cellie” Cereal and Milk . Wowzers 👀! So I raised the plant to be 26 inches from the light that I also dimmed down to about 40% . It works out that I can try to get the most out of the end of flower stretch for the older gal who shall no more than be mentioned for reference to accentuate the great glorious glamorous “Cellie”.
The humidity plummeted after I did a major defoliation of the older gals so I adjusted the airflow rate of the lower in-line fan and the upper inline exhaust fan with the carbon filter .
I lowered them both to the lowest setting & the humidity returned to “normal”
Let me explain my reasonings/thinking behind my adjustments which are experimental at BEST.
It’s worth also mentioning without having to preset a single thing on my 70pint Dehumidifier located inside this tent it is legitimately only plugged into my PRESET humidistat controller which is set to 50%-46% RH WITH an alarm on highs of 55% and lows of 43% . In real life what this translates to is when this humidity controller triggers the dehumidifier ON @50%RH immediately the fan of the Dehumidifier begins running. However this does not help the rising humidity that is occurring (it will reach 55%-60.2%RH ). Given a fixed amount of time , the condenser(atleast what it sounds like . .again, it could be anything) turns on . It is when this “condenser” “sounding” component begins working that the humidity IMMEDIATELY plummets down to my low point of 46%
So to make a long story short the humidity gets vacuumed to 46%RH & the dehumidifier turns off, bc of the PURPOSEFUL EXPERIMENTAL TWEAKING making all air exchange fans low leveled the humidity slowly but steadily rises to 50%RH then the dehumidifier is triggered on but only the fans initially and the humidity eventually reaches 55%RH-60.2%RH & then the humidity gets all its hair snatched out by the dehumidifier and drops back down to 46%RH.
😮💨😮💨😮💨😮💨 with all that said of anybody was even interested per my tents leaf canopy height temperature average good to great OR LITE GREEN TO DARK GREEN VPD for my temperature begins @ 60 & ends @ 52 which is kind of a perfect storm for OUR GIRL “CELLIE” oooooooorrrrrrrrrrr sssssssoooooo I think/hope .
She still hasn’t needed watering since being transplanted, she should now ready and willing to stretch those toes and we need the opportunities to top water that soil a few times to make those dry amendments available to her .
More pics of later the week coming as we go . . Hopefully . Diligence is a practice
Day #17: giving her some water today, no specific amount just until she feels the right amount of “heavy”. She was given 3 different batches of water once ph’d to 6.3 once ph’d to 6.7 one ph’d to 6.5. She’s grown an inch in 2 days.
Also swapped out the smart hygrometer system to a different brand . So far it has all the capability I was looking for but I need to run 2 more experiments to know for certain it lives up to my needs and its price tag 😁
Day 18 Update: she grew an inch taller nice 👍
The smart hygrometer system has reported/experience Bluetooth failures twice already(although I don’t know exactly what that means considering I purchased this for it’s Wifi capabilities )
I didn’t think to check it whilst I was away so I cannot yet say If it meets my final expectation/need
I bought a soil ph meter & it indicates “my mix” is at 3.1 ph 👀 hmm 🤔 I’m wondering if this is a must fix or can I get by .eventually she will be transplanted and at that time I can use my new digital soil ph probe to construct her new blend moving forward but I am curious is I mixed another batch at 3 something ph would it matter ?
In the beginning I wasn’t ph’ing any of my watering just because I assumed my soil mixture was highly acidic because of the 70ish pecernr peat moss base . I also assumed that it would be acid fixing for the water I put in it and therefore wouldn’t need to ph it and I did just fine just giving plain old tap water when thirsty until I experience VPD issues & in an effort to pinpoint what my exact issue was and how to fix it I of course eliminated all the variables and dialed in on my ph of my feed water and now my soil so it leaves me wondering does the soil need to be relatively 6.1 ph or is the 3.1 I’m flying at alright also . I checked the other 3 currently in here getting through flower & two of them are in the 3’s for ph & one of them is 6.2(the largest of them all) how ever she was the largest of them all always and oddly enough I mixed one big batch for them and transplanted them at the same time so I get two of them having the same ph as “Cellie” but the other that is in ph heaven is an oddball
Should I top her here or supercrop later hmm I need to decide my vision for this thing
Day 19 Update: ponytailed her youngest internode for about 16hrs she aggressively popped out of it twice ! It didn’t even work for 24hrs when I try it again it’ll be before the internode is so strong . Also rigged up a 16in oscillating wall-fan that currently being held with 2 zip ties , 2 rubber bands , & a smidget of duct tape and MAJORITY OF FAITH keeping it in place . The biggest plus to my added circulation is that I got the 16in fan for ! A win is a win . Pics uploads will be held for the next 3 days until the end of week 3 upload .
Drop a thumbs up
Day 20 Update : THE FAN FELL! But no one was damaged or injured . I re-rigged it . This time with duct tape , 3 popsicle sticks , 2 heavy duty zip ties & 1 regular strength zip tie . SHES SOLID NOW 😂 I did some solid rigging this time & have videoed my handy work .
Also I forgot to turn my A/C back on before leaving the house so temps and humidity skyrocketed and swung for 9 hours until I got home . The temp in the tent was 84.4 and the humidity went from 42.4 to 57.5 to 42 every three mins.
Day 21 Update : SHES A PRETTY GIRL. RQS says Cereal Milk is a slightly sativa dominant hybrid but the pheno of this particular seed seems to lean more towards indica I’m not mad at it ! I’m getting more stoked to see what she can do. She still hasn’t received any additional water since day #18.

Likes
17
Share


@JohnnyBarrel
Follow
Week 18
Middle August : weather is changing. Return of heat and humidity: 28 degrees, a little bit rain. A heat wave is coming but near the ocean the maximum will be around 32 degrees.
It’s good to grow in greenhouse during this period :
-ventilation control: I adapted the rythme: for now it’s around 18h/24h intermittently
-pests and diseases control: insect’s traps natural and artificial, less heat
-humidity control: no rain problem
Daylight 14h: 7h/21h
Flowering time 😁. Healthy plant, beautiful green color, just a few yellow leaves on the base.
More watering: 1,5L every 60 hours
Same cocktail: Calmag (0,5ml/L)+ FloraGro (2ml/L), FloraMicro (2ml/L), FloraBloom (1ml/L) + Root booster + Cannazym
Feeding soil with guano bat (NPK 3/6/10) for a slow dispersion + dried horn and blood (NOK 13/0/0) for nitrogen add.
Protecting plant: sprayed Neem Oil, added diatomaceous earth on soil. I found signs of thrips attack.
I will make a defoliation soon.

Likes
23
Share


@kevxyn
Follow
Der Geruch ist mittlerweile der Hammer süß-fruchtig aber gleichzeitig auch stechend-gasig 😍💚
Likes
27
Share


@R_Dank
Follow
10 days into flower with the first taste of bloom! Happy with how things are going.. don’t know why my videos won’t play
