The Grow Awards 2026 🏆 


Likes
Comments
Share
@Glizzy420
Follow
Last auto i'll grow , autos are actualy good for fast and not so heavy stoners , my yield is good but not the way i want it , so i'll keep improving my shit , starting with femenised seeds next run also a blueberry , first femenised im going to use , so lets hope it will have a better harvest. Overall this autoflower blueberry yielded the most of all my autoflowers , dense buds , good quality and very fruity smoke!

Likes
1
Share
@Trinidad
Follow
04.08.25. Day 70
10 weeks and I think she still has about 2 more weeks left. She is a big girl. 98cm tall. I gave her a fresh reservoir change out today. She has developed some symptoms on her leaves. Maybe nutrient burn or maybe the onset of some kind of deficiency. She is looking good. I will continue to monitor and update.

Likes
35
Share
@DjDaveAtHome
Follow
A 4 hour planned power outage in my area gave me the excuse to flip the girls. Kept the lights off for a cycle then immediately went 12/12. Although the temperature dropped to a root freezing 58°F, the reservoir didn't have a chance to fluctuate much and I also kept my air pumps running for an extra hour and a half off my computer backup battery!
The battle with root rot is basically over. I am taking care to rinse the roots every once and a while.
Growth has been amazing! Loving DWC! It also gives me things to do as I lie to pay attention to my plants. Doing a thorough clean with H2O2 every res change. PPM is around 800-900. Drops fast now. Every two days I check PH and correct if necessary. Usually it's been around 6.2-6.3 when I check. I PH it back down to 5.8.
I've heard that flowering is a little on the acidic side so I'm planning on dropping my PH to 5.5-5.6.
Did a major defoliation after this diary entry. Will do another in three weeks. Stretch has started by the looks of it.
Blueberry Headband (2) from Humboldt Seeds.
https://www.humboldtseeds.net/en/blueberry-headband/
Lighting
https://www.horticulturelightinggroup.ca/products/260w-qb-v2-led-kit
DWC Nutients
https://generalhydroponics.com/floraseries
FloraGro 5ml/gal
FloraBloom 10ml/gal
FloraMicro 7.5ml/gal
Cal Mag 5ml/gal
https://generalhydroponics.com/calimagic
Epsom salts
Brown Slime Root Rot Organic Microbe Tea
5 ml (1 tsp) organic sulphur free molasses
5 ml Alaskan Organic grow fertilizer (or something comparable)
5 ml Alaskan bloom fertilizer (or something comparable)
5 ml Seaweed or kelp fertilizer
2-4 ml Advanced Nutrients Tarantula

Likes
10
Share
@barlobruz
Follow
08/30/2021
- Noticing more gnats than usual. Could be overwatering, anaerobic soil conditions, or both.
- Going to set up fly traps, starve both the plant and the gnats of water for about a week.
- Will observe any stress responses due to an extended dry period.


Likes
14
Share
@Kakui
Follow
15 Noviembre:
-Hoy se instaló el sistema de riego "Drip to Waste" que me permitirá hacer riego de precisión, con protocolo "Crop Steering".
-Se instalaron sensores de humedad de suelo, para saber cuándo y cuánto regar, el sistema manda datos de humedad de suelo, temperatura y humedad ambiente, etc vía internet a mi celular.
-Mañana se comienza con el primer riego de precisión.
17 Noviembre: Segundo día de riego automático, 3.0EC y 5.9pH, las plantas crecen a buen ritmo, las raíces ya están saliendo por los orificios de drenaje a 2 días de transplantadas.
20 Noviembre: Se realizó una pequeña defoliacion de las hojas tipo abanico muy grandes.


Likes
7
Share
@Danger90946
Follow
Hello all, so today Day 61 12/24/2021 marks the end of this lady. There is a few reasons why this happen out of no where. First wife got me a new tent for B-day/X-Mas and this lady did not fit with other grow I have going on. Second running out of stock supply so its time to restock 😜. I do Wish I did gave her another two weeks, I am going to grow this again so stay tune in the near future for it.
Likes
18
Share
@Hashy
Follow
Week 2
Light cycle=22/2
Light power=86w=36%
Extractor controller settings
High temp= 24c
Low temp= c
Temp step=0c
High Rh= 70%
Low Rh= %
Rh step=0%
Speed max=5
Speed min=1
Smart controller settings (during lights on).
Lights on= 02.00am
Radiator on= below 19c
Radiator off= above 20c
Humidifier on= below 64%
Humidifier off= above 67%
Dehumidifier on= not in use
Dehumidifier off= not in use
Smart controller settings (during lights off).
Lights off=00.00am
Radiator on= below 16c
Radiator off= above 18c
Humidifier on= not in use
Humidifier off= not in use
Dehumidifier on= not in use
Dehumidifier off= not in use
Friday 29/12/23
#3 (Day 8)
📋 This is looking strange, the leaves seem to have lots of blemishes, almost like tiger stripes, early leaves do show up weird growth at times so I'll put it down to that.
Saturday 30/12/23
#3 (Day 9)
📋 Still got strange leaf markings.
Was H=8cm D=77cm DLI=19.5
Now H=8cm D=70cm DLI=19.0
10.00pm
Switch to 20/4
Light power was=86w=36%
Light power still=86w=36%
Lowered light by 7cm.
Extractor controller settings
High temp= 24c
Low temp= c
Temp step=0c
High Rh= 68%
Low Rh= %
Rh step=0%
Speed max=5
Speed min=1
Smart controller settings (during lights on).
Lights on=20/4 (04.00am)
Radiator on= below 19c
Radiator off= above 20c
Humidifier on= below 62%
Humidifier off= above 65%
Dehumidifier on= not in use
Dehumidifier off= not in use
Smart controller settings (during lights off).
Lights off=20/4 (00.00am)
Radiator on= below 16c
Radiator off= above 18c
Humidifier on= not in use
Humidifier off= not in use
Dehumidifier on= not in use
Dehumidifier off= not in use
Sunday 31/12/23 (New year's eve)
#3 (Day 10)
📋 wet the soil.
Monday 1/1/24 (New year's day)
#3 (Day 11)
📋
💧💧💧💧💧💧💧💧💧💧💧💧💧💧💧💧
Method= manual
Neutralise=0.1ml/L
Roots=5ml/L
Feed=nutes
Volume=200ml
Easy Ph down=0 drops/L
Ec=0.27PH=6.1/6.2
Time=9.00pm
Runoff.
Total runoff=45ml
Ec=2.5 PH=5.7
💧💧💧💧💧💧💧💧💧💧💧💧💧💧💧💧
Tuesday 2/1/24
#3 (Day 12)
📋Humidifier didn't come on autopilot.
Wednesday 3/1/24
#3 (Day 13)
📋 Maybe top tomorrow.
Thur 4/1/24
#3 (Day 14)*****
📋 ✂️ Topped after the 3rd set of leaves (5 fingered). Removed lower leaves and nodes (single fingered).
Tomorrow will be the 1st day of 18/6 so altered the light at 10.00pm
Light power was 86w 36%
Light power now 120w 50%
Was H=10cm D=67cm DLI=18.9
Now H=10cm D=67cm DLI=22.0
Been another good week, she is still sporting some cool tiger stripes on some of the leaves. She has been topped so I should have 4 main colas, I may top some of them further down the line.
Back soon.
Take it easy.
Likes
28
Share
@valiotoro
Follow
Terpenes are like an invitation to travel
I’d say to Brazil, on Copacabana beach, sipping a citrus and passion fruit caipirinha!🤤🤤
*Autoflowers and Fast Flower have the same terpene profiles, but with Fast Flower, the terpenes come through way more powerful💥
Likes
45
Share
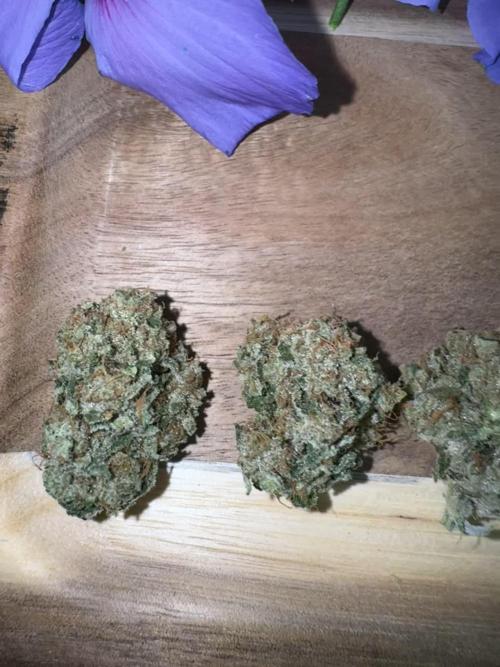
@GreenHouseLab
Follow
Big thanks to the homie @wicked_stix for providing me with this Masterpiece!
One plant was grown in coco coir drain to waste with cropsalts other DWC also with Cropsalts. Hydro was neglected but ran itself for 3 weeks as a stand alone system. All in all got over 380gr running the light at 280w for the hydro setup full of frosty the ⛄️ type buds with tremendous sugary flavours ❄️❄️❄️❄️❄️❄️❄️❄️❄️❄️❄️❄️
Processing
Likes
4
Share
@ganjaman24
Follow
I flipped them to flower earlier this week so I can make space for some new stuff and I think they’re doing pretty well...no buds yet will try to stay more consistent with entries. Thanks for tuning in!! Happy growing! XD

Likes
5
Share
@2x2UkGrow420
Follow
3 weeks in already, plants seem to be looking good, little bit of Nute burn on the plant on the right but only on 1 of the older leaves so not too concerned. Fastbuds GSC starting to smell, piney fresh ganja smell, are are now stretching a bit more. Really happy so far and loving my new hobby, excited to see what the next weeks brings! Happy growing!!!

Likes
12
Share
@TheBudWhisperer
Follow
End of the third week of transition and the hot mess is rounding out nicely👌. We’ve got an extra pots worth of space freed up so we spread em out a little and tied the super tops back down again. Probably for the last time as we wait for em to bulk up through mid flower. Per the video - we kept as much foliage as we could and we’ll move to straight maintenance and pruning from here on out.
What’s interesting is that every single one of these clones is perfectly healthy. This is in stark contrast to the mothers growing out seed in the tent next door. Half of those are showing deficiencies of some kind. A telling comparative between to different hydro methods. Coco is an imperfect method imo and every plant always seems to react a little differently. Dutchies, well…. They speak for themselves😉👌.
I expect yield will be much heavier on this run than originally anticipated. This is the way👍.
Background
This cycle of clones represents all the potential of this F1 line of WalkerBerry OG. Bred by myself over the last couple of years. This genetic shows excellent hybrid vigour, incredibly stable nutrition requirements to date and an eclectic mix of long and short internodal spacing bu specimen.
We know we have indica and sativa dominant traits spread evenly across the 6 available clones. Now it’s just a matter of seeing them run out under controlled and pollen free conditions.
We’ve labelled each plant and it’s resulting seed accordingly. Once we get to the F2 run, we’ll hopefully be able to isolate down to 2-3 phenos if the bud is any good. From there, who knows. It’d be great to get to a finished, stable generation that would be fem worthy but that could be a very long way off. For now - we’ll focus on this line and see where it goes🤞🤞.
Processing
Likes
1
Share
@Esebees
Follow
Cambiamos de fotoperiodo y las plantas rápido han pegado el cambio y ya sacan los primeros pelitos


Likes
7
Share
@TheGreenHoodlum
Follow
2 phénotypes totalement différents! Une avalanche de trichomes et une odeur de paradis! Cette gorilla cookies est magnifique, vivement la dégustation!!
Le poids humide est approximatif
Qu'en pensez-vous les amis? Des conseils pour la prochaine session?
Peace Love and Let's Grow!
Ps: je vais essayer de poster plus de photos d'ici quelques jours
Likes
33
Share
@1Right_Angle
Follow
Nov 27th
Nov 30th a.m.
*** 3L Water and Molasses for its last meal. Lights-Out Friday morning, into a dark tent for 48 hrs. Harvest Sunday ***
Dec 2nd
- one last couple-litre drink of h2o/molasses/rezin to help her through the long night(s)
Dec 3
- last day of man-made light comes after 12 Full weeks of Flower !!!!!!!!!!!!
- also obviously going to be the largest yielding AutoFlower I have grown. (Walter White, Maui Wowie & Northern Lights Express) ea. grow has been bigger
- goal is 48-72 hrs of darkness for Lemon Pie Auto (36hrs darkness is for the plants going into Flower…)
-Photos, Chop and Hang happen on Monday morning
Processing
Likes
11
Share
@ganjaman24
Follow
They’re looking extremely healthy..gave em their first nute feed with the last watering seem to be doing fairly well..fimmed the GG and LST. Did not touch the unkown as it looks smaller to be the same age. Running GHE base line with few extra supplements.
****UPDATE****
Both are LST’d..might rethink the way I tie them. Going for a “coil” type look, we’ll see though. They’re looking great! Hoping for females!

Likes
3
Share
@BioGrowBayer
Follow
Diese Woche verlief ohne weitere Probleme. Alles entwickelt sich wie geplant. Die Thripse sind nach der Neemöl-Behandlung nicht mehr zu sehen – scheint gut gewirkt zu haben.
Zur Sicherheit habe ich noch AC-Raubmilben ausgebracht, um eventuelle Nachzügler unter Kontrolle zu halten. Außerdem wurden ein paar Blätter entfernt, um die Luftzirkulation zu verbessern und mögliche Verstecke für Schädlinge zu minimieren.
Die Pflanzen sehen gesund aus und wachsen kräftig weiter.