
Likes
Comments
Share


@FreeRangePessimist
Follow
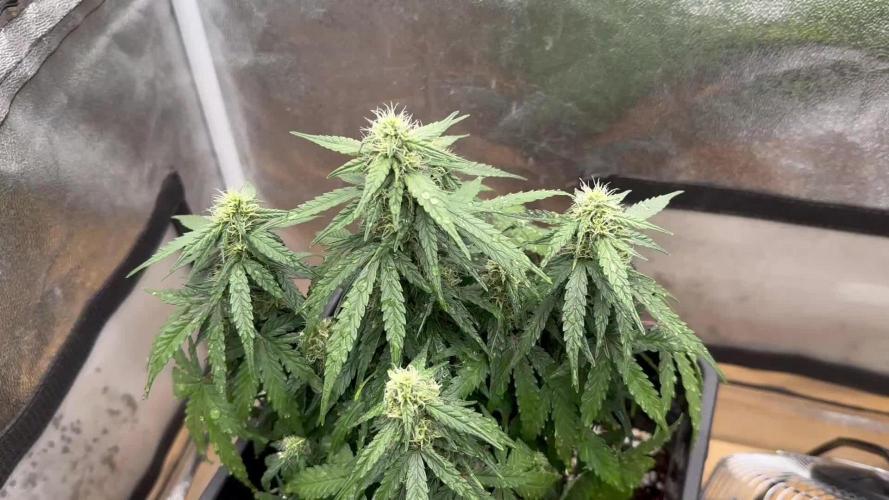
Plants are doing well. I'm going to top them soon. I tend to wait on topping to reduce stress, you never want to remove more that 1/3 of the plant( to each their own). I'll be FIMing the Sensi Star and Topping the Peyote.
Pretty sure I stunted the White Widow from exposing it to the cold snap we had back in late February. I will top it and try and clone off the topping and see if that clone takes off. In my past I cloned plants outside in Mid June back in 2012 on 5 foot Agent Oranges, those clones caught up to the plants outside and eventually outperformed them, in less than two months. Never would have found that out if I didn't try.
Happy growing everyone!


Likes
49
Share


@SolitudeCorners
Follow
This cross between Cherry Pie and Chemdawg and do-si-dos It smells vaguely like brain cake. However, chempie has a stronger aroma than brain cake. strong terpenes of linalool, and the smoke was quite harsh and powerful with each hit. The nicest form and most substantial buds in this crop

Likes
3
Share

@I_roll_my_own_420
Follow
Hello guys. So far so good, 2 of the girls(yellow leaves) looks like different genetics a bit 😅. Still growing and not flowering as fast as other 3 plants. I will try to boost them with a bit more nutes.

Likes
2
Share


@VirginiaGrownExotics
Follow
Flower starting up nicely already starting to turn purple these ladies are looking great. Starting to feed with some bloom but still giving low doses of Veg nutes in the 1st 2 weeks for growth

Likes
Comments
Share


@HOMEGROWBOOK
Follow
Wir starten in die BW 5 Pflanzen sehen sehr gesund aus. LST ein wenig nachjustiert.
Richtiger gesamt Bericht Ende der Woche

Likes
17
Share


@Bobo_Zion
Follow
Plants are growing nice, garden pest totally under control. No issues to report this week thankfully, in the next two week we will be doing some defoliation of the ladies. Tallest plant is 46" , shortest plant is 12"
Likes
47
Share


@S2340420
Follow
Another week closer due a bit of a heatwave this week according to the forecast temps. Were at 30 today humidity 55 will needty keep. Ma eye on tht

Likes
32
Share


@BudVision
Follow
Hello growers,
as I mentioned last week, La Bomba was left alone in the coop and she’s doing amazing. I’m just watering now and waiting for the right moment to harvest. The aroma is incredible, somewhere between a sweet profile and that loud gassy fuel, a truly unique combination. I gently spread her branches with a few strings so the light can reach the lower buds. The buds are hard and the whole plant looks beautiful.
Peace and happy growing ✌️


Processing
Likes
10
Share


@BodyByVio
Follow
After 21 days in turbo cloner I transplanted 4 Sweet seeds Green Poison into 1 gallon plastic pots filled with Cana coco. Few days later I transplanted another 4 clones into DWC!
Stay tuned!
Coco feed at 700ppm
Dwc feed at 480ppm

Likes
14
Share


@Rock_n_Roll_Randy
Follow
FOR EVERYTHING MARS HYDRO VISIT:
www.mars-hydro.com
www.marshydroled.ca
PROMO CODE: rocknroll
VISIT THE ALIEXPRESS STORE:
@marshydro_aliexpress
Instagram: @marshydropenny
https://youtube.com/channel/UChU5ZWwNi-DvnO3oWVU3ceA
(NEW) STRIVE NUTRIENTS 💪
Thanks for taking the time to read and check out my diary🤜🤛
ATTENTION GROWERS!!!! BEWARE OF A SCAM COMPANY.... GREEN BUZZ LIQUIDS WILL SAY THEY WILL SEND FREE FERTILIZER BUT THEY MAKE YOU PAY THE SHIPPING WITHOUT TELLING YOU AND THE AVERAGE SHIPPING PRICE IS $100. AND THEY WILL GET ANGRY AND RUDE. THEY TOLD ME TO SUCK IT UP AND BITE THE APPLE🤬🤬
AND THEY TELL ME THIS RUDE BS AFTER THEY TOLD ME I NEVER EVER HAVE TO BUY OR WORRY ABOUT FERTILIZER EVER AGAIN. THEY ARE A RUDE, LYING GARBAGE COMPANY 🗑️
POOR QUALITY NUTRIENTS WITH VERY POOR AND RUDE CUSTOMER SERVICE AND NOT WORTH THE PRICE
FC-E6500 LED GROW LIGHT:
FC-E6500 grow light with 3978pcs OSRAM BridgeLux Diodes & Moso Driver, market-leading PPF 2.7 µmol/J, Max 2.5g yield/watt with 30% higher Average PPE, more cost-effective when compared to same style type lights. Only consumes 650W, perfectly cover 5x5ft (personal), 4x4ft (commercial) grow space. Innovative Precise Uniform Lighting-Built-in removable bars interval & dimmability enable the exact & dynamic PPFD control over each of the plant growing stages, FC-E6500 detachable bars deliverSuperior Heat Dissipation: Real Aluminum heatsink together with 6 slim profile passive cooled bars (THINNER & LARGER surface) and detachable Meanwell Driver, create less heat. save 50% hydro than other old grow lights! Driver can be mounted remotely on the side of a grow tent/rack or on an adjacent wall to remove heat from grow space. Full Spectrum UV IR LED: With Yield Max spectrum (660nm Osram enhanced Deep Red,2800k-5000k,730-740nm IR,380-410nm UV LEDs), Average PPFD the FC-E6500 LED grow lamp enables cultivators to produce BIG FAT Dense Buds, perfect for full-cycle hydroponic, soil, grow tent/grow room.
Dimmable Commercial Grow Light: Cost-efficient, easy dimming & daisy chain With a max up to 20 lights, IP65 Waterproof, master light easily controls the rest. Perfect for commercial & home horticulture.
FC4800 LED GROW LIGHT:
GET THE MAX FROM MARS👍: Welcome one of the newest members of the Mars Hydro family🤜🤛🤘. The Mars Hydro FC 4800 480W LED Grow Light can accommodate up to a 4' x 4' area for flowering. It has OVER 2000 LED chips consisting of the best selling Samsung LM301B diodes which has a Luminous Efficacy of: 220 lm/W
0.2 W, 3 V mid power,
Osram 660nm Diodes, Infrared light and UV LIGHT👍. It boasts the incredible efficiency of 2.8 µmol/J, maximum 2.5gram yield per watt with 30% higher Average PPFD. This High-intensity spectrum is beneficial for plants at all stages - from veg to bloom, and creates Big dense Buds👍. achieve 50% higher yields & quality compared with the old lights! Only consumes 480W for 4x4ft personal grows, and 3x3ft for commerical grow. It comes with a dimmer and daisy chain function with a maximum of up to 15 lights, the master light controls the rest👍. Wide 6-bar design offers even & wide canopy coverage and can maximizes your grow space. slim 180° FOLDABLE DESIGN... YES I SAID FOLDABLE🤘🤣 , making it compact and easy to install, it's IP65 WATERPROOF and will give you no worries while growing in a humid environment and makes it a flexible high performance commercial grow light for enormous SUPER FROSTY yields.😛😛😛. MARS GETS EM FROSTY BOYS👍
AWESOME HEAT DISSIPATION: The Low energy consumption FC4800 growing light has 6 passive-cooled bars and an aluminum heat-sink a removable driver you can upgrade later or have it outside your tent. with zero noise you can save up to 50% in your electricity bill compared to HID's or HPS lights!
It also has a removable driver so you can upgrade it in the future or have it outside your grow space for better heat control in your growroom👍
UPGRADED FULL SPECTRUM: Yield Max Spectrum with enhanced red (Top-Bin Samsung 3000k-5000knm, Osram 660nm Deep Red), speed up blooming & fruiting, perfectly suited for full-cycle growing. The FC4800 LED grow lamp was born for Big Buds, perfect for commercial, grow tent, grow room, hydroponics, and all soil grows.👍
THE BEST SAMSUNG DIODES: THE FC4800 has Top Bin genuine Samsung Osram Diodes, combined with remarkable 2.8 µmol/J Efficacy, 30% higher Average PPFD, 50% less energy consumption, to maximize your yields. They give you a TRUSTED 3 years warranty 100% Satisfactory guaranteed!!!
TSW2000 LED GROW LIGHT:
INCREASE YIELD AND CROP QUALITY WITH MARS HYDRO LED GROW LIGHTS: NEWEST SMD LED technology provides the highest PAR/LUMEN output (1122umol@18") and can make you get 30% higher yield compared to OLD blurple led lights. Max 2.5g yield per wattage and achieve maximum quality and quantity, much better than traditional HPS grow systems
LOW ENERGY CONSUMPTION LED GROW LIGHT: Consuming only 300W true output with 684 LEDS! It saves up to 50% energy than other led grow lights. Perfect for 3.5x3.5ft bloom stage, 4x4ft veg stage. Over 90% light energy can be absorbed by plants, it will have higher intensity in a MARS HYDRO grow tent with diamond design mylar, or by crossing over using multiple TSW2000
HIGH EFFICIENCY FULL SPECTRUM INDOOR GROW: 3000K 5000K and IR 660nm 760nm RED, makes it close to natural light, highly engineered to provide improved growing performance for plants at all stages of growing, rapid plant response from seed to flower; Uniform and wide-beam light distribution for your plant's optimal growth
8x8 1680D GROW TENT
The MARS HYDRO 8x8 Grow Tent interior is made of a unique diamond design mylar which is highly reflective. (Other companies mylar and reflective rate is as low as 50%, and it won't provide efficient light. They use thick 1680D oxford canvas, and being double stitched, it is tear proof and perfect for locking in the light. Their grow tent keeps 100% of the light inside the tent and helps your plants absorb more light. EXTRA-THICK material means No light leaks or rips at all.👍
Strong Stable metal corner adapters and poles are the trustful supporters of the tent. It's very sturdy, neither rusting or paint flaking off. quick and easy tool-free setup. They use heavy-duty metal zippers, with double layer black lining, by far the best on the market which creates a light-proof seal.
The Easy observation windows are made by double layers of cloth. Observe the growing conditions of your plants without opening the tent and avoid disturbing your plants. The observation windows also serves to dissipate heat and ventilate the air.
The tent includes 2 removable waterproof floor trays to hold soil and water. The removable tray can be taken out to wash easily.
They guarantee the grow tents are easy to install even if you've never done something like this before. Clear Instructions and no tools needed! They also offer 30-day unconditional refunds for quality problems. Just contact their friendly 24 hours customer service 👍
Likes
1
Share


@Trinidad
Follow
04.08.25. Day 70
10 weeks and I think she still has about 2 more weeks left. She is a big girl. 98cm tall. I gave her a fresh reservoir change out today. She has developed some symptoms on her leaves. Maybe nutrient burn or maybe the onset of some kind of deficiency. She is looking good. I will continue to monitor and update.


Likes
22
Share


@MasterKush714
Follow
_ ___ _👹YOOOO WHAT UP GANG👹!!!!! SOOO 2ND WEEK OF VEGETATION BEGINS!!!! ____________________ _______________ ____ ___ __ _ _
********************************************************************************************************************************************
..............................................................................................................................................................................................................................................................................
SOOO GUYS HERES THE UPDATE WE ARE NOW AT DAY 14 FROM GERMINATION START DATE, SO FAR SHE TOOK A HIT INITIALLY FORMING
LEAF STRUCTURE BUT SHE IS RECOVERING LIKE A CHAMP, ALSO I TRANSFERED HER INTO THE LARGE FABRIC BUCKET (TECHNICALLY I SAID
I WOULD TRANSFER AT WEEK 3 BUT I DECIDED PHUCK IT AND TRANSFERED, NOW WAITING FOR HER TO RECOVER THIS WEEK WITH CONSTANT
DAILY WATERING BUT NOT HEAVY VERY LIGHT UNTIL SHE STRETCHES A BIT MORE, THEN GOING TO BE ADDING MORE NUTRIENTS INTO THE SYSTEM WITH FOOP NUTRIENT LINE THIS WEEK THANKS! 😎_______-----_____------___------____________________________________--------------------_______________________-----______-----_-_____
++++++++++++++++++++++++++++++++++++++++++++++++++++++++++++++++++++++++++++++++++++++++++++++++++++++++++
09/22/2023 UPDATE GUYSS!!!!!!!!!!!!!!!!!!!!!!!!!!!!!!!!
SOOOOOO SHE IS REALLY REALLY PROGRESSING AND COMING OUT OF HER SHELL * PUN INTENDED HAHA*😆
STARTED HER ON THE FIRST FEEDING OF NUTE'S WITH FOOP!!!!!!!!!! ( DO NOT SLEEP ON THEM!!!!!!!!!!!)))))
SHE IS REALLY TAKING OFF SO YEA OTHER THEN THAT GOING TO SWITCH TO THE MIGRO ARAY 2 + RED IN ABOUT A WEEK AND GO FROM THERE!!!!!!!!!!!!!!! THANKS!!!!
AS ALWAYS THANKS FOR STOPPING BY ALL THE ADVICE AND HELP IS TRULY TRULY APPRECIATED I WANNA WISH YALL A GREAT RED EYED WEEKEND LFG!!!!!!!!!!!!!!!!!!!!👹
++++++++++++++++++++++++++++++++++++++++++++++++++++++++++++++++++++++++++++++++++++++++++++++++++++++++++++++
________________________________________________________________------------------------------__________________________------------------------___________________________---------

Likes
Comments
Share

@Cainb
Follow
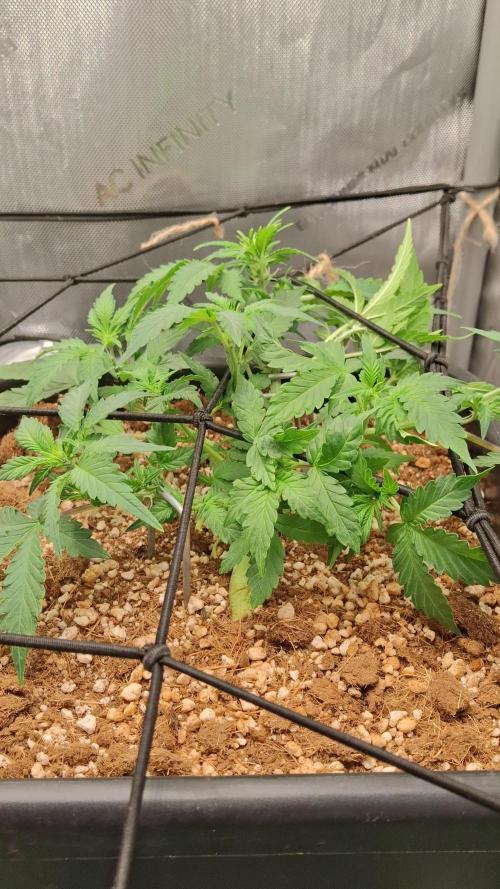
The pre-flower is just starting and they are putting on good growth.
One of the plants doesn't have the same vigour as the other, but it is still doing well.
Likes
13
Share


@Oklahomasunrise
Follow
She's doing great! Just gotta keep up with Ipm.
I have been going between circadian sunrise and lost coast pest management.
Cannot wait to see this girl flower!


Likes
1
Share


@lalee
Follow
first time I grew Dutch passion, and it was orange bud auto. I love Sativa dominant strains, and this strain is now on my favorite list. First on my list is Amnezia haze auto, which is 70% Sativa dominant seedstockers and fastbud seeds. I love it. The second is chocolope DNA genetics feminized; this strain is really heavy and many thc. Three is orange bud auto from Dutch Passion, really nice buds, many thc, and long-lasting sativa effect. This strain really tells you that you are really high.


Likes
2
Share


@CalGonJim
Follow
11/4 130am Lights up to 77 watts 4.3 grams Maxi-Grow powder this week. Using mix from last week. Will probably switch to Bloom by Wed.
11/5 12am Canopy Creations LST things are great resistance training builds huge branches!!!
They are amazing. 10am growing fast and big after today’s watering!!!
Garlic muffin and fatso have the thickest branches that I’ve ever seen the side branches are thicker than what I got when I was growing in bigger containers so these nutrients and the soil and this light wattage seems to be a good formula I have to save this and work on it And stressing with the Canopy Creations has doubled the diameter of the branches that I have been stressing. Just great results.
11/6 Galic is the strongest so far her branches are THICK, a perfect 4 cola grow. Each of the 4 branches are as thick as the main stem on my first few tries at this.
12am They were all dry gave water probably last week using Grow switching to Bloom nutrients. Extremely strong plants from Seedsman!!!! When I finally got them going I found using Maxi-Grow & Rapid Start made a huge difference!!! Only Rapid Start for the first week.
11/7 1am GM & CA are huge now!!
lights up 89W as the leaves fold up a little for the heat I will raise them an inch or so. 1pm did water today. They are starting to flower
11/8 12:30am Switched to Bloom nutrients yesterday after the last feeding with Grow they all went to sleep right away after that and are waking up now with flowers forming. I will use 4grams Bloom, 0.4 Purpinator, 0.5 Rapid Start, 0.4 Silica, 0.4 Cal/Mag. Silica causes fluctuations in pH.
2am Galic is a MONSTER, and Seedsman is out of them. Fatso is next for size. I can not believe how huge the branches are this technique of 4 colas in a small 1 gallon container. These plants will be perfect for this
9am LST crazy day!!! I have never been able to train the small set of first branches that come off the first node on plants before until seedsmen Faso and garlic🤩🤩🤩🤩🤩🤩🤩🤩😍😍😍😍😍😍😍😍😍😍😍😍
11/9 1am flowering I might have to split them up into 2 tents they are all getting bigger than I thought they could, this is just great! after 20 fails I think im getting this small grow style worked out.
1:30pm moved the RSQ's into tent 3. Tent 2 not big enough but I'll make it work. Once I harvest the plants from the 🎃 Halloween All the Darkness grow it will be easier. Galic & Fatso by Seedman are HUGE very thick branches, thick side branches responds to training extremely well. Strongest F1's!
Likes
4
Share


@AlpAge_Cino
Follow
Last week with B.A.C. organic program, a big shot of Final Solution, less PK booster and no more Calmag : after this watering, it'll be rain water for everyone until the end (about a week or two).
The smell is powerfull! It killed my 1 year old carbon filter...😓
2023/05/01 : trichromes checked... still too much clear and not enough amber.