
Likes
Comments
Share


@CaliJ
Follow
Day 60: cookies gelato 1: in the shape of tennis balls, and a golf ball, magnificent, 268 grams wet🇺🇸🔥. Cookies gelato 2: 197,6 grams Wet🇺🇸🔥 Cookies gelato 3: 217,7 grams wet🇺🇸🔥

Likes
13
Share


@Danieledec
Follow
Hi Guys
the triple is doing well
and i think next week orthe next after i will change the light schedule and start the flowering
what you think??is that a good choice??
sorry for the bad quality of the pics
thx everybody
Daniele & Claudia
Italians from Greece
Likes
31
Share


@Pedrojuan
Follow
Inicia una nueva semana, subí el EC a 1.4, el PH 5.8 aproximadamente. Todo va bien, los olores están controlados, veremos cómo procede. Tal ves la próxima semana meteré un dehumificador para tener controlada la humedad en las últimas semanas.

Likes
7
Share


@Naujas
Follow
well, it's exactly 12 weeks :) and my house is full of lemon aroma :) the girl endured really difficult growth, but she coped with everything perfectly :) who followed the growth, you saw that she grew on the balcony for 10 weeks, and she spent the last 2 in the grow tent :) 500 gr wet weight !!!!:) , before putting it in the ground I expected less than 10 g dry yield :D then this growth turned out super well, if it wasn't for my vacation I would have let it grow for about 2 weeks I think. but everything is still very good, I'll go home, fix it and do a smoke review :).


Likes
3
Share


Processing
Likes
22
Share


@EelGrows
Follow
Week 9:
Day 57-60: So... I'm in love with these White Cracks! #1's Main cola coupled with that PHAT ass double bud has got my wouth watering! I was worried it would be a bit too early on day 73 for #2 and #3 but they seem to be catching up qickly and are really only a few days behind #1. I can throw everything at #2 in terms of nutes and she just eats it up, what a surprise pheno after the VERY bushy and compact structure of her first 3.5 weeks. Buds are very dense on all 3 plants and SUPER frosty! They enjoy an upped dose of Calmg on day 60!
Day 61-63: They are starting to show their fall colors ever so slightly, and the temperatures are going to be 2C cooler from here on out, so hoping for a little extra color 😉 Gave em all a nice final feed of bloom nutes on Day 63. #1 has about 85-95% white pistils and #2 and #3 have about 45-55% orange pistils. #1 is about 70% milky with a 5% amber and #2 and #3 are about 50-60% milky and a few amber here and there. Looking forward to these last 10 day! will be giving them PH'd water with regulator until harvest in 10 days. I only have time on Day 73-74 to harvest which I don't mind. I'm hoping this will create a varience in the type of effect every plant has to offer!
Oh and these White Crack overpower the 4AM in terms of smell by quite a large amount. I can't smell the 4AM in the tent with these 😂
EDIT: Oh and just wanted to say thank you for all the help you all have given me so far! Oh and shout out to FastBuds, which sent me a message last week saying they were interested in me growing their genetics! They're sending me some free seeds for my next grow! How awesome is that!

Likes
16
Share


@Marijuanaisland
Follow
Desculpe o atraso na atualização mais tive problemas para atualizar mais estou de volta ansioso para esta colheita


Likes
28
Share


@Adkguerrilla44
Follow
Man oh man the gp x bkp is taking off like a champ and filling out very nicely now that she's starting to flower 🌼 🌸!!!!! Gp x shb is starting to come back finally and is about to start flowering smells like straight up sour d already!! The gp x bkp is smelling like skunk and fruit I'm super excited for these strains especially after seeing somebody went and tested a few of wicked genetics strains and all of them came out to be 23%thc-27%thc !!! Fricken pumped gary payton is supposed to be a heavy hitter so I cannot freakin wait until both of these are finished
Likes
4
Share


@sjrseid
Follow
The featured time-lapse is from week 0 to week 5. The camera will be fixed; I couldn't hang it up earlier. Some light LST was required for overall light penetration. Final week of vegetative state before the stretch and pre-flower!
Likes
15
Share
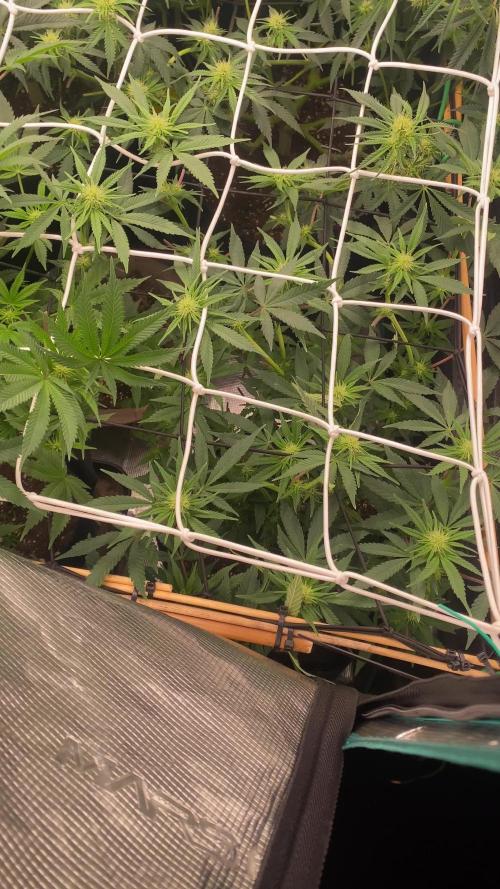

@Diips
Follow
did as much as i had time to defol day 21 and ended up throwing down another net that i will tighten up later today. also raises the smallest of the plants, she have been eager to get some sun, so shes alittle toofar raised atm, but will adjust as she gain some size 🌞❤️
day 23 - they all got their first dose of pk booster 5-8 from biotabs, all look so good!
day 24 - all seem to be going perfectly! gonna raise the light intensity a few. (74% up to 76%). we still got many weeks to go ;).

Likes
12
Share


@Jays_Not_Here_Man
Follow
Temps have been good and RH has been steady between 60-65%. I have good airflow all around and don’t worry too much about it the higher RH at this point in the grow. Transplanted the ladies from their starter pots to their 2 gallon pots. They did not seem to have any transplant shock. A few more weeks and we will go to their 4 gallon final pots.


Likes
33
Share


@StickyFingah420
Follow
Día 88 y penúltimo antes del corte.
Ya se aplicó Flawless Finish para un acabado impecable como su nombre lo indica. Siempre prefiero hacer el lavado de raiz solo aplicando agua en las últimas 2 semanas, pero esta vez lo hice aplicando el finalizador y luego los últimos riegos con agua purificada.
La verdad es que estoy contento con los resultados de esta nena, que es hermosa por cierto, desprende olores ácidos, cítricos, dulces.
Los colores son hermosos y las flores están rebosantes de tricomas, lo que la vuelve muy vistosa.
Es todo por ahora, estaré manteniendoles informados en estos últimos días.
Buenos humos! 👽
Likes
15
Share


@I_Identify_As_A_Dan
Follow
Week 6 for Peyote Zkittlez by seedsman
Absolutely loving the structure on this plant😍 Shes been topped a few times at this point already up to 16 tops for now... She was fed twice this week with some FPJ, Regulator, Enzym+ & Startboooster by @aptus_portugal just to give it an extra boost!😎
She will be moved outdoors as soon as the outdoor autos are done😁She will definitely benefit from the extra space outside + some high humidity 😂
Up there with my favourites of this season for now!

Likes
21
Share


@Adriplnks
Follow
Les hago una defoliación cada 2 días para que los nuevos brotes tengan bastante luz.
Empiezo con revienta cogollos a media dosis.
He alzado la más pequeña que se queda atrás, la más grande la voy doblando sin problemas.
De momento siguen creciendo.
Likes
8
Share


@Shalma_kush_420
Follow
Muy buenas mi gentee
Por aquí otra semana más con estas increíbles plantas #sherbetz de @artgenetix que vienen con una forma muy top.
Color y aroma muy marcado.
Ya hemos empezado con los azúcares e hidratos de carbono para ayudar la floración.
Riegos con fertis solo una vez por semana, el resto de riegos con solo agua regulada.
Veremos cómo siguen la semana que viene.

Likes
1
Share


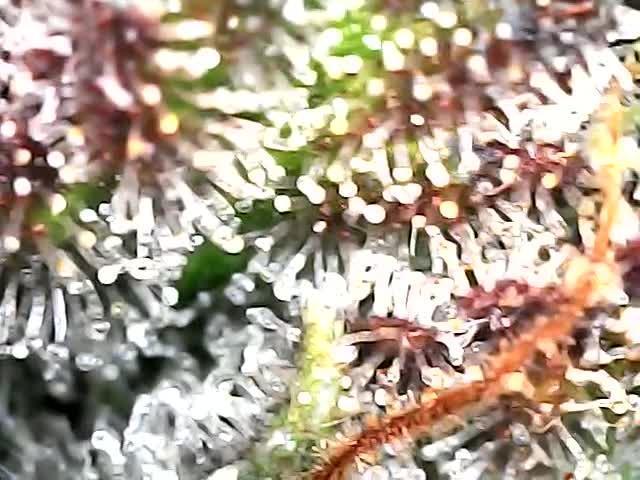
@RKGENETX
Follow
overall was great to grow and for it being my second grow I'm so glad how well it turned out some of the frostiest buds I've seen or smoked.

Likes
29
Share


@nijuana
Follow
I'm flushing it since 1 week , HERE WE ARE ENDLY 💚 !!!!! the 3 latest day i increase the water that I'm giving to it and the latest day I'm flushing with terra aquatica flush (3ml/l) I'm so impressed by this queen 👑 , so heavy , so powerful !!!
From the beginning to the end this is a phenomenal strain , total love !

Likes
14
Share


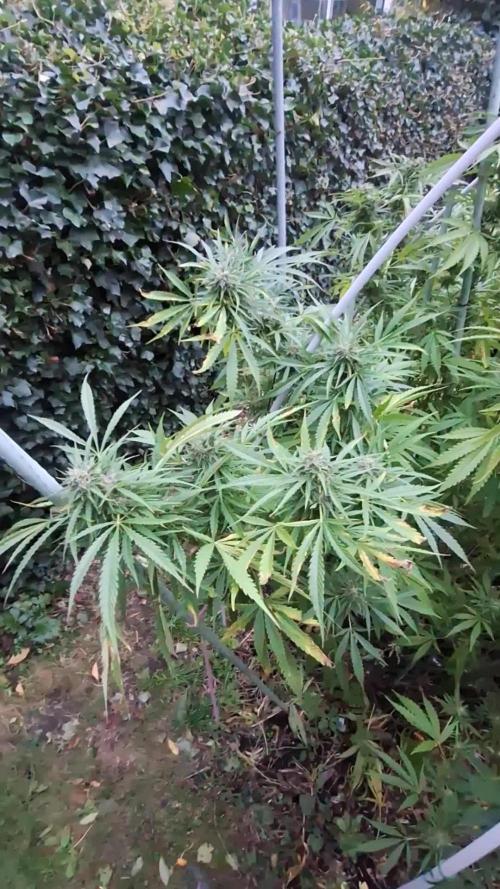
@ao_grows1978
Follow
Cruise control for the OG Kush. Heading into the final weeks, so I'll be removing odd fan leaves here and there and giving her one last light top dressing. She's drinking water daily now and trichome production is finally ramping up.