Likes
Comments
Share
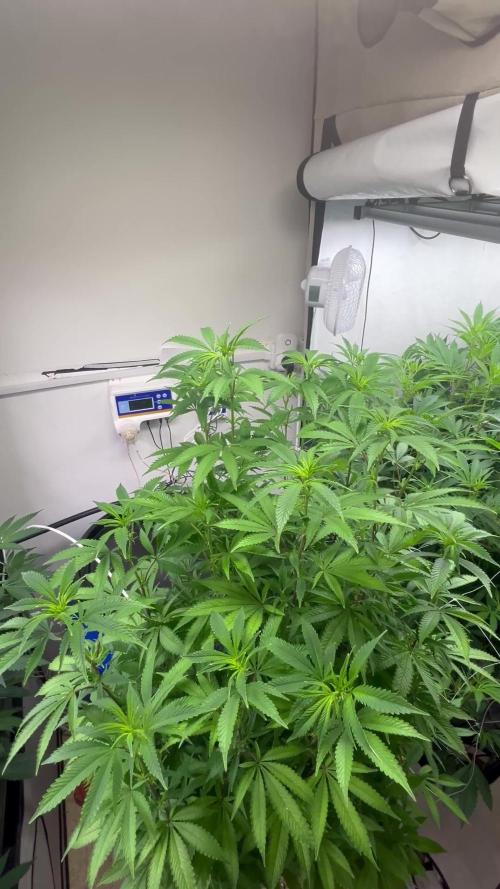
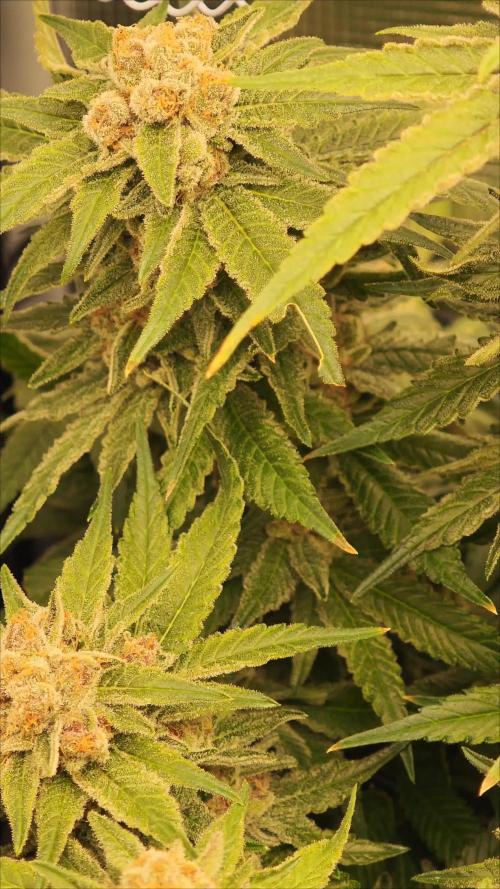
These bids are looking nice and fat, a very nice og Kush smell and vigorous plants, this week we are flushing and i think that somewhere around next week the plants might be ready but of course i will review the tricomes 😁
Processing
Likes
4
Share
How the time has flown by. She completes her flush this week and will start her dry, Sticky, smelly and buds are thick. Extremely happy with how she handled these last few weeks! Excited to taste her.
Likes
7
Share
Processing
Likes
7
Share
@Kushizlez
Follow
Day 49-56 (Day 50) I hooked up my carbon filter to the humidity controller and it is keeping the room exactly at 65-70% RH night and day. It looks like it turns on about every 45 minutes for about 5 minutes so it allows me to run the co2 bag properly. I don’t even have to use my dehumidifier. The room is 100% dark now too. Even the small red lights on the space heaters. Not going to feed anything other than foliars this week. (Day 51) Blackberry #4 & #8 #9 and white widows #2 & #3 are all confirmed males. Chopped them down and recycled the soil. White widow #1 is the first official female and I’m starting to see pistils on the m39/zkittlez too. Plants seem to be responding to the light fairly well. It’s hung 32 inches above the canopy which is as high as it can go without strapping it to the roof, which may have to happen one day. The plant can get within 6 inches of the light so I’m probably good. The ppfd output is 1800umols which is super high so I want to hang them as high as possible in veg. I wish I could rent a ppfd meter to see if I’m in range at 32”. (Day 52) Blackberry breath #3 is the first official bbb female to show. I decided to scrap BCTG #2. It sounded like a good strain but after looking at pictures of people who have grown it online, it doesn’t look up to my standards. I found a very small patch of powdery mildew on one of the leaves so I’m not even going to start with that shit again. I’m really thinking about scrapping the m39/zkittlez and the white widow too. I’m praying that I get at least 4 females of BBB. I tried super cropping for the first time today. A few of the branches I definitely squished a bit too much as they turned quite brown and looked dead within a day. (Day 53) Despite the m39/zkittlez vigorous growth, I know it will be a shitty strain that will most likely herm as it’s from a bag seed of low grade weed. I’ve decided instead of scrapping it, I will use it for experimenting with a new chemical powdery mildew preventative. If it dies oh well. I doused it and chopped a limb off a few hours ago during lights on and it seems fine. (Day 54) I’m about 90% sure BBB 6&7 are both female. #2 & #5 are looking like males but too early too tell. #1 is really tough to say. Just gotta be patient I guess. #3 has a great spread out structure, I hope it doesn’t stretch too much. The scrogging is a priority. I put up the scrog net just to see how it fits. It’s a little small around the edges but that’s fine. So it’s looking like out the 9, I would be lucky to get 4 fems if #1 & 7 would show forsure already. If #1 is a female I have my 4 and I can throw out the white widow. The white widow is just insurance at this point. Super cropped plants have recovered nicely. Going to continue doing this more. I’ve noticed that the plants that were put into my custom soil mix have very small fan leaves compared to the fabric pots of straight promix and dry amendments. Could also be the fabric pot is helping dry downs too. (Day 56) I’m seeing some yellowing so I’m going to give a foliar spray just too keep some deficiencies at bay. All of the plants are stunted except the m39 and bbb#3. Node spacing has also reduced significantly. I can’t help but feel it’s from the intensity of my lights but maybe they just need a transplant into some new soil something. Luckily the stunt and droop is only really happening to what I suspect are male plants anyway. Leaves are looking twisted and gnarled on #5. Going to move it into the veg tent for a while. I’m going to mix up and amend my Destiny/coco blend today and transplant bbb#3 and 6 & 7 in a few days. I mixed them up in contractor bags making sure to toss and turn vigorously. Here is my blend: 2 bags 40L Destiny soil 2 bags 40L coco 700ml glacial rock dust 700ml oyster shell flour 700ml nature’s pride bloom 300ml basalt rock dust 150ml langbeinite 150ml nature’s pride veg I am also going to try the Destiny top dress as it’s only 13 bucks a bag and full of good shit. I’m trying to not feed heavy in flower other than 2 or 3 top dresses and 2 teas and nothing after week 5. Because it’s taken so long for the plants to show sex, when I transplant into the 10 gallon pots, they should have more than enough nutrients too keep them going strong all the way through flower with just water. I’m a little skeptical about that though. Besides teas and dressings are fun. Everything should be broken down by week 8 or so. Will transplant in a few days.
Likes
Comments
Share
Around 4 weeks since sprouting nice and slow for now.. Two more weeks then I’ll do the flipping to 12/12 and weave out the males and go from there .. gave them a light dose of floraflex nutrients V1 and V2… 🤙🏽 Tinos Genetics
Likes
3
Share
This week it's all about the 8 White Widow clones, rooted well in shallow water bath with .5ml pH perfect Grow in the water. Long roots sprouted through the rockwool and they didn't seem to be inhibited by the 50w led. Now transplanted into their 1L pots with fresh soil substrate, no additives. Transplanted 2 clones into rockwool now in 1 pot, see how they (Cerberus) develops. Harvested the clone cuttings on 24/8/2020, took approx just over 2 weeks (17 days) to develop the long roots seen in the pics above. Kept the water feed fresh every 3/4 days to prevent algae build up. Switched to 12/12 11/9/2020 Unfortunately, I had to pull this grow, it was painful to ditch the plants as the grow was going well but i had to move house and couldn't take them with me.
Likes
6
Share
@dfgh95
Follow
I didn't take photos nor videos this week so I uploaded a vid from the new round, I have 2 cutting just growing healthy and some new seeds. You can check them on my new diary. The girls in cuestion are really good and finishing their lives, check the next week for mor photos
Likes
147
Share
Hello all friends! Last week I disturbed my girls for the last time. did a very hard defoliation. also cleared of everything superfluous that was below the skrog. Overall, both plants are doing great. I think that the harvest should be excellent and high quality! Now all that's left is to wait!! @Zammi_official what can you say abouth this Double Gorillas?😜
Processing
Likes
24
Share
**Encontrarás la traducción a español al final de la descripción** If you like this week, please hit a like, it costs you nothing! 👊. Thanks in advance 😉! From/Desde: 05/08/19 || To/Hasta: 11/08/19 From day/Desde día: 14 || To day/Hasta día: 20 -----IMAGES & VIDEOS----- V2: From day 17 to 22 she has turned a quarter, 90º. -----WEEK SUMMARY----- One week more of normal and constant grow, i like the rythm she has growing as i feel she's having a good amount of time for developing the root system. I didn't noticed any weird colour, twirl or something like that, anyway this tent is not totally isolated from outdoors as is always semi-opened in my living room, and the door to my terrace is opened 24/7. She looks very healthy and equitative, also i think she has a perfect height to keep her growing at low height, just a bit over the pot once topped. Next week i will perform the first topping and prunning. -----WATERING CALENDAR----- 08/08/19 - 3,000 ml with all week nutrients @ 1 E.C. PH5.8 *****ESPAÑOL***** Por favor, si te gusta esta semana dale un like, no te cuesta nada 👊. ¡Gracias por adelantado 😉! -----IMÁGENES & VÍDEOS----- V2: De los días 17 a 22 de crecimiento la planta ha girado un cuarto de giro, 90º. -----SUMARIO SEMANAL----- Una semana más de crecimiento normal y constante, me gusta el ritmo en el que crece pues me da la impresión de que está teniendo un tiempo excelente para desarrollar el sistema radicular. De momento no he notado ningún color o cosas raras en las hojas, aún así este armario de cultivo no está totalmente aislado del exterior ya que está siempre semi-abierto en mi salón, y la puerta de mi terraza está abierta 24/7. Se la ve muy sana y equitativa, también tengo la sensación de que va a coger el tamaño perfecto para mantener el crecimiento bajito, justo un poco por encima del tiesto una vez hecho el topping. La semana que viene realizaré la primera poda y el primer topping. -----CALENDARIO DE RIEGO----- 08/08/19 - 3.000 ml con todos los nutrientes semanales @ 1 E.C. PH5.8
Likes
2
Share
@YAMA47
Follow
Dia 67 desde germinacio.aqui muestro las 2 mas avanzadas.comparando cultivos de bsf Arg. Con Bsf España. LLEGO A LA.CONCLUSION QUE A NOS NOS TRATAN DE SUDACAS Y NOS MANDAN SEMAS DE CALIDAD MEDIA.PROX CULTIVOS CAMBIO E BANCO¡
Likes
111
Share
@DreamIT
Follow
🍋🥧🏎️ LEMON PIE AUTO BY FAST BUDS 🏎️🥧🍋 🍋 5.2 ... 🍋 6.2 ... 🍋 7.2 ... 🍋 8.2 🍋 9.2 🍋 10.2 🍋 11.2 today second top. , by the weekend I put in a 6.5 l pot, yeah __________________________________________________________________________________________________ ❌❓Not sure where to buy your seeds? 😮 Fast buds literally ships all over the world, check out their site! http://bit.ly/FastBudsgood __________________________________________________________________________________ 📜 A look at the details of what I'm growing 📜 🍋🥧🏎️Lemon Pie Auto 🏎️🥧🍋 ⚧ Gender ▪️ Feminised ➰ Genes ▪️ 50% Indica / 50% Sativa 🎄 Genetics ▪️ Lemon Pie X Autoflowering Genetics 🚜Harvest ▪️ 450 - 550 g / m² 🌱Vegetation ▪️30 - 35 days 🌷Flowering ▪️ 30-35 days ✨THC ▪️ 24.0% ✅CBD ▪️ 1.0% 🏡Room Type ▪️ Indoor 🌄Room Type ▪️ Outdoor 🕋Room Type ▪️ Greenhouse 🎂Release Year ▪️ 2020 __________________________________________________________________________ 📷🥇 Follow the best photos on Instagram 🥇📷 https://www.instagram.com/dreamit420/ 🔻🔻Leave a comment with your opinions if you pass by here🔻🔻 🤟🤗💚Thanks and Enjoy growth 💚🤗🤟
Likes
Comments
Share
A scent that’s impossible to describe — it’s like sweet bubble gum with a hint of wine. Pure beauty!
Processing
Likes
17
Share
@kcartel
Follow
For the first time I cut the leaves, for more extensive illumination of the upper part, due to the close location of the light of the plant, the trunk trunk grows and does not stretch upwards, I want to cover the entire area of ??the pot with one layer then start the flowering stage at 6-7 weeks I didn’t cut the leaves, but simply pressed them to the ground, since this is my first experience, I think that everything is going well, the plant eats a lot of nutrient fertilizers and looks good as you can see, the temperature in the box exceeds 27 degrees and it seems to her that temper tsya. in many of the moments, I would like to express a special thanks to such a cool grower like ctm_dzagi! Looking at his works of past cycles, I learned a lot and continue to learn, his technique and approach is great! Well, we are waiting for the fifth week)) Let's go!
Likes
6
Share
@Chubbs
Follow
420Fastbuds FBT2302 Week 1 Week 1 of the start of veg for these 2 FBT2302 plants. So far I've switched to 18/6 light cycle and keep a 75'f day temp with a 65'f night time Temps. I give them 500ml of straight well water every other day. I did to a pm spray and didn't realize my lights would be coming on as soon as they did. Lesson learned it'll burn the leafs. 😆 All in all Happy Growing
Likes
16
Share
@DonKrika
Follow
Last week of flower, I flushed during the last 4 days, I didn't do big flushes I simply water the plants with plain water, last 3 days of complete darkness. I think that next time I will complete the flush and then give 3 days of complete darkness, the fact that the plant is not receiving light makes flushing harder because the plant drinks less water. During the last 3 days, the humidity was always greater than 50% but the plants didn't seem affected. Before I started the flush the pant was only receiving 8h of light. I'm currently drying the plants, the temperature fluctuates between 17 and 19 degrees, I start with 65% humidity and I reduce 1% of humidity every day. I Do a 14 day dry DAY 134 PH - 6.02 Solution Temp - 16.9 PPM-1955 Watering Volume per plant - 4L DAY 136 - Molasses PH - 5.92 Solution Temp - 15.2 PPM-300 Watering Volume per plant - 4L
Likes
23
Share
Ghost Train Haze — Harvest / Trim / Cure Part 2 — Trimming, Resin & First Cure First of all, once again, sorry for dividing this harvest into three different parts. But honestly… there was just no way to fit this entire experience into one single update without rushing it. This run became something special for us. So instead of throwing everything into one giant report, we wanted to slow things down and give each phase the attention it deserves. Part 1 was about harvest day itself — especially the frozen plant and the preparation for the future ice water hash runs. Now in Part 2, we focus on the monster of the room. The big Ghost Train Haze girl. The giant. And damn… she was beautiful. ⸻ The Giant Finally Ready After drying slowly and patiently, she finally reached that moment every grower waits for: the stem click. Not bending anymore. Not soft anymore. That perfect dry snap telling us she was finally ready for trimming. And honestly, seeing this massive plant hanging there fully dried was already rewarding by itself. Huge flowers. Dense structure. Long spears everywhere. Frost absolutely covering the plant from top to bottom. At this point, we brought out the Trim Bin, got comfortable, and of course… Mr. Baggy joined the session too. Because trimming alone is trimming. But trimming with the homies becomes part of the memory. ⸻ Trimming This Beast Once we started separating the branches and working through the flowers properly, one thing became immediately obvious: This plant was ridiculously frosty. And I mean ridiculously. Possibly the frostiest plant in the entire room. Every touch released resin. Every nug felt sticky. Scissors getting glued together constantly. Gloves turning darker and shinier minute after minute. The flowers themselves came out incredibly dense and compact too. Heavy in the hand. Proper weight to them. Not airy at all despite the sativa influence from Ghost Train Haze. And visually? Beautiful. Silver-covered calyxes. Orange hairs fading perfectly into the resin layer. Chunky flowers with that classic “don’t squeeze too hard or you’ll ruin the trichomes” feeling. This girl truly felt like a reward after the full cycle. ⸻ The Trim Bin Surprise One thing we absolutely loved during this trimming session was watching how much resin naturally collected inside the Trim Bin. By the end of the session, the amount of loose trichome heads sitting underneath the screen was honestly crazy. No dry sift machine. No mechanical shaker. Just trimming. And still… A beautiful golden layer of resin waiting for us underneath. Of course, finger hash also started building up naturally while trimming. Sticky gloves. Sticky fingers. Sticky scissors. The classic signs of a happy trimming session. Then came one of our favorite moments of the day. ⸻ Playing The Drums — Moroccan Style At the end, we decided to have some fun with the trim itself. Using the dry material almost like traditional Moroccan drum-sifting techniques, we gently worked the trim leaves and remaining material to knock off even more trichomes. Simple. Relaxed. Traditional-inspired. And honestly? It worked beautifully. What we collected afterward turned into a gorgeous little hash bar that looked and smelled incredible. We didn’t even bother weighing it. Sometimes not everything needs numbers. Some things are simply for the experience. For the ritual. For the future session. For curiosity. For enjoyment. And this one definitely earned its place for later tasting sessions. ⸻ Final Dry Weight After everything was trimmed, cleaned, and separated, the final dry flower weight from this single plant came to: 294.9 grams dry Honestly? We’re extremely happy with that. Almost 300 grams from a single plant in this run is something we can absolutely appreciate. Especially considering this entire project was: * 12/12 from seed * Minimal training * Minimal intervention * Natural structure * Mostly observation and guidance Just letting the plant express herself while giving her the right environment. And she rewarded us massively. ⸻ Storage & Cure — Different Approaches Once trimming was done, we started organizing the curing process using different storage methods. This time we decided to split the flower between: * Glass jars * Metal Zamnesia containers * Grove Bags Each one has its own purpose and philosophy. Glass Jars The classic. Simple, reliable, proven for decades. Perfect for manual burping and personally controlling the curing environment yourself. They also allow us to visually inspect the flowers easily during cure. ⸻ Metal Containers The Zamnesia metal containers feel more protective physically and also help reduce light exposure completely. They feel solid. Clean. Almost laboratory-like. A very nice option for preserving flower while keeping things discreet and protected. ⸻ Grove Bags These are probably the most modern approach we tested in this run. The idea behind Grove Bags is that their “TerpLoc” technology supposedly regulates humidity internally while allowing gas exchange in a controlled way. The theory is that they naturally maintain flower within the ideal curing range around: 58–62% RH without constant burping. So now we’re extremely curious to compare all three methods later during the smoke review phase: * Does one preserve terpenes better? * Does one keep the flower softer? * Does aroma evolve differently? * Does cure quality actually change? We’ll definitely revisit this in Part 3. ⸻ The Frozen Plant — Flower Comparison After finishing the main giant plant, we also trimmed and cured the material that came from the frozen/hash-focused plant from Part 1. This was important for us because we wanted to compare: * Flower from the “normal dried” plant vs * Flower from the plant intended mainly for extraction And surprisingly? The terpene profiles feel extremely similar. Same family. Same identity. Same Ghost Train Haze soul. Maybe slight differences in intensity or texture, but overall the profile remained very recognizable between both plants. Which honestly gives us a very good feeling about the future hash quality too. The frozen plant itself ended up giving: 58.5 grams dry Plus whatever was already separated and reserved through the frozen material process itself. So overall, absolutely worth it. ⸻ Macro Photography & Focus Stacking During all this, we also continued working on our macro photography experiments. Some of the photos shared in this update were actually focus-stacked images made from: * 112 photos * 96 photos * 33 photos For people unfamiliar with focus stacking: Macro photography has extremely shallow depth of field. When you photograph trichomes closely, only tiny portions stay in focus at once. So instead, we take dozens — sometimes over a hundred — separate images with different focus points and merge them together afterward in software. The result is a final image where the entire flower or trichome field becomes sharp at the same time. It takes time. It takes patience. But honestly, we love the process. Because cannabis truly deserves to be appreciated up close. ⸻ Trimming Timelapses We also recorded trimming timelapses so people can better see the workflow behind everything. Not just the glamorous final nug shots. But the actual process: * separating branches * cleaning flowers * resin building up * trim collecting * the mess * the rhythm * the work itself Because behind every beautiful cured flower, there are hours of patience nobody usually sees. ⸻ What Comes Next — Part 3 The next and final report will focus on: * Full smoke review * Cure evolution * Drying process explained deeper * Flavor profile * Terpene expression * Effects * Overall experience with Ghost Train Haze * Personal reflections after living with this cultivar That final report will close the entire Ghost Train Haze journey properly. ⸻ Thank You And as always… Huge thanks to everybody who stopped by this journey. To the breeders behind these genetics. To the companies making nutrients, LEDs, gear, and tools possible. To the platforms that allow growers to share their passion openly. To the community members constantly supporting each other. To the OG followers. To the new followers. To the silent viewers. To the growers. To the curious people. To the skeptics. To the lovers. To the haters too. If this grow made somebody stop scrolling for even a few seconds and appreciate the plant differently… that already means something to us. From grower to growers. See you all in Part 3. 📡 DELETED @ 1K Please stay tuned.we never quit https://www.youtube.com/@TheDogDoctorOfficial NEW 🙏 Thank you for your patience and continued support. FOR DISCOUNT CODES AND MORE JUST FOLLOW THE LINK https://website.beacons.ai/dogdoctorofficial 📲 Don’t forget to Subscribe and follow me on Instagram and YouTube @DogDoctorOfficial for exclusive content, real-time updates, and behind-the-scenes magic. We’ve got so much more coming, including transplanting and all the amazing techniques that go along with it. You won’t want to miss it. GrowDiaries Journal: https://growdiaries.com/grower/dogdoctorofficial Instagram: https://www.instagram.com/dogdoctorofficial/ YouTube: https://www.youtube.com/@dogdoctorofficial Deleted by Youtube - https://www.youtube.com/@TheDogDoctorOfficial NEW Vimeo : https://vimeo.com/dogdoctorofficial Under construction stay tuned ⸻ Explore the Gear that Powers My Grow If you’re curious about the tech I’m using, check out these links: 🔆 Lighting & Environmental Control • Future of Grow — Advanced LED lighting technology https://www.futureofgrow.com/ DISCOUNT CODE: DOG20 • Lumiflora — Under-canopy LED lighting https://lumiflorade.com/ • TrollMaster — Environmental controllers and automation gear (past collaboration) ⸻ Genetics • Zamnesia Seeds — Genetics used in this project https://www.zamnesia.com/ ⸻ 🌱 Soil, Substrates, Boosters & Root Support • Plagron — Substrates, bio mixes, and supportive products https://plagron.com/en/ ⸻ 🎒 Storage, Curing & Preservation • Grove Bags — Curing and storage solutions https://grovebags.com/ ⸻ 📸 Photography Equipment & Tools (Not sponsors, but part of my creative toolkit) • Sony A6700 • Sony full-frame macro lens + few more • Stacking photography workflow - learning • iPhone (for behind-the-scenes shots) We’ve got much more coming as we move through the grow cycles. Trust me, you won’t want to miss the next steps, let’s push the boundaries of indoor horticulture together! As always, this is shared for educational purposes, aiming to spread understanding and appreciation for this plant. Let’s celebrate it responsibly and continue to learn and grow together. With true love comes happiness. Always believe in yourself, and always do things expecting nothing and with an open heart. Be a giver, and the universe will give back in ways you could never imagine. 💚 Growers love to all 💚 📸 P.S. – The Eye Behind the Lens All photos in this diary (for now — except for the ones showing the camera, which I took with an iPhone) are taken with a Sony A6700 paired with a Sony full-frame macro lens and a few more. Photography is part of the story — it’s how we share the fine textures, the glow, and the quiet details that words can’t always capture. I’ve also started experimenting with photo stacking — a technique where multiple images, each taken at a slightly different focus point, are layered together to create one perfectly sharp image from front to back. It’s not digital enhancement or AI; it’s pure photography — a way to reveal the plant’s beauty in microscopic depth, from trichome to petal. You’ll even see a few shots of "ghost me" capturing the shots — camera, lens, setup — because every grow deserves not just to be cultivated, but documented like art. FOR DISCOUNT CODES AND MORE JUST FOLLOW THE LINK https://website.beacons.ai/dogdoctorofficial NEW DISCORD - Official Server Invite Link : https://discord.gg/ksjAkA5T74