
Likes
Comments
Share


Likes
2
Share

@DeepRootsGrowTrees
Follow
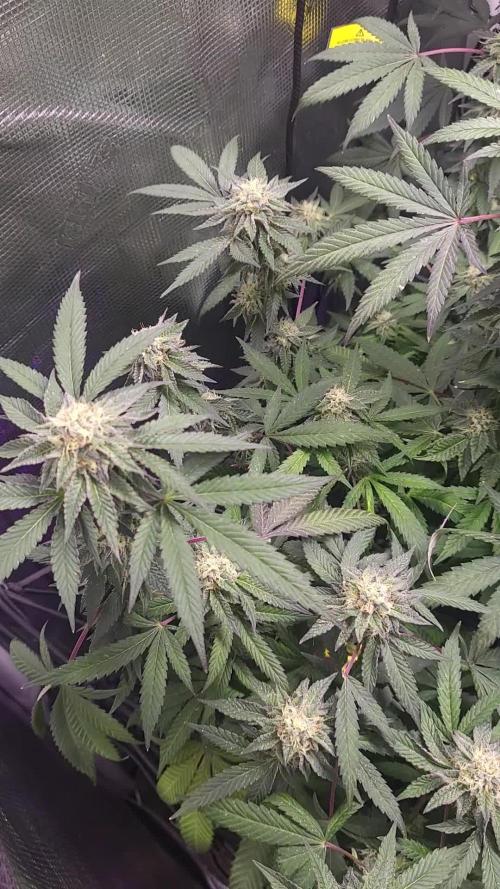
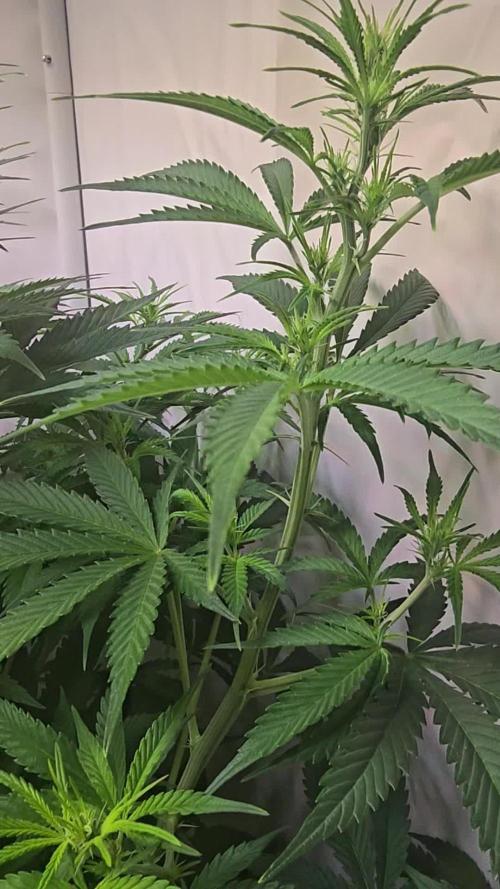
THE JAW BREAKER COLLAB / ROYAL QUEEN SEEDS & MIKE TYSON
WEEK #2 OVERALL
WEEK #4 FLOWER
This week she's looking good 👍 buds are starting to stack and get frosty along with a purple 💜 hue in he buds. She's had no issues as far as feeding goes. She got a dose of PLAGRON GREEN SENSATION 💚 this week. Then later during the week a top dressing of DOWN TO EARTH ACID MIX. Stay Growing!!
THANK YOU 😊 FOR STOPPING BY AND TAKING A LOOK IT'S MUCH APPRECIATED!!
THE JAW BREAKER COLLAB / ROYAL QUEEN SEEDS & MIKE TYSON

Likes
45
Share


@masterofsmeagol
Follow
7/11 It's pouring. We got like 2 in of rain. I compared the flowering with that of the mendo breath I grew in a previous journal and they are real close. Tjat was DONE DONE in September. Judging by the small preflowers they are going to be ready approximately around the same time. I think I'm going to have a middle September harvest with some and some will go to October. Realistically, I should've changed this to flower. I like to call it "the stretch" though. Plants are stretching like a mother fucker. Seems like the less I fuck with them the better they do! No nutes yet. I'm going on vacation for a week and I think I won't feed before I leave either. Plants don't look like they are lacking in anything. Just because I have tons of nutes doesn't mean I need to use them. Still need to put up the secondary supports for flower. Went over after a break in the rain. Went through each plant one by one. Most had leaves that were either turning yellow or yellow at the bottom interior. I only removed leaves that were dead or dieing. I should probably have degoliated more but I'm doing the KISS method this year. Things seem to be doing good that way. Some minor pests. I found a slug but put out slug bait for those and earwigs. Noticed a few white flies and multi color flies (probably fungus knats but they are up at the top, not down by the soil. I'm going to think about it and do some research. Damage is so MINIMAL and pests are MINIMAL that im holding off spraying. I mat start nutes tomorrow though. I'm uncertain on a lot of things. I need to meditate on it. Just because those interior leaves died the plants are still a LUSH dark green so I think they're alright. It's going really good but I'm going to be on vacation for a week. I can still monitor daily with my camera's and my family that is watching them will FaceTime me every morning and show me what's going on. They know what they're doing and if something arises I have BASICALLY a growers union in my town. All family. We look after each other. That's the only reason I considered even going. However, the event horizons, sherb pie, toasted toffy and AT LEAST 1 GMO "LOOK" like they will be flowering early. Like I said they look similar to a mendo breath pheno on another diary that finished in September. We shall see. I'm excited that's for sure!
7/12 So far no rain! Super hot and muggy. Killed a jpn beetle and a moth larvae this morning and another beetle this afternoon. I'm seeing SOME pest damage which makes me want to spray before some of these plants take off flowering. There isn't much damage and tje birds sit on the top just WAITING for a chance to swoop in and grab something. I've seen tons of wasps tjis year. I killed a snail yesterday and put out slug bait around my pallets. I'm leaving early tomorrow. I'm CONSIDERING doing an application of Cap'n Jack's before I leave. I'm not sure. I made little DIY videos for dad and I hope he follows them. If not I'll have another grower come help. With all the rain I noticed some white flies when I shook a couple plants. I don't have time to really deal with it right now. There were only a few and I think spinosad would kill those too. Either way it will be fine. I can monitor via camera. I can even hit an alarm that goes to four different people. Still. I don't like leaving my girls. Especially in this heat.
7/13 Left early for a short vacation. Just got a picture saying it's sunny there and my plants are doing good. I'm lucky to havecthe crew that I do. I'm sure if I asked they'd put up yellow sticky traps. That's something I may consider.
7/14 Dad said it Rained last night and driving down here it was just PURE SHEET RAIN. He sent me pics I uploaded and everything looks GREAT! gonna get sun after all that rain and wind. They are gonna explode!
7/15 Still on Vacation. Dad showed me the plants and said they looked a little dry so I had him use the 4 GALLONS OF WATER I HAD PREMIXED FOR HIM TO WATER THE GARDEN. This way each plant gets a half gallon. It's supposed to be in the 90's with no rain tonight. Rains euppised to come tomorrow but I've seen how fast a bag can dry out in ONE day with super hot weather and high winds. The wind blows through the bag drying the medium out. Dad's right. Things do look amazing. I'm having fun but it will be nice to get back and see if I was right and those few plants are trying to flower. Looks just like those two mendo phenomes that flowered early.
7/16 still on vacation. Got a nice rain for the plants. Not much though.
7/17 Had DAD WATER FOUR GALLONS ON THE GARDEN. ANOTHER HEAT ADVISORY IN EFFECT. I really miss my girls. I'm ready to get going and start doing the things that need to be done. Few more days and I'll be home with my pretty ladies. Last time I came back to nice little flowers. They looked about in the same stage when I left. I love early finishers. They're stretching thsts for sure.

Likes
57
Share

@WhiteEdge
Follow
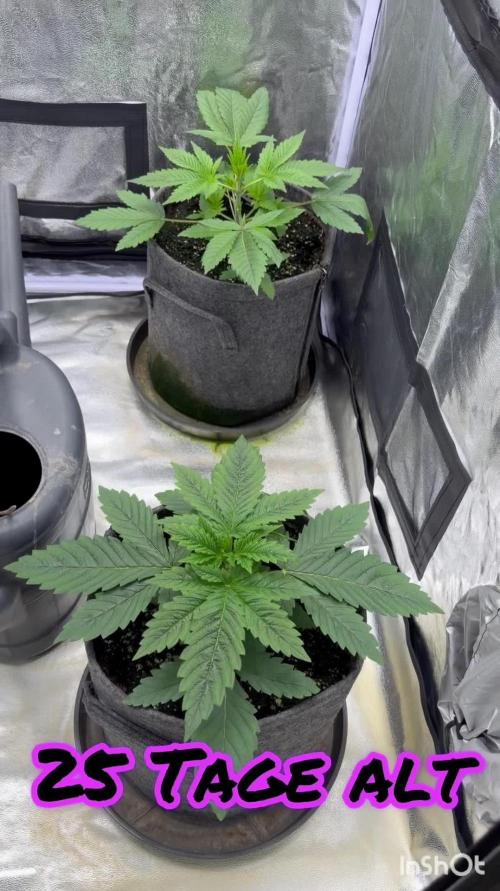
Flowering W1 D1
Girls moved into big tent, biggest girl is 60cm, smallest 53cm. Little to none transplant shock. Fast recovery
Girls are already oversize , i should put them earlier in flowering.
First days starting with same environment settings, later into week reducing watering frequency and night/day temperature differential.
Mix fresh nutrient solution with Athena Core + Bloom + Sio2 + HOCl @ 5.64ec - 5.75PH
Light intensity - 650 PPFD , Light distance - 55cm, DLI - 29, Light Interval 12/12
Day RH - 69/72%, Night RH - 67/70%,
Day Temperature - 28/29c, Night Temperature -24c/25c,
Leaf temperature 26/27c,
VPD Day - 0.8/1.0 , VPD Night 0.8/1.0
CO2 - 600+PPM
Nutrient Tank - 2.64EC, PH-5.70, Temperature - 18/20c, ORP-410/450mV
Day Misting - 20s ON/15min OFF + 1 x 2 minute long shot
Night Misting - 20s ON/30min OFF
Runoff - 20.00h - 2.54ec/5.75ph
Flowering W1 D2
Light intensity - 730 PPFD , Light distance - 60cm, DLI - 35, Light Interval 12/12
Day RH - 69/74%, Night RH - 66/79%,
Day Temperature - 27/28c, Night Temperature -25c/26c,
Leaf temperature 25/26c,
VPD Day - 0.6/0.7 , VPD Night 0.7/0.8
CO2 - 390+PPM
Nutrient Tank - 2.74EC, PH-5.99 Temperature - 19/21c, ORP-410/450mV
Day Misting - 25s ON/20min OFF + 2 x 5 minute long shot -
Night Misting - 25sON/30min OFF
10.00 r2750-6.01ph,
Flowering W1 D3
Athena Stack 0.1ml + 1 drop H4SiO2 - 150ml
Girls are grow 2-3cm in height from yesterday , think its going to be a problem with height and size after stretch.
Stop venting at night, dehumidifier doing the job done plus raise temperature in tent. Around 26c in night time.
Light intensity - 750 PPFD , Light distance - 60cm, DLI - 35, Light Interval 12/12
Day RH - 69/74%, Night RH - 66/79%,
Day Temperature - 27/28c, Night Temperature -25c/26c,
Leaf temperature 25/26c,
VPD Day - 0.9/1.0 , VPD Night 0.8/1.0
CO2 - 590+PPM
Nutrient Tank - 2.84EC, PH-5.98 Temperature - 19/20c, ORP-410/450mV - PERFECT 😇 for this stage!
Day Misting - 25s ON/20min OFF + 1 x 5 minute long shot
Night Misting - 25sON/30min OFF
10.00 r2880-5.95ph, 21.30 r2840/6.10ph
Flowering W1 D4
Light intensity - Max 850 PPFD , Light distance - 55cm, DLI - 35, Light Interval 12/12
Day RH - 69/74%, Night RH - 66/79%,
Day Temperature - 27/28c, Night Temperature -25c/26c,
Leaf temperature 25/26c,
VPD Day - 0.8/1.0 , VPD Night 0.7/1.0
CO2 - 400+PPM
Nutrient Tank - 2.84EC, PH-5.98 Temperature - 19/20c, ORP-410/450mV
Day Misting - 25s ON/20min OFF + 1 x 5 minute long shot
Night Misting - 25sON/30min OFF
Runoff - 10.00h r2910ec-6.02ph, 20.30h r2840ec/6.12ph
Flowering W1 D5
Middle girl is 65cm, 2-3cm growth per day so far.
Remove some bigger fan leaves from dominating branches and from the middle of the plants-main stem
Light intensity - Max 850 PPFD , Light distance - 55cm, DLI - 35, Light Interval 12/12
Day RH - 69/74%, Night RH - 66/79%,
Day Temperature - 27/28c, Night Temperature -25c/26c,
Leaf temperature 25/26c,
VPD Day - 0.8/1.0 , VPD Night 0.7/1.0
CO2 - 400+PPM
Nutrient Tank - 2.84EC, PH-5.98 Temperature - 19/20c, ORP-410/450mV
Day Misting - 25s ON/20min OFF + 1 x 5 minute long shot
Night Misting - 25sON/30min OFF
Runoff - 10.00 r2990/6.06PH, 16,00 r2880
Flowering W1 D6
Foliar feed - Athena Stack + H4SiO2 - 200ml
Lowering shot duration by 5s in day and night irrigation
Light intensity - Max 850 PPFD , Light distance - 55cm, DLI - 35, Light Interval 12/12, keeping light at same distance
Day RH - 69/74%, Night RH - 66/79%,
Day Temperature - 28/29c, Night Temperature -25c/26c,
Leaf temperature 25/26c,
VPD Day - 0.8/1.0 , VPD Night 0.9/1.0
CO2 - 400+PPM
Nutrient Tank - 2.84EC, PH-5.95 Temperature - 19/20c, ORP-410/450mV
Day Misting - 20s ON/20min OFF + 1 x 5 minute long shot - lowering shot duration
Night Misting - 20sON/30min OFF - lowering shot duration
Runoff - 10.00 r3120ec/6.06PH, 16,00 r2900ec
Flowering W1 D7
Middle girl 72cm, grow in height around 17cm in first week. Too much for first week of flowering. Need to stack this girls soon
Mix new nutrient tank - 2.99ec/5.75PH,
In night time temperatures drop to 21-22c, VPD is stable, lowering humidity at that moment....
15/20 - 15/30 + 1x5min, cascade irrigation
Light intensity - Max 750 PPFD , Light distance - 55cm, DLI - 35, Light Interval 12/12,
Day RH - 69/72%, Night RH - 62/69%,
Day Temperature - 28/29c, Night Temperature -21c/22c,
Leaf temperature 25/26c,
VPD Day - 0.8/1.0 , VPD Night 0.9/1.0
CO2 - 400+PPM
Nutrient Tank - 3.0EC, PH-5.95 Temperature - 19/20c, ORP-410/450mV
Day Misting - 15s ON/20min OFF + 1 x 5 minute long shot - lowering shot duration
Night Misting - 15sON/30min OFF - lowering shot duration
Runoff from last night, in the morning- 2910ec/5.95PH, in night time is probably even more

Likes
17
Share


@Kirsten
Follow
16.2.25:
I decided to check out the lower canopies of all plants to see if I need to get rid of any foliage.
I did get rid of a few small branches and leaves.
However, whilst I was doing this, I saw more garden pegs from my LST remaining.
There were about 6 or more in Pink Mist alone. Additionally, on Watermelon, there were some left in, too.
I'm so annoyed to see that because the plants are really stretching, and I could've potentially disrupted this by leaving the pegs in for all this time without realising it.
🤞 that I haven't compromised things too much. We'll see.
I watered today with 2ltrs of dechlorinated water PH'd to 6.3 containing the following nutrients;
♡ .8g Green Leaf Nutrients PK booster
♡ .5g Ecothrive Biosys
I ordered quite a few things for the garden. I got Greenleaf Nutrients Sea K(elp) and Mega Crop Parts A+B. To go with their PK Booster I got last month. I'm excited to try it all together. Next run, maybe just using these. We'll see how it goes.
18.2.25:
The plants are going crazy for water! Everything is getting used right up so fast!
Today, I decided to add some more Black Strap Molasses to add some carbs and other micronutrients. I'll add the jar with the label in the photos section above.
I watered a very small amount to each plant.
What I put in:
♡ Black strap molasses 150g
♡ 2g Sea K(elp) Greenleaf nutrients.
I dissolved everything in 4ltrs of dechlorinated water PH'd to 6.4.
19.2.25:
I received the majority of the garden purchases that I made. I'm still waiting for the Ecothrive Life Cycle. I wanted to top dress, but it's been delayed unfortunately.
I am using my Greenleaf nutrients products which I bought on Amazon. I got the Mega Crop 2 part system Part A and Part B. I have the Sea K(elp), and the bud explosion PK booster.
I really wanted to get some of their sweet candy asking read many positive reviews. Unfortunately, for me, this is unavailable to buy currently. So that's a little disappointing.
I needed to do a good watering so when my nutes were delivered today, I got excited 🤗
I watered 2ltrs of dechlorinated water per plant, PH'd to 6.4, containing the following nutrients:
♡ 1g Mega Crop Part A
♡ 1g Mega Crop Part B
♡ .5g Sea K(elp).
The plants drank this up within a few hours.
I'm going to try and hold off on watering in hopes that my Ecothrive Life Cycle will arrive so I can top dress and water it in then.
20.2.25:
My Ecothrive Life Cycle arrived yesterday, and the plants are ready for their top dress and a good watering in.
I have some Biobizz Light Mix, Canna Coco,and perlite. I'm going to use this as a base to mix my amendments in.
I'm going to fill my 5 gallon bucket with about 4.5 gallons of my top dress mix. I will distribute this across 6, 4-5 gallon pots. Then I will water in well with Greenleaf nutrients Mega Crop Parts A+B and Sea K(elp).
I've made a crude attempt to video mixing my top dress. Don't listen to the audio. lol, my YouTube didn't stop playing whilst I recorded this 😂
So anyway, I added the following amendments to the above base mix of 4.5 gallons;
♡ 3 TBSP Ecothrive Life Cycle
♡ 3 TBSP Vitalink Bat Guano
♡ 3 TBSP Ecothrive Charge
♡ 1 TBSP RHS Mycorrhizal Fungi granules
♡ 6 TBSP Ground Cinnamon.
Likes
32
Share


@TenerifeCultiva
Follow
Esta semana se hizo el trasplante a media semana el video es de justo antes en el siguiente diario ya estarán en sus nuevos recipientes. Combatimos calor como siempre

Likes
9
Share


@TPBzh
Follow
They look si strong and healthy. They have quite a strong smell, very pleasant. All good for now
Likes
4
Share


Likes
20
Share


@Ultraviolet
Follow
Let her show us her unlimited potential; all possibilities exist within the present moment, yet most people predict the future based on past experience, when you are truly present. The observer effect is
the phenomenon where the act of observing or measuring a system inevitably alters its state is a concept fundamental to quantum mechanics and applicable to various fields. It occurs because measuring tools interact with the subject (e.g., photons hitting a particle), rather than requiring conscious observation. Detection forces particles to behave differently—acting as particles rather than waves. It is closely related to Heisenberg's uncertainty principle. Light exhibits a wave-particle duality, acting as both an electromagnetic wave and a particle (photon) depending on how it is observed. It travels like a wave (refraction, interference) but interacts with matter as distinct, quantized packets of energy, known as photons. This duality is a cornerstone of quantum mechanics. Quantum particles, including light, can exist in multiple states or locations at once (superposition). In complex processes like photosynthesis, light energy acts as both a wave and a particle, traversing all possible paths simultaneously to select the most efficient route, acting as a "quantum computer". Particles can become so deeply linked that the state of one instantly influences the other, regardless of the distance between them. This phenomenon, initially doubted by Einstein, has been validated through rigorous experimentation.
When researchers quantize the classical electromagnetic field, the theory predicts four potential oscillation modes, but only two are observable. The other two are "ghost" photons—unobservable yet necessary for the mathematical framework of quantum theory. Quantum mechanics is not limited to cold, isolated laboratory settings. Research indicates that plants utilize quantum coherence at room temperature to achieve 99% efficiency in photosynthesis. Recent experiments have shown that light can be manipulated to exist in dozens of dimensions, which could revolutionize quantum computing and secure communication. New research suggests that classical light interference patterns arise from, and are controlled by, specific quantum states known as bright and dark states, which persist even when light waves appear to cancel each other out. These findings challenge the fundamental understanding of reality, suggesting that the universe is far more interconnected, probabilistic, and mysterious than previously imagined.
Emotion is the chemical experience of energy passing through a conscious vessel, e-motion, energy in motion. Emotions are fundamentally neurochemical events. Neurotransmitters (like dopamine, serotonin, norepinephrine) and hormones (like cortisol, oxytocin) dictate what we feel. The word emotion itself comes from the Latin emovere ("to move out/move away"). Emotions are literally energy in motion—nervous system activation, shifts in heart rate, muscle tension, and electrical impulses in the brain. Consciousness experiencing itself with amnesia, mother nature, father time, electromagnetic light/sound matrix evolution making sunlights data durable using water and magnetism as its template to store in DNA, less of a body with a soul and more a soul within a body. Clock-like recording device. That's why it matters, that's why you matter. Thats why it's never too late, lead to gold.
Ecclesiastes 12:13

Likes
37
Share


@Gardener_of_Goodness
Follow
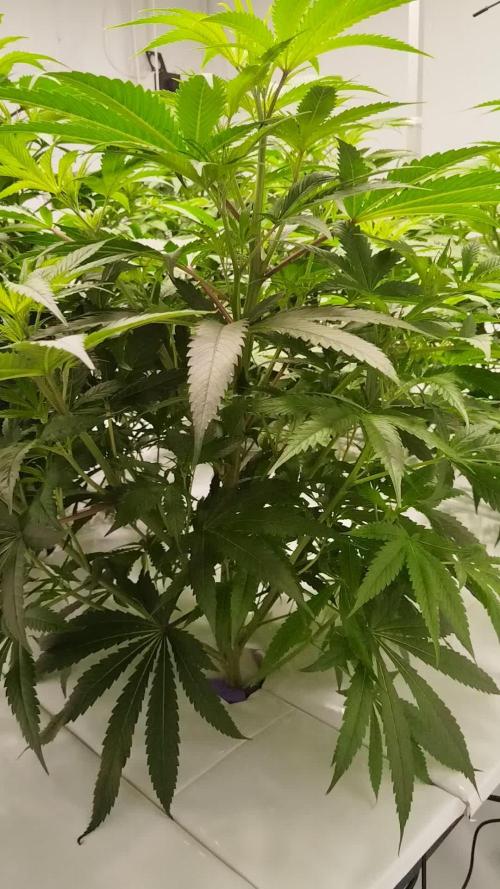
Not much to report apart from some decent growth, she’s starting the stretch a little.
New ph meter and EC meter here now that really help with nutes and watering accurately :)
Thanks for reading and happy growing!
Likes
142
Share


@MadeInGermany
Follow
Hey everyone :-).
There is not much to tell this week :) A few came to the flowering tent, 2 are still in the vegi phase for 2 days and then come last to the flowering tent :-)
The Blue Cheese and the Kosher Tangie Kush smell very good and how they should 😍👍
It will be difficult to choose 2 mums :-).
I wish everyone a nice week 👌 Let it grow


Likes
15
Share


@SirBudAlotts
Follow
This week was a blessing...
Everything went smoothly, except..I had my grow light a little too close to her...
**Tips Burnt abit**
But, I corrected the mistake that should not have happened in the first place if I payed attention to the setup 🤣😫..
Other than that she is doing quite well as you can see 👀 😉

Likes
14
Share


@eldruida_lamota
Follow
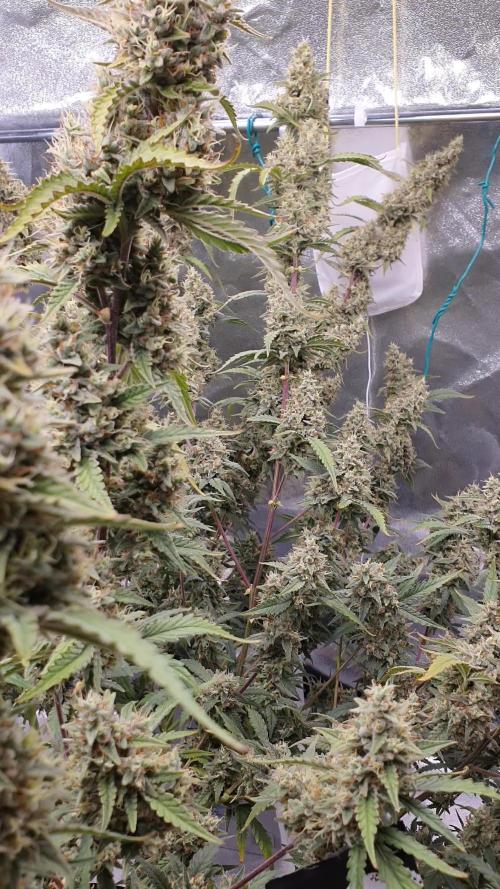
Vamos familia septima semana de floración de estás Tropical Zmoothie de SeedStockers.
Que ganas tengo de ver el progreso de esta variedad, las plantas están sanas, se ven con buen color.
Ya entramos en la recta final de esta variedad.
La cantidad de agua cada 48h entre riegos.
Esta semana añadimos nutrientes de la gama Agrobeta.
Las plantas están bastante bien y eso que subió par de grados la temperatura que en mi tierra hace mucho calor.
Estas próximas semanas veremos como avanzan y progresan las flores.
Mars hydro:
Code discount: EL420
https://www.mars-hydro.com/
Agrobeta:
https://www.agrobeta.com/agrobetatiendaonline/36-abonos-canamo
Hasta aquí todo, Buenos humos 💨💨.
Likes
11
Share


@Skunkiest_bender39
Follow
Shame on me… habe den taupunkt am morgen deutlich unterschätzt. Täglich steigt die LF phasenweise bis auf 95%. Solar ist praktisch, Zelt darf aber nicht draußen stehen!
Der grow hat sehr viel Spaß gemacht, trotz einiger kleiner Fehler und Unachtsamkeiten meinerseits! Die Damen sind super und werden wieder in den Stock zurückkehren, konnte sie leider nicht voll bis zum Ende bringen ca 2 Wochen zu früh. Nächste mal weniger Pflanzen oder mehr entlauben und mehr umlauft dazu. Komme vom outdoor Growen und habe enorm viel Neues kennengelernt!
Banana’s & painkiller XL sind noch im Spiel ohne jeglichen Schaden oder Betroffene stellen von Schimmel. 🐝


Likes
13
Share


@FlavoursUk
Follow
Welcome back to another week, finally decided to flip to flower as these girls do grow pretty quickly in DWC. Aiming for some nice quality buds bit also a decent yield of at least 1 gram per watt of light.
Nutrient solution has not been changing to complete flower schedule yet but I will be sure to switch it over in a few days. The crucial part now is keeping the EC and pH in a good range to avoid any deficiencies or Nutrient lock out.
Let's see what the stretch brings the first few weeks. Stay tuned, and I'll be back for the by the end of the week to report some video feedback.
End of the week has ending with a heavy defoliation session. Plants were getting bushy and covering potential tops so that needed to be addressed. For now, it will be selective defoliation once they have recovered, which should be in 2/3 days.
Let's watch them bounce back. Stay tuned for week 2.
Check out my YouTube and Instagram channel for a closer look. (Link on profile)

Likes
13
Share


@smokeycropping
Follow
Se agregó la malla scrog se paso a floración, no pude obtener la malla con más tiempo asique ya no tenia mas tiempo para rellenar. Pero con el lst se busco el mismo objetivo y pasamos a 12/12 primera semana de floracion
Likes
16
Share


@Seldom_Seen
Follow
This was when the plant was first moved to new grow space. I had to do a good bit of defoliation on week 4 as the plant was getting too big for its old space.
Likes
10
Share

@ThatsmyGrow
Follow
I'm already assuming we'll have a longer flowering period. The Gorilla Cookies has grown so huge that it will definitely need more time. So we'll certainly repeat the 4th week of fertilization. Before that, it will get week 3 of the master recipe from Advanced Nutrients.
Likes
6
Share

@Chubbs
Follow
What up Fam, weekly updates on these lovely ladies. This week it's been warm and such a bad time for my AC to go out but overall temps been in the mid it's inside the tent and the plants seem to not mind at all. They're still getting fed 16oz daily. I'd say from the looks, maybe 2-3 more weeks until harvest. Happy Growing