
Likes
Comments
Share


@The_Doctor_Green
Follow
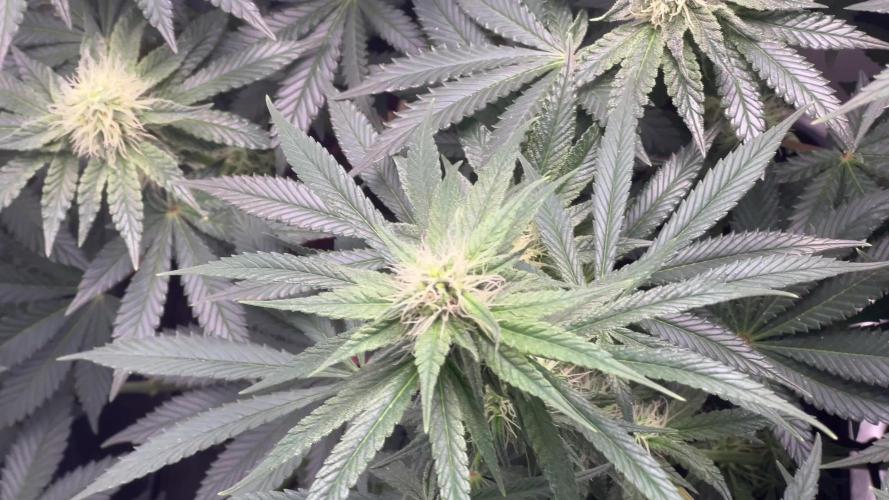
En la semana 11 de floracion solo hemos regado con agua ,sin nutrientes,para bajar la EC del sustrato.
El tamaño de los cogollos empiezan a ser importantes, al simple tacto se puede notar que los cogollos están bien compactos.
Estas semanas que quedan se van a hacer eternas, ya quiero cortarla 😅😅. El aroma te inspira a hacerlo👺👺🚀🚀

Likes
17
Share


@420DeepGrow
Follow
Gracias al equipo de Kannabia Seed, Marshydro, XpertNutrients y Trolmaster sin ellos esto no sería posible.
💐🍁 Moby Dick 🐋:
Criada a partir de dos parentales icónicos, como es el cruce de White Widow y una Haze pura G13, este choque de titanes provoca un híbrido que golpea a las puertas de las sativas más fuertes disponibles en el mercado.
Estamos ante una criatura impresionante en todos los sentidos, con ejemplares que florecen en solo 9-10 semanas en interior y arrojan un peso en lonja de 550 gr./m²
Al igual que su padre Haze, nuestra Moby Dick ofrece agradables notas cítricas, pero con efluvios de vainilla y eucalipto, una mezcla de aromas que genera una combinación intrigante, que puede llenar cualquier habitación con una fragancia inolvidable.
El sabor es muy parecido a su olor, con toques de limón agrio que harán que tu lengua cosquillee al inhalar, convirtiéndose lentamente en un humo dulce y terroso, con pinceladas de madera e incienso que se adhieren al interior de la boca al exhalar.
💡TS-3000 + TS-1000: se usaran dos de las lámparas de la serie TS de Marshydro, para cubrir todas las necesidades de las plantas durante el ciclo de cultivo, uso las dos lámparas en floracion para llegar a toda la carpa de 1.50 x 1.50 x 1.80.
https://marshydro.eu/products/mars-hydro-ts-3000-led-grow-light/
🏠 : Marshydro 1.50 x 1.50 x 1.80, carpa 100% estanca con ventanas laterales para llegar a todos los lugares durante el grow
https://marshydro.eu/products/diy-150x150x200cm-grow-tent-kit
🌬️💨 Marshydro 6inch + filtro carbon para evitar olores indeseables.
https://marshydro.eu/products/ifresh-smart-6inch-filter-kits/
💻 Trolmaster Tent-X TCS-1 como controlador de luz, optimiza tu cultivo con la última tecnología del mercado, desde donde puedes controlar todos los parametros.
https://www.trolmaster.com/Products/Details/TCS-1
🍣🍦🌴 Xpert Nutrients es una empresa especializada en la producción y comercialización de fertilizantes líquidos y tierras, que garantizan excelentes cosechas y un crecimiento activo para sus plantas durante todas las fases de cultivo.
Consigue aqui tus Nutrientes:
https://xpertnutrients.com/es/shop/
📆 Semana 6:
Esta semana ha explotado 💣, los cogollos comienzan a tomar densidad y llenarse de resina, me hubiera gustado aplicar algo mas de nutrientes en la fase vegetativa, la próxima vez será.


Processing
Likes
26
Share


@DaddyPrime
Follow
8/2 everything looks good
8/5 watered and took 24 clones off both of these plants. Maybe they'll go through a spurt of growth now
8/7 scrog netted plant is 37 inches the other one is 55 inches

Likes
32
Share


@LION07
Follow
I will wait about 10 days before completing the cleaning of the buds and starting the tanning process.

Likes
241
Share


@Tropicannibis_Todd
Follow
💩Holy Crap We Are Back At It And Loving It💩
Growmies we are at DAY 14 and she's doing really well👌
So I'm starting to pull her over and do some low stress training 🙃
She now gets full feeding from this point 👉 NutriNPK
Lights being readjusted and chart updated .........👍rain water to be used entire growth👈
👉I used NutriNPK for nutrients for my grows and welcome anyone to give them a try .👈
👉 www.nutrinpk.com 👈
NutriNPK Cal MAG 14-0-14
NutriNPK Grow 28-14-14
NutriNPK Bloom 8-20-30
NutriNPK Bloom Booster 0-52-34
I GOT MULTIPLE DIARIES ON THE GO 😱 please check them out 😎
👉THANKS FOR TAKING THE TIME TO GO OVER MY DIARIES 👈
Likes
16
Share


@Tipton
Follow
Able to start low stress and get these shoots to grow grow grow so I can get this space filled and let em rock!!!! I'm excited too cuz these are getting cloned right before I flip and then see how they do outdoors in my colder climate...

Likes
4
Share


@MonkeyGrower
Follow
The first 2 days I also gave voodoo juice.
21d LST works excellently with the plant. Side branches look powerful and grow very fast.
23d LST already has given me great results, I'll have a minimum of 8 strong side branches. So my main goal was reached: vitality will be distributed more to the side branches, and the height of the plant will fit in the box. I'll allow it to become taller, and if it does not start blooming - I'll do LST again. I've already prepared the stem for rotation. And I don't expect a bloom in 2-3 days, but it should be enough with the current growing dynamic. So LST2.0 is coming... ^_^
A few leaves blocking the light of the side branches were cut off.
24d All branches are on the same level with the stem. I’ll have at least 10 (hopefully 12-14 before flowering) strong branches + the main stem.
25d Start rotating the stem. I took off all stretching for the night and half a day. It restored the stem a bit, and I've made new stretchings. It is very obedient, but I start worrying about the number of side branches I have, and they start fighting =(
28d The end of the week. It has shown bloom signs, so probably next week will be flowering ^_^
LST gave great results I have 10 branches + 2 coming soon. Only one is a bit problematic, cuz it was crushed, but I still hope that it'll recover.
Likes
17
Share


@Targona
Follow
02.10.2022 - 56 days since my little girl sprouted from seeds🌱
The fourth week of flowering of my Orange Sherbet 🍨🍨🍨
Nutrients:
Jungle Indabox - I serve the same as last week
Advanced Nutrientiens - Bud Candy - carbohydrates for my plants 🍭🍭
Building Stimulators 🌼🌼🌼:
Jungle Indabox Environ X
Advanced Nutrientiens - Big Bud - I applied this week for the last time
ATAMI - ATA CALMAG - When growing under LED lights it is recommended to use Calmag and Atami is an excellent brand
The plants tolerate the nutrients well, some of the lower leaves showed slight signs of burning, they turned a little yellow and the tips of the leaves were brown 🍃🍃
Therefore, I will continue to use only one Bud Stimulator and that - Jungle Indabox Environ X, I will leave Big Bud from Advanced Nutrientiens for other plants.
Training:
Defoliation: I still remove the large and lower leaves so that they do not shade themselves 🌞🌞
I'm not planning a bigger defoliation until next week, the girls are a little leafy, but not enough to need more trimming 🌴🌴
General: The girl is already blooming strongly, dense buds are forming 🌸🌸, the branches reach the same height, exactly as I wanted 👍 At the moment it has more leaves than I would like, but I will do more defoliation later, as I wrote 🍃
I will adjust the nutrients from the next watering, I will leave the only bud stimulator 🏵️
🏵️
The girl no longer grows tall, she puts all her strength and energy into her buds 🌸
Light: Believe - the best light of sponsor Mars Hydro TS 1000 💡💡
Smell: The whole box already smells a lot, the smells mix and flow out of the box, when I open the tent, I get a strong smell of flowering cannabis 🍇🍊
Thanks for your opinions, smile and fun with my diary, you can follow me on Twitter 🐦: @targona666
See you soon 😍
Likes
12
Share

@ohcibi
Follow
Approaching the finish line. Fertilizer is now at its final dose. Both plants stopped growing now and started to build thick buds. Ken in fact is way ahead in terms of buds but it might be because he Hase a little bit less in number. It’s possible that I trained Ryu too much for his pot size 😆😆. But let’s see. Both looking very good and a lot more powerful than in my first grow.
Water intake is still massive. The top soil is rock solid while draining water super fast which must mean the pots are filled with massive roots. The erected teeth came down a bit but they were never that severe in the first place so I’m still not worried about that. I skipped one day of watering to account for possible slight overfeeding but I mean, today’s watering then was with the increased dose of fert 😆😆. I know I’m pushing it a little bit but that’s deliberate. I have high demands both in mass and quality so my approach is riding the edge as good as possible from the beginning 😆

Likes
111
Share


@Salokin
Follow
Hello Growmies,
As we enter week 18 of our journey with the Northern Lights by Zamnesia, the anticipation and excitement are at their peak. Let's delve into the latest developments from my garden.
Our Northern Lights plant is displaying phenomenal growth. The buds are swelling and ripening beautifully, showcasing the success of our careful cultivation. Their density and frosty appearance are truly remarkable, indicating a high-quality yield on the horizon. This week marked the last phase of her receiving nutrients. I've meticulously managed the nutrient levels to support her through this critical growth stage, ensuring she received everything needed for optimal development. In the coming week, I'll be introducing Canna Flush to help remove any residual nutrients, preparing the plant for a pure and clean final product. Following this, she will be on a week of straight reverse osmosis (RO) water. This flushing process is crucial to ensure the final product is of the highest quality, with a smooth taste and pure aroma. Looking back at the journey so far, it's astounding to see how our plant has transformed, especially considering the initial challenges. Her resilience and our adaptive care have truly paid off. Your ongoing support, tips, and shared experiences have been invaluable throughout this process. I'm excited to hear your thoughts as we near the harvest. Your engagement makes this growing community a rich and rewarding experience.
Thank you for being with me on this incredible journey. Your involvement has been a key part of this adventure. Stay tuned for more updates as we prepare for the final stages and the much-anticipated harvest of our Northern Lights. Here's to a successful completion and a bountiful harvest!

Likes
8
Share


@DoMoNe
Follow
WEEK 10: HARVEST!
https://www.royalqueenseeds.com/blog-how-to-grow-autoflowering-cannabis-n83
#64 - #70 17.5.-23.5.
#64 17.5.
Harvested Purplematic#1 and #2
Harvested most of Stresskiller, left few lower sites
Threw em up in the tent, laying on the scrog net (up)there for now.
#65 18.5.
-Nothing done
#66 19.5.
-Harvested rest of stresskiller.
-Will give fasteddy until tomorrow, and for solomatic possibly until end of week fri-sun.
#67 20.5.
-Cut FastEddy and put up to dry out, also took out her pot from the tent, now only solomatic left.
#68 21.5.
-Nothing done
#69 22.5.
-Now also Solomatic gets to go
-Will start cleaning and prepairing the tent for next batch, which can be found here:
https://growdiaries.com/diaries/107451-grow-journal-by-domone (RQS Spring Cup 2021 - Watermelon)
Also will install my new Autopot system and start thinking 'bout a possible LED setup
ADDED FULL TIMELAPSE VIDEOS, from both cameras, to week FLO10
"fullTIMELAPSE1 #1-#64 From bottom"
"fullTIMELAPSE2 #1-#70 From above"
Likes
23
Share


@DreamIT
Follow
-Sponsored by:
⚖️HUMBOLDT SEESDS⚖️-💡VIPARSPECTRA💡-💐GREEN BUZZ LIQUIDS💐-🛠️WEDRYER🛠️
🏁18/6 hello growerz, with today I start the resumption of diaries on GD. I have 13 new genetics in germination and as many diaries. I start by putting the seeds in water for 24 hours, after a day I will put the two seeds in two different jiffies, one with humic acid from greenhouseseeds and the other with just plain water. Get comfortable and follow the updates 😉👋🦄
19/6 The seeds were divided and placed in two different jiffies, one with humic acid and one with water only.
21/6 after another 24 hours in the dark the jiffies were moved under the lamp. let's start the dances!
23/6 still nothing to report
24/6 still nothing to report
25/6 the seed in jiffy with humic acid has sprouted, the other still nothing
30/6 the seed born goes well, tomorrow I check the second seed, if it does not check it will make room for another genetics always signed by humboldt seeds
__________________________________________
Personal advertising (contains affiliate links)
__________________________________________
🦄 Highly professional graphics and website, one-of-a-kind genetics, and a legendary story! Anonymous shipping!
✅https: //bit.ly/HumboldtSeedsCompany
__________________________________________
Did you know that Green Buzz Liquids fertilizers are 100% vegan? A complete line of products ready to give the best to each of your plants! Visit the site and see my journals to see how they work 🦄
🤯 And with the code "dreami t" you will immediately receive a 15% discount on your purchases
✅https: //bit.ly/GreenBuzzLiquidsPro
__________________________________________
👀 Are you looking for a good lamp to start with? 👀
🌞Viparspectra has something more than the others, take a look at their site.
⏩ Use "GDVIP" for an extra discount or "DREAMIT3" for an extra 5 %% discount
👀 Search for it on Amazon
✅Amazon USA: https://amzn.to/30xSTVq
✅Amazon Canada: https://amzn.to/38udUVe
✅Viparspectra UE: bit.ly/ViparspectraUE
✅Viparspectra USA: bit.ly/ViparspectraUS
______________________________________________
🌈 Tired of blowing on your weed hoping it dries quickly? Check out the Wedryer website! You will find a well-made accessory that will help your weed dry in just 8-10 days without the annoying risk of finding mold or other annoyances! (no affiliate links)
✅https: //bit.ly/Wedryer_
______________________________________________
📷🥇Follow the best photos on Instagram 🥇📷
https://www.instagram.com/dreamit420/
Backup
https://www.instagram.com/dreamit4200/
🔻🔻Leave a comment with your opinion if you pass by here🔻🔻
🤟🦄💚 Thank you and good growth 💚🦄🤟

Likes
15
Share

@El-Ecko
Follow
Week 2 of Flowering
Little Pearl is doing wonderfully.🤩 Despite her slow start, she’s now thriving 🔝🥦
The week began with relatively cool temperatures and humid conditions... but by the middle of the workweek, the weather turned noticeably more summery again, which certainly did the plants a world of good.☀️👌

Processing
Likes
5
Share


@Ensign420
Follow
Week 02 Introduction
This week has been a bit of a struggle. Had my first experience dealing with slime and brown algae. But I think adding enzymes and increasing the beneficial bacteria helped to fix the issue. Also experienced nutrient burn for the first time. My nutrient solution strength got as high as 671 PPMs. So backed it down to about 430 PPMs during the end-of-week reservoir change. Also cut Hydroguard (expired?), CaliMagic, and Superthrive from this grow. Now she's still stunted, but is starting to recover. Hopefully...
[START OF WEEK 02]
Day 01 - Monday - 08/10/20 - Total Days: 008
-----------------------------------
- [0830]: Still looks a bit yellow. But getting larger!
--- Solution strength was at 248 PPMs.
--- Just topped off with a bit of distilled water
--- PH went up to 6.1 so PH'd down to 5.8
--- Ran the top feed for a bit to wet the hydroton.
- [2130]: She's looking even more yellow now.
--- Even the new leaves are really yellow.
--- Decided to add more base nutes.
--- Added 4ml of Sensi A
--- Added 4ml of Sensi B
--- Now at about
--- Solution Strength went up to 304 PPM.
--- PH was at 6,
--- Also raised the water level a bit more.
--- I really hope it's a nutrient deficiency and not an over-watering issue.
--- Please live!
Day 02 - Tuesday - 08/11/20 - Total Days: 009
-----------------------------------
- [0830]: Looking less droopy. But still yellow.
--- Decided to do a reservoir change.
--- 4.5gal of distilled water
--- 8ml of Sensi Grow A
--- 8ml of Sensi Grow B
--- 8ml of Voodoo Juice
--- 4ml of B-52
--- 4ml of CaliMagic
--- 4ml of Hydroguard
--- 4 drops of Superthrive
--- PH'd down to 5.8
--- Solution strength: 302 PPM
--- Since I didn't want to risk over-watering the rockwool, I did not to do a top feed, may do one tonight after the sleep cycle (lights are still set to go off at 10am and back on at 4pm).
--- As I was doing a reservoir change, I noticed that the tubes and bucket were a bit slimy. Didn't really stink or anything. Is this normal? Maybe due to the Hydroguard and Voodoo Juice?
--- I hope she gets better soon!
- [2215]: Getting larger! But still yellow.
--- Also can see a root growing through the net pot! Tiny little thing but it's there! Will have to start dropping water once more appear.
--- After looking over a few DWC diaries using AN nutes, seems like my solution strength is still too low. Most around this stage average around 500 PPMs with about 4ml per gallon.
--- Top fed for a minute to wet the top of the hydroton.
--- Solution strength went down to 263 PPM.
--- Added 8ml more of Sensi A
--- Added 8ml more of Sensi B
--- Now base nutes are at 16ml for 4.5 gal of water.
--- PPMs went up to 411.
--- Still lower than 500 PPMs, but that's okay.
--- PH was at 6. Not sure if I should adjust PH using AN nutes. So going to not ajdust unless PH goes above 6.1.
Day 03 - Wednesday - 08/12/20 - Total Days: 010
-----------------------------------
- [0830]: Looks like more root growth!
--- She still looks yellow. But leaves are perky.
--- PH was at 6.2 so lowered down to 5.8.
--- Solution strength was at 394 PPMs
--- Since roots are still growing, I decide to lower the water level a bit. Now water level is a bit below the net pot.
- [2200]: Root is getting longer!
--- Slime is returning. Not sure why.
--- Solution strength: 357 PPMs
--- PH: 6.1
--- Decided to add an enzyme along with more beneficial bacteria to hopefully cure the slime.
--- Added 16ml of Sensizym
--- Added 5ml of Hydroguard
--- Added 8ml of Voodoo Juice
--- New solution strength: 430 PPMs
--- New PH: 6.1
--- Top fed for a minute.
--- This slimy residue is really freaking me out! I hope the added enzymes will help eliminate the slime.
--- Going to do a full reservoir sterilization/nutrient change over the weekend. Please survive until then girl!
Day 04 - Thursday - 08/13/20 - Total Days: 011
-----------------------------------
- [0930]: I think the enzymes worked! There is little to no slime now!
--- Although I think the root was also dissolved in the process. It's now just a little stub sticking just below the net pot. The enzyme is also suppose to dissolved dead roots too but guess that root was too weak? Not sure what happened there. But I think the slime is cured!
--- Solution strength went down to 395 PPMs. Decided to add more base nutrients.
--- Added 8ml of Sensi A
--- Added 8ml of Sensi B
--- Added 4ml of B-52
--- Solution strength went up to 598 PPMs.
--- PH was at 6.1
--- As long as the PH is between 5.5 and 6.3, I'm not going to use PH Up or Down. But still will monitor PH levels.
- [1715]: Checked up on her after her nap and shes looking alive but stunted. But no slime!
--- Decided to add some sugars to help maintain the enzymes and beneficial bacteria.
--- Solution strength was at 587 PPMs.
--- PH was at 6.2
--- Added 8ml of Bud Candy
--- Solution strength went up to 671 PPMs.
--- PH also went up to 6.3
--- Lowered water level a bit to hopefully promote more root growth.
--- Top fed for a minute.
--- She is getting bigger, but still looks yellow.
Day 05 - Friday - 08/14/20 - Total Days: 012
-----------------------------------
- [0915]: Leaves look a little burnt on the tips. Still no slime.
--- Going to back off on the PPMs to hopefully fix the nutrient toxicity.
--- Solution strength was at 632 PPMs
--- PH was at 6.3
--- Added/Removed water until PPMs were at 536.
--- PH was still at 6.3
--- Raised water up a bit, then top fed for a minute.
- [2200]: Looking better. Still yellow though.
--- Solution strength: 514 PPMs
--- PH: 6.5
--- Added PH down.
--- New solution strength: 518 PPMs
--- New PH: 5.2
--- PH was kind of high. So decided to PH down. Had to use quite a bit to bring it down. But eventually got it to drop down to 5.3. A little low, but so far, the PH has always gone up so wanted to start it really low.
--- Ran the top feed for a minute to re-saturate the top of the hydroton.
Day 06 - Saturday - 08/15/20 - Total Days: 013
-----------------------------------
- [0830]: She looks stunted. leaves are still yellow.
--- Solution strength: 514 PPMs
--- PH: 5.6
--- Top fed for a minute.
--- Not sure what to do at this point. Going to do another reservoir change soon. Hoping she lives until then.
- [2145]: Looking pretty much the same.
--- A bit of slime has returned. Since I've been diluting the nutrient solution, the enzyme ratio has dropped. So I guess this is expected.
--- Also noticed that slime build up was on the air-stones. Never really checked the stones so not sure how long that has been there. Looks brown too, which can't be good.
--- Going to do an H202 sterilization of the system (minus the net pot) tomorrow so did not add anything.
--- Lowered the water level to below the net pot.
--- Then top fed for a minute.
Day 07 - Sunday - 08/16/20 - Total Days: 014
-----------------------------------
- [0900]: STERILIZATION DAY!
--- Decided to skip today's night cycle for a deep clean.
--- I'm hoping that skipping a night cycle won't be too stressful.
--- Temporarily moved her to a new bucket.
--- Used about a half of gallon of straight distilled water to flush out the net pot.
--- Drained the system and wiped up all the brown sludge. Also removed the air stones and cleaned up all the goo.
--- Filled the system with 2 gallons of distilled water and at least 30ml of food grade hydrogen peroxide (35% strength).
--- Yea its a lot, but since I'm not going to sterilize the system overnight, I went with a really high doseage. Basically I kept adding until I started to see little bubbles start to form.
--- Then I ran the water pump.
- [0915]: Boiled the air stones in tap water for about 10 min. Then reconnected them to the airlines.
--- I let the air stones and hose soak in the sterilization solution for about 5 minutes so the peroxide can absorb into the stones. Then ran the air stone to help mix and agitate the solution.
--- Occasionally, I'd repeat the process of turning the air pump off for a few minutes to let the stones soak.
- [1000]: Covered the top two row of holes of the net pot with some aluminum tape. Hopefully this solves the light leaking in through the hydroton.
- [1200]: Used an old toothbrush and scrubbed the pump clean. Then drained the system.
--- Refilled with more distilled water and peroxide. Again added a lot.
--- Ran system again to sterilize even more.
- [1530]: Drained the system and refilled with distilled water to rinse.
--- Ran the system for a few minutes, then drained and rinsed again.
--- Did this a few more times over about an hour.
- [1630]: Added 4 gallons of fresh distilled water.
--- Added 15ml Sensi Grow A
--- Added 15ml Sensi Grow B
--- Added 12ml of B-52
--- Added 16ml of Voodoo Juice
--- Added 16ml Sensizym
--- Solution strength was at 430 PPMs
--- PH was at 5.6
--- I was going to add Hydroguard, but I think the bottle is expired. Since 2017 or 2018!? I think Hydroguard is good for up to 2 years from the date on the bottle or 6 months after opening. So not going to use from now on. I wonder if this could have contributed to the slime build up.
--- Also removed the CaliMagic and Superthrive too. Going to only use AN products to eliminate the chance of incompatible nutrients.
--- Placed her back in the bucket and top fed for a minute.
--- Here's hoping for the best. Going to let it ride until morning! Please feel better!
[END OF WEEK 02]


Likes
6
Share

@World_Breeders
Follow
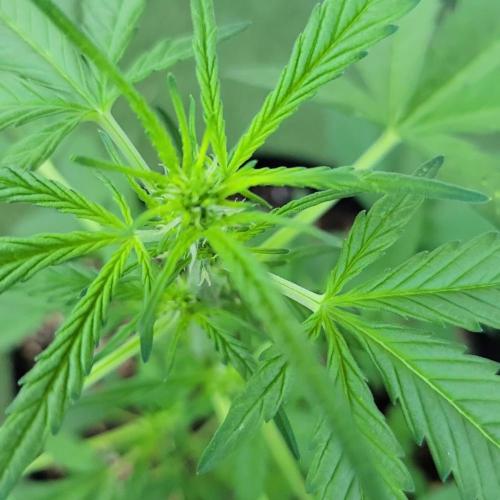
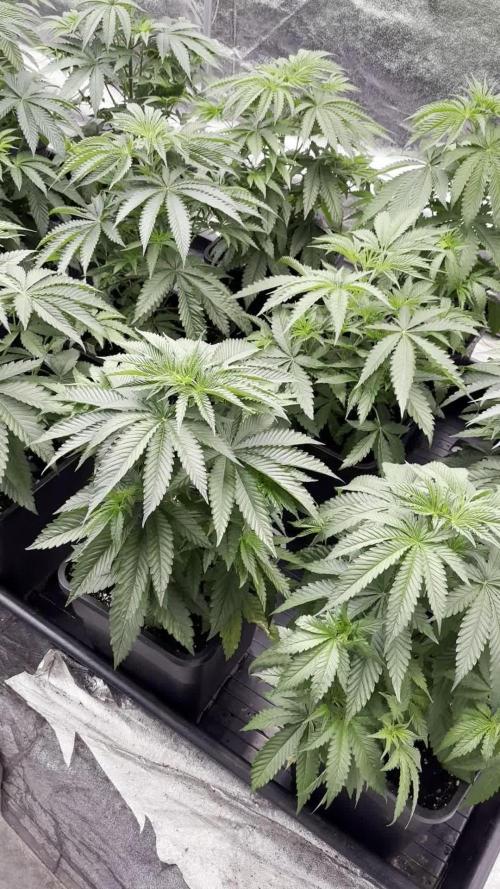
🌱 Week 5 – Vegetation
Plants are now in a strong vegetative stage, showing vigorous growth and a well-developed structure. Leaf size has increased noticeably, and the canopy is becoming denser and more uniform across all plants.
Nutrient levels have been adjusted to support higher demand, resulting in healthy green coloration and steady development. Root systems are fully established, allowing for more efficient nutrient uptake.
Environmental conditions remain stable, helping maintain consistent growth without signs of stress. Overall, plants are responding very well and are preparing for the transition into the next phase.


