


Likes
3
Share


@Grammo216
Follow
Late update, ran into some issues with the roots but the end product is still decent. Will make some tweaks next time, the problem was my transplant. I didn’t put the plants down deep enough and the soil was compacted to add. Plants start tipping over and nearly derooted when buds got heavier. Also was using too much nutes, will be switching to coco. Don’t think I used too much, soil just retained a lot of the nutes and water. Hoping coco will solve that issue for me.


Likes
7
Share


@dank604
Follow
This is a really odd plant. Lots of yellowing going on, looks like an N deficeny but ph in/out is 6.5. She's just weird and I have to assume it has something to do with genetics as I'm the only person here who's grown it so far and Seedsman shows it discontinued. It did come from my local seedbank where I got my Great White seeds from which was a disappointing grow. Anyways, I'll take what I can from her. I have 3 other plants going that I don't have diaries for as I've been too busy :( but they all are looking great! (Seedsman Auto Lemon, FB Wedding Cheesecake, SweetSeeds Sweet Gelato).

Likes
33
Share


@DesDeGrower
Follow
Ladies and gentlemen...welcome in Week 3 of Flower 🙌
Omg....The stretching is real.....girls almost tripled in size.
Few days ago we went through every plant, removing tones of lower shoots and leafs. Girls recovered straight away, increasing in size. They all look very happy without exemptions and I’m just hoping I will manage to accommodate space they need.
We can already see those nice small buds starting to form. Really can’t wait to see them in full beauty 😍
EC 1.9 - 2.0 as aim this week
pH 5.8
2 litres every 24h
Stay tuned with updates 🙌

Processing
Likes
4
Share


Likes
36
Share


@Cannabis_King
Follow
This week was great this is supposed to be an autoflower but here we are at 8 weeks and I've seen one pistol per bud site I'm wondering if I was accidently sent photoperiods? I'm not sure if anyone has ideas is this normal for this auto or is it a photo

Processing
Likes
10
Share


@Fibro_Witch
Follow
Good growth this week. The inchworms are still munching away so I sprayed with some neem oil. Will be watering in some Big Bloom and molasses later. Really looking forward to this one flowering in a couple weeks. It had the prettiest purple flowers last year!
Likes
9
Share


@Green4H
Follow
It's been two weeks since I added the last pictures, I'm glad they're growing, they're blooming, but I'm not satisfied when I see when I see other growers' plants I'm ashamed, I'm glad at least that as a beginner I managed at least this...
Likes
5
Share

@nerdz
Follow
57 to 63 Friday.
It is currently f58 as of creating this entry. I am going to be chopping them tomorrow at f59. This is the earliest harvest I've had. These guys were exploding at week 6 of flower.
The pics here don't do justice. With everything collapsing from the weight, and the leaves all being completely black messes with the image. When I pull them out of the tent the pics will show them in their true form.
Super sticky tight buds. I'm kind of in love with Clearwater. Especially after the nightmare I dealt with with those Beleaf jokes.
Been flushing about a week. Still ripping the lights as hard as I can while holding 24-25c.
I'm estimating around 750g dried for these. I'm usually fairly close ;)
Enjoy
Likes
14
Share


@Lickey
Follow
2/3 of the plants are starting to fade. Middle pheno is showing deficiencies. It’s a toss up between pheno 1 and 3 . And a strong question about whether I want to keep this strain going. Robinhood Seeds, you have disappointed me greatly.

Likes
3
Share


@blacknpearl
Follow
june 29. Megacrop ~2 litre feed number 8. 1.17gr/litre. ph 6.11
july 3. Megacrop ~2 litre feed number 9. 1gr/litre. ph 6.11. Snapped a branch by mistake. Tried to tape it without success :(
july 5. Megacrop ~2 litre feed number 10. 1gr/litre. ph 6.11
Keep performing some light defoliation almost every day.


Likes
299
Share


@Roberts
Follow
It is harvest day on my green crack by seedsman. She is a monster auto. Thanks again for the likes, follows, and subscriptions on my YouTube channel. I appreciate the support.😀🌱🌱🌱
Processing
Likes
21
Share


@LittleBigTrees
Follow
The plants were so crowded I decided to put them into a Larger tent to allow some light to the lower bud sites and to help lower the humidity amongst the plants. I'm sure they will love the extra space.
The light has now been raised 20cm (20cm taller tent)
Allowing me to turn out right up which is 45000 lux in the centre right below it.
I will up the bloom to 2ml/l this coming week.
Likes
128
Share


@Tropicannibis_Todd
Follow
💩Holy Crap We Are Back At It And Loving It💩
Growmies we are at DAY 42 and she's just killing💀it👌
👉Added straws within the Tiny pot to help watering in week 4 👈
So I'm starting to see she needs watering every single day and now need nutrients 🙃
Lights being readjusted and chart updated .........👍rain water to be used entire growth👈
👉I used NutriNPK for nutrients for my grows and welcome anyone to give them a try .👈
👉 www.nutrinpk.com 👈
NutriNPK Cal MAG 14-0-14
NutriNPK Grow 28-14-14
NutriNPK Bloom 8-20-30
NutriNPK Bloom Booster 0-52-34
I GOT MULTIPLE DIARIES ON THE GO 😱 please check them out 😎
👉THANKS FOR TAKING THE TIME TO GO OVER MY DIARIES 👈
Likes
Comments
Share


@GrowDiaries
Follow
Wrap up of the Award Day at Spannabis 2025 with Adam iLL!
That’s a wrap on an epic awards day at Spannabis! Congrats again to all our growdiaries.com community-voted winners for shining in the growing world! Thanks to everyone who joined us!
#Growdiaries #Awards


Likes
3
Share


@Cannabis_Sativa
Follow
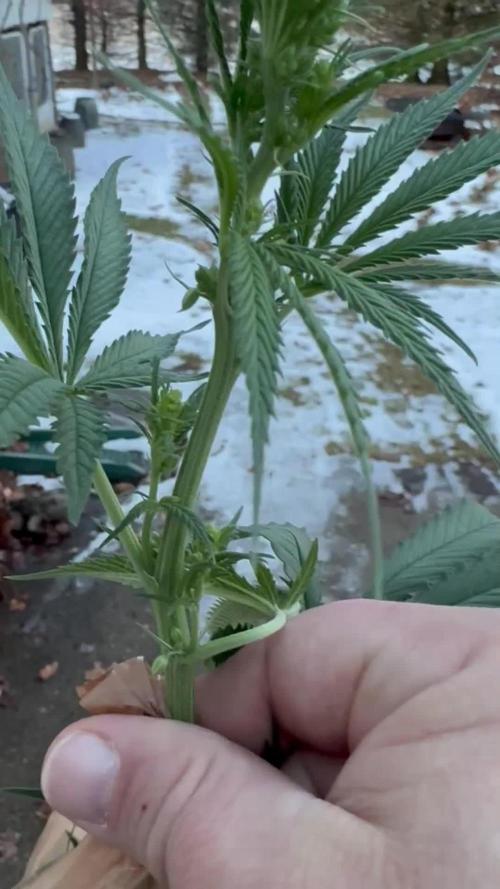
Def def and defolation... it started flowering already with quick growing steps

Likes
11
Share


@LACREME
Follow
Comecei a semana fazendo uma desfoliação e uma amarra LST.
Estou achando o desenvolvimento bom, crescendo bem rápido.
Observei pistilos aparecendo, logo ela entrará na floração.
Agora é aguardar os frutos...


Likes
8
Share


@I_Identify_As_A_Dan
Follow
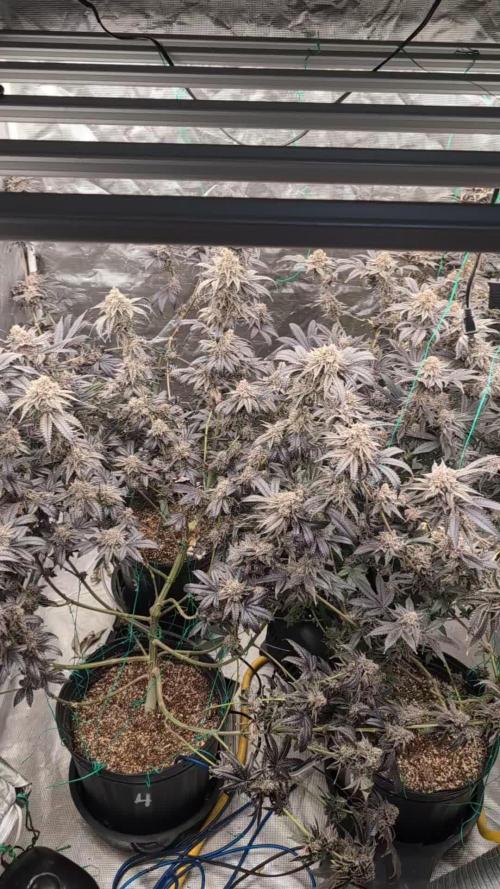
Week 6 of flower for Ztrawberry by greenhouseseedco
Shes faded hard into purple fan leaves shes looking gorgeous, Pistils are also maturing nicely.
Looking a little sad as i had took these before their water time.