





Likes
70
Share


@Insaniac_0
Follow
So I have decided to only note when changes are made, observations are warranted, or I feel something of note has happened. I'll still do daily progressions, but the rest has already been documented and no need to create a hundred new pics showing the same. Just understand that if I say "7.1ph," or something with tested amounts that I mean I first calibrated and tested my ph pens and all units are measured for accuracy. I am learning as I go, so it would be of no benefit to report inaccurate details.
112/42
VPD and PPFD are still the same this week. 73-76F in the day and 66-68 overnight with RH set to not exceed 55% but is mostly at 45 to 50% now that winter is here. The fan is set to auto and I have 2 de-humidifiers in the tent. The PH lockout issue is still in progress but I am starting to get the soil up to snuff now. I think using the knitting needles has the most beneficial effect on the soil as it both aerates and allows the nutes to get deeper.
113/43
Defoliated today. I removed the worst of the affected fan leaves and this unfortunately only leaves sugar leaves to run photosynthesis process. Im hoping she still gets enough of everything else to grow the buds, but only time will tell. I will take new control pics for new progression on 3 other sites now.
Watering Days.
All feeds with nutes use either a whole ratio, or combination, of "Veg Mix" and "Bloom Mix"concentrates. These are/will be DILUTED in water until a total ppm of add-in is reached using a (Total Dissolved Solids) TDS Meter measured in PPM (parts per million). The "Veg Mix" concentrate will eventually be added-in larger, then smaller, ratios while the "Bloom Mix" concentrate will eventually replace the "Veg Mix" concentrate entirely. The ppm and ratios will be listed when I feed. Veg mix recipe is on week 3. Bloom Mix recipe is on week 5.
Last feed was day 110/40 (next will be +3)
I expect to continue to use 7.1ph with 650ppm of bloom mix concentrate and feed 2.5 gallons every 3 to 4 days, so I expect about 8 to 11 cups of runoff at that time as well. I have decided that I will try to add 1 ml of CaliMagic (General Hydroponics 1-0-0) per gallon of feed on each feed for a week or two to see if this can help against ph lockout of calcium since it cant be N,P, or K. Cant be N because she uses WAY less N in flower, and it cant be P or K because I am getting nute burn with the feeds I am already using... so my conclusion is that she need more micro nutes from the lockout, and since I was thinking it was Calcium in the start, I am going to try a more detailed treatment to test results against from here.
Day 113/43 (last feed was day 110/40)
Tested and Calibrated my ph pens. Fed 2.5 gallons of purified water (starting with 16ppm) mixed with 658ppm of 100% Bloom Mix Concentrate. Due to this soil showing a possible calcium deficit, I am starting a 1ml per gallon add-in to test on all plants using this soil, so I added 2.5ml of CaliMagic (General Hydroponics 1-0-0) to the feed then I ph balanced before feeding. The ph on this feed was balanced to 7.1. I used knitting needles to help both aerate the soil and create new water pathways for the roots. (a practice I may consider a new feeding standard for all my plants) I got ~7 cups of runoff (~11 cups last feed). Higher runoff volume was expected with the feed volume but glad to see she's taking it better now since I started knitting needles. Runoff was tested at 6.12ph and 2250ppm (5.9ph with 1860ppm last feed). Top soil tested at 6.23,6.31,6.57,6.38 for an avg of 6.372 (6.327 avg after last feed) - next feed will be 7.1ph again as I'm still liking where the ph is finally going, but rather see it closer to 6.3 or 6.4 top and bottom. I dont see any issues with the feed's data other than the possible calcium deficit and I will continue to monitor runoff ppms as I expected this to be lower with less runoff but have to consider they maybe washing out salt with the knitting needles. Next Feed should be 3 gallons of de-chlorinated tap water ph balanced to 7.1 in +4 days (117/47). I will run 650ppm and 3ml of CaliMagic (General Hydroponics 1-0-0) again.
Day 117/47 (last feed was day 113/43)
Tested and Calibrated my ph pens. Fed 3 gallons of de-chlorinated tap water (starting with 299ppm) mixed with 671ppm of 100% Bloom Mix Concentrate. Due to this soil showing a possible calcium deficit, I am starting a 1ml per gallon add-in to test on all plants using this soil, so I added 3.0ml of CaliMagic (General Hydroponics 1-0-0) to the feed then I ph balanced before feeding. The ph on this feed was balanced to 7.4. I used knitting needles to help both aerate the soil and create new water pathways for the roots. (a practice I may consider a new feeding standard for all my plants) I got ~20 cups of runoff (~7 cups last feed). Higher runoff volume was expected with the feed volume increase might let her go to 4 days again and 2.5 next feed. It could be a result of the knitting needle treatment when feeding. Runoff was tested at 6.10ph and 2070ppm - again thinking it could be a result of the knitting needles (6.12ph and 2250ppm last feed). Top soil tested at 6.23,6.31,6.57,6.38 for an avg of 6.372 (6.372 avg after last feed)- next feed will be 7.1ph again as I'm still liking where the ph is finally going, but rather see it closer to 6.3 or 6.4 top and bottom. I dont see any issues with the feed's data other than the possible calcium deficit and I will continue to monitor runoff ppms as I expected this to be lower with less runoff but have to consider they maybe washing out salt with the knitting needles. Next Feed should be 2.5 gallons of de-chlorinated tap water ph balanced to 7.1 in +4 days (121/51). I will run 700ppm and 2.5ml of CaliMagic (General Hydroponics 1-0-0) again.

Likes
4
Share


@Ageddd
Follow
Bending ULH1, and give her a dose of 1l: (3ml/l TopVeg+1ml/l Green Explosion) , after the Nutrients dose it got a little more darker. The broken leaves are being replaced by the new branches leaves, so the storm was just a little pain ... Vigorous mode: ON
Watering ULH2: It is getting more colour :) . I think it is starting to root well and eat the nutes stored in the soil.


Likes
1
Share

@ChronicNerve
Follow
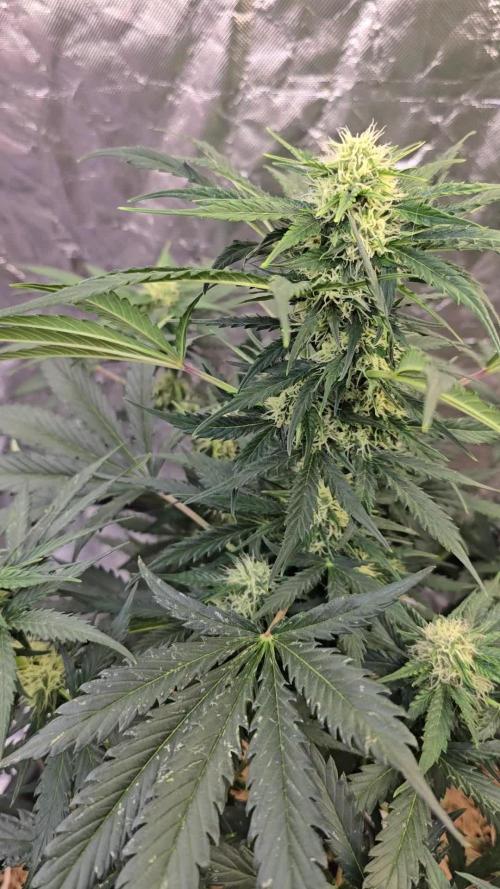
The Glueberry Auto is progressing very nicely despite having a bit of pest damage. The only thing I have attended too this week is two waterings and nothing more.

Likes
12
Share


@Skunkiest_bender39
Follow
Der Harvest war erfolgreich, alle bis zum maximalen Ende stehen lassen. Alles gleichzeitig zu ernten war ein bisschen unentspannt, da der Indoorgrow gleichzeitig zum trocknen hängt! Dennoch mega glücklich!!! Jetzt beginnt das Aushärten, die meisten Behälter sind zwischen 67-73% bleiben aber noch 1-2Tage offen.☮️

Processing
Likes
10
Share


@MoMedicalAlchemist
Follow
They all got topped last week and they responded very well and quickly as you can see...im going to let them grow this week and lollipop a little and maybe top next week.


Likes
2
Share


@pzwags420
Follow
Plants are growing well. set up veg tent with new ac infinity tent and fan.


Likes
47
Share


@CHILLING_RACOONS
Follow
✅WEEK NOTES: 20/01 LIGHTS OFF! Some days in the dark and cold box are great to increase flavors and potency
✅ 🌱GERMINATION🌱 01/10/2023 SEED IN THE SOIL 03/10/2023
🔝 10th NOVEMBER 1st FLOWERING DAY🔝
🔝 10° FLOWERING WEEK🔝
📅20/01/2023 LIGHTS OFF 📅
💡💡💡Viparspectra xs2000 at 75% Power + QUANTUM BOARD AT 75% POWER💡💡💡
💉🔍Fertilization schedule:🔍💉
ONLY PLAIN WATER
🧐 🤓 JEALOUSY DATA SHEET 🧐 🤓
Brand Zamnesia Seeds
Parents Gelato x Sunset Sherbet
Genetics 55% Indica / 45% Sativa
Flowering Type Photoperiod
Flowering Time 9-10 weeks
THC 25%
CBD 0-1%
Height (Indoor) 150cm
Height (Outdoor) 200cm
Yield (Indoor) 650-700 gr/m²
Yield (Outdoor) 700-750 gr/plant
Sex Feminized
💸💸💸💸💸 Buy JEALOUSY FEMINIZED BY Zamnesia: https://www.zamnesia.com/9479-zamnesia-seeds-jealousy.html
_______________________________________________________________________
🔧💡OUR SET UP FOR THIS GROW CYCLE💡🔧
✔️ 💲💲💲VIPARSPECTRA 🚀🚀🚀🌕🌕
ViparSpectra®️ XS2000 240W Infrared Full Spectrum LED Grow Light:
Excellent ratio between wattage and ppfd, excellent light penetraton, perfect light spectrum (it also has IR 🤩) and it has the best build quality on the market. You can touch that quality. Materials are really strong, excellent driver and the best leds on the market. Heat dissipation is perfect, the lamp is never too hot and it has a passive dissipator so you will have zero noise. It also has IP65 certification. I like that this lamp is bigger than others, so the 240w of power are well distribuited on the space. Viparspectra has an awesome customer service, and shipping was incredibly fast!
This awesome brand also offers 3 years warranty.
This lamp has no rivals.
A special thanks Viparspectra ❤️❤️❤️❤️
HERE YOU CAN BUY THIS PROFESSIONAL LIGHT: https://www.viparspectra.com/products/xs-series-xs2000 or https://amzn.to/3dyUoJl
and here you can buy other awesome stuff: https://www.viparspectra.com
💣Quantum board - 480w - 4x120w Boards
Samsung LM301B 288 led/board 3000K 0dB noise
+24led/board led Osram 660nm
Efficiency 2.6 umol/J 220 lm/w
Driver: Meanwell HLG-480H-36B
-ESTRACTION FAN:
Blauberg 125 Turbo Pro Series
Maximum air flow: 430-560 m³ / h 50W 32-44 dBA
____________________________________________________________________________________________
🙏❤️ THANK YOU FOR BEING HERE ❤️🙏
Please leave a comment with your opinions, it is very important to us to have a comparison.
If you like our job, tap the weed button and follow us. It will be really appreciated.🙏
We want to thank again everyone that help us in our project. You support us to support our dream. ❤️
SPREAD THE LOVE OF THIS PLANT ALL AROUND THE WORLD
🌿Thank you again🌿
❤️Sweet hugs❤️
👨🌾CHILLING_RACOONS👩🌾

Likes
9
Share

@420DeepGrow
Follow
📆 Semana 10
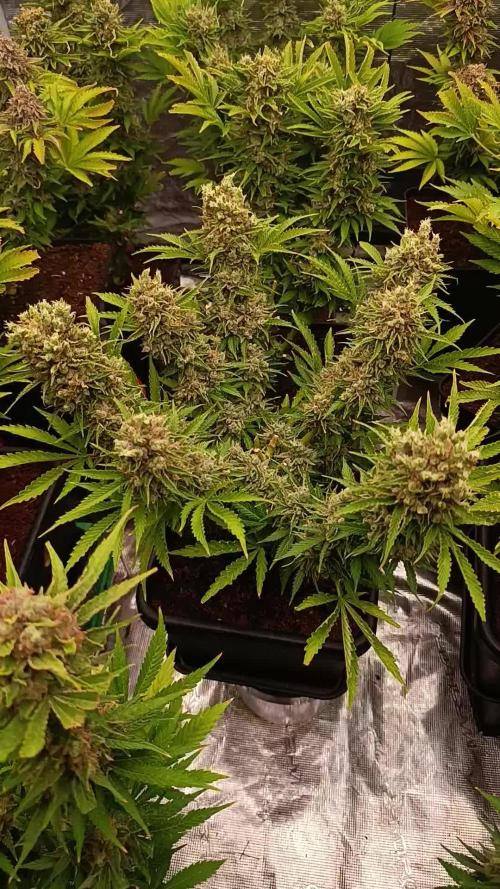
El cultivo entra en su fase final de maduración, con plantas muy cercanas al punto óptimo de corte. Los cogollos se muestran duros, densos y completamente formados, con el peso ya definido en todas las ramas.
La resina alcanza niveles máximos, con tricomas mayoritariamente lechosos y presencia de ámbar empezando a ser más visible, marcando claramente la ventana de corte abierta. Los pistilos continúan oxidándose de forma progresiva, reforzando la maduración avanzada.
La planta reduce su actividad y comienza a consumir reservas internas, provocando un ligero fade en las hojas grandes y una mejora en el perfil final de aroma y terpenos.
Cultivo en recta final, afinando el punto exacto de cosecha.
Seguimos creciendo fuerte 💪!


Likes
4
Share


@gottagrowsometime
Follow
Welcome to my Wedding Cake, Freebie from Zamneisa.
0-35 Days. Week 0-5
She has a lovely shape. Grew very quickly.
Has that distinct from all the other Wedding Cakes I've seen here. Looking at other diaries. And after looking at this in my seed storage. I said let's go with it.
Possible 25% THC
all in the end of pics.
Lovely leafs, strong roots. No dying leafs. Has a lovely root ball. As she's in an 11L pot now as she was such a fast Grower out of the fems. Just behind Green House Seeds Lemon Orange. But, she's catching up. Soon I'll put her to LST, last Defoliation and will put her to the flip.
I was using power buds. And my god. So many stems with shoots. Tbh, I ended up removing a lot of those extra stems that were on my autos. It really does work. If you've the time. Which to bring all those nodes to full flower, would of added weeks to my grows. With this. She's a fem. I've removed at lot below and has long stems with a good few shoots, making for what should be some big tops (huge tops) by feeding right and with proper lighting. Also I've a trick by adding nearly 2 extra hrs during fattening with FAR RED 730NM which puts fems to sleep in 5m after 5-10m after a dose. Also have UVA for ripening.
Likes
2
Share


@KeemBboomin
Follow
Watering these girls with just plain 6.5 ph water. It’s definitely time for her to start flushing I’m just waiting on that fall season look I love it . But day by day the frost and density just keep stacking and stacking noice
Likes
27
Share


@RDWCGrowing
Follow
1/20/2023- So much to do pre grow and over the next 16 days, absolute first order of business is that I have to take down my current Grow---TIMBER-- Then I have a list of things I have to get done in order to be ready to start this grow 1 Feb.
With that said
T - 2 days until start 48 hour Flush
T - 2 days until Start 48 hours of Light
T - 4 days until TIMBER!!!
Items that need to be done before 1 Feb 2023
1. I need to clean the tent out
2. I need to clean the equipment- Proper Sanitization between grows in Hydro is a must!!!
3. I need to get the hole in the ceiling above my tent repaired- For my last grow I had a deep sink installed in my grow room, to make Hydroponics a little bit easier and have a water source in the same room. The seals on the pipes they were installing broke and leaked through the ceiling causing some damage all the way across my grow room, I was already weeks into my grow and couldn't risk them working above my tent and it would have been very awkward positon for them to be working in as well, so have to get this done quickly between chop and germination.
4. I have to install my new light- I was using a Vivosun 4000 and for this grow I am switching up to a Spider-farmer SF 7000.
1/20/23- For this upcoming grow I am working with M/F photo seeds so I ordered 4 Sex determination kits. I recieved my my 4 Sex determination testing kits from Rimrock Analytics today. I will be using these to test my plants at week 2 of Veg so that when/if I take clones I know I am taking them off females. As well as I don't want to accidently pollinate my tent during this grow I am looking for big beautiful buds not seeded buds. :-)
1/24/2023- Harvest of current grow- Started at 2:00pm and finshed wet trim and firt batch into the freeze dryer.
1/25/2023- Next batch into the freeze dryer and cleaning all my equipment for this Grow.
T-1 Day until the workers are supposed to be here to fix the hole in the Grow Room.
T-3 days until I instll my new Gorilla Grow Tent and my New Light Spider Farmer SE-7000 for this grow.
T-7 Days until Start of Germination
1/26/2023- Harvest is done ran through the Freeze dryer and dry tim completed.
1/27/2023- Grow Room repairs completed. Hole is gone Letting the paint dry before I install the new tent.
T-2 days until Install the New Gorilla Grow tent and the new Light
T-3 days until I put the hydro equipment in the new tent
T-5 days until Germination
1/29/2023- Day 0- Final Pre Germination activities
Germination Start T-3 days
The paint on the ceiling was dry and it was time to finish prepping for Germination. I got the following items knocked off my list.
New 4X4 Gorilla Grow Tent is up and ready
New Spider Farmer SE-7000 Light is installed- Thanks Moony Grows for the suggestion and for the Code that got me some money off and free shipping (Moonygrows)!! I turned the lights all the way up to max and set the timer to 18/6 0600-0000. I will keep an eye on the temperature and humidity without my plants and see how hot it gets with the new light.
I put my Hydro system back together and put in 40 gallons of water into it, time to monitor for leaks the next few days.
I Setup my cloning machine for Germination Days 3-11
1/30/2023
let me break down the situation, ROOM in the TENT.. Enough said.. No really I tried putting my exhaust system up in the new tent with my new light, The light is so big corner to corner that it really didn't give me enough room for the lights be be raised, with the exahust hanging the buckets my plants are Starting in are 2 and 1/2 feet off the ground, great for plenty of room for roots but not so great for upwards space for the plant to grow. In a 6' 11 tent with the exauhst in side and hanging that only gave me a little over 4 feet of grow room to play with. My last grow if you saw my diary, anyone could tell I was struggling to keep the buds off the lights. No good, Since space was such an issue I was running my carbon filter inside on the ground but It really needed to be up sucking the heat out not shooting the cool out. With that setup I was sucking air through the filter and pushing it out the tent at a bottom exhaust hole cold out. Wasn't doing me any good for my heat. I was hitting temps of up to 85 degrees. I bought a portable AC unit and have been running it in the grow room to try and keep temps below 85 and I have had to lower the power on my lights during grow also not ideal.. With that said a friend of mine MoonyGrows (Check out his diary) took the time to look at my issue send me a picture of my grow tent setup with detailed instructions on how to suck the air out from the top but putting my filter and fan on top of my tent so no room issue and I am sucking the air out from the top where the heat is instead of pushing the air out from the bottom where the cool is... THANK YOU MoonyGrows For taking the time to help me get this straightened out.. Now I have room and I have the exhausts working right and now my temps with everything at 100% are topping out at 80 this dropped the temp by 5 + degrees at 100% max.
T-2 days until Start of Germination
Prepped my seed tray with humidity dome
Prepped my Rapid Rooter plugs. I Used RO water, and I added a few drops of Hydrogen peroxide to Oxygenate the water. I then PH balanced between 5.7-6.0 the same that they will be getting in the Cloning Machine and when they get to thier final grow pod. I perfere the 5.8x range and I hit 5.84 for these rapid rooters. If you want to see a complete video on the process HowWeedGrow has an amzing video that shows step by step how to do it and explains it better than I ever could including how to plant the seeds. Which I will cover when I get to that step on Wed. https://www.howweedgrow.com/how-germinate-weed-seeds-cannabis-rapid-rooters/
1/31/2023
T-1 day until Germination Start
All set and ready have my Rapid Rooter plugs ready to go have my seeds out.. Have my seed tray warming up tonight. Tomorrow morning right into the Rapid Rooter then strait into the tray. I will spray the dome to start the humidity in there.
2/1/2023
Germination Day!!
Let the games begin!
0600am Put the seeds into the Root Riots. And then put the seeded Root Riots into their first home the Seed tray. I have them under the light 24/7. Sprayed the dome
7:30pm Sprayed the Dome to keep humidity going on the dome.
2/2/2023
Day 1 of Germination
Sprayed the Dome in the morning
Sprayed the Dome in the evening
2/3/2023
Day 2 of Germination
Roots are starting to come out the bottom of the root riot plugs and the heads are slowly popping out of Number 4 just below the surface.
Afternoon- Number 4 has popped up
Evening- Number 3 has popped up as well. Happy Dance!!
2/4/2023
Day 3 - Germination
Surprise Surprise Surprise- all 4 have now poked their heads up.. Happy day!! 100% Germination succeeded.
Now major milestone to track is how many are female and how many are male.
I will take look at the roots this afternoon/evening and see if they have enough root to go into the cloning machine for the next 7 days before they go into their Hydro Pods.
Day 3 - Germination - Evening..
Roots looked good and they were tall enough to make it into the cloning machine.
Now that they are all in the cloning machine I have switched the lighting to veg state 18 on 6 off.
2/5/2023
Day 4 - Germination - Morning
All the Ladies (fingers crossed) looking great stretching nicely and look nice and green, Photo synthesis underway....
UPDATE!! After a very interesting POD cast on FSTS by Dr. Bruce Bugsbee from Utah University, I have shifted my lighting to 24 hours on through seedling and then I am going to shift to 20 hours on the rest of Veg.
2/6/2023
Day 5 - Germination
While Checking on my conditions inside the new tent last night, I found that the Humidity was down to 39 Percent. I added an AquaOasis Cool Mist Humidifier, the reason I selected this humidifier is that I needed one that could be turned on and off utilizing my Inkbird Humidity Controller IHC200 that I have my Pro Breeze Dehumidifier currently running with.
Root structures are starting to get there about 1/4 of an inch.
2/7/2023
Day 6 - Germination
Everything seems on track more roots poking out of each today. They are each getting a little taller as well.
Checked in the evening and number 3 was drooping the Root riot plug on the bottome was dry and the roots were not in the water yet. I raised the water just enough that the longest root that was sticking out is now hitting the water.
2/8/2023
Day 7 - Germination
Everything looked good while checking in on them this morning number 3 is now full up and no droop again.
2/9/2023
Day 8 - Germination
T-2 days until Plant into Forever Pods and we start week 1 of Veg .. :-)
Surprising thing to me is that number 1 and 2 were later in popping then 3 and 4 but the roots are growing longer in 1 and 2.
2/10/2023
Day 9 - Germination
Number 1 and Number 2 are definitely ready for transplant today.. Based on how they were yesterday and where they are today I am hoping by tomorrow 3 and 4 are ready. Today they look to me where 1 and 2 did yesterday.. I really hope 3 and 4 catch up by tomorrow since..
T-1 day until transplant to new/ final home for grow.
Need the roots long enough to have some clay down in the basket to keep the root riot out of the water and only roots in the water..
2/11/2023
Day 10 - Germination
Today they got placed in thier forever Home, 7 days from Sprout and 7 days until Week 1 Start.
PPM- 180 this is water out of the Tap
Temp Water: 70.7
Temp Tent: 77
Humidity: 40% I have a humidifier going 24/7 to try and bring this up.. I also have Humidity Domes on each plant.
2/12/2023
Day 11 - Germination
Sprayed the domes, all are looking good.. Nothing much to do at this phase but Keep monitoring the PH level in the system and making sure they have a comfortable home.
T-6 days until Week 1 start
2/13/2023
Day 12 - Germination
Sprayed the domes, They were looking a little yellow today so I moved the light down to assist. Nothing much to do at this phase but Keep monitoring the PH level in the system and making sure they have a comfortable home.
T-5 days until Week 1 start
2/14/2023
Day 13 - Germination
Sprayed the domes, They were looking a little Florissant yellow today, with what looks like slight burn on the tips, I talked with a fellow grower and we agreed that It was probably that I was drowning them, Yes you can drown you plants even in Hydro, but only early on.. :-) It usually happens with the water being too high, which soaks not only the roots but the medium (root Riot plug in this case). I lowered the water from touching the bottom of the pot to about 1" away. This will probably take 3-4 days to resolve. I will continue my daily monitoring.
T-4 days until Week 1 start
2/15/2023
Day 14 - Germination
Sprayed the domes, continue my daily monitoring they look a little darker green instead of lime green now that I lowered the water levels in the system, so I think that I might have resolved the issue but it will take a few days for recovery to happen.
T-3 days until Week 1 start
2/16/2023
Day 15 - Germination
I looked in on them this morning, 3 and 4 look like they are doing well and recovering nicely. Number 1 not so much it has brown spots on the leaves, this very well can still be a side effect of the overwatering but I decide to go ahead and add Nutes earlier than I was planning just incase. I was going to wait until Saturday but I think intervention is necessary now especially after drowning them early on.
I added 1/2 what I am planning on adding for week 1 start. I also think I am going to adjust my chart to add 1/2 2 days after plant from now on. I don't think it would hurt it to have some Nutes to pull from.
.25ml/Gal Calmag = 12.5ml
1ml/gal GH FloraMicro= 50ml
1ml/gal GH FloraGro = 50ml
1ml/gal GH FloraBloom = 50ml
T-2 days until Week 1 start = I will drain the system and start it over on Saturday with Week 1 Nutes.
2/17/2023
Day 16- Germination
I didn't even want to post today after looking in on them this morning, 3 of the 4 are now showing signs of dronwing.. Brown spots on the leaves, the water levels were still too high.. I drained about another inch out of the tanks.. Will see how quick they recover.. I start week 1 tomorrow and will have to ensure my water levels are at least 1" away from the basket on this round.

Likes
3
Share


@weedelicious
Follow
Hey ihr Grower, sind am Tag 79 angekommen. Den Mädels gehts super! Blüten werden immer größer. Temperatur noch bei 23C und die LF habe ich etwas runtergedreht und auf 45% gestellt. 2.5L Wasser mit Hesi Bio-Bloom bekommen sie alle 3 Tage, mit einem Ph-Wert Zwischen 5.5-6.0. Die Lumatek 200W Pro ist nun 30cm entfernt und auf 100% gedimmt.
------
Tag 80 angekommen. Nachtbilder. Den Mädels gehts super! Blüten werden immer größer. Temperatur noch bei 23C und die LF habe ich etwas runtergedreht und auf 45% gestellt. 2.5L Wasser mit Hesi Bio-Bloom bekommen sie alle 3 Tage, mit einem Ph-Wert Zwischen 5.5-6.0. Die Lumatek 200W Pro ist nun 30cm entfernt und auf 100% gedimmt.
---------
Wir sind an Tag 82 angekommen. Den Girls gehts bestens! Blüten werden immer noch größer. Temperatur bei 23C und die LF ist auf 45% gestellt. Der Heizer von Spider Farmer macht eine super Arbeit - Temp. und LF noch konstanter. DDD bei 1.5.
2.5L Wasser mit Hesi Bio-Bloom bekommen sie alle 3 Tage, mit einem Ph-Wert Zwischen 5.5-6.0. Die Lumatek 200W Pro ist nun 30cm entfernt und auf 100% gedimmt.

Likes
101
Share


@DreamIT
Follow
🌴🌞 TROPICAL FUEL BY EXOTIC SEEDS 🌞🌴
____________________________________________________________________________________
🏝️ 26.3 ...
🏝️ 27.3 some more details today but it's still early for serious photos
🏝️ 28.3
🏝️ 29.3
🏝️ 30.3
🏝️ 31.3
🏝️ 1.4
____________________________________________________________________________________
📜 A look at the details of what I'm growing 📜
🌴🌞Tropical Fuel by Exotic Seed🌞🌴
⚧ Gender
▪️ Feminised
➰ Genes
▪️ 70% Indica / 30% Sativa
🎄 Genetics
▪️ Tropicana Cookies F2 “C cut” x Tropicana Cookies F2 #5
🚜Harvest
▪️ 400 - 500 g / m²
🌷Flowering
▪️ 56 - 64 days
✨THC
▪️ 20.0 - 24.0%
✅CBD
▪️ 1.0%
🏡Room Type
▪️ Indoor
🌄Room Type
▪️ Outdoor
🕋Room Type
▪️ Greenhouse
🎂Release Year
▪️ 2020
____________________________________________________________________________________
📷🥇 Follow the best photos on Instagram 🥇📷
https://www.instagram.com/dreamit420/
🔻🔻Leave a comment with your opinions if you pass by here🔻🔻
🤟🤗💚Thanks and Enjoy growth 💚🤗🤟

Likes
9
Share


@Call_Me_Vaan
Follow
💪ROUGH FEED SCHEDULE💪
VEG
Week 1 (day 1-6) : Just 6.5Ph balance H2O
Week 2 (day 9) : ( 1ml Micro , 1ml Grow , 1ml Bloom , 2ml B-52 , 2ml Voodoo Juice) / 1 lite H2O
Week 2 (day 14) : ( 2ml Micro , 1ml Grow , 1ml Bloom , 2ml B-52 , 2ml Voodoo Juice) / 1 lite H2O
Week 3 (day 19) : ( 4ml Micro , 4ml Grow , 4ml Bloom , 2ml B-52 ) / 1 lite H2O
Week 4 (day 23) : ( 4ml Micro , 4ml Grow , 4ml Bloom , 2ml B-52 ) / 1 lite H2O
FLO
Week 5 (day 32) : ( 4ml Micro , 4ml Grow , 4ml Bloom , 2ml Voodoo , 2ml Bud Candy , 2ml Sensizym)/ 1 lite H2O
Week 5 (day 38) : ( 4ml Micro , 4ml Grow , 4ml Bloom , 2ml Voodoo , 2ml Bud Candy , 2ml Big bud , 2ml Sensizym)/ 1 lite H2O
Week 6 (day 42) : ( 4ml Micro , 4ml Grow , 4ml Bloom , 2ml Voodoo , 2ml Bud Candy , 2ml Big bud , 2ml Sensizym)/ 1 lite H2O
Week 6 (day 48) : ( 4ml Micro , 4ml Grow , 4ml Bloom , 2ml Voodoo , 2ml Bud Candy , 2ml Big bud , 2ml Sensizym)/ 1 lite H2O
Week 7 (day 52) : ( 4ml Micro , 4ml Grow , 4ml Bloom , 2ml Voodoo , 2ml Bud Candy , 2ml Big bud , 2ml Sensizym)/ 1 lite H2O
Week 8 (day 56) : ( 4ml Micro , 4ml Grow , 4ml Bloom , 2ml Voodoo , 2ml Bud Candy , 2ml Big bud , 2ml Sensizym)/ 1 lite H2O
(👉one time per 5-7days👈)
😏EQUIPMENT USED😎
- CREE CXB3590 COB 3500k (100watt) 💪
- Mars Hydro grow tent (0.6mx0.6mx1.4m)
- 4" Duch fan HF-100P
🙌I'm a beginer grower 👽

Processing
Likes
39
Share


@G4NJAG4NG
Follow
100419Day 70 flower 28 - switched fully to bloom nutes now and they are all starting to slowly fatten up, they are all turning lovely and frosty and the size of laughing Buddha on the middle is crazy, she is my monster 👌😁
140419 - changed feed to 2.5ml/l bloom 1.5ml/l bud candy and 1ml/l Calmag, half way through flowering and leaves are starting to turn yellow, don't think I have added enough bloom therefore lack of nitrogen in the soil. Buds are increasing in size however.
150419 - I think zkilltez of will be ready soon, trichomes are cloudy with a few amber , began 10 day flush today feeding 4 litres of 7.0 pH water every day now till the 25th which will be harvest day 😎