


@DaisyNabis
Follow
Mi oasis recibe si primer baño con preventivo, aplico aceite de neem cuando mis bellas se van a dormir justo cuando la luz se apaga las dejo bien empapadas por todos lados repitiendo una vez por semana.


@BIYEI
Follow
Plantula 12-11-2024 a 21-11-2024
Semana 1
12-11-2024 Se mantiene en rehidratacion constante y vigilancia ya que son los dias mas vulnerables de la plantula.
15-11-2024 Se coloca por la tarde en el recipiente hidroponico ya que la plantula ya tiene la madurez necesaria, y se colocan nutrientes en dosis muy baja.
16-11-2024 Primer Contacto de raizes en agua.
18-11-2024 Se nota la evolucion radicular de la planta y se observa mejoria.
Parametros Utilizados
Temperatura del ambiente 24 C°
Extraccion de aire 4 pulgadas
Humedad 75% a 90%
Potencia de la lampara 50%
Ec Original 0.4
Ec Nutriente 1.0
Ph 6.5


@Teezkiee
Follow
Biggest Autoflower Ever - Pineapple Express was the GOAT.
479 Grams Dry Weight,
78 Days from seed to Harvest
Was a big surprise having almost a HALF KILOGRAM FROM AUTOFLOWER,
Always thought 500 grams per square meter description was a legend but no, IT CAN BE TRUE
Good luck to all my grower fellas, I will not stop on growing in hydro, even tho half of this run was in handmade hydro.
It was my third hydro Grow and I see the Improvement
Last one was only 300 Grams dry weight Strawberry Banana from FB
Pinepple Express itself is a 10/10 strain, it says mostly Indica but feels like the best Sativa I have ever tried, great pineapple smell and taste, hits like Mike Tyson, perfect strain and YUMMY as hell, loved it, will grow it again probably as it's not only mine favorite strain.
Cheers Fellas, good grows and big yields to everyone!


@Ryno1990
Follow
The Tropicana Cookies is comming along great also she is frosting up very nicely as she feeds on these cronk nutrients an is praying everyday under this medic grow fold 6 led testing out the 12 hr light cycle for flowering autos with these an can say that iv noticed a little difference but not much well see as the ending weeks get closer


@Organic_G
Follow
Hab es etwas zu gut gemeint mit dem flüssig Dünger, dachte es wäre ein Kalium Mangel, es war aber eine leichte Verbrennung und dann habe ich die Babys noch mehr verbrannt 😂 egal passiert man lernt und es wird besser 😎
Ansonsten sind die Pflanzen an Tag 28 der Blüte und am Beginn der 5. Blütewoche.
Parameter sind soweit stabil,
28 Grad Tages Temp
60-62% RH
VPD 1.5 -1.7
Ich denke das ein weiteres Düngen nicht mehr notwendig sein wird.
Topdressing wurde ebenfalls nachgelegt.
Ich denke das Sie ziemlich fortgeschritten für gerade mal 4 Wochen Blüte sind 😍
Budds sind gut fest, alle sehr Trichomenreich selbst die Fächerblätter tragen außergewöhnlich große Mengen an Harz…
Weiß nicht ob es die Generiken sind oder die UVB Lampe ihre Arbeit macht.
Diese ist 5 h täglich an ggf wird die Dauer nochmal erhöht, es macht den Pflanzen auf jedenfall nichts aus… (310 nm Peak aber auch 285 nm dabei )
Geruch ist Fruchtig Sweet Tropisch, hoffe noch auf einen weiteren Komplexen Aufbau des Terpenenprofils und auf deutlichen Nachschub in den unteren Ebenen…




@Naujas
Follow
42 days into my project - "Girl on the balcony on the north side" she is already blooming :) she looks really good, knowing what conditions she has to endure, this week there was not much sun, there was a lot of wind and rain, I used a little LST for the girl, the girl drinks = every other day 1.5 liters of water 6.3 ph, every 3rd watering I give biobizz nutrients :) good luck to everyone :).


@RDWCGrowing
Follow
1/20/2023- So much to do pre grow and over the next 16 days, absolute first order of business is that I have to take down my current Grow---TIMBER-- Then I have a list of things I have to get done in order to be ready to start this grow 1 Feb.
With that said
T - 2 days until start 48 hour Flush
T - 2 days until Start 48 hours of Light
T - 4 days until TIMBER!!!
Items that need to be done before 1 Feb 2023
1. I need to clean the tent out
2. I need to clean the equipment- Proper Sanitization between grows in Hydro is a must!!!
3. I need to get the hole in the ceiling above my tent repaired- For my last grow I had a deep sink installed in my grow room, to make Hydroponics a little bit easier and have a water source in the same room. The seals on the pipes they were installing broke and leaked through the ceiling causing some damage all the way across my grow room, I was already weeks into my grow and couldn't risk them working above my tent and it would have been very awkward positon for them to be working in as well, so have to get this done quickly between chop and germination.
4. I have to install my new light- I was using a Vivosun 4000 and for this grow I am switching up to a Spider-farmer SF 7000.
1/20/23- For this upcoming grow I am working with M/F photo seeds so I ordered 4 Sex determination kits. I recieved my my 4 Sex determination testing kits from Rimrock Analytics today. I will be using these to test my plants at week 2 of Veg so that when/if I take clones I know I am taking them off females. As well as I don't want to accidently pollinate my tent during this grow I am looking for big beautiful buds not seeded buds. :-)
1/24/2023- Harvest of current grow- Started at 2:00pm and finshed wet trim and firt batch into the freeze dryer.
1/25/2023- Next batch into the freeze dryer and cleaning all my equipment for this Grow.
T-1 Day until the workers are supposed to be here to fix the hole in the Grow Room.
T-3 days until I instll my new Gorilla Grow Tent and my New Light Spider Farmer SE-7000 for this grow.
T-7 Days until Start of Germination
1/26/2023- Harvest is done ran through the Freeze dryer and dry tim completed.
1/27/2023- Grow Room repairs completed. Hole is gone Letting the paint dry before I install the new tent.
T-2 days until Install the New Gorilla Grow tent and the new Light
T-3 days until I put the hydro equipment in the new tent
T-5 days until Germination
1/29/2023- Day 0- Final Pre Germination activities
Germination Start T-3 days
The paint on the ceiling was dry and it was time to finish prepping for Germination. I got the following items knocked off my list.
New 4X4 Gorilla Grow Tent is up and ready
New Spider Farmer SE-7000 Light is installed- Thanks Moony Grows for the suggestion and for the Code that got me some money off and free shipping (Moonygrows)!! I turned the lights all the way up to max and set the timer to 18/6 0600-0000. I will keep an eye on the temperature and humidity without my plants and see how hot it gets with the new light.
I put my Hydro system back together and put in 40 gallons of water into it, time to monitor for leaks the next few days.
I Setup my cloning machine for Germination Days 3-11
1/30/2023
let me break down the situation, ROOM in the TENT.. Enough said.. No really I tried putting my exhaust system up in the new tent with my new light, The light is so big corner to corner that it really didn't give me enough room for the lights be be raised, with the exahust hanging the buckets my plants are Starting in are 2 and 1/2 feet off the ground, great for plenty of room for roots but not so great for upwards space for the plant to grow. In a 6' 11 tent with the exauhst in side and hanging that only gave me a little over 4 feet of grow room to play with. My last grow if you saw my diary, anyone could tell I was struggling to keep the buds off the lights. No good, Since space was such an issue I was running my carbon filter inside on the ground but It really needed to be up sucking the heat out not shooting the cool out. With that setup I was sucking air through the filter and pushing it out the tent at a bottom exhaust hole cold out. Wasn't doing me any good for my heat. I was hitting temps of up to 85 degrees. I bought a portable AC unit and have been running it in the grow room to try and keep temps below 85 and I have had to lower the power on my lights during grow also not ideal.. With that said a friend of mine MoonyGrows (Check out his diary) took the time to look at my issue send me a picture of my grow tent setup with detailed instructions on how to suck the air out from the top but putting my filter and fan on top of my tent so no room issue and I am sucking the air out from the top where the heat is instead of pushing the air out from the bottom where the cool is... THANK YOU MoonyGrows For taking the time to help me get this straightened out.. Now I have room and I have the exhausts working right and now my temps with everything at 100% are topping out at 80 this dropped the temp by 5 + degrees at 100% max.
T-2 days until Start of Germination
Prepped my seed tray with humidity dome
Prepped my Rapid Rooter plugs. I Used RO water, and I added a few drops of Hydrogen peroxide to Oxygenate the water. I then PH balanced between 5.7-6.0 the same that they will be getting in the Cloning Machine and when they get to thier final grow pod. I perfere the 5.8x range and I hit 5.84 for these rapid rooters. If you want to see a complete video on the process HowWeedGrow has an amzing video that shows step by step how to do it and explains it better than I ever could including how to plant the seeds. Which I will cover when I get to that step on Wed. https://www.howweedgrow.com/how-germinate-weed-seeds-cannabis-rapid-rooters/
1/31/2023
T-1 day until Germination Start
All set and ready have my Rapid Rooter plugs ready to go have my seeds out.. Have my seed tray warming up tonight. Tomorrow morning right into the Rapid Rooter then strait into the tray. I will spray the dome to start the humidity in there.
2/1/2023
Germination Day!!
Let the games begin!
0600am Put the seeds into the Root Riots. And then put the seeded Root Riots into their first home the Seed tray. I have them under the light 24/7. Sprayed the dome
7:30pm Sprayed the Dome to keep humidity going on the dome.
2/2/2023
Day 1 of Germination
Sprayed the Dome in the morning
Sprayed the Dome in the evening
2/3/2023
Day 2 of Germination
Roots are starting to come out the bottom of the root riot plugs and the heads are slowly popping out of Number 4 just below the surface.
Afternoon- Number 4 has popped up
Evening- Number 3 has popped up as well. Happy Dance!!
2/4/2023
Day 3 - Germination
Surprise Surprise Surprise- all 4 have now poked their heads up.. Happy day!! 100% Germination succeeded.
Now major milestone to track is how many are female and how many are male.
I will take look at the roots this afternoon/evening and see if they have enough root to go into the cloning machine for the next 7 days before they go into their Hydro Pods.
Day 3 - Germination - Evening..
Roots looked good and they were tall enough to make it into the cloning machine.
Now that they are all in the cloning machine I have switched the lighting to veg state 18 on 6 off.
2/5/2023
Day 4 - Germination - Morning
All the Ladies (fingers crossed) looking great stretching nicely and look nice and green, Photo synthesis underway....
UPDATE!! After a very interesting POD cast on FSTS by Dr. Bruce Bugsbee from Utah University, I have shifted my lighting to 24 hours on through seedling and then I am going to shift to 20 hours on the rest of Veg.
2/6/2023
Day 5 - Germination
While Checking on my conditions inside the new tent last night, I found that the Humidity was down to 39 Percent. I added an AquaOasis Cool Mist Humidifier, the reason I selected this humidifier is that I needed one that could be turned on and off utilizing my Inkbird Humidity Controller IHC200 that I have my Pro Breeze Dehumidifier currently running with.
Root structures are starting to get there about 1/4 of an inch.
2/7/2023
Day 6 - Germination
Everything seems on track more roots poking out of each today. They are each getting a little taller as well.
Checked in the evening and number 3 was drooping the Root riot plug on the bottome was dry and the roots were not in the water yet. I raised the water just enough that the longest root that was sticking out is now hitting the water.
2/8/2023
Day 7 - Germination
Everything looked good while checking in on them this morning number 3 is now full up and no droop again.
2/9/2023
Day 8 - Germination
T-2 days until Plant into Forever Pods and we start week 1 of Veg .. :-)
Surprising thing to me is that number 1 and 2 were later in popping then 3 and 4 but the roots are growing longer in 1 and 2.
2/10/2023
Day 9 - Germination
Number 1 and Number 2 are definitely ready for transplant today.. Based on how they were yesterday and where they are today I am hoping by tomorrow 3 and 4 are ready. Today they look to me where 1 and 2 did yesterday.. I really hope 3 and 4 catch up by tomorrow since..
T-1 day until transplant to new/ final home for grow.
Need the roots long enough to have some clay down in the basket to keep the root riot out of the water and only roots in the water..
2/11/2023
Day 10 - Germination
Today they got placed in thier forever Home, 7 days from Sprout and 7 days until Week 1 Start.
PPM- 180 this is water out of the Tap
Temp Water: 70.7
Temp Tent: 77
Humidity: 40% I have a humidifier going 24/7 to try and bring this up.. I also have Humidity Domes on each plant.
2/12/2023
Day 11 - Germination
Sprayed the domes, all are looking good.. Nothing much to do at this phase but Keep monitoring the PH level in the system and making sure they have a comfortable home.
T-6 days until Week 1 start
2/13/2023
Day 12 - Germination
Sprayed the domes, They were looking a little yellow today so I moved the light down to assist. Nothing much to do at this phase but Keep monitoring the PH level in the system and making sure they have a comfortable home.
T-5 days until Week 1 start
2/14/2023
Day 13 - Germination
Sprayed the domes, They were looking a little Florissant yellow today, with what looks like slight burn on the tips, I talked with a fellow grower and we agreed that It was probably that I was drowning them, Yes you can drown you plants even in Hydro, but only early on.. :-) It usually happens with the water being too high, which soaks not only the roots but the medium (root Riot plug in this case). I lowered the water from touching the bottom of the pot to about 1" away. This will probably take 3-4 days to resolve. I will continue my daily monitoring.
T-4 days until Week 1 start
2/15/2023
Day 14 - Germination
Sprayed the domes, continue my daily monitoring they look a little darker green instead of lime green now that I lowered the water levels in the system, so I think that I might have resolved the issue but it will take a few days for recovery to happen.
T-3 days until Week 1 start
2/16/2023
Day 15 - Germination
I looked in on them this morning, 3 and 4 look like they are doing well and recovering nicely. Number 1 not so much it has brown spots on the leaves, this very well can still be a side effect of the overwatering but I decide to go ahead and add Nutes earlier than I was planning just incase. I was going to wait until Saturday but I think intervention is necessary now especially after drowning them early on.
I added 1/2 what I am planning on adding for week 1 start. I also think I am going to adjust my chart to add 1/2 2 days after plant from now on. I don't think it would hurt it to have some Nutes to pull from.
.25ml/Gal Calmag = 12.5ml
1ml/gal GH FloraMicro= 50ml
1ml/gal GH FloraGro = 50ml
1ml/gal GH FloraBloom = 50ml
T-2 days until Week 1 start = I will drain the system and start it over on Saturday with Week 1 Nutes.
2/17/2023
Day 16- Germination
I didn't even want to post today after looking in on them this morning, 3 of the 4 are now showing signs of dronwing.. Brown spots on the leaves, the water levels were still too high.. I drained about another inch out of the tanks.. Will see how quick they recover.. I start week 1 tomorrow and will have to ensure my water levels are at least 1" away from the basket on this round.


@CanadianFillmore
Follow
Week 6 begins with a 3 liter feeding and removal of a few dead leaves. Buds are developing nicely and frost is present, woo hoo!!
Thanks for stopping by.


@MrJones
Follow
“DAY 72 Above Ground”
📝Sunday 07.02.23 - These ladies are looking ready to harvest, going to cut after lights-on, and do a pre-harvest report.
📝Wednesday 06.28.23 - The buds continue to pack on weight and ripen, the smell in the tent is amazing, fed with a Mayan tea from Humbolt Nutrients, loved the way it looked, they have great products.
~~~~~~~~~~~
📝@fastbuds_official
📝Soil - ProMix HP
📝Medic Grow Smart 8 LED / Light Settings: 40% - V1
📝@medicgrow420
📝@gaiagreenorganics
~~~~~~~~~~~~~
📝Cinderella Auto - grows dark-green thick buds with elongated large-sized calyxes and lots and lots of long amber hairs all over them.


@1juan420
Follow
All pictures were taken on day 37
She is starting to show first signs of flowering
I tied her down with a metal hook to achieve better light penetration and added one hook for stability
I will start feeding nutrients soon


@nonick123
Follow
Día 15 (04/11) Las plantas se muestran esplendidas después del 1er riego e introducir la 1ª Bio Tab! 😍
Subo a DLI 35
Día 16 (05/11) Las plantas se muestran espectaculares y radiantes!
Un color verde intenso y sano! 😍
Día 17 (06/11) CBD Auto 20:1 #1 tiene un crecimiento increíble!
El resto tiene un desarrollo perfecto para sus días 17 días de vida!
Día 18 (07/11) Mudanza y riego!
Las plantas se mudan al armario definitivo de 60 x 120 cm por varios motivos:
- CBD Auto 20:1 #1 está empezando a tocar las paredes del armario pequeño
- CBD Auto 20:1 #2 ha tenido una ventilación menos adecuada que sus compañeras, ya que el ventilador quedaba justo encima de ella, y el flujo de aire era inadecuado
Esto ha provocado que la maceta de CBD Auto 20:1 #2 no se seque a la misma velocidad que el resto. Espero que no afecte a su crecimiento
- Las plantas pasan a tener dos lámparas a su disposición (230W + 100W) ajustadas con el regulador al 60%
- Mantenemos DLI 35 tras varios ajustes (tener 2 lámparas simultáneamente es más complicado de ajustar!)
- Colocamos dos ventiladores oscilantes para que el flujo de aire sea adecuado dentro de la carpa
Riego: 4 días después del 1er riego, las macetas se muestran "ligeras" excepto CBD Auto 20:1 #2 por la falta de ventilación comentada arriba
Riego con 750 ml de H2O RO excepto CBD Auto 20:1 #2
Día 19 (08/11) Las plantas se muestran esplendidas y creciendo mucho!
Día 20 (09/11) Macetas poco pesadas, pero no lo suficientemente ligeras para regar
Se muestran las preflores! 😍
Día 21 (10/11) Introduzco la 2ª Bio Tab a 5 cm de profundidad, lado izquierdo
Riego con 750 ml de H2O RO a todas excepto CBD Auto 20:1 #2 que se riega con 1 Litro
Aplicación foliar de Boom Boom Spray 5 ml/L. Aplicar justo después de encender la iluminación.
Aplico LST a CBD Auto 20:1 #2
💦Nutrients by Bio Tabs - www.biotabs.nl/en/
🌱Substrate PRO-MIX HP BACILLUS + MYCORRHIZAE - www.pthorticulture.com/en-us/products/pro-mix-hp-biofungicide-plus-mycorrhizae
"GDBT420" 15% DISCOUNT code for the BIOTABS Webshop https://biotabs.nl/en/shop/


@MrWeeedWorld
Follow
Jetzt beginnt die Ernte langsam ihren Schatten vorauszuwerfen.
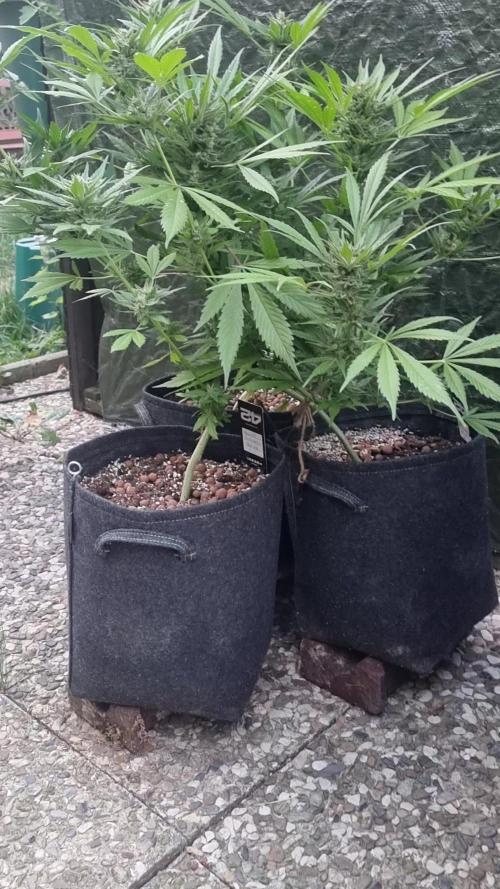
Jede Woche zeigt diese Apricot Auto ein neues Gesicht. Was vor wenigen Wochen noch wie eine sauber trainierte Outdoor-Pflanze aussah, entwickelt sich nun immer mehr zu einer beeindruckenden Sammlung harziger Colas.
Das Training der vergangenen Wochen macht sich jetzt richtig bezahlt. Die offene Pflanzenstruktur sorgt dafür, dass nahezu jeder Haupttrieb ausreichend Licht erhält und sich gleichmäßig entwickeln kann. Statt einer dominanten Hauptblüte stehen inzwischen zahlreiche kräftige Colas im Mittelpunkt, die Woche für Woche an Größe und Dichte gewinnen.
Besonders schön zu beobachten ist die Entwicklung der Blüten. Die Kelche beginnen sichtbar anzuschwellen, viele der ersten Blütenstempel färben sich bereits orange, während an den Spitzen weiterhin frische weiße Pistillen entstehen. Genau diese Mischung zeigt, dass die Pflanze noch einmal ordentlich Energie in den Endspurt investiert.
Auch die Harzproduktion legt deutlich zu. Inzwischen sind nicht nur die Buds selbst, sondern auch die Sugar Leaves von einer dicken Trichomschicht überzogen. Je näher man herangeht, desto deutlicher wird, wie frostig die Blüten mittlerweile aussehen.
Die großen Fächerblätter verlieren langsam etwas Farbe – ein typisches Bild einer Pflanze, die ihre gespeicherten Reserven zunehmend in die Blütenbildung steckt. Insgesamt wirkt sie jedoch weiterhin vital, stabil und ausgesprochen gesund.
Jetzt beginnt die spannendste Phase. Von Woche zu Woche werden die Blüten dichter, schwerer und aromatischer. Wenn das Wetter weiterhin mitspielt, dürfte in den kommenden Tagen noch einmal ein ordentlicher Gewichtszuwachs bevorstehen.
Ich freue mich schon darauf zu sehen, wie sich diese Apricot Auto auf den letzten Metern noch einmal entwickelt.
--------------------------------------------------------------------------------------------------------------------------------------------------------------------
The finish line is finally coming into sight.
Every week this Apricot Auto reveals a new side of herself. What started as a carefully trained outdoor plant has now transformed into a beautiful canopy full of resin-covered colas.
The training from the previous weeks is now paying off perfectly. The open structure allows almost every top to receive excellent sunlight, resulting in an even canopy where multiple main colas continue to develop together instead of a single dominant top.
The flowers have clearly entered their swelling phase. The calyxes are becoming thicker, many of the early pistils have already turned orange, while fresh white hairs continue to emerge on the upper buds. This combination is always a great sign that the plant is still pushing hard toward the finish.
Resin production has increased noticeably once again. The buds are becoming increasingly frosty, and even the sugar leaves are now heavily coated in sparkling trichomes. Up close, the flowers are beginning to develop that sticky, icy appearance every grower hopes to see.
Some of the larger fan leaves are gradually fading as the plant redirects its stored nutrients into flower production. This is a completely natural part of late flowering, while the overall plant still looks healthy, vigorous and well-balanced.
Now comes the most exciting stage of the entire grow. Every passing day adds a little more weight, a little more density and another layer of resin. If the weather stays cooperative, the final weeks should reward all the patience invested since day one.
I can't wait to see how this Apricot Auto finishes her journey.


@rorrobz25
Follow
Mi experiencia fue excelente. Muchos puntos a mejorar. Y es el primer diario qué logro terminar desde que pertenezco a esta comunidad. Es complejo actualizar semanalmente. Tanto como sacar las fotos, videos, fertilizar, regar. Pero a pesar de que me faltaron semanas, pude anotar la cosecha para cerrar el ciclo. Agradecido de los comentarios. Me sirvieron mucho.


@Roberts
Follow
Blue Dream Autoflower is doing good. She had her first lst and defoliation today. Everything is looking good. Thank you Spliff Seeds, Athena, and Medic Grow. 🤜🏻🤛🏻🌱🌱🌱
Thank you grow diaries community for the 👇likes👇, follows, comments, and subscriptions on my YouTube channel👇.
❄️🌱🍻 Happy Growing 🌱🌱🌱
https://youtube.com/channel/UCAhN7yRzWLpcaRHhMIQ7X4g.


@Prozak
Follow
to mutch cold here 2 week with low temps at night cicle betwen 12 &16 graus in europe.
maybe this is the reason of that purple orange colors (:


@BasedBuds_89
Follow
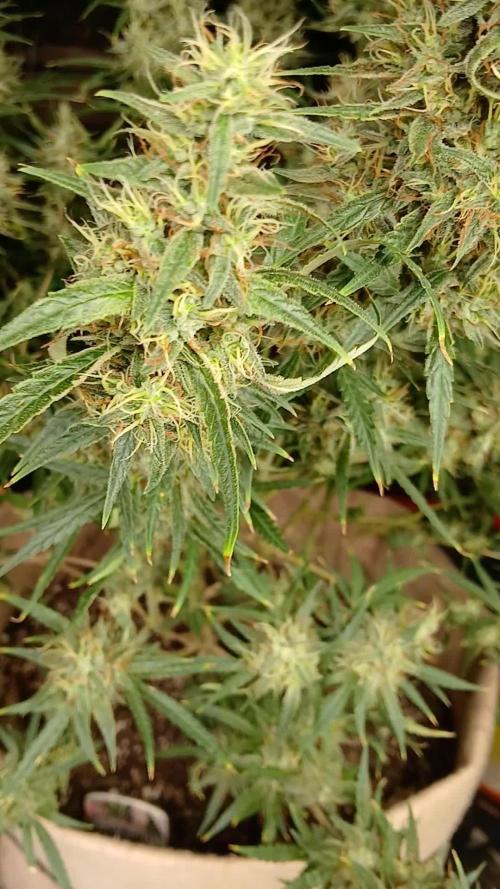
Had a really good week, im going to give this baby another month at most, trichomes look great and the nugs are swelling more and more every day. The smell is skunky with a piney after smell. It's covered in sticky trichomes. This plant will yield the most out of this grow guaranteed.
