
Likes
Comments
Share


@adam_pawloski87
Follow
@twenty20mendocino Ateam R&D Update ~ Let’s Go day 18 of 🌸almost 3 weeks in an we are looking great! Gave em another aggressive trim up some lollipops this week hopefully wasn’t too early but hey it’s we learn as growers, but they are bouncing back super nice, praying a looking happy y’all! Can’t wait to see what these girls do over the next few weeks, y’all have to keep them eyes peeled for next weeks update. Y’all have an amazing productive rest of your day as well as great rest of your week! Hope y’all enjoy, peace love an positive vibes to all y’all Cheers an blaze on 😶🌫️💨💨💨💨


Likes
285
Share


@Tropicannibis_Todd
Follow
Alrighty My Friend
well this was one hell of a grow , i had a blast , the SugarLarry exceeded my expectations in everyway ....
I would definitely recommend 👌
👉Soil Provided by ProMix.ca
👉Nutrients Provided by Agrogardens
👉Lighting Provided by MarsHydro.ca
Thanks my friends for the great support over the years 🙏 Happy Growing

Likes
26
Share


@Ukfarmer420
Follow
Hi guys
So we are on day 42 from switch so going into week 7 now, these are a 45-50 day flowering plant, I will be using a ripner for the next 10 days then give it a final flush of just water at ph 6.2.
So there starting there fade now on some of the leaves and the buds are are fattening up.
There really really sticky and covered in trichomes. I'm really looking forward to the end result.
Temps and humidity are all good I took a few leafs off that was blocking buds but other than that its been a normal week.
Happy growing guys and keep it up 💚💚💚
Day 44 on the scrog there fattening up but jeez there's so many white pistils.
I'm not sure whether to just flush with alternating water and molasses or to use a ripner on it???? Any suggestions🤔
Thanks guys 💚💚💚
Day 47, started feeding bio heaven, bloom and topmax again for the next 2 weeks after a discussion about the organic range im using.
Buds are swealing and really sticky, smell really sweet now. Humidity and room temps are consistent to where I want them, no signs of powdery mildew or rot of any sort.
Stacking on the trichomes now too I cant wait to see the final finished plant in her glory.
Happy growing guys I thanks for looking 💚👌


Likes
Comments
Share


@Chronickarl
Follow
Finally moved into their forever home and final pots all seems generally good,it's abit tricky with multiple strains as they all react differently so trying to balance and learn what each strain likes is abit harder,net is in place and already using it to spread the canopy out for more top nodes and coverage

Likes
4
Share

@xTaps
Follow
15.08
Day 22
Stretch is coming.
17.08
Mixed a new nutrient solution, optimized for flowering.
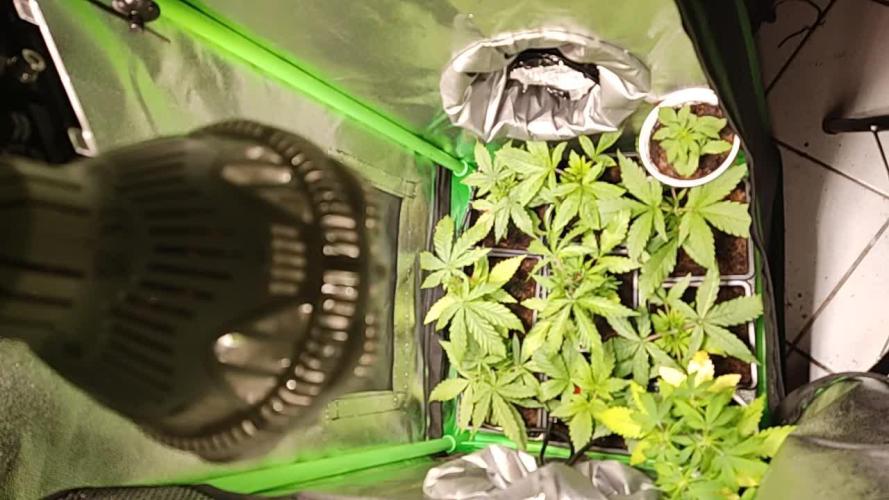
Unfortunately, my tent got a bit flooded last Wednesday (13/08), so I’m still trying to find a better solution for handling the drain in such a small space.
I even considered putting her into the big tent for now, just to be on the safe side.


Likes
16
Share


@BB_UK
Follow
Wow oh wow 🤩 to start I’ll say I’ve been very careful watching the feeds timing them almost perfectly! Also was a struggling week with humidity! Lucky I have my tricks to keep it down (no dehumidifier) 😊 I use air control 😉 (in the house) air control in the tent is perfect or next to perfect anyway! The aromas are continuously getting stronger and I am in for a treat! This time is my best time! It just shows! But every next time is my best time as I only get better at this!

Likes
49
Share


@masterofsmeagol
Follow
8/15 Yesterday the girls finally got some sun. They're flowering. Like crazy. I do need to do an application of BT once this rain stops. It just started up again. Went back over and things were dry. I decided to hold off watering until tomorrow when I feed.
8/16 Watered the 50 2 gallons, 10 1 gallon, and the rest about 1.5 gallons. I fed a pint to the ten, 2.5 pints to the 30 and 2.5 pints to the FIMMed bluecheese that looked hungry. This way I can tell if they can handle larger doses. I'd like to keep it as small and simple as possible. Gave me a fright this morning when a sheriff pulled in while I was feeding. He was on his way to a neighbors but it looked like he was just admiring things lol. I'm all legals there's no problem there. I put off spraying BT last night because dad had a couple ppl drinking and I didnt want to interact with them. Plus it was to early. The sun hadn't crested the barn yet. At least now u know what time to go spray. I'm finding some lady bugs and I killed my FIRST aphid of the season. I still have caterpillar holes in some leaves though so I might as well hit them with the BT (even though I actively hunt them). No one ever said growing cannabis is easy. Oh and my soil must be BANGING because I found some mushrooms growing in it and like a mycelium web which is awesome.
8/17 This was a quick morning due to an upcoming doctor's appointment. Removed some grass that had grown on the tar from spilt soil as it had diseases on it. I don't want that spreading to my plants. I have one blueberry cheese that I FIMed with four cola's that doesn't have as many leaves and has dropped a few leaves but looking at ot from the other side it doesnt look as open. I know that these girls are transitioning and this is the time I lose leaves. However some plants still seem totally green with no problems despite flowering. I'm wondering if it's a specific phenome thing. I also noticed that the caterpillars are still there and this morning would've been a great time to apply BT but I didn't have time and since I upped the feed I didnt want to do two things at once and have a problem and not know what it is.
8/18 Rained overnight. Plants were soaked. It's not raining now. Plants are definitely overwatered. I'm losing a few more leaves that are yellowing on the bottom interior of a couple plants. Some of it could be from the transition to flower ir the large amount of rain we've been getting. At least my drainage is really good. I need to pull the fence out and co soder cutting a pallet I. Half to better utilize space. I know I say this stuff all the time and I'm not sure it NEEDS to be done. What DOES need to be done sooner rather than later is to apply BT. I can see the damage from them. It's not bad but I want to avoid botrytis as much as possible so those pillars have got to go. Otherwise I've never had plants this healthy and it's been a real ahotty season. Boy those 10th planet's are all mice and green and healthy looking. I'm really looking forward to flowering these strains and see what they can do. I'm already greatly impressed with what I've experienced so far. UPDATE: Wasn't raining earlier then it Rained off and on but just a light steady rain that plants love but it's 3:30 now and it's pouring. Guess I won't be applying BT tonight. We need some sunshine but unfortunately I can't control the weather. Just sitting here thinking I was wondering about using Plant Doctor preventatively just due to the steady rain but I noticed mushrooms growing in my soil and since I haven't not9ced any type of fungal problem I'll revisit that idea another time. Polycarbonate roof or even some form clear plastic and a rough frame of pvc or extra lumber. Theoretically I believe I could move them all indoors for a little bit if need be but that would he a huge pain in the ass. Honestly I've got great drainage and my watering seems pretty good so I might be alright doing nothing. We shall see knock on wood.
8/19 Plants were soaked this A.M. I took a video and uploaded it (which takes forever). It's sunny though today and after the sun comes out after a period of rain the plants grow like crazy. Everything is flowering nicely. I think I can go to the end of October. I talked to a lady today that said she'd already harvested some of her peanut butter breath clones. It's my buddies mom and if you look back at one of my diaries NY mendo breath was done in September. These girls have a ways to go but the are explosively flowering which is good. It's easy to tell which strain is which. Pheno's vary but the flowers on the plants are easy to distinguish from one another. I've also never had plants stay this healthy green this long! Previously I'd have multiple pests, wpm and maybe septoria at this point. I think I've upped my game. Knock on wood. My worst problem now is worrying when to spray BT for the miner caterpillar problem. I have wasps, lady bugs and a shit ton of birds from the 3 bird feeders. I see them dart in and out of my cage. Chances are I'll spray BT tonight and take some pictures if it's nice out.
8/20 The sun is finally out. Bags are still heavy. Looks like it Rained again. I found caterpillar shit so I REALLY need to get that BT applied. I also saw minor damage to a budsite on a low hanging branch. Looks like those fucking earwigs bur I'm probably being paranoid. I also had to remove the rope that I was using to support "the big cheese" because with all this wind and rain it "rubbed" against the stem and caused an injury. I don't need that now anyway with the trellis up. Bids are developing rapidly and stacking up nicely. I have a couple plants that aren't as green as the others bit it may be do to all the rain we've been getting. I think I need to increase the volume of liquid i give my plants when I feed. Next feed I'll be doing at LEAST a quart. Due to my w8fes illness I haven't been able to spend as much time there as I should. No fungal stuff "YET". I have seen some leaves that show the plants have been over watered. Drainage is good though. I forgot to upload the video from this morning and it's uploading super slow so I'm gonna have to upload it tomorrow
8/21 Awesome. Went to town and left without going to my doctors appointment. Good job man. 👏 ANYWAY....My phone was dead when I went to town so I coukd only upload one video. I'll have to do the others later. I mixed up a batch of bt 1 tablespoon with half gallon of water (as that's what this hand mister holds. I went around the cage and sprayed every angle. Then I went to each individual plant and sprayed while spreaking the branches to make sure I got the interior. I used almost the entire half gallon so I'm hoping this will help. Bags were heavy but doesn't take them long to dry out. I'm wondering if the yellowing that is moving up (on the small purple punch and the one in the tote) is because they need more nutes, they're transitioning to flower and really stacking up or because they've been over watered with all this rain. Opinions are more than welcome. I'll check the girls tonight and if the are wet enough I'll feed and at a higher volume. If they aren't ill wait till they get their full water.
MY WIFE WAS HAVING AN "MEDICAL PROBLEM AND SO ON THE WAY TO THE DOCTORS I CHECKED THE PLANTS. THE 10TH PKAMETS WRRE DROOPING. I QUICKLY MIXED UP ENOUGH TO FEED EVERYTHING AT LEAST A GALLON AND THEN GAVE THE ONES THAT WERE THE WORST LIKE AN EXTRA HALF GALLON. JUST ENOUGH TILL WE GET OUT OF THE ER THEN I'LL GIVE THEM THE OTHER HALF OF WATER AND ILL FEED THEM. AT LEAST MY WIFE IS OK. UPDATE: Took my wife to the hospital. They did a shit ton of nothing which is par for the course. However, luckily for me (yeah right) I got back early enough to give the plants another half gallon of water each and then I fed increasing the volume to 2.5 pints (upping the big bloom to 3 tsps per gallon) but I ran out of feed on the last plant. I only mixed up two gallons and it was super dark so thar one container plant will need to be fed tomorrow I guess. This is masterofsmeagal signing off to fucking FINALLY get stoned!


Likes
18
Share


@berlinbeginner
Follow
SD2 has/had nutrient burn. I will water her till run off to lower the run off ppm

Likes
41
Share


@WolverineGreens
Follow
The stretch came in with a bang. Gonna have to stay up on my training. Ladies look lovely no complaints as of yet. Smell pickn up quickly. I think the new amendments and bigger pots are payin off. Cant wait.
Likes
26
Share


@KeiserOrganics
Follow
I have had some troubles this week. I have lost quite a few fish (not sure why) I am also showing signs of light burn/nutrient deficiency.
I had to put netting around the sides because they grew taller than they should have and started falling over from the weight.
The buds are filling out quite well, some of the hairs are starting to turn orange. It wont be long before harvest.

Likes
9
Share


@TiRobotProds
Follow
Les pompoms commencent a se former belle structure de cette plante. Boit énormément. Les engrais se mettre en marche et cela fait une énorme différence.

Likes
4
Share

@Oyziphar
Follow
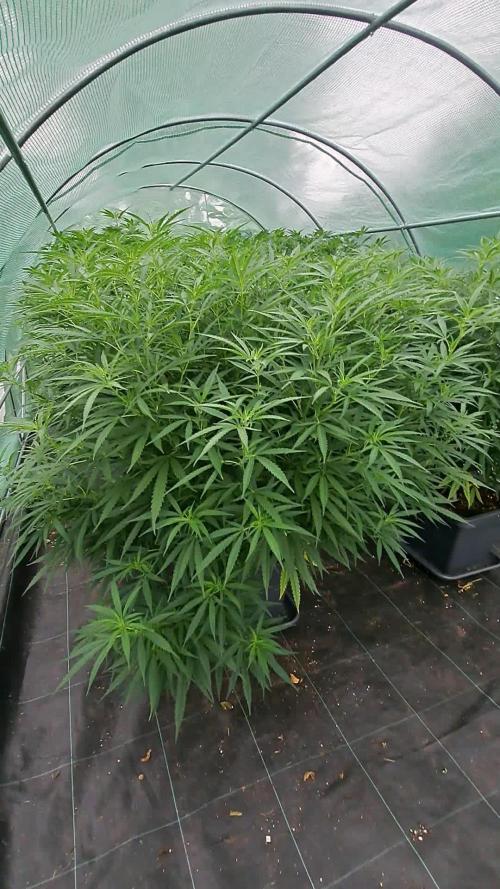
Glorious summer sunny days 🌞🌞🌞
I topped the plants, to limit their growth, because they are becoming too big 😏. Soon, I will have to move them to my other greenhouse which has a higher ceiling 🔝
Once a week I give the plants some water with OPF 7:2:3 ; Fulvic 25 ; Yuccah ; Biovin liquid ; Earthworm compost extract.
Big Thanks to Luc from Plant Health Solutions / Bioplantenvoeding dot nl 🙏🙏🙏
Likes
Comments
Share

@Rare_Terps_5280
Follow
Another week down, and we had some interesting weather. Big thunderstorms, lots of rain and hail. But the ladies were safe outside in my greenhouse. This gal is still growing fantastically and added some bat guano and bio-fish for all the essential love. All good things. Still have months and months of growth left but looking great.

Likes
43
Share


@TheCannaProphet
Follow
~ FastBuds PAPAYA SHERBET Photoperiod~
Well here we go on another journey together through 'Canna-land' and this one's kinda special... forget that, it's VERY special because this is FastBuds newest surprise for the community, a FEMINIZED PHOTOPERIOD STRAIN!🤯
I was fortunate enough to score these seeds, of which only 1000 were available and can't wait to see what this strain can do! This Papaya Sherbet, according to FastBuds, is a hybrid with a 9-10 weeks flowering period. For a more detailed and accurate description of this strain the following from FastBuds says it best:
"Combining the massive stature of Papaya (Oni Selection) with the strength and resilience of one of our best keeper cuts (Sunset Sherbet), this strain develops into a big, expansive bush adorned with numerous bud sites that later transform into a generous harvest of medium-sized buds. Papaya Sherbet flowers deliver a signature flavor of premium cannabis with subtle citrus undertones that emerge upon inhaling. During growth, her aroma makes for a sweet yet pleasantly bitter fragrance, giving you an idea of what the smoke will taste like. Notably stress-resistant, Papaya Sherbet is a great choice for growers working in challenging environments. She is very forgiving and rebounds quickly from any adversity, allowing growers the freedom to experiment with confidence that she will take everything like a champion she is. This strain embodies resilience, flavor, and abundant yields in every grow cycle."
Sounds like an epic strain and I personally cannot wait for this lady to strut her stuff!😍
________________________________________________________________________________________________________________________________________________________________________________________________________________________________________________________________________________________________________________________
The Setup:
This is going to be an outdoor grow, but I have started the Papaya Sherbet photoperiod indoors as our weather is still a bit too chilly to put a newly sprouted seedling outside (nighttime temp's dipping regularly into the 40's℉).
The plan is simple... let her grow inside under a 19/5 light schedule until the nighttime temperatures are in the mid 50's℉, which shouldn't be long. After which, she'll be moved outside and transplanted into the soil which I have already setup and inoculated with beneficial microbes from BioTabs and slow release dry amendments from Gaia Green. Once she's established herself outside she'll be given periodic top dressings of Gaia Green 4-4-4 and 2-8-4 along with worm castings and Compost Tea's. Her grow area is approx. 5'x5' and I have posts and a trellis net set up already for when she gets bigger to aid in training her. Let the fun begin!🤪💚
________________________________________________________________________________________________________________________________________________________________________________________________________________________________________________________________________________________________________________________
Weekly Updates:
9/20- Here we gooo... Week 6 of flower and the FastBuds Papaya Sherbet photoperiods flowers are exploding now!
9/22- My daily routine of watering, removing dead foliage and checking over the Papaya Sherbet continues. She is unfortunately starting to show signs of Septoria which is a bummer, but at least it's showing up late in flower so it hopefully won't affect the outcome too much.
9/24- Our weather has now cooled off dramatically, with daytime highs in the mid 60's℉, and nighttime temperatures dipping into the low 50's℉. As a result I have cut back on the amount of water the Papaya Sherbet photo is receiving daily.
9/26- There's another exciting week of flowering on the books for the FastBuds Papaya Sherbet photo and from the looks of her, she only has a couple of weeks to go! I'm so excited!🤩
Thank you for checking out my diary, your positive comments and support make it all worthwhile! 💚Growers Love!💚😎🙏
Likes
9
Share


@CheeRz
Follow
Blue is now around 30 cm tall. I don't think she'll catch up with the others, but we'll do our best. However, since she's been getting fish mix, you can see that she's growing better. Perhaps I should have started giving her protein earlier. Keep it IZI 💚

Likes
32
Share


@Sejnik
Follow
Minulý týden jsem nestihl svou týdenní aktualizaci než jsem odcestoval. To ale nevadí protože rozdíl za poslední 2 týdny není tak veliký . Na začátku 14. týdne dostaly naposledy čaj od bio tabs. Nyní už jen čekám na sklizeň 🙂 možná jim seberu velké listy aby lépe dozrály (zatím se rozhoduji).
Likes
45
Share


@AsNoriu
Follow
Day 48. They look very nice for such pitty UK summer. Days are in low 20, nights as low as 11.... constant rain ....
Happy with that strain a lot !!! Copes through everything without any issues. #1 lost one set of bottom branches , #2 and #3 lost two sets each. They needed good clearing.
Cleared all garden from fresh grow, aerated soil, put slug pellets and thats it.
Came late so leaves are droopy.
Will visit in two weeks to top up with PK boost.
Happy Growing !!!

Processing
Likes
31
Share


@FlavoursUk
Follow
Growth is super, despite having splitting and getting a break where I topped due to something falling on the plant. I quickly patched her up with some electrical tape and a cable tie and she recovered within a day! Super resilient plant. She's starting to smell and putting out a few pistils already at the end of week 1 flower!