
Likes
Comments
Share


@Anoniaprendiz12
Follow
Estas fotos son finalizando la semana 3 cambié algunas de macetero y comenze el primero riego con fertilizantes.


Likes
Comments
Share


Likes
2
Share


@Smokwiri
Follow
Welcome to week 8 of my Northern Lights XL Auto diary
Did some LST, and she seems to like it very much.
Development did slow down a bit as it seems, but the plant is taking the training very well
the lower branches did grow quite a bit and are moving upwards to the light
overall performance is very good, no insects problems, also no problems with rain (yet)
Waiting for more bud development, let the plant take it's time

Likes
9
Share


@TeaTime
Follow
This cultivation I lost a little bit the size that could reach . 😓
The light stayed too much close of the plant .


Processing
Likes
15
Share


@MG2009
Follow
07/26/2020
Vegging,and bending!
They are growing well but she can't seem to, clear up the powdery mildew.
Likes
36
Share


@BigNate89
Follow
I'm sorry I'm 4 weeks behind here guys, it's been a busy period in my life. So here we have a mixed grow, as you can see everything is growing well. I've been LSTing these plants since day 1, the results are a nice evn canopy and plenty of tops. Used the biotabs lineup this time around with a light dose of micro nutrients for veg. Working great
There are
2x Power Kush
2x PPP
2x Chemdawg
2x White Widow
Thanks for following


Likes
13
Share


@DieselKush
Follow
Oct.29 - We transplanted the girls into soil since they are moving into vegetation phase
Nov.4 - Watered each plant 250mL, 0.25mL of each nutrient for each girl


Likes
44
Share


@bSandersWitASteelChair
Follow
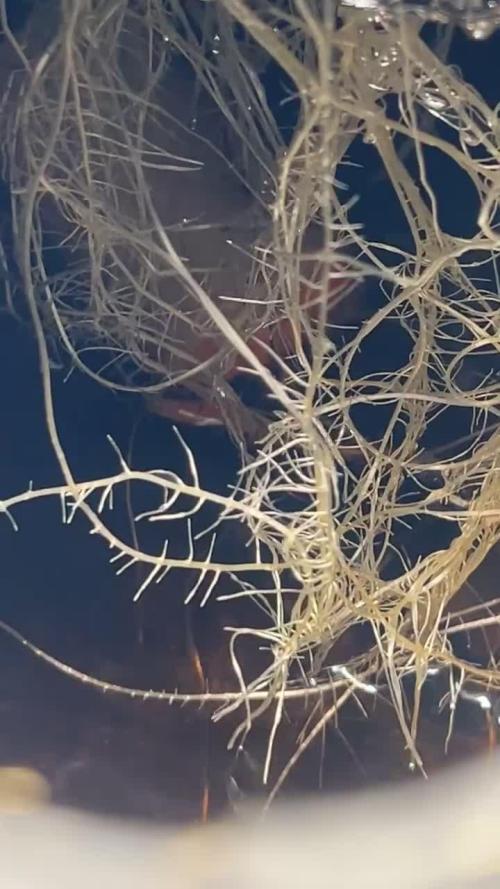
5/14: A ended up falling over so I decided to move the dirt around and see what I could see with respect to its root structure. It had one very long, extremely thin dried out root that extended about 2-3 inches and ended in a little tangled up taproot. There was a little worm/nematode/larvae something crawling around in it. I attached video. I'm assuming I need to dump all my water and sterilize, re-ph, etc. Everything is already watered for tonight (should have pulled A first in hindsight) so too late to do anything about the other 2 plants, though they do look pretty healthy still.
---------------------
5/13: Transplanted E into her pot this morning. Same soil mix (3 parts FFOF to 1 part perlite). Seedling C is crushing it, with second set of leaves already forming. E is probably going to go quiet for a day or 2 while it recovers from transplanting. Seedling A looks like it might be overwatered? It feels pretty frail compared to the other 2 plants and the downward curl of the leaves I think suggest too much H20. Will be letting them dry out a bit today.
Also, turned up the lamp to 600W and moved it to about 24 inches from the tops. Temperatures are consistently 74-77F and RH holding right around 50%.
Still no nutrients. I plan to add them around week 3, unless I see signs they need it sooner.
--------------
Out of 5 seeds we started, A, C, and E remain. E a few days behind A and C but growing faster. Planted A and C in FFOF/Perlite 3/1 about 4 gallons total in a 5 gallon bucket. Will do the same for E in a couple days. Moved the light up a bit to account for the buckets. Water ph'd to just about 6.0. Light still on 250W but will be moving up to 400W when they wake up later today. Will go to 600W once all are in pots and at a relatively uniform height. Currently just trying to keep the RH close to 70 and the air temp less than 80. No nutrients for 3-4 weeks unless they look hungry, since FFOF has quite a bit in it to begin with.
If not for me killing seed B and seed D never germinating, I'd say we're off to an OK start. The 3 that are growing, seem to be growing extremely well. I put together my own ScrOG that I will install once the light is out of the way, and plan to top these a few times each and LST. I was hoping to have 4 plants to fill the space but we will do our best with 3.


Likes
6
Share


@Lukewarm
Follow
Decently shitty grow. Lets see what happens till flowering.
5th october: 2 litres for each pot
Started lsting them today
.
Likes
33
Share


@TeknoRanger
Follow
🌱 Sour Apple⠀⠀⠀
🌸 flowering 9 weeks⠀⠀⠀⠀⠀⠀
💚 70% Indica, 30% Sativa⠀⠀⠀⠀⠀
💣up to 27% THC⠀⠀⠀⠀
👅Apple, lemon⠀⠀⠀
⚖️ 550g/m²⠀
Sour Apple was created by an intersection of the original Sour Diesel and a Pure Kush. It is an indica dominant hybrid with a combination of both indica and sativa effects. It has an delicious intense taste of sour apples and lemon and a gigantic potency.
The rockhard buds are covered in a thick layer of milky white trichomes and are packed with sweet resin. Users describe the high of the sour Apple as a strong mental shift, a uplifting head high that leaves you motivated and focused with a sense of overwhelming euphoria and social tendencies. This is followed by a slow fade into an intensely overwhelming couch-lock. Sour Apple sends her 27% of THC stright to your mind to kick you in other psychedelic spheres. We proudly present this unique goddess to all the growers in the world.
GROWING SOUR APPLE
When growing indoors it is a good idea using screen of green or sea of green methods. You can expect big yields of 500g or more per squae meter indoors, 700g per plant outdoors. The flowering time is 9-11 weeks. Indoors, Sour Apple is a vigorous grower with many side stems which can be trimmed to keep the plant in bounds. Indoors, the plants grow between 1,00-1,50 m depending on the introduction of the flowering phase, outdoors Sour Apple can reach four metres of hight.
MEDICAL USE
Because of its strong effects Sour Apple is an ideal strain for treating patients who suffer from conditions such as chronic stress or anxiety, chronic pain due to injury or illness, and sleep disorders (insomnia and sleep apnea). In low doses it is daytime suitable for medical applications, at higher doses, it is the ideal weed for medication at the evening.

Likes
58
Share


@Rap_a_cap
Follow
Weather here is still fantastic, hot days, partially cloudy, cooler nights. Long term forecast are excellent till the end of September, probably till mid October. No news to report, I'm just waiting for buds swelling, these are the slowest days of my life.
I've got pheno #1, tall plant with short and dense buds, fast blossoming, good leaf/buds ratio, great resin production. The plant is gorgeous, all concentrated on the top, big, rough and fat buds. It is evident from the physiognomy typically indica that she is a rustic, wild plant and not an indoor doll. Flushing started, last feed Thursday 17th. Very strangely rust fungus infection has attacked only to fan leaves and hasn't hurt flowering, till now. She will be a generous yelder... and maybe she will cropped together with her sister Royal Gorilla in 7/10 days.
Stay safe Bros
Likes
Comments
Share


@PatriciaGant
Follow
Dane, We all should help one another.
Human beings are like that.
We should live by each other’s happiness - not by each other’s misery.
We don’t want to hate and despise one another, share the Joint.
And mother earth is rich and can provide for everyone.
We can Grow enough Happiness, In this paradise, there is room for everyone.
We only exist to bring joy into the world and The way of life can be free and beautiful,
but we have lost the way.
Grow High and Give the world A smile.
At the end we own nothing more then all our memories, lets make them amazing for everyone,
nothing to loose only everything to win.
A last kiss goodby, a second one, softer and long as a sign, that you are woth it.
That Everyone worth who loved and give.
Enought Hippie Talk, now have a nice day and an even better grow, thx for watching by.
((From Seed 🌱
week report:

Likes
2
Share


@Fleetwood
Follow
I am busy all weekend, so I wanted to make sure I got something out of the grow (just in case). I might use a good portion of this harvest for rosin and for when friends ask :) That is if the second plant lasts until next week. I cant ask my wife to keep an eye on water, roots, or bud.


Likes
33
Share


@The_Moz4rt
Follow
The plant kept stretching during this week. I'm a little bit worried as I don't see the flowers touching each other to form nice colas, but she's healthy so I can't complain, it's my first grow after all. Just hoping in fatter buds and not many popcorns.
She's drinking a lot of water in these days and the EC was higher when checking it before the daily refill. Don't know why she's eating less, but I lowered it to 1.6 again. I give her what she wants.
Keeping an eye on her development and trying to figure out when to add the P-K booster.
No particular problems this week, everything is going ok.
I gave her another (hopefully not too heavy) defoliation at day 59 so i guess I'm not going to touch her again till harvest.
Likes
6
Share


@MNGrowBro_Angel
Follow
I Topped Dressed 5 Tbs of 2-8-4 & 2.5 Tbs of 4-4-4 & Feed 1 Tbs of Molasses in 1 Gallon water Feed
Likes
64
Share


@Ju_Bps
Follow
Hello happy Growers!
This week was better than early,
I've founded few very litle banana spend the week,
I will continue to check this week,
Harvest will be in 2 or 3 weeks, I hope can take situation under control untill harvest.
If banana start to be too big, I'll remove the branch.
If no, buds start to be compact, Nice sweet smeel and sticky,
Probably my last fertilizer week, after I'll start flush
Plant start to take less water, sign harvest for soon :)
Have a good week my friends