
Likes
Comments
Share


Likes
12
Share


@GirlGoneWeed
Follow
Not much to report, plants keep growing nice and healthy with no signs of gender yet. I will be bringing these girls outdoor as soon as thet show sex.
Stay lit xoxo

Likes
14
Share


@Shellshocked
Follow
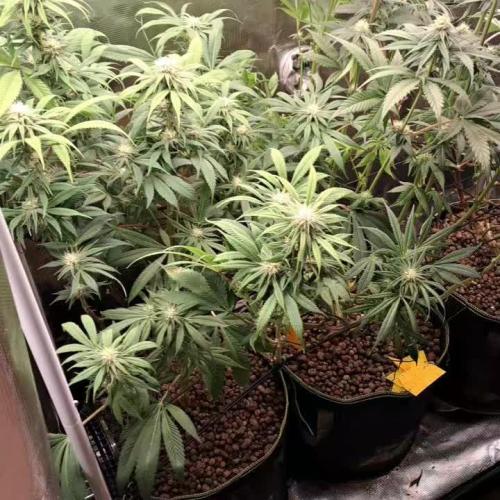
Start of week 2 ladies are growing like beast gave them all botanicare kind bloom and base also gave them open sesame from fox farm line just gave 1/4 of the recommended dose. Was using Gaia green bloom but got a dwc grow going now and the botanicare is working better than anything I've seen before. 1st week went very well with the botanicare feeding plants really love it not sure what I'm going to do as the tent is way 2 full and stretch is not done yet.
Likes
16
Share


@bro8006
Follow
alright, how y'all doing?
this week I did defoliated both plants, for the last time, I hope.
The Rd started to flowering few days earlier, and the SS on the other hand, is very small in size, I confess when defoliating the next day it looked I didn't do lol. 😵, but yeah I noticed the plants now are going int flowering so no more defoliation for now.. SS its showing it gender but still very shy 😜, I keep telling her, hey, don't be shy be like your friend right there all showing off.. 😇.
alright.. feeding schedule..
I was doing some research and couldn't find much at all about mixing different types of fertilisers brand...
so I got this advanced nuts ( carlbooad was sent cause they ran out of bud candy but in the website it was available nd on the email I said to send me the big bud then but whatever.. 😕..
I did made a mistake with the nirvana. ( the bottle says> 2 ml/l during all grow fase and during weeks 3 till6 of blooming. ( on the website doing some research found only tu use during weeks 3 till 6 on bloom.)) so with that said I just used as the bottle said, and it was too late, I mean when I realised I had done it already, some lets hope and prays for the best kkkk....
so for the next feeding this week I won't add nirvana yet..will wait 2 more weeks and then put back inside 😆.
so. I guess its all for today.
let me know ur comments below and suggestions, if had the experience mixing different fertiliser and etc.. even if it was a bad experience pls comment..
thanks y'all c u next week...
👊


Likes
14
Share


@Cannabot
Follow
Transplanted in final pots,one is a 25l and the other a 35/40l.Seen some decent growth since I transplanted.Weathers been great bar one or two days of shitty wind.Started lst


Likes
15
Share


@SamDo
Follow
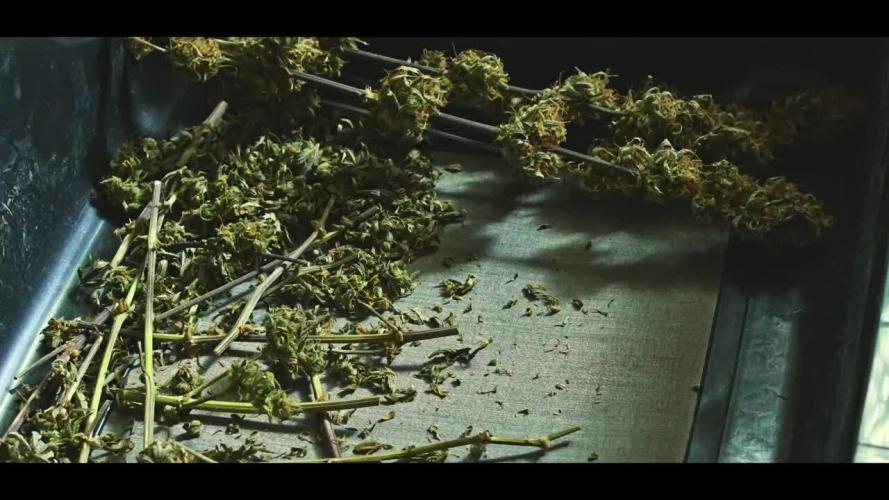
Hello, enfin je peux faire le dernier update.
Nous voici à un peu plus de 15jours de séchage,,, la manucure est faite,
Je ne suis pas déçu du résultat final, même si il reste encore plein de choses à améliorer,,,
Hâte de relancer un nouveau cycle, pour tenter d’atteindre d’autres objectifs... plus de 500gr/m2🙏

Likes
27
Share


@Ganjagrandaddy
Follow
At the 5 week point we are still a way off what they should be due to their waiting for me to get them settled but today they look good and better than they have all week. The megacrop is working the magic now and I am getting them into their NFT later today so I expect them to fly.

Likes
6
Share


@TheSurfBud
Follow
Ganja Farmer Seeds
Gorilla Cookies Auto
In @highpoweredorganics new ISLAND-BLEND.
Fed water soluble powders.
AQUA-MARINE Grow Formula 5.1.4 paired with OCEAN-POTION and RHIZO-MOJO in dechlorinated water.
Alternating ANTI-MATTER & DARK-MATTER feds weekly.
Foliar fed GREEN-SUPREME daily
Following High Powered Organics Island-Blend Feed Guide.
https://www.highpoweredorganics.com/
Happy growing friends 🇦🇺🇦🇺🇦🇺

Likes
2
Share

@Grow4ever
Follow
Frohes neues! 🎆
Nach einer Woche Abwesenheit, kam ich heute zu diesen ganzschönen dichten Büschen und bereits etwas entwickelten Buds zurück, die Bewässerung lief top. Allerdings ist mir ein Tripsbefall direkt ins Auge gesprungen, unübersehbar... Entsprechend habe ich dannach begonnen zu defolieren, wir haben Tag 20 der Blüte. Vorallem bei der GSC extrem, da von ihr der Befall ausging. Raubmilden habe ich mir heute bestellt und ich hoffe, mit der starken Entlaubung, die drei noch gut durch die Blüte zubekommen.
Likes
11
Share

@DarbGrowDiaries
Follow
Finally done, one of the girls could have probably gone for another week or so, but she was not getting much fatter in the last few days.
I think this might turn out to be very nice buds, but probably lower on the overall yield.
Have to give them 1-2 weeks to dry and hopefully end of July I can smoke them

Likes
1
Share

@psychonaut420
Follow
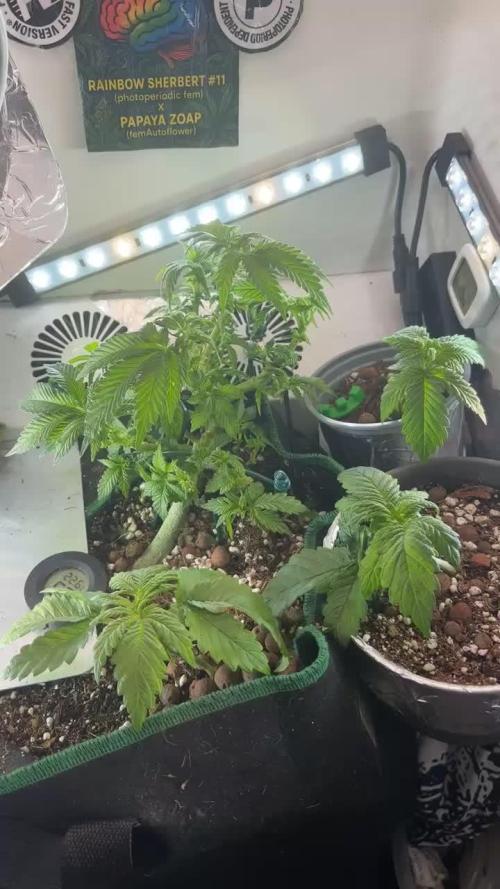
The first 2 one companion planting a f1photoperiod(documented on another diary) and in a 2L pot are both lemon cherry cookies auto and the last one in a 1L pot is frozen face auto there are 2 sets of 2 side branches streaching on each autoflowers and handeling first set of defoliation and LST extremely well hopefully should see signs of more streaching as coming up to pre flower due to autos genetic makeup


Processing
Likes
1
Share


@Lukazw
Follow
Semanas finales endulzado los cogollos con melaza y maca peruana.
Likes
9
Share


@Kushizlez
Follow
Blackberry Breath #1
Yield: 57.5
Smell: 9/10 - sweet, grape, berry, gassy, earthy, hashy
Bag appeal: 8.5/10 - dense, sparkly buds
Crystal coverage: 9/10 - super impressed
Ash: 5/10 - flaky, mostly grey/blackish
Fire holding: 4/10 - stays lit for 10-30 seconds
Smoke: 5/10 - tastes like chalky shit
High: 6/10 - indica dom
Comment: looks amazing, smells amazing, tastes like shit, burns like shit.
46.5/70 = 66% 👎🗑️
Blackberry Breath #2
Yield: 76.1g
Smell: 6/10 - musky, tea, berry, herbal
Bag appeal: 8/10 - slightly leafy/stemy
Crystal coverage: 7.5/10 - very impressed
Ash: 5/10 - flaky, mostly grey/black
Fire holding: 4/10 - stays lit for 10-30 seconds
Smoke: 5/10 - taste is shit
High: 6/10 - indica dom
Comment: looks nice, smells shitty, tastes shitty, burns like shit.
41.5/70 = 59% 👎🗑️

Likes
33
Share


@Rap_a_cap
Follow
Pre-flowering stage, stretching phase.
Today exactly 14.41 hours of light.
Average week's temperatures 80°F
High humidity, some stormy days, hew heat wave is coming.
Afghan is a massive plant and is almost ready to flower. Branches are very thick and sticky. Great smell. Starting to defoliate the bottom canopy.
No issues, no pests, no need 4 food.
Likes
26
Share


@darb35
Follow
Day 22 - 660 ml water (ph 6.5)(22 cm)
Day 23 - 660 ml water with Acti+Heaven+Grow+Calmag (ph 6.6)(24 cm)
Day 24 - no water(26 cm)
Day 25 - 660 ml water (ph 6.6)(28 cm)
Day 26 - 660 ml water with Acti+Heaven+Grow, also trimmed a bit of fan leafs, it's getting crowded inside (ph 6.5)(30 cm)
Day 27 - 660 ml water (ph 6.6)(33 cm)
Day 28 - 1L water (ph 6.5)(35 cm)


Likes
16
Share


@Camarao_Desperto
Follow
Day 28/06/2024 I chopped the first one, day 08/07/2024 I chopped the second one and today day 09/07/2024 I'm going to chop the other two (bigger ones)
Very satisfied with all this, just the beginning and you will also see more diaries around here!
These plants were perfect for a newbie like me, but I also learned that I'm very good at this, all the knowledge were in my head.
See yall! 😎👻👽😈
Edit: great smoking, relaxed but not much couch lock, good after a day of work, will try on days of to see, I’m fucking happy bros!!!!!


Likes
10
Share


@RandomStreetMerchant
Follow
The girls are looking strong, can’t wait to see em in a couple weeks. Much love 5/29/23
