
Likes
Comments
Share


@Chumpkilla
Follow
*Here is a link to video on the Harvest. https://youtu.be/aZUOrljaioc
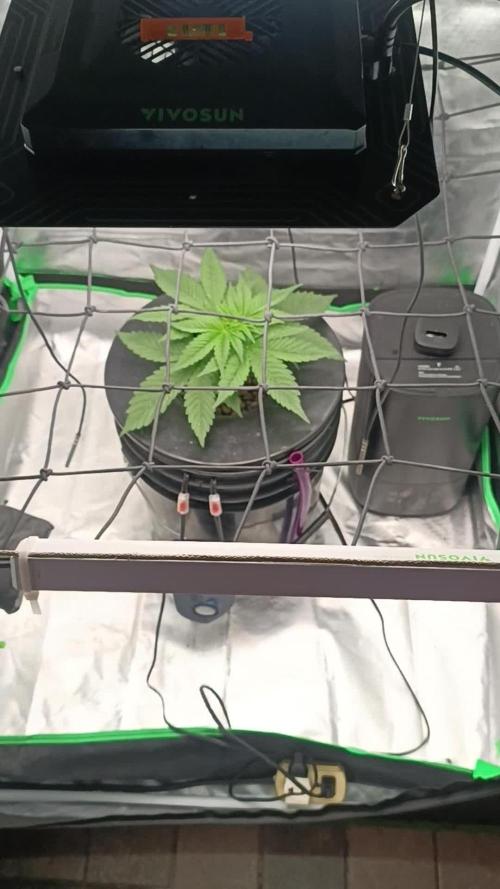
9/23/23 - Day 114 - Today was going to be the Chop, but I will wait one more day. I was not able to dedicate the full time I needed to make this happen today, so I decided I would give it one more day.
One thing I am noticing is the color of the leaves. I've always wanted to grow a strain that has purple in it, and it looks like this plant turned super purple. I couldn't tell because of the lights.
9/24/23 - Day 115 - I'm 2hrs away from chopping. With the Leaf box, you have to stay on your timeline, No rushing it, and no waiting. Always right on time. I started the grow at 3 pm 115 days ago so from 3 pm - 3 pm is a full 24/hrs. I'll update after 3 p.m. I already have my tripod, tools, cleaning materials, etc., up and ready. We will drain the water, ill then remove the roots and clean out the tub. Then, I'll start to remove the branches one at a time. Once they are removed, I will then get the hanging supports in place. Then I will hang them upside down and hope there is enough room. :)
I've noticed I have a lot of views on this grow. One thing I feel I should do a better job of (based on all the messages I received) is documenting the process that I follow throughout the grow. So I'll start my next grow in November. I'll document it with better "this is how I do this in Leaf" type details. 2 hours and counting! See you at 3 PM!
9/24/23 - I started at 3 p.m. and finally finished around 9 p.m. Holy shit, am I tired...... I have a lot of pictures and videos to upload. I'll add some photos tonight with some videos to follow tomorrow. I don't know how much I have yet, I need to wait until I can jar them to weigh them. I was able to get all the buds off and hung. With a couple of bags of A/B stock (Snicklefritz) of leftovers that I didn't want to hang. In just the Snicklefritz, I had 219g of wet buds. Ill know the full dry amount in a couple of days.
I was REALLY happy with the amount of buds. There were more than 75 branches of bud to hang/dry. Its the most weed I have grown ever.
Now that the buds are all back in the box. The Leaf box will handle all of the drying process. It will maintain temperature as well as humidity. I now wait and check daily to check for dryness.
Here is a link to video on the Harvest. https://youtu.be/aZUOrljaioc
9/26/23 - The buds are way more dry today. Im getting some really nice citrus smell from them. I think one more day should work before I start putting them in jars. I already trimmed them. Its a prefrence on trimming before/after drying. Becuase I had so much I wanted to make sure there was enough air space. This is my first grow in this box so this will be floor, theres no where to go but up from here. Im hoping to finish out this journal in September with a final weight.

Processing
Likes
7
Share


@Isle_of_dank
Follow
all purple lemonades #1 run Plants exploded under the 400watt hps check back in a week all plants are just over 10inch tall/plants fed 17june proper pH 6.5 hopefully spring back after stunted and heat stressed

Likes
17
Share


@TightNugs
Follow
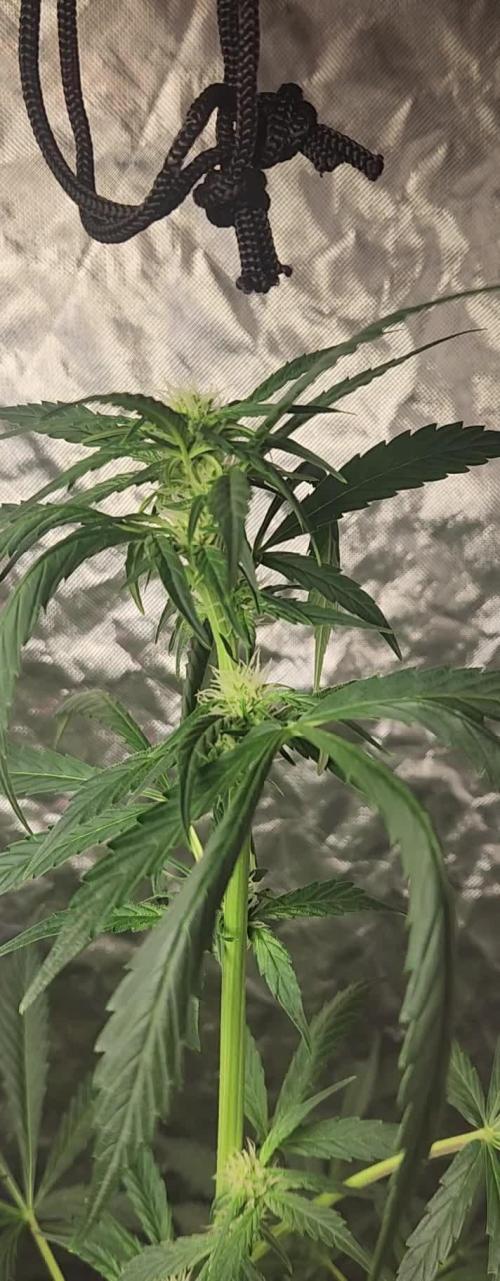
Missed a week last week due to time,first week of flowering and the purps have appeared on both plants 💪.
Minimal training on this grow both plants topped with defoilation.
Upped nutes to 1200 added bud candy.
Happy growing bud buddies 🤞🏴🍁
🍁🍁🍁
Breeder-Fast buds LSD-25 ×2
🍁🍁🍁
Light-Voost VST 120 veg
VST 240 flowering
https://voost.com/
Code-TightNugs
🍁🍁🍁
Processing
Likes
48
Share


@S_V_F_O
Follow
Not Good! I am wating new PH meter, my broken! Now i shed all my bushes with good clean water and add ventilation.

Likes
55
Share


@Max1973
Follow
Day 44 - Put em in flower/bloom... 12/12... they are drinking alot.....
Day 47 - Decided to thin them out and defoliate ........ pics/vids....... (video are big files, need to pause, let em buffer)
Day 48 - Posted a pic, day after defoliation.
Day 50 - more pics, recovered from defoliation, and some pics of the beginnings of the flowering....... something interesting in the day 50 pics , is the color of the light spectrum...... it looks like a yellowy sunlight spectrum..... home made DIY LED..... 😎
Globe setup is working better,
10x click- 9w - 2700k - 8000 Lm
2x osram- 10.5w - 6400k - 2160 Lm
Lightpanel- 70w (600w) - 20x blue 6400k (2000Lm) - 38x red 2700k (4000 Lm)
Likes
2
Share


@mck47
Follow
Sprayed her 2x with magnesium + aloe vera in the last week & watered only with rainwater..
Put some old salad & leafs from defoliation on top of the soil for the worms.
I dont know what to think about this one. lets see how she will produce.
Likes
9
Share


@HollowSource
Follow
The banner is looking like it's namesake. Big, green and mean. She is super dense and has colas almost as long as she is. She is fattening up. She is giving the Gelato a run for its money when it comes to bud size.

Likes
16
Share


@Nugget_head88
Follow
Day 44 01/07/2025, I flushed with a quarter strength nutrient solution but kept with the usual does of cannazym and Rhizotonic as sure it could only help her, im experiencing some issues with yellowing and a few brown spots plus tip burn, I've never done an auto before and never considered that they might need less feed than a photoperiod, feel very stupid, so with that being considered I think it was probably for the best and will move forward with half strength feeds.
I am also actually trying to get the night cycle in check as I've been advised of some processes that won't happen with the low VPD that I was allowing to happen at night, the dehumidifier works but also heats the room up to nearly daytime temps, it's a desiccant dehumidifier though and I think it just pumps out more heat, I'll have to reinvest in a more suitable dehumidifier
Maybe the issue is too much calmag, it also has iron in it and an iron excess can cause a manganese deficiency, unsure..
I have had some heat issues over the last week hit 30c for a short time and has been consistently over 28c, I have kept the humidity higher to keep vpd in line but it's not great, this is just due to some very warm conditions in my area over the last week or so, and I just don't have the cooling capacity to deal with it, hoping things cool down a bit now so I can at least make sure temperature is ok..
Likes
7
Share


@Minuteman_Organics
Follow
Big week of defoliation. Added another level of scrog as well to prevent the plants growing into the light.
The medipak are sativas and are stretching like crazy. Medipak #2 in the middle back is looking like an indica with much larger fan leaves and thicker stems. Less stretch compared to medi pak #1 and #3 which are growing like crazy. #3 is gonna be a real heavy yielder...stacked!
Smelling of spices and hash
The indigo child are stretching much less and are a little slower in flower development. Very similar to the putang I grew previously. Usually slow to start but will pick up steam and fatten up in the last few weeks.
Smells like orange soda mixed with grape candy. Has a little sour pine sol finish. Almost identical to the putang. Still one of my favs.
Edit day 17. Not great but my setup lost power most of the day. It probably got into the low 50's in my tent, maybe less. I'm sure I'm gonna see some temp shock from that.
Sure enough when I looked at the leaves they were a little curled. We shall see what happens. They're big plants so I'm sure they'll bounce back. Maybe lose a few days of stretch...
Update day 19: Plants are recovering nicely. Starting to see some frost. Temps are back in check now as well.
Update day 20: temps are good.


Likes
5
Share


@AustinRon
Follow
TH 1Q2025 - Week 2 - Seedling
(ON Haze X Original Haze) X Northern Lights #2
“Todd’s Haze”
Objective
- 8 Female Plants, Topped ONCE @ Flip, 12” when topped
- Modified Sea of Green
Seeds Wet: 1139PM, 28.2.2025
Germinated: 2.3.2025
Flip: 21.3.2025
Harvest: 77 Days, DATE: 6.6.2025
_________________________________________
__
Fri Mar 14, 2025
TH 1Q25 15:V:2:1
__
Sat Mar 15, 2025
TH 1Q25 16:V:2:2
- Moderate Fertigation, Root Biased, Reducing Container Moisture Levels
-
LightIntensity: [ 414, µMol/m2/s]
SIDE NOTE: We’re Still 14% Moisture Content on Orange Gasm #1
AM
Watering with PCAL1660, Kelpak, CalMag Fuel, Lush Green
- Starting with 1L PCAL1660 (@ 1g/gal)
- Add 1 ml Kelpak/L
- Cal Mag Fuel: 3.4 ml/L
- Lush Green: 1.7 ml/L
- EC: 0.9 (Delivered)
Sex Tests Returned, Selected 8 for grow, w/ Priority to
- Sex
- Root Development
- Seedling Size
Final Selection: 3,4,7,6,8,9,11,12


__
Sun Mar 16, 2025
TH 1Q25 17:V:2:3
Pots Hefty - #4 looking, meh. (Reduce Light from 75 - 67%)
Disassembled airpots for culled plants.
Notes:
- Overall - HIGHER Moisture than ideal - I’ll say it’s evidenced by sparse root development (Roots White, Top to Bottom - Roots throughout, but SPARSE
- Action: Need to keep OVERALL moisture content at a lower level - Perhaps aided by REDUCED PEAT PARTICLES in coco
- Fine Peat leads to Coco clumping. When it Clumps, it’s time to be washed,.
Mix 1 Liter
PCAL1660: [ 0.35, g]
CalMag Fuel: [ 4, ml]
Lush Green: [ 1, ml]

__
Mon Mar 17, 2025
TH 1Q25 18:V:2:4


Girls are displaying the funk of SMALL container = BUT - We just need some air . . .
Evening
Foliar, 1 Pt
- [x] Solar Rain: [ 2.5, ml]
- [x] Silica Skin: [ 2.5, ml]
Drowned Rats


__
Tue Mar 18, 2025
TH 1Q25 19:V:2:5
With Grow room doors closed last night, we hit max Temp and lost ability to hold RH, Resulting in VPD: 0.96 - 1.27. Opened doors ~0900, reduced max to 82, humidity back up, VPD back down.
We’re at the “I NEED NEW SHOES” stage -
SOP - Prep 1L Propagation Cells
- Assemble PCells
- Load with FRESHLY PREPARED Coco (Fresh, Unused) [NO FINE PEAT]
- Assure Sides are Taughtly packed, not Tightly packed
Evening:
- Fertigate Balance of EC: 1.0 PCAL, KelPak, Cal Mag Fuel, Lush Green, PSP, Quillaja 60 Powder
Fertigation Periphery, 1 pt
PCAL 1660: [ 0.25, g]
KelPak: [ 1, ml]
CalMag Fuel: [ 3.4, ml]
Lush Green: [ 1.7, ml]
__
Wed Mar 19, 2025
TH 1Q25 20:V:2:6

Girls need to look happy, even colored, lifted leaves, BEFORE Transplant and Flip.
Starting Standard Feed Regime at EC: 1.0 mS/cm
__
Thu Mar 20, 2025
TH 1Q25 21:V:2:7
We’ll water to runoff this morning - 8:6:4:5:4
Bumping CaMg, Bumping N
Watered entire Liter over 8 Plants, ~ 125 ml/plant
With LOWER Light, Girls are MUCH HAPPIER.
ALL PCells display ROOT MATS at bottom of airpot. We need to BALANCE THE GREEN across the plants, before Transplant.
A day or two, or three of a more relaxed environment should better prepare us for transplant.

We’re gonna need more water than we’ve harvested.
- [x] 8 Gallons of Distilled Water
For Transplant
Consider P/K ≥ 2.5 (Root BIAS)

Likes
2
Share

@fabialien
Follow
Comienza la semana del 3 al 9 de noviembre.
Se le hace poda de bajos nuevamente el 2 de noviembre
Likes
3
Share


@Bdawg
Follow
Grow went well.
Spider farmer produces again the se5000. One day they myt sponsor me beofre someone else does.
Dyno myco somw gd stuff chek out ppl.
Likes
10
Share


@Rychap
Follow
The plant has really jumped in size 20 inches I have started out using 1.25mls (Dutch nutrients bloom a/b) per L using 2 gallons of water each watering and letting water drain checking the ph of the drainage water as well and it's the same ph going in as going out 6.2

Likes
18
Share


@thenotillwizard
Follow
Harvested at day 76, after 72h of darkness.
Very good yield!
3.3 pounds of dry buds + 1 pound of trim
The 2 keepers yielded 366 and 342g of premium quality smoke.
Very uplifting and energizing high :) Love it!

Likes
3
Share

@Kushncheeseplz
Follow
I had to change the light this week. To smaller lights because of some fan leaves was turn at the tips away from the lights

Likes
29
Share


@coldweave
Follow
Hey all sorry for the late update. Got really busy with work and just wasnt uploading. I had to cull phat Gary cause she was a genetic herm, I’m talking pollen sacks all the way up the main stem. I’ve seen a few stress sacks here and there on the lowers but nothing like this. I added a video of it so you might know what to look out for.
It’s my first experience with exotic genetix and while I have heard of them having herm issues before, I have never had anything quite like phat Gary. But, on the other hand, this Gary Poppins #2 is the best smelling plant I’ve ever had. She smells like a straight strawberry soda, just this very fizzy strawberry scent. It’s unreal. Gary Poppins #1 has a similar terp profile, but not as loud and she’s frosty as ever. Both the perm marker s1’s are identical. Both look exactly like the perm marker flower I’ve bought from seed junky in the past. Very lime green buds with light oranges hairs. Smells just like a permanent marker.
Couldn’t be happier with how this run is going, well except Phat Gary. Still haven’t decided on Exotic Genetix yet. I guess we will wait and see how Blueberry Gary comes out, she’s currently in week 6 veg. Shout out to the mad scientist Jbeezy though, this perm marker is unreal. When I saw he was releasing s1’s I couldn’t believe it. Gonna wash this entire run for some fresh frozen. I would absolutely love to get this Gary Poppins #2 smell to transfer to some live rosin. Will update this when we finish and I’ll make a diary for blueberry Gary and Gastro pop from compound genetics when I get a chance. Until then, happy growing all
Day: 52F - Week 8
🌡️:79 Fahrenheit
💦:50%
💡:75% @ 14 inches


Likes
13
Share


@Aircoholic
Follow
Girl Scout Cookies Auto was suddenly ready to get chopped - I would've like to see a few more amber trichomes, but the fan leaves started yellowing faster, and more sugar leaves got crispy tips. Also, the smell got pretty strong over the last week or so. It was a very nice grow, and I'm curious on the yield and effect after drying and curing.
Yuhbar Auto still needs a little more time, and will enjoy a few more days or weeks under the (artificial) sun, giving the trichomes more time to ripen.

Likes
5
Share


Likes
Comments
Share


@SirBudAlotts
Follow
So this and last week was all about dialing and maintaining temperature and humidity..
It's been quite hard to get the precise temperature and humidity because my growing closet is packed...My Gawd..
So she finally has Milky Trichs between the middle of her...
The one thing that I wanted to test...
So as I mentioned my closet is stacked lol so I decided to Chop off her 2 main Colas..Unfortunately I think my Grow light was placed too close to her canopy..
Which caused the two Main Colas trichomes to turn about 30% amber..
So this is a good trial to see if this will cause the smaller collas to fatten..
Keeping fingers crossed 🤞 🔀