
Likes
Comments
Share


@Onlygrow99
Follow
Llevamos 13 días desde que se empezaron a germinar, hoy 23/10/23 empezamos a contar la primera semana de crecimiento.
He usado ROOTS y GROW de BOOM nutrients.
Ya tengo 2 o 3 a punto de descartar, tienen alguna malformación y no crecen igual de rápido esperaremos una semana mas.

Likes
29
Share


@HighDran
Follow
Hice un lavado de raíces hace 7 días o un poco mas, creen que ya este lista para cortarla? Ya tiene bastantes pistilos naranjas
Que opinan?🙌

Likes
20
Share


@CzAlmighty
Follow
Best flower 🔝
Strong flower. I love qualitty of HSO.
everyone recommend This strain. 💚
Thank for watch. ✌️🏼🔝🔝🔝

Likes
11
Share


@Thigh
Follow
Paar Tage schönes Wetter 🙂
Paar Tage schlechtes Wetter 🙃
Willkommen in Deutschland 👨🏽🌾
Bis jetzt läuft alles 😜

Likes
42
Share


@Siriuz
Follow
Okkk so we did fimming to this lady
And she responded very well
Now she is all good and growing wild
She is also in a bigger pot plus
We started adding bloom nutes
We hit her with 1500ppm to begin
IT was just 300ml/400ml top
And I believe 50ml of water or more
But its all good tho
Temp is around 23/25 at day
Temp at night lowes to 19 when really cold
And humidity always around 45%/65%
Usually 41 when really dry and 78% when top humid
I always keep them between 50/60
Anyways lights are on around 16/18 hrs per Day and just been using these nutes
Floranova bloom and veggie
Probably will add some big bud
And some other great stuff
Anyways thanks for your support
Blessings and happy growing

Likes
18
Share


@Ananas_Comosus
Follow
Saturday, 05.03.2022
Girls graduation! Bwoy Shabba, world of girls, In container loads! (Shabba Ranks, 1991) I wish you could hear this song playing as you read this post to get the feeling I am feeling. Culled plant with strong male characteristics (#3). Left with 3 plants showing pistils, #s1, 4 and 5 😁. #2 was the largest and best looking of the plants but 'a soh it goh' 😉. All plants recovering well from recent phytotoxicity. Fed twice in past week with 12 ml/gallon CAB. Plants show no ill effects to Cytokin treatment and seem to like it. Have to move ties daily to accommodate growth. Signs of leafminers on a few leaves.
Sunday, 06.03.2022
A little rain fell Saturday afternoon but pots not overly moist. Fed with Recharge at 5 ml/gallon and remainder of Ph'd water. Ph measurement via Ph paper was still hot, 5.0~, so I repeated same method of adding 500 ml tap water to jug and topping up with acidified water, following the principle of adding acid to water and not vice versa 😉.
Likes
1
Share

@Olduffybastard88
Follow
By far the biggest bud ive dome to date and still a few weeks left alot of changes in colour and smell over the pass few days hope for some of the same in the next few weeks


Likes
Comments
Share


@AcidBurn_40
Follow
04.06.25
BT#35
Servus liebe Growmie's
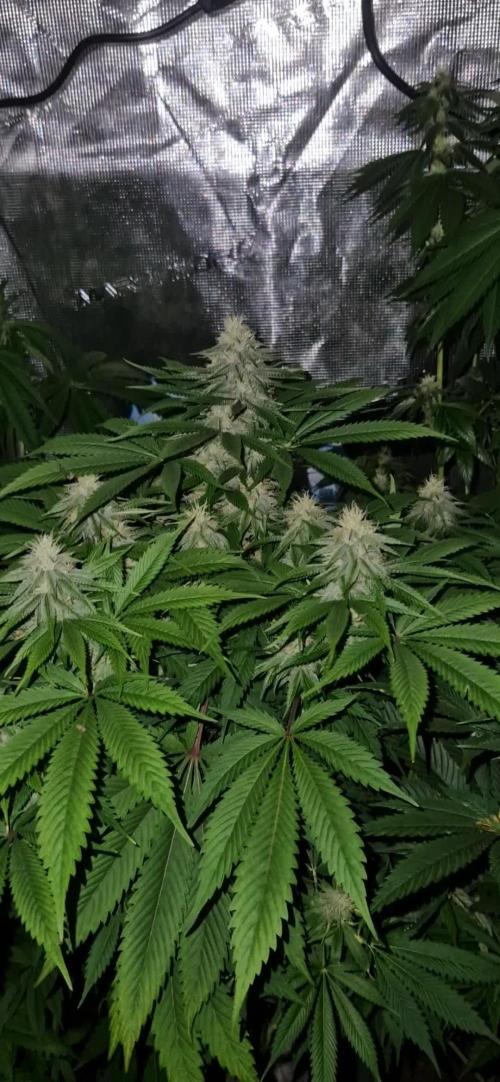
Die Caramba macht sich wirklich gut, Sie ist jetzt in der Massephase angekommen.
Ab heute gibt es Phosphor Plus von Hesi mit dabei habe ihr eine Dosis von 1,5ml/L verabreicht. Den kann ich jetzt bedenkenlos jede Woche um 0,5ml/L steigern.
Hesi Blüh Complex in der Dosierung 4ml/L & Hesi PowerZyme 2ml/L.
Zu guter Schluss noch ein Tropfen Hesi SuperVit auf 2,5L Wasser.
Nach der zugabe von allen Nährstoffen habe ich einen PH von 6,4.
Jetzt werden wir sehen was in der Caramba steckt.Die Tricome Produktion gefällt mir sehr,aber schauen wir einfach noch ein bisschen. Die Lady wird sich schon von der besten Seite zeigen.
Danke jeden für den Stop bleibt Sauber and Stay High bis zur nächsten Woche.
Mögen all eure Ladys Gesund und prächtig wachsen und euch mit schmackhaften Stuff versorgen 🤜🏻🤛🏻
■■■■■■■■■■■■■■■■■■■■■■■■■
04.06.25
BT#35
Hello dear Growmie's
Caramba is doing really well, she has now entered the mass phase.
Starting today, I added Phosphor Plus from Hesi, giving her a dose of 1.5ml/L. I can now safely increase this by 0.5ml/L every week.
Hesi Bloom Complex at a dosage of 4ml/L & Hesi PowerZyme 2ml/L.
Finally, a drop of Hesi SuperVit in 2.5L of water.
After adding all the nutrients, I have a pH of 6.4.
Now we'll see what Caramba has to offer. I really like the trichome production, but let's wait and see. The lady will show herself from her best side.
Thanks everyone for stopping by, stay clean and stay high until next week.
May all your ladies grow healthy and magnificent and provide you with tasty stuff 🤜🏻🤛🏻


Likes
28
Share


@hydroponicganja
Follow
Home stretch, added some dry kool bloom to help ripen. 1-2 weeks left then flush and chop Time :-)


Likes
19
Share


@Ferenc
Follow
Really nice plant. Very strong smell, Well THC coated buds and very nice effects. Lovely.


Likes
22
Share


@donovanliam
Follow
Love the amount of growth. Pruned a bit just to let light in but i cut as little as possible. If anyone has any suggestions of what to do or if you think im doing something wrong please tell me. This is only my 3rd plant ever so i have alot too learn and dont mind criticism

Likes
Comments
Share


@BakedBotanist
Follow
Massive growth, going to be big girls. Experiencing some calcium deficiencies but has been corrected
Likes
14
Share


@eurorack
Follow
Red Pure CBD - Growing pretty well, I'm thinking I have some deficiencies in these now that that have properly started pushing flowers out fast, I've dosed with PK13/14 and CalMag. We are getting some colour showing too.
Pink Kush CBD - Even the runt plant is growing though not as well as its neighbour or the Red Pure plants, lots of colours are coming out on the runt, colours on the better plant too but not quite as prominent.
Fingers crossed the PK and CalMag will sort the Red Pure leaves.

Likes
2
Share

@Olduffybastard88
Follow
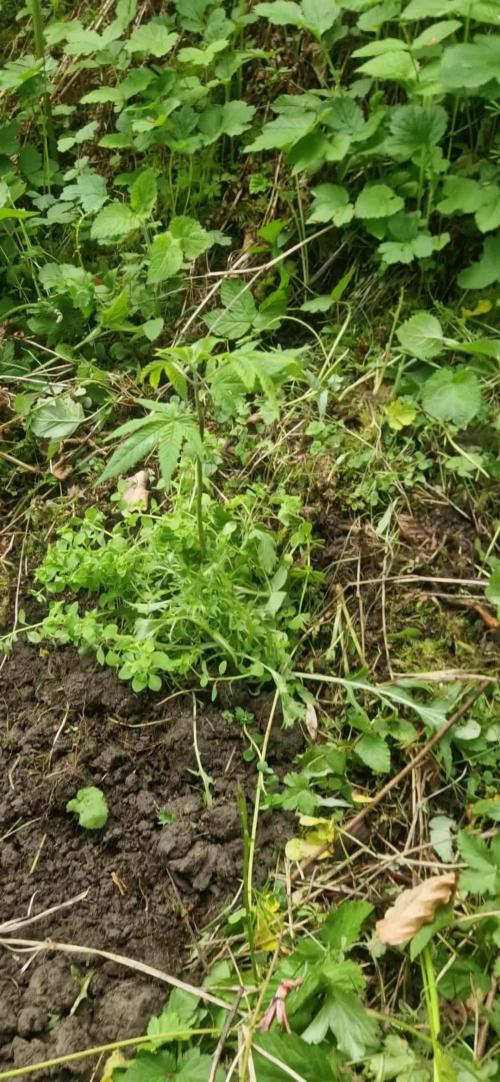
Had some sunset sherbert left over from last year so I have more than usual with this plant going put half outside in the ground and the other half to flower in the tent going attempt to take cuttings of one plant


Likes
5
Share


@Smokeitup091191
Follow
Now I have solved the light setting all the girls are starting to swell very well I have used so caning to spread the canopy other than that it’s that stage of patience watching the pistils and calyx’s mature, the smell of all these plants are delicious can’t wait now for harvest!!!
Likes
4
Share


@MarihuAchA
Follow
Fin del cultivo amigos. 98 gramos dejo está nena. Ahora a curar y a probar este hermoso fruto
Likes
152
Share


@EBxAH
Follow
Sunday, July first was the start of week 5. Having slight issues with the mothers but the clones are doing awesome! So even if they die I have 17 more tries, lol.
UPDATE: Saturday, July 10...final step in mainline. I was super excited to do this 😁 Here goes nothing, lol. Oh, and the clones are rooted and potted!!!
