
Likes
Comments
Share


@TooQuiikk
Follow
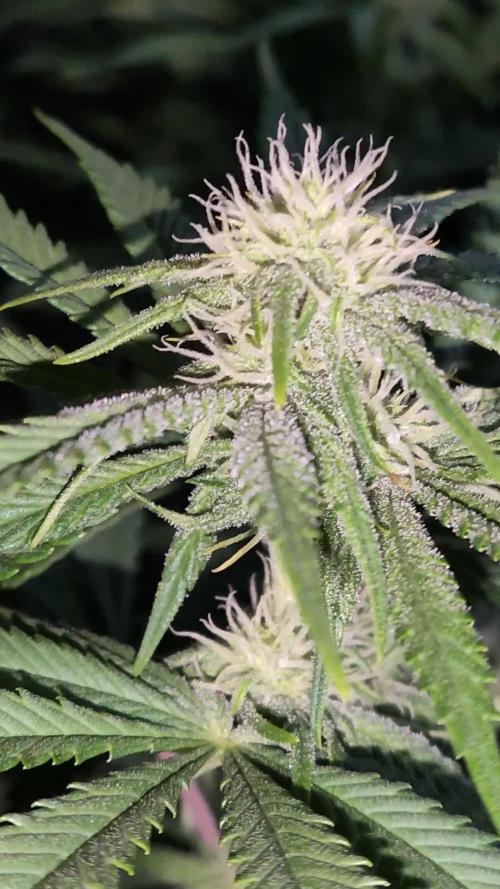
The hardest part of growing, is the time for harvest...
I didn't do the norm, no 12/12 I do 10/14.. Do I harvest? I flushed her out, its only week 6 of flower, and I feel like there is plenty of time for these babies to bulk up... things are on cruise control, moon mintz is a 9 week flowering plant. She is looking absolutely BEAUTIFUL.
This whole grow, except the hermie... has been a blessing. I love this plant, seeing my efforts going into these huge buds is very very amazing.


Likes
7
Share


@Phaleg
Follow
Warmer temperature here also in the mountains now and plants are getting more sun and growing better. These are their height in cm, photos will show how they look and grow.
I noticed that Do-Si-Dos auto is already showing signs of flowering, despite it is still short, but plants know better ^^
2x ICE = 25 & 27 cm
White Widow = 24 cm
Cookies Gelato = 23 cm
Do-Si-Dos Auto = 22 cm

Processing
Likes
6
Share


@Silverback_Guerilla
Follow
SUNDAY 6/23:
I had to suspend my indoor operation for a couple months and within a week I'm so bored that I don't know what to do with myself....so...
I'm gonna grow 5 total plants in a secluded, mostly shady area on a nearby property and see what results.
1 * CC4 (Candy Cane #5 x C4 #3 - the purple pheno)
1 * Early Candy (Candy Cane #1 x Early Miss #2)
1 * Candesia (Candy Cane #5 x Auto Amnesia #2)
...plus a couple others which will be in other diaries.
I'm using the complete Biotabs line of products for this stealth grow..hopefully a few less sneaky midnight trips required to keep them happy.
I floated the beans today, They are under a dome, on a heat mat now. Once sprouted, I'll plant the seedlings in rockwool cubes with Great White and Mycrotrex. They will be planted in 3 gallon pots when ready. I'll probably let them get to about the 3rd internode before I move them outdoors.
TUESDAY:
I floated a second CC x EM seed today. The first one sunk and cracked open but still hasn't sprouted. Both the CC4 and Candesia beans sunk and also cracked open. I should be able to dip their tap roots into the Great White tomorrow and plant them in cubes.
For stealth purposes, simplicity in transfer to the grow site, and to give the seedlings an advantage, I've decided to transfer the rockwool-cubed seedlings from the dome to some 6" pots (1/2 gallon) that I've prepared with startrex and silicium flash. I'll grow the seedlings under my 2000w blurple light for a couple of weeks before taking them outside. I should be able to carry all of them in a big box out to the site without injuring them. This will give me time to start sneaking the big pots out to the site. I'll pre-mix the startrex and silicium flash on-site and add the mycrotrex when I transplant them to the 3 gallon pots and give them a good douching with bactrex and orgatrex to get them started well.
My soil has been recharging for several months with tons of good stuff added (earthworm castings, bat guano, azomite, biochar, bokashi, nectar for the godz one-shot and myco), plus I'll be growing them with the biotabs line of products, so they will have a good chance. I figure that I'll probably fix up their first batch of PK booster compost tea right away and douche them with it in their first week outdoors. Every little thing I can do to help them strengthen for the oncoming heat they'll experience...probably some extra kelp too...
THURSDAY:
They are all planted in cubes now.
FRIDAY:
Still waiting on them to emerge.
SATURDAY:
Still nothing...so...I floated the following:
10 x Candy Cane x Amnesia Auto (Seedsman) (F1) seeds
1 x Candy Cane x Early Miss (F1) seed
1 x Candy Cane x White Widow(CKS) (F1) seed
1 x Candy Cane (S1) seed
If my luck changes and a bunch of them sprout, not sure what I'll do. Knowing myself, I probably won't have the heart to kill them, but I can only spare about another cubic foot of soil, so the extra plants may end up in 2 gallon nursery pots (1.67 gallons) with Osmocote Plus for food...and maybe even a few of them in 6" pots (1/2 gallon) if I get really lucky and they all take off...
I also floated a Fastbuds C4 and a mystery breeder Sour Diesel bean, but they probably won't be included in this diary if they do grow...or maybe I'll change the name of the diary..
TUESDAY:
Maybe the "distilled" water I used before had chlorine in it, so I bought another gallon of distilled water and even left the lid off for a night so as to ensure any chlorine dissipated. I planted half of them in rockwool cubes and half in rapid rooters.
WEDNESDAY:
I see several sprouts breaking through..
I decided to go ahead and float 2 x Candy Cane x White Widow Auto (Seedsman) seeds produced in February as backups.
I also floated another 2 x Candy Cane x C4 (purple pheno) beans. Worst case scenario is they'll end up growing in 6" pots if everything else takes off...or maybe I'll get some more soil..
so, the list is now:
3 x Candy Cane(CKS) x C4(Fastbuds) (F1) seed
3 x Candy Cane(CKS) x Early Miss(CKS) (F1) seeds
10 x Candy Cane(CKS) x Amnesia Auto(Seedsman) (F1) seeds
1 x Candy Cane(CKS) x White Widow(CKS) (F1) seed
1 x Candy Cane(CKS) (S1) seed
2 x Candy Cane(CKS) x White Widow Auto(Seedsman) (F1) seeds
FRIDAY:
As of today, this diary includes:
5 x Candy Cane by Amnesia Auto sprouts
1 x Candy Cane by Early Miss sprout
1 x Candy Cane by White Widow Auto(CKS) sprout
1 x Candy Cane (S1) sprout
There's still another handful that might emerge..3 x CC by C4 and 2 x CC x WW(seedsman)
Likes
5
Share


@cookingwithninja
Follow
Plants are currently drying
2+ months later. And next project au79

Likes
Comments
Share


Likes
12
Share


@MaxMo8
Follow
I will be careful every time I encounter an insect problem and use an insecticide, I will eventually get rid of it with a water care method

Likes
Comments
Share


@Yiyis_Grow
Follow
Buen aumento en el volumen de las flores.
Una planta no está tomando agua, revisé y no es botritis, la regaré con agua solamente cuando esté seca .
La planta con manchas en la hojas sigue igual , ya ella no se recuperará, no tiene tiempo.
Semana con nutriente de floración al 100% y potenciadores.
Se cambió de lámpara por otra del doble de potencia 2000W. BESTVA
- Luz: Bestva Pro 2000W / 18 h/d
-FloraNova Bloom G.Hydroponics: 0.7ml/l
- Bio Bud G. Hydroponics 2.5ml/l
- Armour SI G. Hydroponics 0.4ml/l
- C4 Mills 1ml/l
- Everest: 0.5 ml/l
Control biológico:
-Solution (bioinsecticida generalista: Beauveria, Metarhizium, Lecanicillium y
Cladosporium + esencia de ajo y chile).
-Acaridox (bioacaricida: Metarhizium e Hirsutella + esencia de canela)
- Scamin (control escama y cochinilla) Cladosporium Herbarum
-Bioprotection BD Plus (microorganismos bioestimulantes y bioprotectores: Trichoderma + actinomicetos + Lactobacillus)
- Bioprotection TR + BSLIN
(biofungicida generalista: Bacillus subtilis + Trichoderma y metabolitos).

Likes
3
Share


@Ogbangbang2981
Follow
well my girl is in her final days. My scope is broken so I need some insight, her flowers look so ripe, this update had to be for tomorrow but she looks so good don't want to get an over ripe bud need her to be perfect✂️✂️✂️✂️✂️✂️✂️✂️✂️✂️🔍🔍🔍


Likes
1
Share


@I_Identify_As_A_Dan
Follow
Week 5 for Strawberry Gorilla by fastbuds,
She's now definitely in flower mode. She's almost the same height as Moby dick but way less leafy so I'm not expecting as much flower from here for now anyway. Don't feel the need to train her just yet whatsoever. She's a little more fragile ATM but hopefully she will stiffness up a bit now with the wind outdoors. 😇 Right after this picture i also put a decent amount of mulch on her as i believe the sun will be coming back fairly soon.
Likes
48
Share


@CatnipGrower
Follow
Its my first time with photo's but im very impressed by the results of this plant. Just amazing


Likes
1
Share


@El_gordito99
Follow
•Seconda settimana•
Ciao ragazzi !! Dopo i primi 15 giorni di vita (totali) le piante presentano una bellissima cera, sinonimo di irrigazione e nutrimenti corretti (nonostante il PH fosse alto).
Ricordo che mantenere livelli ottimali di umidità, temperatura e PH mette la pianta in condizioni perfette per poter aumentare il rendimento finale.

Likes
4
Share

@Nargileus
Follow
So langsam werden die Trichome immer reifer. Alles riecht wunderbar im Garten. Bei einer pflanze mußte ich einen Bud entfernen, da sich dazwischen ein bisschen Schimmel gebildet hatte.
Likes
3
Share


@Luke_Lee
Follow
—————————————————————
WEEK 9 / DAY 58-64
Mars Hydro FC-E3000
Floragard Professional GrowMix
11L Plant bag made of fleece
Light: 40cm
Schedule: 18/6;
PPFD: 1050-1150umol/m2/s
19° C - 45 RH
1L per Plant
PH 6,5-7
4ml BioGrow; 4ml TopMax ; 4ml BioBloom
1ml CalMag
#1 Royal Critical Automatic
#2 Royal Critical Automatic
Fan, extractor and pump ON 24/0.
—————————————————————
-17.03.2025
The fourth week of flowering begins.
Everything is going great, so far there have been no complications.
From this week onwards, the quantity of BioGrow, BioBloom and TopMax is increased to 4ml/1L.
The lamp is also turned up, the measured value with the PhotoneApp is 1050-1150.
-19.03.2025
Both plants were watered with 1.5 liters of water with fertilizer each.
In addition, an extra fan is now running for better air circulation.
-23.03.2025
The next week is coming to an end.
The plants look good, the buds are growing and getting nice and frosty.
I think the week after next will be the time to harvest the ladies.
Both plants were watered the last time with 1.5 liters of water and fertilizer mix.
From next week only clear water.
Likes
9
Share


@RSAFirstOrganicGrow
Follow
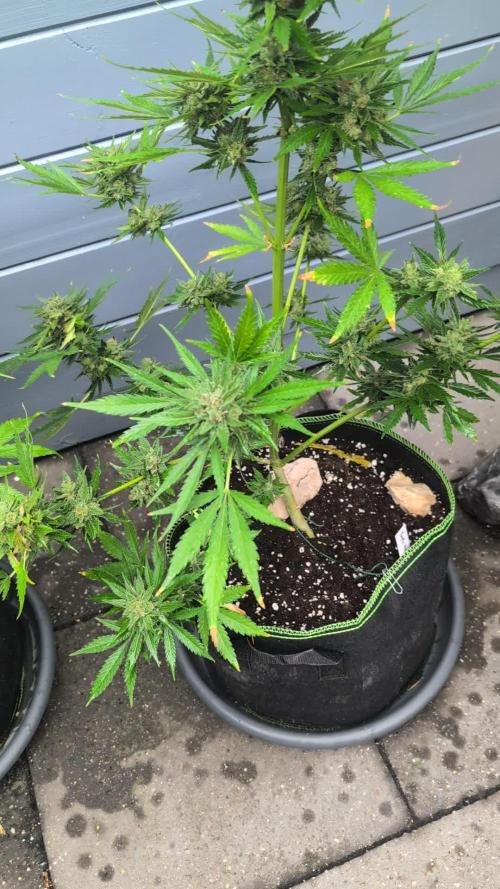
Some great weather the past week.
I am surprised by how the training worked out I should do more but I’m not too confident tbh.
This girl seems to amaze me by her beauty/health.
Because 1 leaf showed a bit of a brown tip after 1 heavier feeding I might just feed water for the coming week.
I’m not sure if I’m everything correctly but really so far so good, a great experience from a tiny seedling up in till this point .
Likes
5
Share

@I_Identify_As_A_Dan
Follow
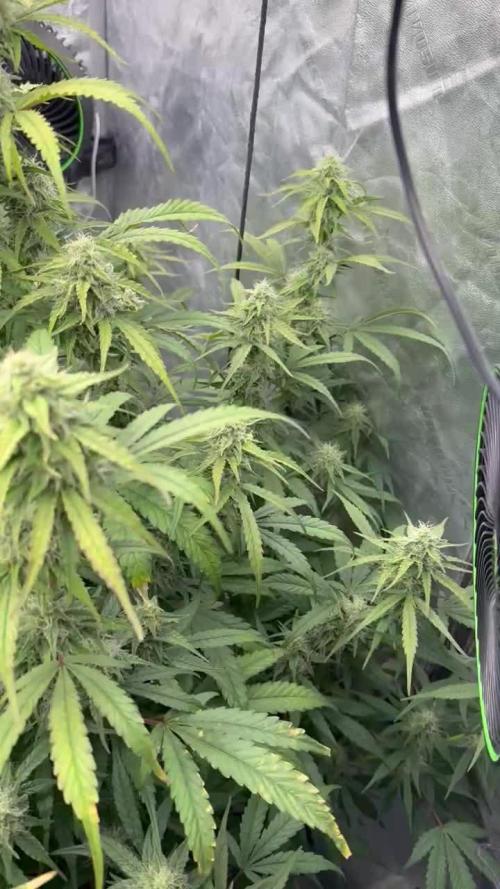
Week 11 for Moby Dick by fastbuds
She's also starting to fill out quite nicely wayyyy too leafy for my liking.
Also caught a little caterpillar munching on a bud today glad i found her before she gives me bud rot 😂
Quite surprising how little water these girls drink... still only got fed once this week with a bit of (WCA) Water Soluble Calcium & (FFJ) Fermented fruit juice for its last few weeks of life now.
Got a few yellow leaves after feeding the WCA wonder if its related...
Processing
Likes
5
Share


@PETEROG
Follow
Hey guys everything is going great with these ladies all 6 germinated and popped up in 3 days after planting 1 of the six shooters is a lot smaller than its sisters so I've order LEMON PIE from FASTBUDS should be here tomorrow to take its place and I'm going to move the six shooter outside so if you would like to see its journey comment and like bellow ⤵️
The only thing I wish I did differently would of been starting these girls under a cfl or a cheap led to stop stretching but lesson learned if anyone has any question's please comment and thank-you all for your support ✌️
Likes
2
Share

@MN-Frozen420
Follow
Day 56
-looking good for the most part. however i ahve onethat just turned completly yellow.
i gave it some calmag, but IDK...