The Grow Awards 2026 🏆 


Likes
Comments
Share
@pzwags420
Follow
On day 1 the reservoirs PH is 6.2. I defoliated leaves blocking the inside/lower canopy to give more light to lower growth points keeping the top 2 leaves on cola tops. The girls are deff still stretching :) So far so good. I'm glad I flipped to flower early this run and could see even dropping the veg time by another week. Its tough working in a small grow space but I'm determined to master it lol. I lowered the lights intensity from 85% to 75% to give my tops 600-800 PPFD. Usually I just blast the plants with 100% until the stretch is over but I'm realizing that I'm way over doing it based on my quantum sensors data.
On day 2 the reservoirs PH is 6.1. The girls are still stretching and putting out new preflowers. My tallest cola is 9" from the light(the other lower colas are between 10"-12" away from grow light).
On day 3 I adjusted the reservoirs PH up from 6.0 to 6.3. My tallest cola is 8.5" from the grow light. Lower colas are mostly 10" away from light.
On day 4 the reservoirs PH is 6.3. My tallest cola is 7.5" from my grow light and the average/lower cola distance from grow light is 10-11". I defoliated large leafs that are blocking lower bud sites and or touching each other causing wet spots on the leaves. I want as much airflow as possible as I can not control my night time humidity which can be as high as 80%-90%. My last run I noticed some sugar leaves touching my grow box walls and this caused them to start rotting. I want to avoid that this time around so I'm being careful not to have any wet spots from leaves laying on each other as well as keeping all colas far enough from my walls. In the future I would like to have the ability for de humidification but being in a small grow box in a garage makes it difficult to control my lung room.
On day 5 I adjusted the reservoirs PH up from 6.1 to 6.3. My tallest cola is 7" from the grow light. Lower colas are mostly 9"-10" away from light. I defoliated and removed lower bud sites not receiving enough light.
On day 6 the reservoirs PH is 6.1. My tallest cola is 6.5" from the grow light. Lower colas are mostly 9"-10". My tallest cola is getting 1000 PPFD while my lowers are 600-800 PPFD.
On day 7 I changed out the reservoir and adjusted the PH to 6.1. The tallest cola is 6" from the light. Lower colas are mostly 9"-10"
Likes
21
Share
@MG2009
Follow
01/01/2022
Potting up and amending with
5-2-4 to give a little kick before mid flower
#6 is first girl to show herself, also got two different males and only difference is that one is lighter green and other darker green
(also dark green one seems to drink more than lighter green) 💚. Other than that structure is very similar I wonder which is a better breeding male? I guess I might pollinate and LABEL TWO BRANCHES ON each female one for each male. and find out.🙏🏻
01/06/2022
#3 showed today, reppoted and into flowering closet, along with#6,who showed earlier this week lights at 14-10 see how they respond to that schedule, which should help use up the 5-2-4 going into week 3 should help with her stretch. Which isn't really that much I believe maybe double her current height, which I will check at lights on.Week ,#3 if I think of it I'll give a good fungal dominant tea.
Likes
Comments
Share


Likes
16
Share
@JohnnyBlaz3
Follow
CLOSE!!!!!! she is absolutely friggin caked with trichs!!!! just need her to plump up a little so we got some weight to her but she definelty looks potent af!!!!! only issue this run really was the stretching. I have a theory about why this happened and will test it out next crop, got the next ladies germed up already. I think removing the third fan allowed it to be to calm in there and the ladies to stretch more, this is just a theory i'll test out. If i had the space, i wouldnt mind the stretch but being in my little 5.5 x 5.5 tent i cant waste any space!!! am i going to break the tent record of just under 800 grams dried? probably not lol but lets hope for 600+


Likes
36
Share
@Salokin
Follow
Training has been continued. She is developing very nicely. As of today she has been switched to 12/12, as the net starts to get busy and anticipating another stretch I thought it would be time.

Likes
75
Share
@Kitties_and_Colas
Follow
~_~_~_~_~_~_~_~_~_~_~_~_~_~_~_~_~_~_~_~_~_~_~_~_~_~_~_~_~_~_~_~_~_~_~_~_~_~_~_~_~_~_~_~_~_~_~_~_~_~_~_~_~_~_~_~_~_~_~_~_~_~_~_~_~_~_~_~_~_~_~_~_~_~_~_~_~_~_~_~_~_~_~_
❤️💡🌱😽💨
First week of flower at last!!! This plant is sooo ready to go lol...we started her flower feeding regiment a whole week before flowering.. we also replaced x2 315watt Philip CMH fixtures for the FC-E6500 by Marshydro..what an awesome move.. this light is so f*cking incredible.. i honestly don't think a better 4x4 option exists, if it does Iv'e never seen it... this plant probably should of been flipped a few weeks back but she should have the room (hopefully)..we'd love to pull over a Lb and this is DEFINITELY the strain to do it.. we pull approx. 3-3.5oz dry on a 6 week veg with ILGM Big Bud, this should smash some records lol...Thanks for dropping by and happy harvests folks!!
⚡Mars Hydro/FC-E6500⚡ Specifications ⚙️:
650 watt, full spectrum design, removable light bars and driver 🔌
Diodes: BridgeLux chips (3978 count!)
Veg Coverage: 6x6 ft 🌱
Flowering Coverage: 5x5 ft 🌼
High-Efficiency
PPFD: 1200umol/m²/s ☢️
-IP65 waterproof ratings, tolerant to high humidity grow environments 💦 ..
-Can be daisy-chained together and all controlled from a single light! 💡~💡~💡~💡~💡
~_~_~_~_~_~_~_~_~_~_~_~_~_~_~_~_~_~_~_~_~_~_~_~_~_~_~_~_~_~_~_~_~_~_~_~_~_~_~_~_~_~_~_~_~_~_~_~_~_~_~_~_~_~_~_~_~_~_~_~_~_~_~_~_~_~_~_~_~_~_~_~_~_~_~_~_~_~_~_~_~_~_~_

Likes
Comments
Share
@ORION1_1
Follow
Still happy and doing well. Maybe a little slow since I was getting the living soil watering differences figured out. Water only living soil for now ph at 6.3-6.6

Likes
33
Share
@zera1337
Follow
Off to week 5 and my ladies are looking healthy again after one week of struggle.
Super excited for their progress this week.
Height growth is now really noticable and I increased watering to 750ml/plant.
Turned my SF SE3000 up to 80% and increased the distance to 60cm.
So far they are loving it and I'm right on track for a good grow!


Likes
4
Share
@AGrowerNotAShower
Follow
Week 10
Day 7 of flowering.
09/28: Well we are fully into flowering. Bethany is currently on her stretch. It seems to be slowing down. The gray spots ended up being some kind of deficiency. The spots ended up rusting, but as of late no new leaves have any damage caused by a deficiency. A few of the lower leaves where little light reaches have turned yellow. I gave her first feeding with Kool Bloom. Looking at mid-November for harvest. I can’t wait!
09/30: A little yellowing on the new leaves. EC levels in runoff were way too high. I waited a little too long before the last watering, so I’m sure we had some salt build up. Now that she’s bigger I’m going to water her more frequently. I also noticed some lower growth that was definitely not going to make it due to lack of light, so I decided to try out some cloning. I took two cuttings and placed them in plain bottled water to try and form some roots. Since she’s an autoflower and is currently in bloom, I’m not expecting much. But we’ll see.
Likes
16
Share
@eldruida_lamota
Follow
Familia, ya actualizamos otra semana más de floración.
Tercera semana de floración de las Blueberry Cheese de Zambezaseeds que sobraron de algún envío y la verdad que respondieron fenomenal después de 2 años.
Tienen un buen color están creciendo bien y desarrollando las flores correctamente.
Que más puedo pedir si en verdad va sobre ruedas este proyecto.
Agrobeta:
https://www.agrobeta.com/agrobetatiendaonline/36-abonos-canamo
Mars hydro:
Code discount: EL420
https://www.mars-hydro.com/
Las maximas de temperatura no superan los 25 grados y las mínimas no bajan 20, así que no me puedo quejar.
Los niveles de humedad también son los correctos van entre 50%/65% de humedad relativa.
Por supuesto el Ph lo estamos dejando alrededor de 6.
Hasta aquí es todo, buenos humos 💨💨💨.

Likes
5
Share
@SurSideCrew
Follow
Scotts OG de Rare Dank, nos esperabamos una OG Kush típica poco ramificada y con corta flora, pero nos sorprendió que era bastante mas Sativa y ramificada! Se estira muchisimo en el cambio de fotoperiodo. Cogollos no muy compactos pero muy dulces, terroso, kushy, pino, cookies.. Muy vigorosa y muy buena para hacer clones! No soporta muy bien el estrés, altas Temperaturas o tierras con alto ec... Tiende a ponerse violeta con el frío


Likes
18
Share
@Silverback_Guerilla
Follow
11/30:
I harvested the first 6 today, flushed 5 more for the second time, and fed everybody else for the last time.
I washed all the branches using the 4-step method ascribed by Doc Bud at High Times/420magazine and many other notable cannabis connoisseurs, with slight modifications:
4 x big plastic totes/bins
8 x ounces of 12% hydrogen peroxide (or 32 ounces of 3%)
2 x cups of concentrated lemon juice
2 x cups of baking soda
10 x gallons of water in each bin
Unless your tap water stinks, you're safe to use tap water for the procedure, but I used an inline carbon hose filter to fill my buckets.
Bin #1 - 10 gallons of water mixed with the hydrogen peroxide
Bin #2 - 10 gallons of water mixed with the lemon juice and baking soda
Bin #3 - 10 gallons of water as hot tap water
Bin #4 - 10 gallons of cold tap water
I was mainly concerned about removing as much lint and cat/dog hair as possible, but also rinsing off any residue left from all the various foliar applications of humic/fulvic acid, kelp, axiom, big bloom, and tiger bloom I did. First, I put my leaf blower on low speed and blasted my plants thoroughly, one at a time, replicating 50-60mph winds for about 10 seconds and watched as a whirlwind of debris and hair flew out the back door.
Bud-washing:
Pluck any necrotic plant material and any old fan leaves off while they're still on the plant. Then, take a handful of branches and submerge them in Bin #1 for about 30 seconds, agitating it, removing from water, submerging again, agitating, etc...then remove it and let it drip out for a few seconds...then repeat the process with Bins #2-4. Let it drip dry overnight with a little bit of airflow, then dry as you normally would...baskets, boxes, etc..
I hadn't watered these plants in a few days, so they were almost in draught, but after doing this procedure, they were fully hydrated(turgid) and seemed to have brighter colors than before. Nice!😍
12/1:
The bottom part of the closet seems empty with only 9 plants in there.. 😟
I cut the harvested plants up and put them into drying baskets in the top of my closet with a small oscillating fan on. I've got the temperature fluctuating between 68f and 75f and the RH is staying between 48% and 52%.
To do that, I had to take down the small light in the top of the closet to fit the drying baskets up there. So, I moved the 3 shorter plants still up there down to the bottom and put them on top of buckets. Now the bottom of the closet looks full again!😃
I'm anxious to finish up this grow so I can get busy growing the Fastbuds Fast Flowering Photo Testers!!! When I harvest the next 5, I'll flush the remaining plants really well and that will be all the flushing they'll get..I'll let them dry back out for a few days and harvest them. I've got to make some minor improvements to the garden (adding UV, blue and red/far red booster panels and intake fans) That should put me on track to start germinating them by mid-December if all goes well.
12/3:
...early a.m...
The harvested plants are already dry!?!?? And have excellent texture??? Wow..bud washing is for real..roughly 48 hours after I hung them to drip dry, and 40 hours after I put them in baskets in 50% RH/70f conditions with moderate airflow...usually takes 4 or 5 days to get a good slow-dry in the same conditions, so I'm convinced that this must be attributed to the bud-washing procedure. I'm sold!
Here's the talley so far:
plant #1 - 115g (plus 13g larf) - Candy Cane [F2]
plant #2 - 108g (plus 18g larf) - Candy Cane [F2]
plant #3 - 119g (plus 15g larf) - C4ndycaine [Candy Cane x C4]
plant #4 - 92g (plus 6g larf) - Candy Cane [F2] - the smallest plant in the main area
plant #5 - 112g (plus 22g larf) - Candesia [Candy Cane x Amnesia]
plant #6 - 75g (no larf) - Candesia [Candy Cane x Amnesia] - grown in upper area under 200w
...afternoon:
I flushed 6 of the last 7 plants for the first time today and harvested 4 more of them. I washed them and hung them to dry.....my dripping wet bathing beauties!😍
Likes
12
Share
@GanjaFarmerGrow
Follow
Last days ahead...
She is doing great...
very tall nice big buds
a great smell of citrus and blueberry...
really amazing...
Fingers crossed to the end...
🙏

Likes
17
Share
@ILoVeThiSpLaNt
Follow
Day 35 da seme. Sweet zkittlez portata outdoor vediamo se resiste agli insetti 😊
Likes
9
Share
@chapothegrower
Follow
started light defoliation and lst, overwatered once 😕 more lst in a few days and update next week 👆

Likes
10
Share
@Z420Organics
Follow
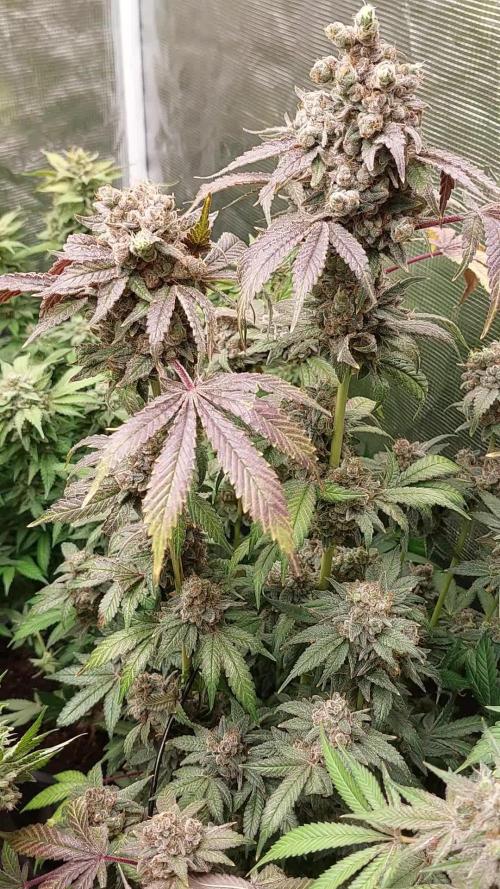
Week 11 – Harvest begins 🍂
This week marked the beginning of the harvest! Four plants have already been chopped and are now drying in the fridge at 5–9°C for a slow dry. Early testers are already showing strong effects and surprisingly good taste, even before a proper cure.
The rest of the plants definitely need another week to fully ripen. The Mimosa Orange Punch is stealing the show with its incredibly sweet and fruity aroma – you can smell it from a distance!
As for the Fast Buds autos, they’re seriously impressive. As you can see in the photos, they’re stacking beautifully, with tight buds and strong sativa traits – genetics are on point. Can’t wait to see how they finish!
The grow is in its final stretch, and things are looking and smelling amazing.

Likes
14
Share
@RFarm21
Follow
Week 19 november - 25 november
23 november - D1 flowering
I watered it a little too much. as it is colder I will start giving 1.5L of water instead of 2L