
Likes
Comments
Share


@OrionSparkles
Follow
-Apliqué bio bloom powder feeding.
- 3g x cada litro de sustrato,esparcido por la base,macetas de 6L= 18g.🤙🏻


Likes
23
Share


@nonick123
Follow
Día 20 (13/05) Todas las plantas muestran las preflores!
Día 21 (14/05) Baño de sol de 2 horas!
Día 22 (15/05) NYC Sour D Auto empieza a mostrar algo de clorosis intervenal...
El gran @Thecannalife420 me diagnostica deficiencia de Mg
Aplico foliarmente Sales de Epson
Día 23 (16/05) Las plantas han reaccionado muy bien a las sales de Epson!
Riego 750 ml H2O + Regulator 0,15 ml/l + CaMg-Boost 0,25 ml/l + Startbooster 0,25 ml/l - pH 6.2
Día 24 (17/05) Las plantas salen al exterior! 😍 Les aplico heno como mulch (acolchado)
Día 25 (18/05) Riego 250 ml solo agua todas las plantas
Día 26 (19/05) Riego 250 ml H2O + Regulator 0,15 ml/l + CaMg-Boost 0,25 ml/l + Startbooster 0,25 ml/l + TopBooster 0,2 ml/l- pH 6.2
💦Nutrients by Aptus Holland - www.aptus-holland.com
🌱Substrate PRO-MIX HP BACILLUS + MYCORRHIZAE - www.pthorticulture.com/en/products/pro-mix-hp-biostimulant-plus-mycorrhizae


Likes
91
Share


@Fire_Farmer
Follow
Week 1 Day 5 Flower
Hi Everyone 🖐️🏻
Thanks for looking in!
I switched to flower 5 days ago and the girls are filling out well each day.
I just today drilled a hole in the floor and inserted an iron rod into it which now pulls the net in a lot tighter and has allowed me to start tucking and guiding branches where they can get the best light and fill the net.
I have supported this with a bit of defoliation to get light to those lower branches and get them pushing growth towards the canopy.
As the next two weeks progress I will continue to defoliate and even remove some lower branches which aren't likely to benefit the canopy and in fact deprive the canopy of some energy.
The roots are looking good rapidly colonizing the tubs, I've had to return them to the trays from the reservoir below several times which is a headache I'm happy to have😂
I may have flipped too early and aren't likely to fill the area but it should still be a heavy crop and if rather have a manageable grow than a jungle.
If it proves way off then next time I grow the same strain using the same method I'll add another week to the veg.
Thanks for looking in GDCommunity and thanks in advance for any help, advice and general support
✌️🏻Peace
🔥Fire
👨🌾Farmer

Likes
10
Share


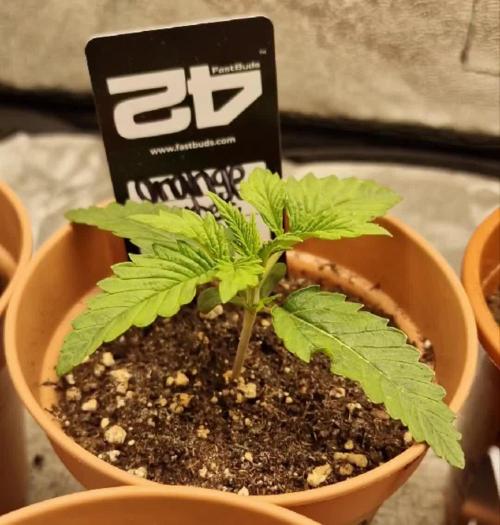
@Madmike88
Follow
25APR - Starting week 2 I transplanted them into 2 gal pots. Moved everyone into the 5x5 tent. Switching to a 1000w MH light Monday, once that's all set up, I will take pictures of everyone individually.
26APR - was going to move everyone but due to cold weather at night unfortunately I can't right now so they're stuck where they're are for now, but they still have plenty room.
27APR - put a fan in, after work today I will be moving them to a bigger tent and switching their lights to 22/2 for a little bit due to cold weather at night.

Likes
35
Share


@SAC87
Follow
Hi Growers.
Everything is going well. Earlier this week I did another super light feeding, the same as last week. I raised the light to 50” and increased the light to 80% and will adjust accordingly per plant and environmental needs. I did notice a bit of yellowing on the PE and yesterday decided to do a stronger feed and go from there. I don’t want them starving and getting stressed into flower. After the first light feeds they popped up nicely so I’m interested to see how they like the higher feed.
Environment wise, I turned on the oscillating fan to just help them strengthen their stocks and branches and still have the humidifier on. Temps & RH are good, no hot temp is a bit cool but it’s only 4 hrs.
What week do you growers start training autos?? I’m starting node 5.
Thanks for stopping, leave a like or comment if you’d like. I appreciate them.
Happy Growing 🌱
Likes
10
Share


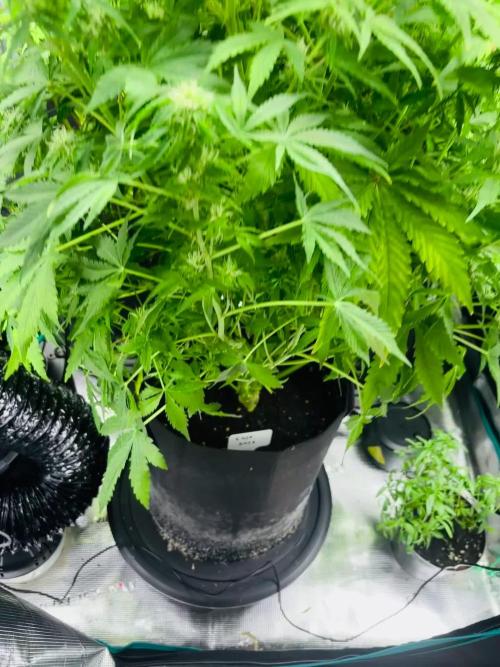
@Medgrow93
Follow
The Wonder Pie were showing signs of deficiencies so I added 2ml/L of liquid worm castings to see if it helps, also top-dressed diatomaceous earth to help get rid of the fungus gnats. Will top dress the powdered nutrients again in 1-2 weeks. Also foliar sprayed them with Sugar Candy Syrup to help with the deficiencies. I'll go with bigger plants next time because I think I won't get much from these smaller plants. Other than that, just waiting for them to do their thing and hopefully harvest in 5 weeks or so.

Likes
28
Share


@Professor_Chaos
Follow
Beginning of week..
I raised the lights a little.. They are at 50% power at 18" (roughly) from the plants. The ladies are getting from 420 to 500 PPFD. Went ahead and fed them some extra FloraMicro this week.. I'm guessing they are just very hungry girls.. And I'm thinking the pH in the rootzone issue is not clearing up at all.. BUT.. It seems like no matter what pH I water them with.. The runoff ALWAYS comes out at 5.8 or 5.9 with the Mandarin Cookies and 5.8 or 5.7 with the ETHOS Cookies.. So if you want to reuse your coco coir.. Make sure to remove ALL the roots. The girls dont look too bad at all.. And that's why I'm guessing they just needed more nutes in the mix.. We shall see how this week goes!
Mid week..
They are looking alot better! Mandarin Cookies is exploding woth growth.. ETHOS Cookies is growing slow but she is growing for sure.. I think I may need to remove a node or 2 on the ETHOS Cookies.. I could just leave it.. But the very top 2 are covering alot of tops.. I could make some clones from it.. Hmm.. All-in-all.. I'm happy with how these girls are growing for now tho.. This rootzone issue isnt going away.. But I think I found a way to make it work out.. I've been watering a little differently.. Here is a bit of an example:
Day 1: Feed at 6.5
Day 3: Water at 6.4
Day 5: Feed at 6.3
Day 7: Water at 6.2
Day 9: Feed at 6.5
Day 11: Water at 6.4
Day 13: Feed at 6.3
Day 15: Water at 6.2
Etc...
The runoff is staying above 5.5 each time.. But as I lower the pH, the runoff pH lowers as well (obviously).. So I think watering this way has helped keep these gorgeous ladies happy.. And theyare also very hungry.. I may have to start watering one plant every other day.. Water plant 1 tomo.. Water plant 2 the next day.. Then plant 1 the next day and then plant 2 the next day etc... 1 reason I want to start doing it that way is because I think the ETHOS Cookies isn't needing as much nutes as the Mandarin Cookies.. But they are looking great. Very happy and so are they! The heat has been insane lately.. So at the hottest part of the day I try to just turn the light down to 25% for 4 hours or so.. I hate having to do that.. But it's all I can do for now.. Or maybe change the light/dark hours.. Blah.. Whatever, they are happy!
End of week..
I supercropped 2 branches.. They pretty much healed up and are already back to normal.. Like it didnt bring them down any lower at all lol.. It straightened back up and its as if nothing happened.. Just a big ass (MOOSE) knuckle lol.. But I stopped using the Kushie Kush and was just using the normal Gen Hydro FloraBloom in the mix. Will be upping the FloraGro next week! Wow.. Such hungry ladies! It's been so long since I've grown a bigger photo period.. I forgot how much they can take!.. On to the next!...


Processing
Likes
15
Share


@PottingShed
Follow
Updated with some midweek pics
Week 2. Re-potted and settling in nicely
Likes
62
Share


@Chucky324
Follow
Hello.
I've harvested the Mega Mouth. WOW!!! I'm very impressed with this strain. Over 1.5 k for 5 plants. and it was finished by Aug 20 with the tents help.
I'm trying some new (for me) categories to add to my report.
Plant Stretch (PS) 1 to 5- 1 is hardly any stretch.
Bud Mutation (BM) 1 to 5- 1 is a beautiful normal bud- 5 is big weird growths like foxtails.
Trim- How easy or hard it was to trim up 1- you blow on the branch and hang it up. 5- Is very hard to trim takes a long time.
About- Best guess on the THC % (I've been smoking a long time)
Resin- 1 is super slippery 5- is very sticky like Gorilla Glue.
Size of Buds (SOB) 1- is very small 5- is the biggest buds
Dense- 1- is the lightest or fluffiest 5- is the rock hard buds your bud buster has trouble busting up.
Plant #1 Wet Trim 1647 g
PS. 3.5
BM 3.5
Trim 4
About 21%
Resin 4
SoB 4
Dense 4
Finished Dry Weight 289.5 g or 10.33 oz.
Plant #2 Wet trim 1606 g
PS 3,5
BM 3.9
Trim 4
About 22%
Resin 3
SoB 4.7
Dense 4.3
Finished Dry Weight- 302 g or 10.78 oz.
Plant #3 Wet Trim 1635 g
PS 3.7
BM 3
Trim 2.8
About 20%
Resin 2.8
SoB 3.7
Dense 4.5
Finished Dry Weight- 314 g or 11.21 oz.
Plant #4 Wet Trim 1753 g
PS 2.5
BM 2.5
Trim 3
About 22%
Resin 4 Falls off easily- Clumpy
Dense 2.5
Final Dry Weight- 343.5 g or 12.26 oz.
Plant #5- Wet Trim 1787 g
PS 3.5
BM 3.7
Trim 3
About 24%
Resin 2.5
Dense 2.5
Finished Dry Weight- 355.5 g or 12.69 oz.
The taste is sweet and smooth to go down with a nice balanced buzz. There was some pests around. I found thrips damage in veg and got some Spinosad to take care of that. Saw some fungus gnats around but they didn't do much damage. Easy to grow and trim. This is a recommended strain.
Chuck.

Likes
1
Share

@Lord_Ninnyhammer
Follow
Unfortunately, I realized quite late that the plants – or rather the tap water – were causing major pH issues. This became noticeable through dry leaf tips as well as light green and yellowing leaves. I’ve never had pH problems before, so I didn’t think to measure it again. After checking, the pH was around 8.5, which I have now lowered to 6 using a pH down solution.
In addition to my usual BioBizz Bloom, I’ve now added Bloombastic and I’m hoping to report positive progress soon. The plant on the left is the most affected, even though it germinated at the same time as the one on the right. Of course, the damaged leaves can’t be saved, but the plant is still developing well, and I believe I’ll be able to harvest it without major issues.
Both Sweet Gelato plants smell incredibly good and sweet, and the Afghan is growing nicely—robust and compact.


Likes
9
Share


@Cogollo_eu
Follow
**Encontrarás la traducción a español al final de la descripción**
From/Desde: 30/09/19 || To/Hasta: 06/10/19
From day/Desde día: 29 || To day/Hasta día: 35
Ocean Grown Cookies Diary / Diario de las Ocean Grown Cookies:
https://growdiaries.com/diaries/38831-oceangrown-cookies-blues-sisters
If you like this week, please hit a like, it costs you nothing! 👊. Thanks in advance 😉!
-----IMAGES & VIDEOS-----
V1: TimeLapse week video, at second 24 I changed the lights to full operation (notice the color change), so since mid week I'm using the full 180W instead the 90W for growing. Also today (Week 11), I purchased the Platinum P450 model to replace the P300 I have. I still don't know if I'm going to place both lights together to end this grow, or if just replace the P300 and use it to grow another plant in my 60x60 tent.
P6: al the plants are bending a bit, I just placed a tutor over the BlueBerry B because is the one that is bending itself more. Just a 3D printed base with a chinese chopstick.
-----WEEK SUMMARY-----
This week I changed the lights to full flora mode as is recommended by the manufacturer for late vegetative grow.
They are still growing at a very good speed more than a cm per day, soon I will perform a full LST on one of them and also I will place the SCROG mesh to try to match the height of the colas. At time the 4 plants (All the cookies) are +/- the same height, but soon the BlueBerries will be bigger than the Oceans.
I see a bit overfeeding in the leaves aspect, it must be due to the guano and volcanic soil I added to Soil mix. In a couple of weeks they will look very beauty and healthy.
-----WATERING CALENDAR-----
05/10/19 DAY 34 - 1 l with all week nutrients @ (1.3 EC | PH 6.2 | 24.9ºc)
*****ESPAÑOL*****
Por favor, si te gusta esta semana dale un like, no te cuesta nada 👊. ¡Gracias por adelantado 😉!
-----IMÁGENES & VÍDEOS-----
V1: Video TimeLapse semanal, en el segundo 24 cambio las luces a full flora (se nota en el cambio de color de la imagen), así que a partir de mitad de semana empezaré a usar los 180W de mi luminaria en vez de los 90W que venía consumiendo en crecimiento. Esta semana (Semana 11) he comprado una mejora de luces, he comprado el modelo P450 de Platinum que reemplazará al P300 que estoy usando. Aún no se si voy a dejar ambas luces juntas para acabar este cultivo, o si simplemente reemplazaré el P300, y este lo usaré para crecer otra cosa en mi armario de 60x60.
P6: Las plantas se están doblando un poco, sólo he colocado un tutor en la BlueBerry B pues es la que más se está doblando de todas. Simplemente he impreso una base en 3D y le he puesto un palillo chino.
-----SUMARIO SEMANAL-----
Esta semana cambio el modo de la luminaria a flora, pues es lo recomendado por el fabricante para la última etapa de crecimiento.
Siguen creciendo a una velocidad excelente, más de 1 cm por día, pronto pondré la malla de SCROG para intentar ajustar la altura de las cola. Por el momento las 4 plantas (todas las cookies) son más o menos d la misma altura, pero pronto las BlueBerry pasarán en altura a las Ocean.
Puedo ver un poco de sobrealimentación por el aspecto de las hojas, debe ser debido a la tierra volcánica y el guano que le añadí al sustrato. En un par de semanas se verán super sanas y bonitas.
-----CALENDARIO DE RIEGO-----
05/10/19 DÍA 34 - 1 l con todos los nutrientes semanales @ (1,3 EC | PH 6,2 | 24,9ºc)

Likes
12
Share
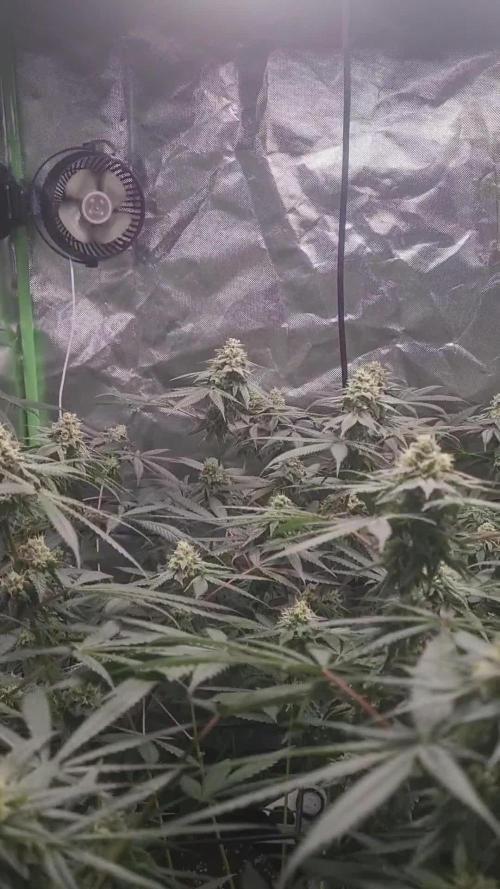

@oldschoolS2
Follow
Hi growmies😉
Here we are day 91/42 after flip of zake!
End of week 6 ...
They are fatting up fat nugs everywhere ..really strong smell...
We can say there are 2 phenos kush mints... and the other is permanent marker pheno super sweet chemical pungent 👌.. really frosty..
I ve notice last week the plant are getting dark green ... this new bloom nuts from biobizz with juju marley has to much N then the other that i used to use.. so im not using anymore ...one week more with bud candy and overdrive and we start flushing until the end ...
See u next week...

Likes
14
Share


@RosQuare
Follow
I hope she’s done stretching because she’s back to being 8” from the light and I need to readjust the way I hung it if I will need to raise to it any further.. she’s drinking about 2 litres a day in total, thirsty bitch, will be increasing frequency to 3 feeds this week. Leaves look lovely, buds getting hairy, trichomes appearing. Now it’s just waiting for her to bulk up over the next month or so. I’m very proud of her structure. Not noticing a smell yet, growers nose, I know she smells.
Pothead has taken to pruning very well. Working on her open cup structure, defoliating and getting fed with GP3 veg nutes. She’s a beautiful little mother and she’s enjoying hanging out with the family in the living room under a little qb. She’s exactly as I hoped she’d be. Very grateful this grow is working out for me. We did our crash course in experimenting and dialling in our grow last season and this grow is proving that we learned a lot and it was worthwhile.

Likes
61
Share
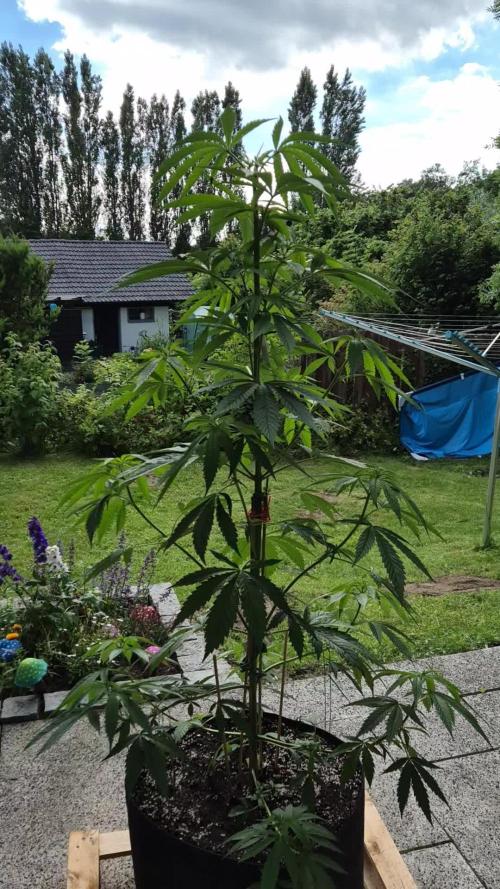

@Growingdaddyo
Follow
Würde sie bis Weihnachten stehen bleiben, kämen da mit Sicherheit Kugeln dran😜
Wat ne Tanne, junge junge..
Gefällt mir super was da Tag für Tag für Fortschritte zu sehen sind.
Seit dem Topping strecken sich die Internodien wie auf Steroiden💪
Es geht weiter aufwärts..
21.06. Hat sich jetzt bei ca 140 cm eingependelt und die unteren Triebe holen auf. Wird also etwas buschiger, so war auch der Plan👌
Likes
22
Share


@donovanliam
Follow
Switching to 12-12 this week. Getting new lights next week. I wrote more comments but i closed it by mistake.