
Processing
Likes
Comments
Share


@organically
Follow
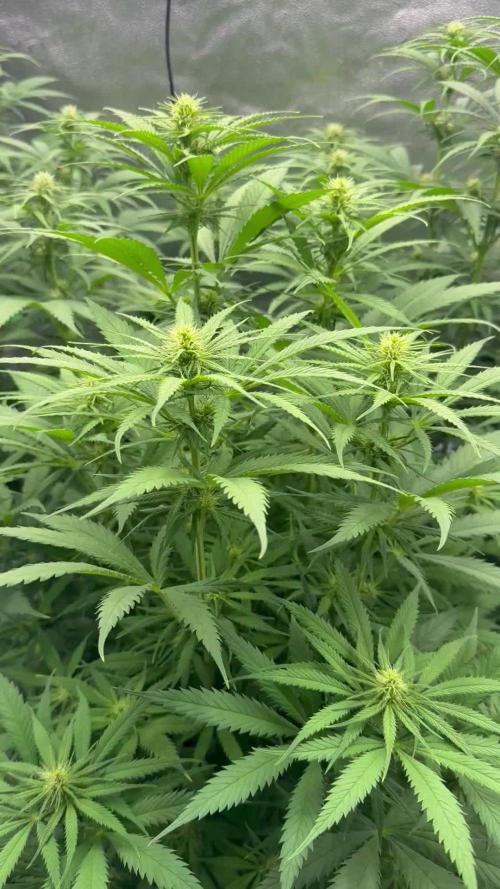
Well we’re in Week 5 now and a huge update is needed.
The lovely ones are good grown, transplanted and moved into the final setup to grow that big.
-
The first Week of flowering brings good results.
-
A little transplanting guide is attached.
1) The bottom of Teku is filled with hydroclays to guarantee a good air circulation.
-
2) The 2nd Layer is filled with a organic fertilized soil for a good feeding in bigger growing stage.
Also added: a 100% biologically powder with trace elements and natural additives.
-
3) 3rd Layer : low nutrients lvl organic soil for prevegetative stages.
-
4) hydroclays on the top, to hold a good humidity.
-
The kids are in 11 Liter Tekus now,
under 400 W MHL,
In a 120x120x185 Tent,
Atami Wilma Watering System for automatically watering.
3 x 5 minutes per Day.
-
■ Timeline ■
28.04.2019 - Starting germination of 2.
30.04.2019 - Popped and planted.
03.05.2019 - 1st Sprouted.
04.05.2019 - 2nd Sprouted.
-
PreVegetative start [ 04.05.2019 ]
Last day of first Week [ 05.05.2019 ]
Moved into Tent [ 10.05.2019 ]
Vegetative start [ 10.05.2019]
PreFlowering start [ 22.05.2019 ]
-
Transplanted into 11 L TeKu [ 26.05.2019 ]
Flowering start [ 29.05.2019 ]
-
Harvesting Part 1 [ xx.xx.xxxx ]
Harvesting Part 2 [ xx.xx.xxxx ]
-
■ Growroom ■
Size » 120x120x185 ~ 2.4 m²
-
PreVegetative Lightning
» 24 Hrs ▪️ Fluorescent ~ 24 W - daylight - 3700lm
-
Vegetative Lightning
» 20/4 ▪️ HID ~ 250W - 5600K - 18.000 lm
» 20/4 ▪️ HID ~ 400W - 5600K - 32.000 lm
-
Flowering Lightning
» 20/4 ▪️ HID ~ 400W - 2100K - 56.500 lm
-
Watering
» Atami Wilma System 4 x 11 liter
-
Supply air ▪️ mesh window - negative pressure
Exhaust air fan ~ max.420m³/h ]
Circulating air fans ~ 3x16W max.2250 rpm
-
Pots ▪️ 0,5 L Airpots --> 11 L TeKu.
-
Medium ▪️ Organic Soils!
Composition ▪️ bark humus,wood fibers,coconut fibers,coconut husks,compost,guano,hornmeal,clay minerals,trace elements,calcium carbonate,perlite.
-
■ Supported by ■
» EXOTIC SEED, TASTE & EFFECT
//////////////////////////////////////////////////////////////////
👋 Greetings your organically
» tried and true, since simple is the best! 👍

Likes
21
Share


@NSABND
Follow
Today start of week 13 and it´s the final coutdown to get some nice buds to harvest 😵😲😩🙏
I think tomorrow evening i harvest the plant wish me luck to get some good stuff 🙏🙏🙏🙏

Processing
Likes
32
Share


@Platinouuu
Follow
noto que estan comiendo mucho, osea se secan rápido que es que estan comiendo bastante de lo comun. Las ojas tornandose color amarillo para cambiar a color vino. se ven muy bonitas y estan fewlices. No he cambiado mucho entre los nutrientes (Té y Recharge), he sostenido alimentarlas simples y he tenido muy buenos resultados. muy contento con todo, sigas adelante, buenos humos y feliz 2021


Likes
19
Share


@pifflestikkz
Follow
Day 22
22/07/24 Monday
Nothing new to report. Starting to see them beautiful fans appear that's all 😁✌️
Day 23
23/07/24 Tuesday
Feed today, giving them straight all nutes Inc flowering nutes.
I will update the dose as they grow and develop a bigger hunger
Video updates 👌💚
Day 26
26/07/24 Friday
De-chlorinated watering pH 6 with 5ml calmag to 5L water.
Watered each with 250ml and had small run off.
I will continue to feed/water with small run offs to help prevent salt build ups.
Video update.


Likes
2
Share

@JuiceboxTerps
Follow
The stretch is finally over haha
Some good stacking going on so I switched over the blue supplemental light to red and turned on the under canopy lights - (40w full spectrum spider farmer). Worked ok in other grows
Tomorrow is day 21 so the girls will get a great clean up
Vpd - 1.25
Ppfd- 800-880

Likes
14
Share


@BlueDream123
Follow
I don't even know where to put this I've lost track. Still feeding everyday. The first pistols appeared about 5 weeks in and then the plants just kept growing. I've moved them To a 4x4 and switched the lights to 12-12 about a week ago. Seen to be starting to bud

Likes
11
Share


@GREENPHOENIX6262
Follow
*Week 5 Flower 09/24*
Thus far both both plants are flowering and budding nicely, Trichomes are setting in accordingly, Increase in Phosphate and Potassium nute feeds.
Both plants have appeared to stop growing in height settling in at 48Inches.
Top COLAS are pretty dense and the aroma coming off both of them is bright and vibrant
White Hairs are starting to turn bright orange.
*Week 5 Flower Mid week update - 09/28*
Both plants have reached max height (48 Inches)
Bud sites are filling up and have become more dense with trichomes cover through the flowered bud.
60% orange hair coverage - Nearing harvest
*Week 5 Flower End week recap 09/30*
Both Apple Fritter and Critical+2.0 nearing harvest
Cutting back on nute feeds starting tomorrow and will increase clean water feeds
Flushing will begin in a week - both will be harvested in 2 weeks.


Processing
Likes
Comments
Share


Likes
3
Share


@Takeaims
Follow
Going clean my tent out and spruce things up a little going start new diary with new xxl and f1hybrids keeep and eye

Likes
28
Share


@tomeugironella
Follow
Well guys , quick kush is just about to finish and its fire ! i give her his last feed , now i’m gonna make an hidric stress to her . Critical 2.0 is like 15 days about to finish and looking nice and fat ! Chem Beyond diesel has 3 weeks or so to go , smell really nice ! Sensi skunk is still struggling with feeding , so imma give her just water again . Let me know ur thoughts guys ! Good smokes !


Likes
2
Share


@Ganjaking
Follow
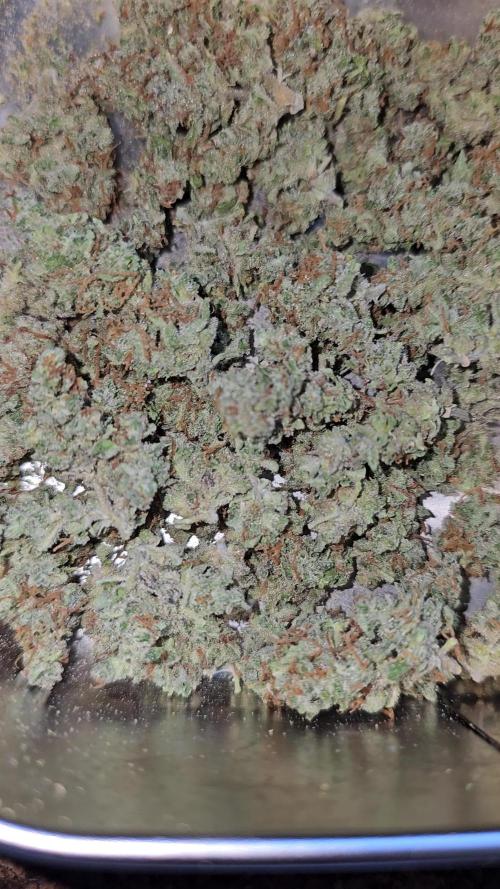
WHITE AMNESIA FEMINIZED
WEEK 5 IN FLOWERING
Looks and smells unbelievable 🔥
Likes
5
Share


@Nebula
Follow
Happy this seed was successful to germinate! This is an organic run with Green Gro in Ocean Forest. Trying some new air pots at my local grow shop, $7 vs $30. Nothing exciting yet. Looking forward to sharing the progress.
Likes
87
Share


@Cannabeast40
Follow
Description
With up to 27% THC, Strawberry Banana Auto is one of the most THC-rich strains to hit the market lately, this colossal autoflower grows up to 150cm and produces massive yields of up to 600gr/m2. An excellent strain for those looking for potent autoflowers that deliver both in quality and quantity. Expect an extremely sweet and fruity terpene profile with an obvious Strawberry and Banana aroma that comes hand-in-hand with a strong body high mixed with a cerebral high that boosts creativity; a strain that will surprise you with powerful yet well-balanced Indica and Sativa effects.
Bud description
The buds grow thick and slightly elongated with a light-green color and thin bright yellowish-orange hairs and dark-green leaves coming out of them; Expect super swollen calyxes that give the buds a distinct spiky look. Thanks to the outrageous trichome production the buds end up looking like it’s been snowing in the grow tent for days, and upon harvest they’ll reek of a delicious mix of freshly harvested strawberries with a background of ripe bananas, making it a marvelous choice for extractors and hash makers who need a trichome powerhouse to take their products to the next level.Smoke report
Due to the high THC level, this strain offers a strong hybrid effect; Upon smoking, you will feel a mild head buzz that gradually turns into a strong euphoric and uplifted cerebral high that leaves you focused and alert. The Sativa effect comes along with a warming corporal buzz that slowly sedates your whole body and can leave you couch-locked with strong munchies if smoked in excess. This strain is seriously recommended for those with a high tolerance and medicinal patients looking for an alternative to alleviate chronic pain, appetite loss, or severe anxiety.Plant appearance
This strain grows vigorously and will clearly show its mixed heritage; The main cola grows tall, reaching up to 150cm followed by several side branches that stay short when compared to the main cola, but still grow quite long and develop multiple flowering sites that get completely covered in greasy buds from top to bottom. This variety remains compact and, despite its height, will maintain that typical Indica structure until harvest, where it will end up looking like a beautiful and atypically huge Indica.
Grow tips
Make sure you have enough vertical space in your grow tent, this strain can grow up to 150cm so it’s recommended your tent is at least 200cm tall to avoid having problems in the last weeks of your grow cycle. Once the buds start fattening up they will get quite heavy so pay close attention to the branches and if you feel like they won’t be able to withstand the weight, use plant yo-yo’s or bamboo stakes to provide support and prevent them from snapping. The strong strawberry banana terps are clearly apparent but remember to flush thoroughly to enhance the potent fruity terps even more.Flavor
This variety offers an unforgettable taste of sweet tropical strawberries with a faint bubblegum background on the inhale and a more apparent ripe banana with a strong earthy background on the exhale. The perfect potency and terpene profile for hash makers and extractors looking for the most powerful strains with the strongest terpene profiles.
Likes
46
Share


@Smokwiri
Follow
Welcome to week 2 of my Bubblegum XL diary, genetics by Royal Queen seeds.
Looks beautifull, no starting problems. Grows fast since day 1.
Small full spectrum burple cob light is doing its job very good, and as you can see the plant is growing as we like it to.
GHE changed its name to Terra Aquatica, so its terra aquatica nutrients
-- update day 3 wk2
Repotted into 15l rqs smartpot
-- update day 4 wk2
Topped/fimmed plant, lets see how it comes out in the future
Added small after-transplant video

Processing
Likes
67
Share


@Ageddd
Follow
This week gaver the plant nutes each 2 irrigations (WATER/NUTRIENTS): using a high dose of Top Bloom, (maximum is 4 ml/l, using 4.5 ml/l at the moment,), Top Candy 2ml/l which adds carbohydrates, and Big One which gives the plant extra PK to help developing new hairs what means more budding sites..
Good Vibes !!
- 20/08/2018 -
Likes
1
Share


@Tryhard1988
Follow
Smell Fire really cakey grape smell throwing out pure tricks and she starting to fatten nicely

Likes
16
Share


@UnkleSkunk
Follow
il tutto prosegue per il meglio ho tagliato qualche rametto basso e un po' di foglie...
continuo con la sistemazione regolare dei tiranti..
ora sta iniziando a far vedere il sesso vediamo come si comportera'...
Likes
14
Share


@OilyEliteOrganics
Follow
Growing great.
Smells good looks like its going to be be a nice physcodelic and strain.
Smells sweet and spicy mostly like sttawberries.
Likes
5
Share

@pareto
Follow
The mold thing is really sad. We had a super wet and humid summer so I added a fan to my setup.
I let the branch with the seeds live to let them finish up.
Total Runtime: 86 days
-------------------------------------------------------------------------------------------------------------------------------------------------------------------------------
Set up cost (fixed costs)
-Lamp: 40€
-Timer: 3,5€
-Pot: 4€
-Total fixed costs: 47,5€
Given 5 years (or 15 grows) usage time translates to around 3,17€ per grow in materials.
Variable costs:
-Seeds: 3,17€
-Soil: 6€
-Fertilizer: 3,50€
-Power: 22,06€
-Total variable costs: 34,73€
-Total costs per grow: 37,90€