Likes
Comments
Share


@RickJames_Mcdank
Follow
If you like the sweet and fruity smell and taste this is the strain for you. But only if you grow organic thats when the taste and smell comes out strong.


Processing
Likes
6
Share


@MissSolasolita
Follow
End of week 6 flower
Time to flush I think
She looks done already and I have had to string all the buds up
as she was falling over
There's a ton of bud on this plant
Roll on the next couple of weeks

Likes
153
Share


@StarLorr
Follow
Welcome to my Banana Purple Punch diary.
🍌💜🤪💥🥊
In this Diary:
Seeds: [420 Fast Buds]from my growmie Tropicannibis_Todd 👊🏻😎
Media: Pro~Mix HP Open Top Grow Bag, Connect.
Nutrients: Green Planet Nutrients,
2 Part Dual Fuel starter kit.
RealGrowers: Recharge.
Diablo nutrients: Supplements.
Feeding :
Wed 06Mar: 3 1/3L Nuts/Recharge pH'd 6.5
Sat 09Mar: 2L Monster Flower,Blaster pH'd 6.5
Mon 11Mar: 3 1/3L Nuts/Recharge pH'd 6.5
___________________________
D-Fol: 10Mar keeping up with the fan leaves😄
__________________________
She's getting smelly and sticky😋
Buds are getting bigger😁
Smooth sailing⛵️week.
___________________________
Thanks for stopping by, likes and comments are appreciated.👊🏻😎
Keep on growin!
Keep on tokin!!!
😙💨💨💨💨💨
Likes
2
Share


@NocturnalGardner44
Follow
Adding this awhile after the fact... but me setup, bed is filled with small logs, sticks, leaves, hay, green grass, alfalfa, then redbud living soil on top 5lbs of worms added as well. Organic feeding, mainly lactic and baccilus, Kashi, knf inputs, fish shit, orca, king crab

Likes
2
Share


@Junior1900
Follow
Happy GrowingHarvested at 15 weeks and the royal runtz will be a staple in my tent from here on exactly what I like to smoke the taste the buzz is perfect high and I'm a Head 💯 since birth so. The plant was a bit hollow didn't produce much all my errors I'm pretty positive but damn It is good . I also ran a sherbet queen . It is the opposite of what I really like I don't care for that cookie lemon mild high on the other hand it produced double and is still good smoke just for my preferences lacking ice got it hanging in a dark closet ac blasting and small fan circulating air . Then I'll jar it and maybe if let it cure a week or two if I can . Maybe also sherb top was 100 gs fresh and Runtz top was 60 gs fresh cut also I think I really did damage more than good in the flush process

Likes
4
Share

@Chubbs
Follow
Weekly update for these lovely ladies. They've grown and grown since the last update so much I had to raise the greenhouse. Cinder blocks under the frame gave me an extra 16in. They're growing probably a foot of week and still reaching for the stars. I did switch to Athena's Bloom A & B and P&K booster this week giving 5-10ml per gallon. I really couldn't be happier with how they've grown up to this point.
All in all Happy Growing.
Likes
35
Share


@Ganjagrandaddy
Follow
Update: what a week full of activity and positive growth.
The Amnesia is a big beast of a lady now. She is nearly 2.5ft across her canopy and growing. I have had a shuffle round in the grow space and she is now under the sp250 with her soil friends. The supercropped knuckles are nice and chunky to support the spiked colas I plan on her having. She has flattened out nicely too. I expect her to get even wider by the flip time and with so many growing tips she should be a good producer.
Sweet Afghani Delicious has thankfully now started her real recovery from the root rot after a week in new feed. She has some good potential for a decent finish by the way shebhas bounced back over the last 2 days with new growth and now starting to fill up wirh chlorophyll again.
Red Hot Cookie is also on the road to recovery with way more colour and actual vertical growth starting too. Her 5th node looked done for so i left it to fall off if it wanted and concentrated on the 4th nodes but she had other ideas and has now began growing the 5th again. Overall inam happy to see a recovery in them as i thought I was going to lose the nft girls from all the damage. Now at 100% power on the sp3000 with an rh of 67% and room temps at approx 24.5°c.
With another weeks growth I am hoping to be close to flipping them all as the Amnesia is in danger of total room domination!!.
Be safe and well. GGD

Likes
64
Share


@Roberts
Follow
Baked Bomb is doing okay. She is not the strongest plant, but she is showing she is tapped into the stinger nutrition. She should be alright since the coco never dries out. She could easily explode in growth in next week. I seen many of my autos do this. So all is well. Thank you Bomb Seeds. 💣 🤜🏻🤛🏻🌱🌱🌱
Thank you grow diaries community for the 👇likes👇, follows, comments, and subscriptions on my YouTube channel👇. ❄️🌱🍻
Happy Growing 🌱🌱🌱
https://youtube.com/channel/UCAhN7yRzWLpcaRHhMIQ7X4g

Likes
9
Share


@BB_UK
Follow
Been a great start 😊 gave her a first feed of organic biobizz nutrients today! She’s 7 days old today and the rest will be 7 days old tomorrow! Several times a day I LST and foliage spray as humidity is 50-60% fastbuds are defiantly the best for autos! 💯
Likes
15
Share


@BeHappyNtoke
Follow
Noticed some yellowing on sour kush a on Monday I do check ph and ppm overall smells nice critical purple finally taking off sticky buds on b and c

Likes
24
Share


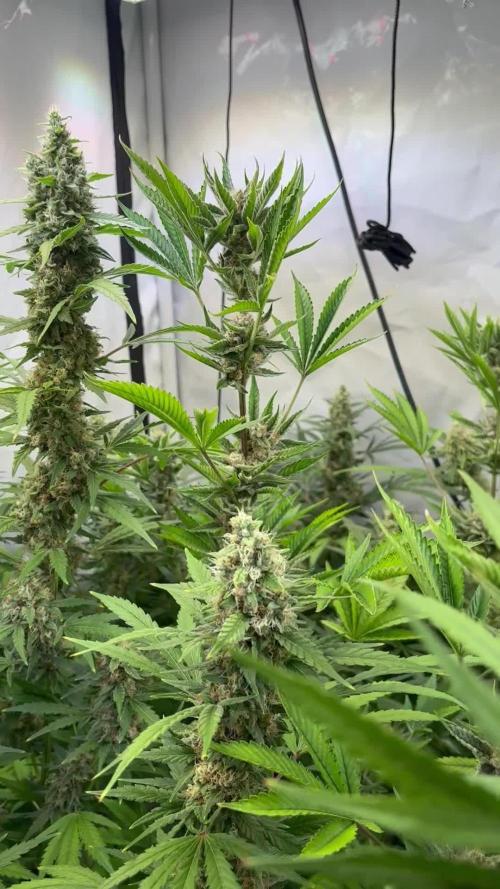
@TerpTurtle
Follow
BAD APPLE WEEK 7 | DIRTY BIRD GENETICS
The color on these buds are beautiful, you see new growth swell in light green spots and within 24 hours goes to a deep velvet color like pictured.


Likes
49
Share


@masterofsmeagol
Follow
8/1 Took another video but didn't upload either videos when I was in town. I'll have to upload later. I have a lot going on and I need to consult my diary more often. The Temps dramatically changed. I watered yesterday just a few that were light but then it poured all night. This morning things looked SUBSTANTIALLY better. I think as long as I can get some sunlight the next few days things will be alright. That streak of weather in the 100s really did a number on me and my plants. Everytime I go they seem to be looking better so I hope that they bounce back and I don't lose anything after all this work. Plants seem "strong" though. They appear very healthy. This just seems like a mistake I made that was substantially worsened by severe thunder storms we weren't supposed to get. If they don't come back before rain I may move the plants that haven't recovered yet inside the barn for the night. It really depends. I want them to dry out. I'm thinking of going and putting a fan in the cage on the smart pots. I just need to keep an eye on them.
UPDATE: I was worriedly watching my plants from the cams and got a message from my father saying my plants were "REALLY DROOPY." I got there and noticed they were WAY worse then earlier and it was sunny and 70's. I got my dude on the phone and sent him several pictures. Luckily I had a second opinion also from my father. A 3cu ft bag of 707 is 22 gallons. These pots were light like that. They just have a seven foot plant in them lol. I'm so happy. I was planning on bringing them Inside tonight in case of ANY rain, luckily I was able to ascertain THE REAL problem, consult my diary and askother growers. Things are looking good. I'm so happy I'm not overwatered.
8/2 Thank the Lord! And my father for his constant vigilance and my commercial buddy for always being there for me. I went over this morning and everything is back up. Plants definitely got stressed though. I think I was OVER and UNDER watering during those days where it was 100 degrees. It'd 68 today. I say this because as soon as I watered the plants they started picking right back up. Luckily I had a dry bag of 707 to pick up and compare with my 20 gallon grow bags and had my father check the weight as well. He's a forester and told me the weight was about tge same. I gave the big blue cheese in the back closer to 2 gallons until I saw some water coming out the bottom. The reason I think I may have overwatered is that the water evaporated as i had watered during the day or at night but not the 10% that they needed. I didn't QUITEgive them all their 10% last time more like I split the difference and did a gallon amd half. Some did get two though. I noticed some light yellowing going up one of the plants that I've watered the most. These plants are transitioning fast to flower. I think I've got the watering schedule down better and that's "don't water them on a schedule". I'll have to individually take note of the plants. Also on that plant and a few others I see minor nute deficiencies so as soon as I can feed I'm going too. I'm going to show my buddy all my info and ask his advice before i take the next step though. I can't believe they made it through this. Talk about anxiety. Wow.
UPDATE: Talked to my commercial buddy. He advised to pick off any of the dead leaves, (which I mostly already have there weren't many) and to wait until next water to feed. He broke it all down in a way i could understand. Then he broke the feeding down further for me so I now know where to start. He did say he thinks my only problem this year will be, "finding a place to store it" lol. I thought he was joking but he went out back and brought out five gallon buckets with screw top lids lol. This back and forth dialogue (with a professional) is seriously lowering my anxiety and giving me confidence that im doing the right thing. Hes never led my wrong and hes always been there. So has my dad. He said to take the old man out for coffee because he saved my ass! I opted for the bottle of whiskey instead. I'll be checking them later. I'm waiting to feed until next watering and I'm waiting to apply BT. I don't want to do anything to a plant that has been that stressed. I'm giving them a few days to chill. Then the twenties will get a quart of grow big, big bloom and calmag and I'll convert that measure to the same amount for the 30's, and 50's. I'm not sure EXACTLY how big that tote is but I think it's closet to 30 than to 40. So I've got a solid plan for the week. I think what I'll be looking to do next is get my supports up. The wind has been crazy but these plants (even when stressed) seemed super strong! Still no fungal stuff knock on wood.
UPDATE: Had to take the car to the mechanic and snag my wheeler to make it home. I sefoliated quite a few bog yellow fan leaves and some smaller leaves down low. Plants went through some stress thats for sure. I HAD to leave my phone with the wife as she had a telehealth appointment so I couldn't take pictures. I wish I could've because things are looking great. I can't wait until things dry out a bit and I can feed! I'm STILL in awe of how my plants look RIGHT NOW and how the looked yesterday. Another buddy said If I didn't see it (and I didnt know you) I wouldn't have believed it was even the same garden! I'll check AGAIN later if my car is ready. I'm anxious to feed and get my supports up. Plants are STRONG though.
8/3 Plants looked great this morning. I did notice what looked like nute deficiencies on the plants I've watered most. After speaking with a few local growers I decided to water. I watered everything a gallon. The containers got more. The 10 got less. Then i mixed up a feeding solution of 1 tsp grow big 2 big bloom and .5 calmag and fed the 20s approx 1.5 pints. A little less for the 10 and a little more for the bigger pots. I'm going to go back over and if I see no negative effects from earlier I'll use the rest of the solution. I'm hoping this was the right decision. It hasn't been enough time but the bags were light. Not SUPER light but last time I waited it didn't work out well for me. Two local growers have told me theyve been watering daily and they have plants in raised beds and right in the ground. I want my watering to be in the morning anyway. Hopefully this works out. I'll update.
UPDATE: Went back over and everything was standing up nice. They loved that water and the small dose of nures hasn't burned them so ill be able to use more next time. I used a Gatorade bottle thats 1.25 pints amd went from there. A total of two gallons was used on the garden. Things look amazing. Things are changing on the daily. I'm losing some leaves now. Well they aren't dropping off but I'm plucking them before they yet that far. I need to water in larger volumes I think. Plants are drying out too quick. Others are saying they are watering much more often as well. It really hasn't been raining and these plants are huge. I have lush green leaves but this transition and the added watering I think has leeched a lot of the nutrients from the soil. Since I have the fox farm that's what I'll be using. I still have a couple leaves that are destroyed by a fourkined plant bug. It's very identifiable so theres another I need to find. Also seeing chunks missing from leaves. I need to up my ipm game. I don't want to do more than one thing at a time though so I know what happened if anything goes wrong. Since i did the nutes today the spraying of BT or captain Jack's I'd going to have to wait. Despite losing these old fan leaves my plants are dense. Defoliating really helped with airflow. I also noticed some chlorosis on a few leaves. That's why I'm going to start doing the 10% minimum. I'm waiting until they are real dry then I'll give everyone (but big blue) their 10%. I got run off from big blue just from like a gallon amd a half today. I hope my 2 minute video uploaded. It says it dis but u bet it didn't. I'm trying again and I'm at 12%. Let's see if my patience lasts. Looks like it doesn't want to upload
8/4 Thunderstorms and heavy rain all night. It's supposed to rain steadily all day. Plants werent drooped or blown around looking or anything after this storm and I only have minimal supports up. I defoliated anything that needed it. Just a few yellow leaves on the bottom interior. More like nitrogen deficiency. I am watering to frequently though. Im noticing some chlorosis (minor) on old far leaves. Could just be that the soil is getting depleted but "if the brown surrounds your plant is drowned" and I noticed a few leaves like that. Just a couple bit i know what to look for. I hate to say it but i think ive almost got things dialed in for this grow. I will need to put up further supports. These are some STRONG plants. I shook them all off today. The seemed to love the nutes. Plants looked way better this morning than I was expecting. I need to up my watering volume to 10% everytime. I DID fine more pillar damage when defoliating and a four lined plant bug mark on the purple punch in the ten.
8/5 It's not raining right now but it Rained all day and night. Plants really seemed to likecthise nutes. I'll up it to a quart next feed. I defoliated what needed it. Found my FIRST totally yellow leaf of the season. Big old interior leaf i must've missed earlier. Smell has greatly increased. Seeing that these plants seem to have no ill effect from all this water I feel more confident about my ability to fully water them their 10%. Especially since they are massive plants. I have one daln near 8ft and it's damn near as wide. Real good airflow. I think this is gonna be my year. I certainly hope so. I need to get rid of that fourlined plant big but more importantly I need to deal with pillars proactively so next nice night I'm going to treat with bt. Super proud of myself so far.
8/6 Didn't rain much yesterday. In fact I stepped out my door and the sun was fully visible and bright while rain poured down around me. It wad a cool experience but the plants dodnt get much for water. I checked the weight this morning (heavy) and shook off the plants and did my normal morning inspection. I news to remove a pallet so I have more room. Plants are really trying to flower. Next week I'm gonna yet them with a stronger dose of nutes. Last year this was about the time I lost my crop. Knock on wood but this is the healthiest crop I've ever had. I MAY apply BT tonight. Haven't decided yet. I'll keep the diary updated.
UPDATE: Went over to check the plants that were WET and HEAVY this MORNING because of the windstorm. If dried the bags out completely. Everything but the 10 was drooping right over like before. Good thing I've got some pretty good intuition. I took two videos. I gave everything their 10% 2 gallons each and for each container plant. Plants were back up by the time I was done adding supports.
8/7 Sunny this morning. Plants looked good. Had to defoliate some dead leaves. I can't believe those grow bags dried out so fast yesterday! Its just the wind was so strong! Plants were right sideways! They got some syrong roots thats for sure. One of them (my canary) seemed light this morning! But we are getting an inch and a half of rain starting tonight into tomorrow so im not watering ANYTHING. I'm not sure what I'm going to do IF anything. I added to my supports. I COULD put EVERYTHING in the barn where we put heavy equipment. I'll probably at least bring a couple inside in case something horrible happens. Things arecreally doing good. Flowering up nice. Found a cicada on one yesterday. First time I've ever seen one. I'll update with what I decide to do.
UPDATE. My canary seems a little light and is losing lots more leaves im not sure if it's because of the transition to flower but I assume that has something to do with it. Plants still have MORE than enough leaves. Found a couple pillars and killed them. Took a video. I have one blueberry cheese that I hope doesn't have a fungal infection as it's losing more leaves. But it takes more water and is greener and fuller up top. I think I'm just worried because of last year. I've done what I can gor the storm so let's see what happens if I NOTICE it get too bad I can bring some indoors.

Likes
15
Share


@eldruida_lamota
Follow
Esa familia, otra cosecha más, no tan contento esta vez la variedad en si está buena pero su cultivo es algo complicado y no está estabilizada la genética, los días de floración son más de 55 días como dice el banco,más de 3 meses de floración con estos ejemplares...
Pero mereció la pena esperar el colocón es bastante fuerte, para mi que , sativa dominante a mi parecer, 24% de thc , cruzada entre cookies x OG Kush , muy productora en general. Así esto es todo , pronto más trabajos, buenos humos familia.


Likes
7
Share


@Shinobi
Follow
Nevidel som ich 2 týždne🤪🤪veľké búrky dažde vyzerali pripravené.trichomy mliečne90%hnedé blizny.pre mňa výborné.mier

Likes
7
Share


@JayBane
Follow
Day 58 - Started on making a natural intake box
Day 59 - Isolated and sealed the natural intake box + added beter sealing on grow cabin doors & cabin
Day 60 - Semi-automated intake.
Likes
5
Share


@MalinaGrow
Follow
Transplanted it to another pot as it seemed to slow down the growth of the plants.
Input 550 ppm 5.5 ph
Output 560 ppm 5.7
Topping! Solutions down 100 ppm
Input 400 ppm
Output 600 ppm 5.5 ph.
after topping, the plants stopped a little, the yield from the substrate also changed


Likes
39
Share


@Randyb4
Follow
Day 29- First day of Week 5. Topped all 4 plants today. Plants growing great! Noticed a "skin or film" on the stems that looks like it's shedding. Watering with spring water 1 gallon pH-6.5 @ 72° F. Sprayed water on the tops and bottoms of the leaves as well.
Day 32- Watered a tiny bit, but ran out of water.
Day 33- Wateres with 3ml/gal of cal-mag and 1/2 tsp/gal of recharge. Plant C has brown spots.
Day 34- Plants have some weird colors but still growing good. First day of 18/6 light cycle.