


Likes
216
Share


@CRiSPrGrow
Follow
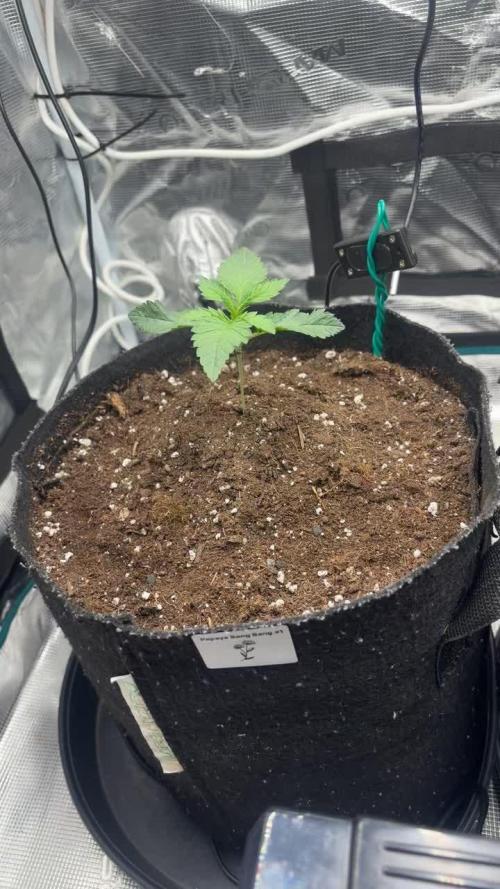
Dutch Passion Week 0
DP is a new company for me so let me just say that their unboxing experience is truly fantastic. You get a nice little sealed tin box, loads of nice writing on it , inside a vacuum sealed bag, some cool story about the gens and how to grow on the inside of the lid aswell, it's an absolute pleasure opening these, if you want more pics of this just drop me a message, truly one of the best efforts i've seen for this for sure. I made a 1L solution with just a few drops of my specially made kelp extract, see the video how thick it is compared to store-bought stuff lol, and put some of that in a glass, dropped these seeds in the glass, cover to protect from the light and let that sit for one night to activate the seed. The next day one of these had cracked its shell already, i'm digging these genetics already, let's see how they do ! placed them in a propagator , covered with some dirt to protect from the light, now they're chilling covered, let's see how many sprout ! hopefully all of them ! they came out strong within a day 2 had cracked the surface, the second day they all had cracked the surface, the third day they already started stretching due to my broken propagator, on the fourth day you can see their roots sticking out on the picture, i decided to transplant them early because they were already stretching and the broken propagator wasn't making me happy. fed them plain tap water with a tea spoon once. I do like the RQS propagator i got from Zambeza, and even though it was broken it did make the whole germination much easier, i would definitely recomend the starter kit from zambeza so far, but i decided not to try any of their genetics until next round, which starts soon anyway... see you for next week's update !

Processing
Likes
120
Share


@CBD_Sweden
Follow
Hi all the happy people here in GrowDiaries.
This is my second cultivation ever and it will be fun to try a bigger space than my closet grows
First, I'm just going to say I'm done with the construction of my new growroom.
I put some pictures on the construction here in week one.
The room is 2.14 meters by 1.7 meters and has a ceiling height of 2 meters.
It provides a floor area of 3.6 square meters.
I use a 54 Watt Lightwawe T5 for germination and 2 Pcs 400 Watt HPS lamps.
I have a channel fan that replaces the room air about 40 times an hour to get a comfortable theme in the room, the air enters a fresh air intake from the outside.
The air is purified through a carbon filter to then leave the room to the rest of the basement.
Then I use that heat to heat the rest of the basement.
I will use 8 pcs 15 liter Autopots to grow with and a 100 liter water tank that supplies the pots of water and nutrition.
I will grow completely organically in soil and will watercure my buds to get the best possible medicine for me.
But there are no cultivation rooms to be displayed here, so I continue with what is most important.
Today I have put my seeds in my moisture dome and hope the seeds have germinated within a few days.
I am very excited to see how the new growroom will work and how this CBD Fast Eddy plant from Royal queen seeds will turn out.
CBD Fast Eddy Automatic is combining Cheese x Juanita la Lagrimosa x Ruderalis, Fast Eddy is a rapid growing, flavourful, and CBD-rich auto strain that goes from seed to harvest in 8-9 weeks, produce generous yields, and induce a clear, mellow, and most importantly, functional high.
THC: 9%
CBD: High
Yield Indoor : 400 - 450 gr/m2
Yield Outdoor: 80 - 130 gr/plant
Height Indoor: 60 - 100 cm
Height Outdoor: 80 - 120 cm
Flowering: 6 - 7 weeks
Harvest month: 8-9 weeks after sprouting
Genetic Background: Cheese x Juanita la Lagrimosa x Ruderalis
Type: Sa 50% In 40% Ru 10%
Effect: Clear, Painrelief
Climate: Mild
..............................................................................................................................................................................................................................................................................................................................................
Update 2017-08-15. Both seeds have germinated and planted in small pots inside the humidity dome.
I'm so glad it worked so well and now it's just hoping they'll start growing and become 2 big healthy girls :)
...............................................................................................................................................................................................................................................................................................................................................
Update 2017-08-16. I have mixed my own soil today. Its 40% sieved peat harrow H2-H4 0-30 mm, 45% sieved peat harrow H4-H6 0-30 mm. 5% sand and 10% of compost soil. And i use 15% of perlite and mix it all together.
...............................................................................................................................................................................................................................................................................................................................................
Update 2017-08-20. These girls are much slower to germinate and to start growing than the other 6 girls I started at the same time.
One of the germinated seeds split in half, so I had to take a new seed and germinate it. It took 2 days.
It was just a smal taproots after germination with this strain as opposed to my Fastbuds cbd.
But I hope everything goes well from now and that they live up to their name, Fast Eddy.
................................................................................................................................................................................................................................................................................................................................................
Update 2017-08-21. New pics.
................................................................................................................................................................................................................................................................................................................................................
2017-08-22. Nr1 dident make it and died. Started germinate a new seed to get another Nr1.
..............................................................................................................................................................................................................................................................................................
2017-08-27. Nr 1 is in a small pot in humidity dome and i hope shes going to break the surface soon. Nr 2 is slow but doing fine.
---------------------------------------------------------------------------------------------------------------------------------------------------------------------------------------
2017-08-28. Nr2 is transplanted in 15 liter autopot.
---------------------------------------------------------------------------------------------------------------------------------------------------------------------
2017-08-29. New movie of the girls Nr2. Its no water for 3 days now so the roots develop more and match the plant above the soil. The temp controlled fan is awesome, its easy to set what temp you like to have in the room. Right now its 28 celcius. And humidity is 56%.
-----------------------------------------------------------------------------------------------------------------------------------------------------------------------------------------------
2017-08-29.
Hello to you who read my diary, I just want to say that I am pleased that you have chosen to check in with me and in my diary.
I just want to say that I do this for myself and for a steady flow of my medicine.
Everything you read and see in my diary is 100% honest and I will never distort or beautify anything here.
I document my crops so that I can learn from my mistakes and also to look back at those different crops.
I try to update with pictures every day and with text if something special has happened in the garden.
This is my strainhunt for the best medicine and the beginning of my journey with cannabis and the cultivation of it.
-----------------------------------------------------------------------------------------------------------------------------------------------------------------------
2017-08-30. Cleaned the room this morning, just vacuuming and cleaning with chlorine solution. Im testing the fan to control temp and humidity, it works great.
Added a movie. Everything is looking great right now.
------------------------------------------------------------------------------------------------------------------------------------------------------------------------
2017-08-31. 3 New pics.
------------------------------------------------------------------------------------------------------------------------
2017-09-01. New pics and a video of the grow room from today.
----------------------------------------------------------------------------------------------------------------------
2017-09-04. Week 2 starts now, new pics.
--------------------------------------------------------------------------
2017-09-05. KL 08.00. Cleaned the room this morning, just vacuuming and cleaning with chlorine solution.
KL 12.00. The girl got 2 liters of water with nutes in it, added a video.
-------------------------------------------------------------------------------------
2017-09-06. KL 08.00. The girls woke up after their beauty sleep, the leaves are always a bit down after 6 h of darkness, but they will stretch now when the HPS lamp starts.
Everything looks good and I keep trying to tuck the leaves so they get the maximum amount of light where needed. Added pics and video.
--------------------------------------------------------------------------------------------------------------------------------------------------------------------------------------------
2017-09-07. Day 17 from sprouting. I have never tested PH in my grows, when growing organic in soil iv learned that it adapt PH by it self. But im curious by nature so i had to test.
Kl 10.00 Tested PH in the soil, it was 6.9 and tested my tap water and it was 6.8. Added video of the girl.
Kl 22.30. New pics.
-----------------------------------------------------------------------------------------------------------
2017-09-08 KL 08.00. Good morning, added new video.
2017-09-08. Kl 23.50. Gave every girl 3 liters of water and nutes, added new video.
-----------------------------------------------------------------------------------------
2017-09-09. Kl 21.00. Defoliated a lot and added pics.
------------------------------------------------------------------------------------
2017-09-10. Kl 08.00. Last day of week 2. New video.
2017-09-10. Kl 23.00. 3 new videos.
--------------------------------------------------------------------------------------------------

Likes
49
Share


@masterofsmeagol
Follow
IVE MADE MORE VIDEOS BUT THEY JUST DON'T SEEM TO UPLOAD AND IT'S FAR TO SLOW TO DO IT FROM HOME
6/27 Made last week a five day week to get back on track. It's still overcast and rainy. It's not raining a lot bit it's consistent. Despite the weather the plants are doing phenomenal. I'll update later. It's 1pm. It's been raining consistently since 11. Just a sprinkle but it's steady. I'm going to begun uploading the weeks weather on my diary. I may start a new diary for the plants I light depped as they are flowering pretty good. Rain stopped and it's just overcast for now. I looked at some videos and did a comparison of videos one week ago and videos today and HOLY SHIT! WHAT A DIFFERENCE. Especially the light depped 10th planet. Well everything but that was the most significant difference. I'm astonished at the health and growth despite the crummy weather. Continued to rain. Just got harder. Plants are taking it but it's flooding underneath the pallets a little but it will be fine. The light dep however has me concerned. The 10th planet is looking spectacular. The bigger purple punch I'd looking good too. The smaller one though looks to have a pollen sack coming off one of the branches. Considering its not on the otherside I assume it's not just a swollen calyx. I don't mind chucking it especially if that means I don't hurt my other girls so I want to make sure. I sent videos to a few other growers and I'll add a question on here. Those three plants have been isolated from the rest for a few days due to rain. I have the suspect isolated alone until I can confirm. It sucks cause the light Depp was going good and the6ve all got little flowers.
6/28 Well that fucking sucks. ALL THREE plants I tried to light depp hermed on me. I could see male flowers. Luckily I had been keeping a really good eye on them and it was preflowers mostly. At least I caught it. One or two stamines on each plant. Would've been really easy to miss. Only one had STARTED to elongate into a stem so I think I caught it early enough. Plus since all this rain they've been kept in a different location then my big girls. Glad I did that now. Boy the roots looked good on those plants. I just grabbed the stalk and lifted and it came right out of the pot. I held it there admiring it for a minute. This sucks. At least the real plants are doing good. As far as I know. No male preflowers that's for sure. I've got some feedback from other growers and the videos are a little blurry but I had found a light leak and I'm certain these plants hermed. I know I could've tried to save them but I didn't want to risk it. I compared what I was seeing with Google photos and other websites. Aside from the larger ball with its stem, there were also several little bumps besides developed calyxes that were weaving into little buds. Trust me that I wouldn't cut down my plants if I wasn't 110% sure. I might've been able to "save them" but to me it's just not worth the risk.
6/29 I was second guessing myself pretty hard last night due to some responses I got on my light dep and messages I got from other growets. Made my anxiety horrible but I looked on several video's I'd taken again and I know what I saw. I felt better after that. This was after I researched and waited THREE days until I saw the ball on the stem and the groupings of small nubs under a fresh yellow flower. These plants were flowering good and it sucks to lose them. One MAY have been ok but one was a runt and had all the characteristics of a true hermaphrodite. They were only in 3's and I couldn't risk my harvest for an experiment. Still sucks. Oh well. Sun is starting to come out. Plants seem to be doing fantastic. I have one spot on a leaf that looks like a pillar munched on a leaf so I'll probably get the bt out soon as I have a dry day that I can apply it. I'll have to check the weather. I need to start a nute regiment but the plants aren't telling me they need anything yet.
6/30 I fucked up dates or dodnt do it yesterday or it didnt save right so I'm leaving this blank today is the 1st.
7/1 I have still only watered s couple times and I haven't had to feed. This week I'm going to start nutes. I had some external ersonal situations that have kept me from my plants. I'm hoping to get back on track. I noticed some pillar damage so I'll need to dig out the BT. This morning I saw this giant ground hog by my cage. Hated too but had to get rid of him. Of course some of the blowback landed on the leaves of one of my plants. I tried to clean it as best I could. Better than that fat bastard eating everything in one night. I broke a branch either falling around it or bulling through when I was pissed or I LST it the wrong way and the wind broke it against the tomato cage. Nice big branch too on top. I tried to fix it with duct tape but we'll see. The plants need me to spend sometime with them. I need to clean them up. Apply bt and give them their first feeding. I'll update as I go. They don't seem nutrient deficient by any means but I don't think it would hurt to start the nutes.
7/2 Bags were lighter today and if it wasn't going to rain tonight and tomorrow I'd he watering. Plants look great so soil isn't depleted yet I guess. They're growing rather rapidly. The branch I broke didnt make it. Had an idea it wouldn't but I had to try. I waited on the BT on account of the rain. I may go back over and change my mind and water with silica or a mild nute solution or maybe apply the BT. Depends what time I get back. I have some work I need to do over there. There's a few that I need to clean up the bottoms on. Pest damage is minor and limited to one or two plants and a leaf or two only.
7/3 More rain. It was supposed to rain this morning too but it didn't. We got .33in yesterday and through last night so I thought that was ok. Looking back on my previous diaries I'm doing things significantly different than before. I had used a lot more nutes earlier on. This morning I mixed two gallons of 2tsp of big bloom and fed it to the 9 plants in smart pots leaving the container plants as they have much more water in them. Looking back at other diaries I previously had, WPM and septoria by this time not to mention a shit ton of other pests I was fighting by this time. Since I poisoned where the cagexwas multiple times and sprayed the cage before it was moved I luckily don't have that problem yet knock on wood. I'm planning to apply BT tonight to deal with the moth larvae if there are any. I'm looking at plants around this area and im seeimg SOME septoria and pm on raspberry bushes and burdock so it is around. I made sure my cage is not by any other vegetation this year and is sitting on asphalt with the bags on raised pallets. Good thing I did or I guarantee they'd be flooded by now. I've been seeing multiple complaints from maine growers online (AND THEY HAVE HEALTHY PLANTS!) saying this is the worst year ever. Maybe they need a dose of fusarium oxysporum to keep them humble. This is maine. If you don't like the weather just wait five minutes. Meanwhile I'll be doing my sun dance hoping for sun. "Hard to grow cannabis with no sunlight" said another grower on my forum.


Processing
Likes
5
Share


@CityFarmer
Follow
Hello everyone,
Been busy this week working around the house so not much I can say. Heres a little video of there growing...
See you guys next week

Likes
7
Share

@Rangaku
Follow
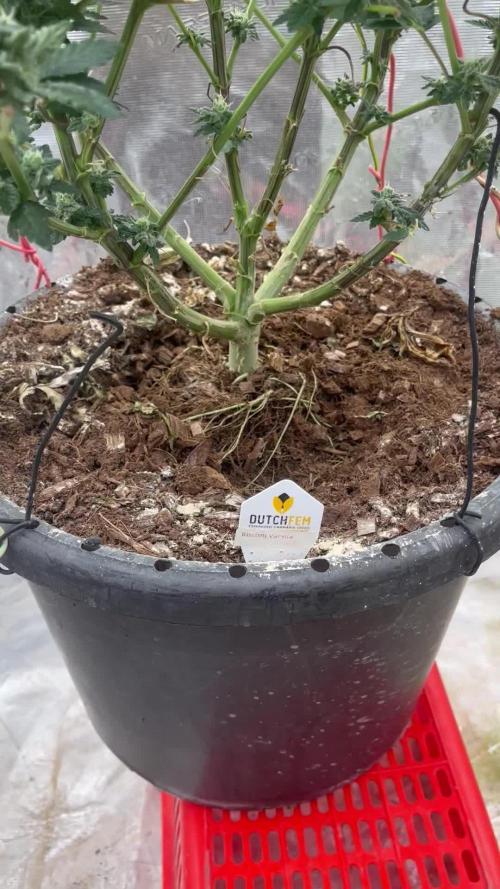
Wow , just wow . Trichomes on trichomes on trichomes on trichomes 😂she’s as frosty as I’ve ever seen . You can’t take a leaf off this one without getting stuck to the plant . Dutchfem perfection. Still got a few weeks left , same same next week just sit back and watch her grow .
Likes
14
Share


@LokalGrenz
Follow
Got a dehumidifier it’s reading different from what mine controller 69 is saying but I have it set at 40% it’s the lowest so it’s going pull humidity regardless right now it’s about 53% which is okay would like it to get down to the 40’s I also changed the light schedule today to 20/4 the humidity raises at in my tent when lights are out so I figured change it to 20/4 instead of the 18/6 I’ve been running so if humidity does go over it won’t be for as long as before hopefully this works just trying to avoid any mold situation
So far the Amneisa Haze 2 is at stretching she’s going be big I can but the haze 2 is done seems to just be flowering the sour diesel is looking good as well so far I’m happy with its looking like left town for two days and the auto watering pots worked!

Likes
10
Share


@Grileon
Follow
Nutrients started.
Hot weathers here for me and having some water temperature problems. Frozen water bottles do some nice job.


Likes
22
Share

@GERGrowDesigns
Follow
Growers ,
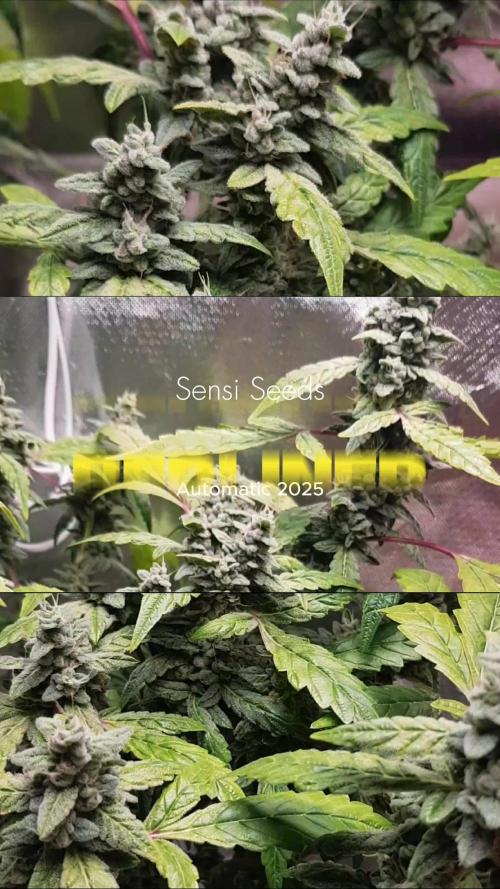
Over the next weeks, we’re excited to share a very special project with you: Sensi Seeds Berliner Automatic 2025 Release
With dedication, knowledge, and hands-on practice, we’ll guide you step by step through the journey—watch with us as growth, development, and small wonders unfold before your eyes.
Whether you're a beginner or an expert, you are warmly invited to join, ask questions, and share your own experiences along the way!
Project Setup & Conditions:
• Brand/Manufacturer: Sensi Seeds
• Tent: 120cmx60cmx80cm
• Light: 2x 200 Watt Full Spectrum
• Humidity: 45%
• Soil: Narcos Organix Mix
• Nutrients: Narcos Products
• pH Value: 5.8
A Special Thanks To
Sensi Seeds
for the amazing collaboration, trust, and generous support in making this project possible. Your contribution is truly appreciated!
Congratulations on Your Own Projects!
We celebrate your growth, your creativity, and the passion you bring to the table. It’s truly inspiring to witness at Each visit .
Stay curious and keep up Growing —we look forward to welcoming you back for the next chapter soon!
Likes
76
Share


@Canna96
Follow
Hey now, this week went pretty well, she grew another 6" to 28" and I decided to flip her to flower as I am running out of space in the 4X4 and I only have about 12-16" of total usable vertical space as well, so she started 12/12 today. I have been defoliating her probably 10 or 12 leaves every other day but when I wake up the next morning, I can never even tell a difference. I did have to re-arrange everything in the tent as far as the fans and cameras and lighting just to better fit the shape of the plant., and I took her out of and cleaned out the tent, and sterilized her runoff container and fertifigation hoses Etc, because I don't plan on moving her again until harvest unless it's an emergency. I took the humidifier out last week as her leaves now provide more than enough humidity in the tent and I am running my 8" AC Infinity the rest of the way, I just set it keep the heat below 75 degrees and the humidity below 55%.
I also have one medium sized fam blowing underneath the canopy and two small fans blowing above the canopy. I believe good circulation prevents pockets of humidity which lead to mold. I am still feeding straight Armor Si/CalMag/Veg Nutes, I will continue this into next week and then probably start transitioning slowly to flower nutes by mid-week. I hope everyone had a great weekend, stay safe and Blaze On!
Processing
Likes
12
Share


@Tazard
Follow
These are clones that I managed to take from my summer garden that became a disaster due to a heat wave that we had breaking 100 year records. I expect everything to be 48” in height at maturity.

Likes
5
Share

@BEM_Genetix
Follow
Die Entwicklung mit APTUS Nutrients sieht sehr gut aus. Gesund bis in jede Blattspitze. Die ersten terps machen sich breit und es liegt ein Duft aus Kirschen und Blaubeeren in der Luft. Die entlaubung haben sie sehr gut weg gesteckt.
Development with APTUS Nutrients is looking very good. Healthy right down to the very tips of the leaves. The first terpenes are starting to come through, and the air is filled with the scent of cherries and blueberries. They handled the defoliation really well.
Likes
90
Share

@CRiSPrGrow
Follow
I'm really digging the Chem OG, squat plants with those trademark thick thick thick indica leaves, clearly it's gonna be a heavy smoke lol Wasnt able to get the juices flowing this week, hopefully next week i'll get the smart protein into feed. Started training some of these, did two more defoliations (total of three light defos so far) ... and then flipped them 4 days ago. the f-ing landlord has been attempting to enter the lab according to my security cameras lol, motherfucker !!!! anyway i have to pack up the lab, hopefully i'll be able to complete the grow cycle , but for sure i'll have to move the grow op ... that's my problem, sure but it also means that i'll have to wait in order to set up my perpetual cycle... and of course i cant really take cuttings if i'm moving the lab... why must people be so curious? really wish there would be at least a bit more tolerance around this hobby just so i can sleep peacefully at night... in the mean time , I lowered my lights to 22cm, i heard from someone (forgot who) that it's a good thing to get the lights closer when you flip so that the plant gets that extra energy for the stretch. I'll let know how that works out ! Any comments or suggestions are welcome , veg is over so it's gonna get interesting - drop me a message if you want ! that's it 🚀

Likes
9
Share

@LoopyTerps
Follow
Everything going great beside the back right Original Oreoz which is very pale and looks either overfed or locked-out. I think this is due to poor genetics. She is still praying and growing buds so...
I cannot ajust the feed for differents plants since I use a single reservoir. That's one of the downsight of growing multiple strains on the autopot system.
First smell is here, very promising for the 2 tropics.
Getting ready for the bulking phase.
Happy growing !😊


Likes
11
Share


@Professor_Daank
Follow
Holy moly. She's growing... like a weed.
She's loving the nutrient schedule and environment (finally). I was having an issue maintaining proper humidity levels and after exhausting EVERY possibility with venting, fans and otherwise, I have moved my dehumidifier inside the tent and it's working wonders. I drain the water with a shop-vac as I do the same for my run-off. Things are going great so far, I hope to continue this forward progress in the coming weeks. Going to LST sometime this week, just not sure when.
6/13: Started minor LST phase to open spots to light. Fan leaves are gonna be huge. I also overwatered her... I'm a noob.
6/14: No watering for 24 hours. I removed my LST. She wasn't yet strong enough for the arc I put into her. Another noob mistake and add the overwatering to this, I just wanted to destress her.
6/15: Back to regular 1 liter per 24 hours, also added Armor Si to the nute schedule.
6/16: She's showing signs of getting back to normal. Added Diamond Nectar on this day. I also LST'd her back to position.
6/18: Back to normal. I trimmed 1 fan leaf under the canopy that wasn't going to get any light.
6/19: She's better and growing well. I'm going to try and keep this vegetation stage a little longer. Added a little more water today, just a tiny bit. I have 2 other plants that are a week behind and I want them caught up for the flip as close as possible. Pray for me.

Likes
25
Share


@pifflestikkz
Follow
Day 29
29/07/24 Monday
Nice feeding today with De-chlorinated tap water pH 6.
Gave her 300 ml and she had a small run off.
Getting chunky in the stem now 💪💚
Day 31
31/07/24 Wednesday
De-chlorinated water pH 6 today with Plagron pk13-14 5ml to 5L
Plagron power buds 5ml to 5L
Used 300ml of the 5L solution.
I will be using these on water days from now on as they are advised to be used every irrigation.
We'll see how they perform 💪💚
Day 32
01/08/24 Thursday
Another feed today using de-chlorinated tap water pH 6, there now taking 300ml every evening.
Day 35
04/08/24 Sunday
END OF WEEK 😁
De-chlorinated tap water pH 6 today with Plagron products. 300ml each.
Had a issue with leaf invaders this week, I have treated and am checking every 48 hrs so far seems ok and not progressive.
All plants look great, very healthy, one of the Overdose is way behind and due to space maybe culled at flower I'll see how she gets on.

Likes
Comments
Share


Likes
13
Share


@FlavoursUk
Follow
So, things are going great. The RO water change left me with a nice sterile clean res. The plants are loving the lighter feeding and it shows.
The trolmaster has my light schedule dialled in with the sunrise and sunset setting
Make sure you follow my YouTube and Instagram accounts linked on my profile page.


Likes
10
Share

@Legendaryseedthumb
Follow
Day 8: i dropped my phone in the bath tub so my photos are very blurry atm :/ besides that she’s doing good.
Day 12: she’s a grower not a shower, you’ll se😎
Day 14: had to put support on the stem because i had too much fan power so she started to lean. Will recover in 24/48hrs!
We are entering week 3 tomorrow! I see forward to it, I will be topping at the 5th node.
