
Likes
Comments
Share


@420DeepGrow
Follow
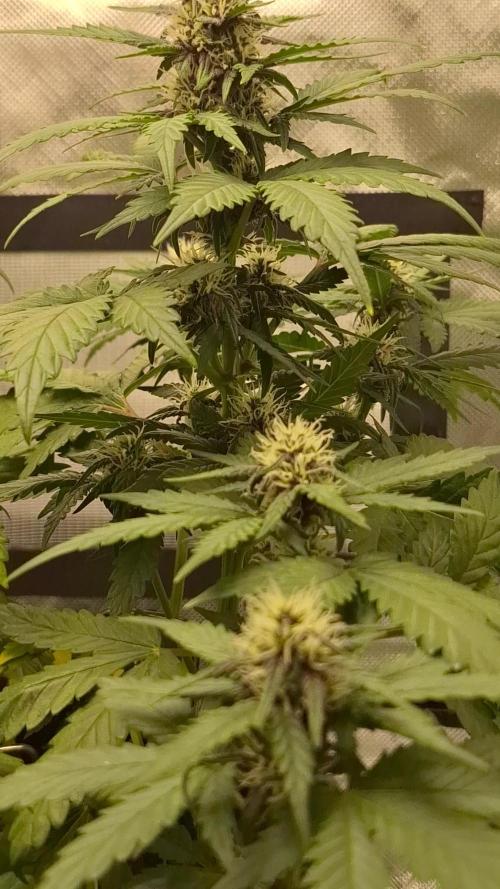
Gracias al equipo de AnesiaSeeds, Marshydro, XpertNutrients y Trolmaster sin ellos esto no sería posible.
💐🍁 Coco Jambo:
Con una composición genética 60% Sativa y 40% Indica, Coco Jambo es tu billete dorado a un verano sin fin, ofreciéndote una escapada a un mundo donde el sol nunca se pone en tu felicidad.
Con unos niveles de THC que oscilan entre un relajante 30% y un estimulante 34%, Coco Jambo es un faro de euforia que guía a sus usuarios en un viaje a través de olas de serenidad y vibrante alegría. Su aroma es una celebración de los sentidos; imagina el momento de euforia al abrir un coco y descubrir que rebosa de las frutas tropicales más suculentas.
🌻🚀 Consigue aqui tus semillas:
https://anesiaseeds.com/es/product/coco-jambo/
💡TS-3000 + TS-1000: se usaran dos de las lámparas de la serie TS de Marshydro, para cubrir todas las necesidades de las plantas durante el ciclo de cultivo, uso las dos lámparas en floracion para llegar a toda la carpa de 1.50 x 1.50 x 1.80.
https://marshydro.eu/products/mars-hydro-ts-3000-led-grow-light/
🏠 : Marshydro 1.50 x 1.50 x 1.80, carpa 100% estanca con ventanas laterales para llegar a todos los lugares durante el grow
https://marshydro.eu/products/diy-150x150x200cm-grow-tent-kit
🌬️💨 Marshydro 6inch + filtro carbon para evitar olores indeseables.
https://marshydro.eu/products/ifresh-smart-6inch-filter-kits/
🍣🍦🌴 Xpert Nutrients es una empresa especializada en la producción y comercialización de fertilizantes líquidos y tierras, que garantizan excelentes cosechas y un crecimiento activo para sus plantas durante todas las fases de cultivo.
Consigue aqui tus Nutrientes:
https://xpertnutrients.com/es/shop/
💻 Trolmaster Tent-X TCS-1 como controlador de luz, optimiza tu cultivo con la última tecnología del mercado, desde donde puedes controlar todos los parametros.
https://www.trolmaster.com/Products/Details/TCS-1
📆 Semana 5:
Comienzan a formarse los cogollos, las hojas se llenan de resina cada dia y el olor es bastante fuerte. Parece que ha terminado de estirar. Practico una defoliación intensa para airear los futuros cogollos y dejar mas espacio en el cuarto de cultivo.
Agrupo de nuevo las macetas en su lugar optimo para asi rellenar por completo la carpa @marshydro.
Me quedé algo corto de nutrientes pero estoy muy contento con los resultados, cada vez le voy encontrando mas su punto optimo. Siempre es mejor quedarse corto que pasarse.

Likes
30
Share


@PapasGrow
Follow
Kosher Haze is what it says, kush and haze, very resinous buds. More leafy and less dense buds but long colas full of frost. Effect is powerful, euphoric, longlasting. Amazing taste of sweet berry.

Likes
3
Share


@JeyGanesha
Follow
Quarta settimana di fioritura anche queste runz layer cake sta venendo very strong 😂🙏💪

Processing
Likes
7
Share


@vertex8
Follow
End of week 6, start of week 7 now, going to be flipping today, all the plants are very healthy, deep green with no signs of any issues, the net is mostly filled out and should hopefully get near full coverage by continued tucking through nthe stretch period.
The food has been switched to base nutrients better suited for flower, will be using big bud and overdrive from the advanced line.
Wish me look on the next phase 😀

Likes
5
Share


@ReggaeShark_420
Follow
Day 65 and she looks sexyyy! Love how this girl thrives in this chilli conditions. She is realy showing some naughty purple pink colours on her booty. Will be starting to flush this girl this week. Real keen to see how she gonna end up. Always new you can go wrong with real OG from Fast Buds, tested her with a few thins and boyy she is a strong. Definitely gonna play around with this girl a fe times😈

Likes
24
Share

@BunnyBud
Follow
This week starts well, I haven't encountered any particular problems except for slower growth compared to an 18h or 24h, 100w 16h a day makes growth slower, after all you learn from mistakes, we'll see how it continues 🍪💐❤️
Likes
22
Share


@NanoLeaf
Follow
End of Week 7
CO2 is definitely increasing growth rates but also changes the game with controlling your environment now that it has to be sealed in order to not waste CO2 unnecessarily. You change one thing and it adds many other variables to keep everything in check. I am learning everyday and that's why I grow.
The trellis net is doing its job and the canopy is looking nice and even.
I also added a soil top-up and top dress of some BioBloom and Mycorhizae so it can start breaking down before I flip to flower next week (Slow release dry organic amendments). And the ladies are using up nutrients in the soil much faster because of the added CO2 (another variable to take into consideration - faster growth = faster nutrient consumption)
In detail:
-Carefully removed trellis netting
-Ammended each plant individually with my soil mixture and nutrients
-Placed them back in the tent
-Reinstalled trellis netting and trained the ladies to shape
Pest Report:
Thrips VS Ladybugs...
I decided to fight fire with fire - I purchased Swirski-Mites from Koppert (They are beneficial insects that feed on the eggs and larvae of thrips and other unwanted pests). As for the adult thrips - I got very lucky and found about 10 Ladybugs in my garden and decided to introduce them into my grow room as they will feed on adult thrips and any other unwanted pests.
I did not spray any insecticide this week and it really seems like the ladies are happy with my new method of bio-warfare and are wilting less and less often

Likes
11
Share


@CanadianFillmore
Follow
08/25 dry weight came in at 157 grams. Very happy with the second round grow of GG4, she produced a lot more bud with the extra veg time. While I enjoyed this strain, I am moving on from her, to other strains.
Thanks for checking out my grow! 👽🌳🔥💚

Likes
3
Share

@ThatsmyGrow
Follow
🌸 Week 5 – Gorilla Cookies Auto Pheno Hunt
Another week is done and the differences between the phenos are becoming more obvious with every update 👀🔥
Now that flowering is progressing, each phenotype is starting to show its own character much more clearly. Even though all plants are running under the same conditions, their reactions are very different.
📈 Current observations:
Some phenos are handling irrigation and feeding extremely well and continue pushing strong growth
Others are showing a bit more sensitivity and reacting differently to the same watering routine
Leaf size differences are becoming huge now — some phenos are producing massive fan leaves while others stay much more compact
Plant structure and overall vigor continue to separate more week by week
At this point, 4 out of the 6 phenos are currently looking like strong candidates and fall into what I’d personally consider the “good” category so far 👀
🍃 Maintenance & feeding:
I’m still managing the canopy and keeping an eye on how each plant develops through early flower. Small adjustments and observation are becoming more important now as every pheno responds differently.
📊 Current environment:
Temperature stable around 26°C
Relative humidity staying between 63–65%
VPD maintained around 1.3 kPa
Light intensity unchanged from previous adjustments
Now I’m especially excited to see how the buds start forming over the next weeks, because that will probably decide which phenos really stand out in the end 🔥🌸
The structure is there — now let’s see who delivers when it matters.
💬 Which pheno do you think will end up producing the best flowers?
Likes
4
Share


@Kelly420
Follow
Girls look amazing. Buds fell over from the weight . Going dark for 24hours and then chopping. Will update with final numbers on the scale and the harvest pics.

Processing
Likes
22
Share


@Hawkbo
Follow
These have been growing kind of slowly but I got the temps up a little this week by adding some extra light and am getting vpd dialed in. These will only be in this tent for a few more days I am just starting to harvest the main tent so once that is done they will be moved to the Gorilla Grow Tent and put under the new Growlightscience LEDs so we can see how the perform full cycle. The autos will have to get moved back into this tent once I flip the main tent but the photos will prob need a few weeks of veg before that happens. Been doing foliars with the Growzyme from greenbuzz as well before lights out every other night which seems to make them happy. I think theyll take off over the next couple weeks.
Processing
Likes
56
Share


@Zannabis7
Follow
Day 12 of organic grow and all is well. Seemed to have dialed in the conditions and able to keep good air movement, CO2 levels, and consistent temperatures/humidity with the ThruWall Closet Fan (Model TW108 ), and the Holmes Twin Exhaust/Intake Fan (Model HAWF-2041). Humidity is maintained with a Lovoit 6L Ultrasonic Programmable Cool Mist Humidifier (Model# LV600HH). Added a SCROG screen (just a cargo net) and bought the Sample Pack of organic nutrients from Nectar for the Gods (just pay shipping and they will send you the sample nutrients - check out the website). People say their line of nutrients make the buds smell and taste like no other! I have always been an organic Earth Juice nutrient guy, so I am going to experiment with combining the two.
Lights are on 24/0 and she has tight internodal spacing with good vertical growth. Room that closet is in is beginning to smell skunky at times, and like diesel at other times. Will begin light organic nutrients with next watering. If you made it this far, please check out my other autoflower grows.
Day 13 - Watered today with very low strength nutrients added. - Zannabis7


Likes
20
Share


@caliEskimo5
Follow
After exfoliation, leaf spot has virtually disappeared and main cola has really put on weight. Flowers are also growing much more densely than with my dwc grow but the blueberry pine diesel smell isn't there this time around.
I have also been fertilizing quite high this week, double strength because soil gets completely dry in under 24hrs and I'm not seeing any lockout or toxic signs.
9/15
Started flushing despite last dwc with Jack grow went 12 weeks. Bud was potent but lacked odor.

Likes
10
Share


@Northern_Ent
Follow
July 14: the double skunk seems to be going well with one plant now on track to circle the rim of the pot nicely.
July 15: single skunk wasn’t doing much so I don’t want to top it and slow it down further. So, I just tied it down instead.


Likes
11
Share


@Lifesgarden420
Follow
Great genetics with the best nutrients always produces awesome results
Every harvest continues to get better
These ladies are healthy and happy


Likes
3
Share


@Farmerbry71
Follow
Day 14 increased the light to 75% strech is slowing down tons of tops on yhe front plant very fast bug growth
Likes
90
Share


@DreamIT
Follow
🍊🏵️ Red Mandarine x9 SoG X ViparSpectra XS1000🍊🏵️
🏵️3.5 ...
🏵️4.5 ...
🏵️5.5 All regular for these sweets. They shouldn't stretch much longer except when flowering. Maybe I'll have to raise the lamp a few more centimeters 😆
🏵️6.5
🏵️7.5
🏵️8.5 Someone stop them !!!! 😆 They have stretched a lot, I hope we fill with little flowers. They are the last plants grown with this method, I hope they perform well. defoliation tomorrow before entering the fourth flowering. You also start to see the red color * _ *
🏵️9.5 AR unicorn style 😆
_________________________________________________________________________________________
❓ Are you new to the world of the cultivation and don't know where to safely buy your seeds?
😮From SweetSeeds you can find award-winning, sweet, fast, fragrant, beautiful, and delicious genetics !!!
✅http: //bit.ly/SweetSeeds_
_________________________________________________________________
👀 Are you looking for a good lamp to start with? 👀
🌞Viparspectra has something more than the others, take a look at their site.
✅ https://bit.ly/ViparspectraXSSeries
⏩ Use "GDVIP" for an extra discount or "DREAMIT" for an extra 5% discount
👀 Search for it on Amazon
✅https://amzn.to/3ttb2j9
⏩ Use the code - lt10gdvip - for an extra 10% discount
👀 Watch my ViparSpectra XS1000 unboxing on YouTube, leave a like and write to the channel 🦄
✅http://bit.ly/UnboxingViparSpectraDreamIT
__________________________________________________________________
📷🥇 Follow the best photos on Instagram 🥇📷
https://www.instagram.com/dreamit420/
🔻🔻Leave a comment with your opinions if you pass by here🔻🔻
🤟🤗💚 Thank you and enjoy the growth 💚🤗🤟
