
Likes
Comments
Share


@Smokwiri
Follow
Welcome to the 1st week of my Anesia seeds - Elementz diary.
This one started to rise from the soil yesterday, took some pictures today. Looks nice, planning to wait a bit more before transplantation so the root system can grow bigger.

Likes
1
Share


@GoodBudz
Follow
Pineapple Express was an exciting plant to grow. It grew fast and stretched nicely.
Purple Kush was just a runt. It did not like the hot climates from the previous week but grew it out anyway.
By weeks end was feeding Remo's full flower lineup.
Pineapple - 8ml per 3800ml Ph between 6 - 6.1
Purple - 5ml per 2000ml Ph between 6 - 6.1
No change in light scheduled as with Auto's they do not require the 12 hour darkness period to flower.
**Spider Farmer lights generate a lot of heat.


Likes
14
Share


@GODSGIFT_2005_JM
Follow
For LIQUIDS & NUTES ******GREEN BUZZ NUTRIENTS***** organic.
Also i’m using their LIVING SOIL CULTURE in powder form!
MARSHYDRO ⛺️ has large openings on the sides which is useful for mid section groom room work. 🤩
☀️ MARSHYDRO FC 3000 LED 300W
💨MARSHYDRO 6” in-line EXTRACTOR with speed-variation knob, comes complete with ducting and carbon filter.

Likes
Comments
Share

@hassehujasse
Follow
Clipping from HASSEGorilla Auto 28 days Twice topped, main lining, HST, LST ,Every ST)
Hasse style 70/70 box 7 plants
Likes
9
Share


@RadDad
Follow
Flowers are starting. It looks like I got about 5 or six bud sites. My first serious attempt LST has worked this plant is slaaaanty.
Started boom nutrients this week too. Hoping for some fat buds.

Likes
49
Share


@Chucky324
Follow
Hello. This is the end of week 8 and the beginning of week 9 of flowering. This week I will start flushing for 2 weeks.
The breeders description said 8 to 9 weeks of flowering, But I found I like to grow everything to 10 week of flowering. I find I like nice mature buds a little past, what some people call, prime conditions. Now that I have a number of flowering areas I might put 1 to sativa use and start flowering 12 to 18 weeks or start some sativa at 12/12. But first I have to get through about 1 1/2 years of bought seeds I have sitting here all 10 week of flowering or less. I would like a good stable of prize females, and then I'll start making my own fem seeds and seeing what new strains I can come up with.
The smell is mostly citrus now with some earthy/watery undertones.
Keep Growing Straight. Chuck.
Likes
11
Share


@MilkyMisty
Follow
They're coming along really quickly they're on week 2, the custom strain I have in here I crossed the sherb tree from the plug with EL chapo and this plant looks amazing and smells like cherry refreshers platinum Z is also looking very nice with a lovely sweet watermelon with a hint of diesel and they really do stink even though they are weak 2 getting excited already haha, they all look very good so far,, I did have 25 but a few of them looked quite sick and a few abnormalities and they really didn't like the feed I was given them so the one's got eliminated and I am now left with 15 of the ones I like, this small room is just for my testers before putting them in main room, the LED that is running is lumatek zeus 600 pro, this is my first try with LEDs I've always been HPS but I'm definitely turning my head towards them as these ones are shooting up and look very healthy, once this run is done if I feel that it comes out better with LED I will swap out all 6 lights in the main room and replace them with 4 LEDs, I have some sherb tree x meringue from Dutch passion, running concurrent I will try and get another diary going with them they are awesome. Thanks 😊


Likes
6
Share


@Fuego19Drippz17
Follow
I’m happy to be here at this point. Hoping In these few weeks these ladies start to thicken out. Sundae Batter is sticky sweet as hell. Bubbles smells so good, just stomping up my nostrils.

Likes
23
Share


@elementhc
Follow
The 2 GSC extreme and one of the GG4 got harvested this morning Dec 20th.
The rest are a week or two behind.


Likes
28
Share


@BillMonroe
Follow
I skipped a week cause it just keeps growing and swelling. A few days ago the branches started falling over. I couldn't find half the plant. So instead of ignoring it I decided to stake this plant up.
Great smells, definitely seems like a winner.
Other plants will have a hard time competing against this blue cheese.
Earlier this week I let this plant dry out for a day to stress it a little.
The yellow leaves are from too much light and the drought stress.
I expected similar heights from the plants but as you can see the difference is huge.😊


Processing
Likes
39
Share


@GreenHouseLab
Follow
Harvested Z1 (Zkittlez 1) at 95 days and Z2 (Zkittlez 2) at 90 days, At week 11 the trichomes were 90% milky with 50% orange pistils. They both received a minimum 2 full water flush, what I mean by that is a good 20% runoff to get all that built up out of the fabric pots.
Note to self. 7 Gallon pots were unnecessary for these autos, 5 Gallons would be more than sufficient possibly even 3 Gallon.
I believed the yield would be more considering how dense these buds are. I had forgotten Z2 had been massacred throughout this grow, unintentional topping as she was starting to flower and the carbon filter which fell on the plant damaging the top bud and other smaller bud sites. Taking these into consideration and after weighing Z1 I am very impressed by Fastbudz genetics especially under 13 weeks! I added a video of Z1 & Z2 dry weight to show transparency of my end results for this grow. I think better internodal spacing could allow for better bud development hence a better yield. Overall extremely pleased.
Z1 = 97gr
Z2= 61gr
Density of Buds: 10/10
Resin: 9/10
Smell: 10/10
Dry Time and Cure for Smoke Report: 6 days (are now placed in Masson jars open lid for the next 2 days then 30 min x2/day) at Relative Humidity 60% // Temp: 72° F
Smoke Report : High THC can be felt but not overpowering. Easily tell its heavier on the Indica side - will only know for sure once I try Zkittlez pheno 1.
Curing will take some time. Generally I find 8 weeks minimum tends to give me a good quality product. I will be burping the mason jars twice a day for the next 2 weeks or so and add a 58% Bodeva pack. I prefer 58% vs 62% because I tend to use a Pax vaporizer.
00

Likes
38
Share


@Ukfarmer420
Follow
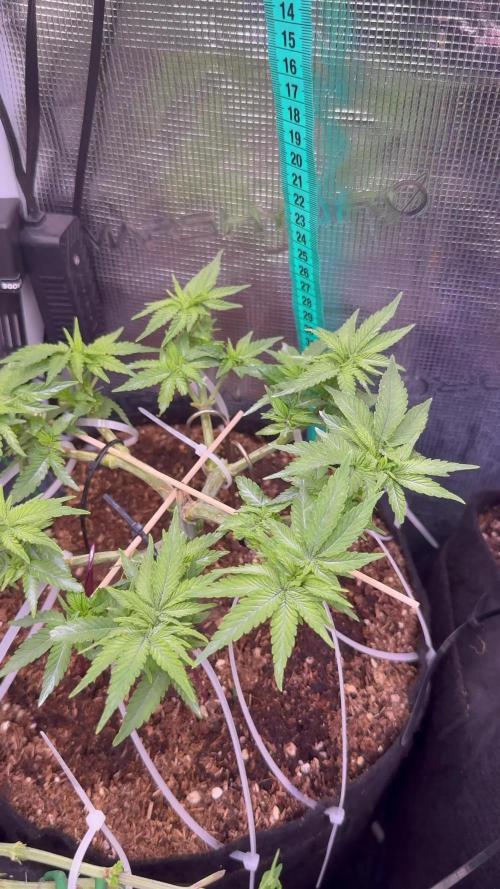
Hi guys week 3 now, not much going on, they have grown massive in a week and since being repotted, I started lst today I will let them grow a bit and keep tieing the nodes down as this needs to be a long veg.
Happy growing guys


Likes
20
Share


@BudXs
Follow
Geurilla set up because it is ultra important that my neighbors, wife, police dont find it
Gravity fed drip system feeds mini hempy buckets. Continous drip, bucket takes about 35 hours to drain. This will be a mostly video based diary going forward.
Contest or not, I challenge all to this fun solo grow.
This strain is a favorite of BeanswithPork and was gifted to me in December 2019. I checked the seeds for mites
Follow along and see if I dont get busted
Likes
27
Share


@RDWCGrowing
Follow
5/30/2023
Week 8- Day 1 of Flower (Day 117 overall)
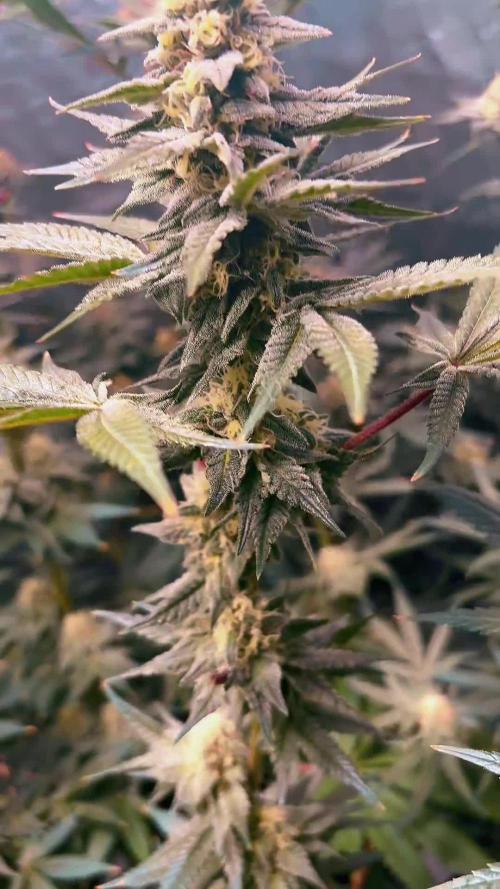
So two of the buds in the back fell over, it was definitely because they are getting heavy, I had to pick them up and tuck them in to the net to help support them they were so covered in Resin that I had to use Rubbing alcohol to clean my hand was so super sticky from touching the bud will have to use gloves from now on if I need to touch the buds. Other than that I sat back and got to watch the ladies grow.
5/31/2023
Week 8- Day 2 of Flower (Day 118 overall)
Just watched them grow today.. :-)
6/1/2023
Week 8- Day 3 of Flower (Day 119 overall)
I noticed on two of the bigger Fan leaves small signs of Calcium Deficiency so I fixed my Chart to up the Cal mag from .5 to .75 for the water change on Saturday.
Other than that I let them keep growing on Auto Pilot, frost is everywhere including all the way ont the Big fan leaves this strain is super Frosty...
6/2/2023
Week 8- Day 4 of Flower (Day 120 overall)
Auto Pilot engaged today.. Growers Hands stayed away just looked and apricated the beautiful buds that are forming. Tomorrow Water Change day!
6/3/2023
Week 8- Day 5 of Flower (Day 121 overall)
There were a couple of sucker buds right up front today so of course I had to get rid of them. Other than that Water Change Day.. Drained and reset the system. Since I am taking this to 10 weeks Week 7 and Week 8 Nutes repeat.
I took a couple of shots looking up for those that like stem action.
I added 36 gallons
Mammoth Silica = .5Mil/Gal= 18Mil
Root DRIP = 1Mil/Gal= 36Mil
CalMag= .5Mil/Gal= 18Mil
FloraMicro = 3.8Mil/Gal= 137Mil
FloraGro= 2.8Mil/Gal= 100Mil
FLoraBloom= 4.6Mil/Gal= 166Mil
LiquidKoolBloom= 2.5Mil/Gal= 90Mil
TPS SIGNAL= 4.0Mil/Gal= 144Mil
ORCA = .5Mil/Gal= 18Mil
Water Temp= 71.2
Tent Temp= 76
6/3/2023
Week 8- Day 6 of Flower (Day 122 overall)
Auto Pilot.. I did nothing but look in and enjoy the beautiful ladies.
6/4/2023
Week 8- Day 7 of Flower (Day 123 overall)
Auto Pilot Day 2.. Just watched them be beautiful.. I did want to get a picture of where they stems meet to make an arch I thought it looked really cool and would be a fun pic. I also wanted to focus on the color differences between the two. I am amazed between this lightside/darkside, yen/yang, thing going on in the tent.. Plant #2 is decidedly bright green, like more light with hints of yellow throughout, and plant #3 leaves are getting darker and it has hints of purple coming in throughout the buds. It really is an amazing and fun contrast especially with the name Yoda Soda to have a type of light side/ dark side theme going on with the Two plants.

Likes
91
Share


@CANNASIM
Follow
RQS . STRESS KILLER AUTO CONCLUSION BEFORE HARVEST.
Harvest time is here, choose to do a final post with how the girl looks after the final flush, so enjoy.
If you are looking for a super resistant strain and easy to grow functional medical strain this is the one.
She was given tap water, and used flawless finish for 6 hours then flush again, 2-3 times in this two weeks, expecting top shelf from her.

Likes
2
Share

@Ninjabuds
Follow
It’s day 43 of flower! All of the plants look great! I’m going to start dialing back the light intensity slowly over the next couple weeks. Harvest time is getting close

Likes
148
Share


@BioBuds
Follow
She seems to thrive in the new soil, I'm checking her regularly because of the darker ridged leaves, could I have overdone the bloodmeal content? It should not have overfeeding effects with organic super soil. But we'll see.
The FIM seems to have taken hold with her and today I started training, although it is more main-lining.
For this, I just used some microwaved bamboo from the garden. Now we go towards flowering and I'm getting more excited after the first few weeks were a bit sad.
Some of you might have seen my super soil recipe in my other grow, the Orange Hill Special, if you didn't, check it out here in the images!
I designed it out of frustration that products like Fox Farms etc are not readily available in Europe.
Those who saw my Gelato Monstercop grow, know that soil was pretty good, that soil became the base for this recipe, amended with some organic precursors to make it less dependent on feeding and after amending.
I would recommend amending some before flowering starts without the bloodmeal.
Hope you can use it!! Thank you very much for checking me out again this week!
Hapy growing and big hug
BioBuds and Sunshine


Likes
6
Share


@Young_agronomist
Follow
28.03.23- одна из девочек северного сияния в горшке 3 л начала цвести , вторая же из горшка 10 л активно ростки и не планирует останавливаться и получает лст до начала цвета .
Обе получают раствор ппм 850 и пш 6
Только для разных стадий !
Ждем дальше ❤️
01.08.23-обе девочки развиваются и кушают 👌🏻
Растение в 3 литра горшке активно цветет и получает раствор на цветение 850 ппм short flowering ph 6
Вторя в 10 литров горшке продолжает активно вегетировать получает раствор grow 850 ppm, ph 5.8
92.08.23-Обе девочки значительно выросли , та что находится в горшке 3 литра активно цветет и получает питание для цветения ! Ее размер примерно 40 см и она продолжает почти лол 😜
Девочка в горшке 10 литров набирает обороты в вегетативной стадии и получает лст ! Надеюсь она будет гораздо больше сестры
06.08.23-31 день жизни двух сестер !
Одна из них , та что в горшке 3 литра активно цветет и привыкает 60 см , вторая в горшке 12 л только вошла в предувет.
Обе выглядят очень хорошо и получают полную дозу раствора greenhouse feeding short flowering 1000 ppm,6 ph.
Сток стабилен и под контролем
09.08.23- Растение #1(в горшке 10 л) продолжает расти и получает лст тренировки , приобретая огромный размер . Растение #2 (горшок 3 л) сильно вытянулось и продолжает цвести .
Обе получают разное питание для своих стадий развития .
