
Processing
Likes
Comments
Share


Likes
4
Share


@MasterKush714
Follow
07/09/2024 Week 7 Update!!!
Yooo what's good gang update!!!
What's good gang, we pushing into week 7 now and the girls are doing great, chugging along trying to get them to even out at the canopy level nutso let's see!!
07/11/2024
Yoo gang what's brackin!?!?👹
Soo they girls are coming along, gotta do the water change Sunday and gunna hit the Rez with that CropSalt drop on em!!! Stay tuned training is in full effect tonight will update lessgooo!!!


Processing
Likes
3
Share


@Dico29
Follow
Day 120
Smells good buds are fatter and looking better then I thought last week, I flushed but I think I may have caused nutrient burn or nitrogen since my stems have turned purple also along the buds and tips or ideas of what I should try thanks
Day 127 photos at the bottom

Likes
8
Share


@Farmer1
Follow
Greetings growers,I took the two girls out of the greenhouse because it is getting very hot, they will finish flowering outside. Both are starting to produce beautiful compact flowers that are getting bigger every day. Starting to smell very good around here.😎

Likes
49
Share


@masterofsmeagol
Follow
8/15 Yesterday the girls finally got some sun. They're flowering. Like crazy. I do need to do an application of BT once this rain stops. It just started up again. Went back over and things were dry. I decided to hold off watering until tomorrow when I feed.
8/16 Watered the 50 2 gallons, 10 1 gallon, and the rest about 1.5 gallons. I fed a pint to the ten, 2.5 pints to the 30 and 2.5 pints to the FIMMed bluecheese that looked hungry. This way I can tell if they can handle larger doses. I'd like to keep it as small and simple as possible. Gave me a fright this morning when a sheriff pulled in while I was feeding. He was on his way to a neighbors but it looked like he was just admiring things lol. I'm all legals there's no problem there. I put off spraying BT last night because dad had a couple ppl drinking and I didnt want to interact with them. Plus it was to early. The sun hadn't crested the barn yet. At least now u know what time to go spray. I'm finding some lady bugs and I killed my FIRST aphid of the season. I still have caterpillar holes in some leaves though so I might as well hit them with the BT (even though I actively hunt them). No one ever said growing cannabis is easy. Oh and my soil must be BANGING because I found some mushrooms growing in it and like a mycelium web which is awesome.
8/17 This was a quick morning due to an upcoming doctor's appointment. Removed some grass that had grown on the tar from spilt soil as it had diseases on it. I don't want that spreading to my plants. I have one blueberry cheese that I FIMed with four cola's that doesn't have as many leaves and has dropped a few leaves but looking at ot from the other side it doesnt look as open. I know that these girls are transitioning and this is the time I lose leaves. However some plants still seem totally green with no problems despite flowering. I'm wondering if it's a specific phenome thing. I also noticed that the caterpillars are still there and this morning would've been a great time to apply BT but I didn't have time and since I upped the feed I didnt want to do two things at once and have a problem and not know what it is.
8/18 Rained overnight. Plants were soaked. It's not raining now. Plants are definitely overwatered. I'm losing a few more leaves that are yellowing on the bottom interior of a couple plants. Some of it could be from the transition to flower ir the large amount of rain we've been getting. At least my drainage is really good. I need to pull the fence out and co soder cutting a pallet I. Half to better utilize space. I know I say this stuff all the time and I'm not sure it NEEDS to be done. What DOES need to be done sooner rather than later is to apply BT. I can see the damage from them. It's not bad but I want to avoid botrytis as much as possible so those pillars have got to go. Otherwise I've never had plants this healthy and it's been a real ahotty season. Boy those 10th planet's are all mice and green and healthy looking. I'm really looking forward to flowering these strains and see what they can do. I'm already greatly impressed with what I've experienced so far. UPDATE: Wasn't raining earlier then it Rained off and on but just a light steady rain that plants love but it's 3:30 now and it's pouring. Guess I won't be applying BT tonight. We need some sunshine but unfortunately I can't control the weather. Just sitting here thinking I was wondering about using Plant Doctor preventatively just due to the steady rain but I noticed mushrooms growing in my soil and since I haven't not9ced any type of fungal problem I'll revisit that idea another time. Polycarbonate roof or even some form clear plastic and a rough frame of pvc or extra lumber. Theoretically I believe I could move them all indoors for a little bit if need be but that would he a huge pain in the ass. Honestly I've got great drainage and my watering seems pretty good so I might be alright doing nothing. We shall see knock on wood.
8/19 Plants were soaked this A.M. I took a video and uploaded it (which takes forever). It's sunny though today and after the sun comes out after a period of rain the plants grow like crazy. Everything is flowering nicely. I think I can go to the end of October. I talked to a lady today that said she'd already harvested some of her peanut butter breath clones. It's my buddies mom and if you look back at one of my diaries NY mendo breath was done in September. These girls have a ways to go but the are explosively flowering which is good. It's easy to tell which strain is which. Pheno's vary but the flowers on the plants are easy to distinguish from one another. I've also never had plants stay this healthy green this long! Previously I'd have multiple pests, wpm and maybe septoria at this point. I think I've upped my game. Knock on wood. My worst problem now is worrying when to spray BT for the miner caterpillar problem. I have wasps, lady bugs and a shit ton of birds from the 3 bird feeders. I see them dart in and out of my cage. Chances are I'll spray BT tonight and take some pictures if it's nice out.
8/20 The sun is finally out. Bags are still heavy. Looks like it Rained again. I found caterpillar shit so I REALLY need to get that BT applied. I also saw minor damage to a budsite on a low hanging branch. Looks like those fucking earwigs bur I'm probably being paranoid. I also had to remove the rope that I was using to support "the big cheese" because with all this wind and rain it "rubbed" against the stem and caused an injury. I don't need that now anyway with the trellis up. Bids are developing rapidly and stacking up nicely. I have a couple plants that aren't as green as the others bit it may be do to all the rain we've been getting. I think I need to increase the volume of liquid i give my plants when I feed. Next feed I'll be doing at LEAST a quart. Due to my w8fes illness I haven't been able to spend as much time there as I should. No fungal stuff "YET". I have seen some leaves that show the plants have been over watered. Drainage is good though. I forgot to upload the video from this morning and it's uploading super slow so I'm gonna have to upload it tomorrow
8/21 Awesome. Went to town and left without going to my doctors appointment. Good job man. 👏 ANYWAY....My phone was dead when I went to town so I coukd only upload one video. I'll have to do the others later. I mixed up a batch of bt 1 tablespoon with half gallon of water (as that's what this hand mister holds. I went around the cage and sprayed every angle. Then I went to each individual plant and sprayed while spreaking the branches to make sure I got the interior. I used almost the entire half gallon so I'm hoping this will help. Bags were heavy but doesn't take them long to dry out. I'm wondering if the yellowing that is moving up (on the small purple punch and the one in the tote) is because they need more nutes, they're transitioning to flower and really stacking up or because they've been over watered with all this rain. Opinions are more than welcome. I'll check the girls tonight and if the are wet enough I'll feed and at a higher volume. If they aren't ill wait till they get their full water.
MY WIFE WAS HAVING AN "MEDICAL PROBLEM AND SO ON THE WAY TO THE DOCTORS I CHECKED THE PLANTS. THE 10TH PKAMETS WRRE DROOPING. I QUICKLY MIXED UP ENOUGH TO FEED EVERYTHING AT LEAST A GALLON AND THEN GAVE THE ONES THAT WERE THE WORST LIKE AN EXTRA HALF GALLON. JUST ENOUGH TILL WE GET OUT OF THE ER THEN I'LL GIVE THEM THE OTHER HALF OF WATER AND ILL FEED THEM. AT LEAST MY WIFE IS OK. UPDATE: Took my wife to the hospital. They did a shit ton of nothing which is par for the course. However, luckily for me (yeah right) I got back early enough to give the plants another half gallon of water each and then I fed increasing the volume to 2.5 pints (upping the big bloom to 3 tsps per gallon) but I ran out of feed on the last plant. I only mixed up two gallons and it was super dark so thar one container plant will need to be fed tomorrow I guess. This is masterofsmeagal signing off to fucking FINALLY get stoned!


Likes
8
Share

@CalGonJim
Follow
4/13 11AM MONDAY RQS Gelatto 44 and Punch Pie Tyson 2.0 are Finished!!! I will let them go a couple weeks longer but they are good to go! 9/10 Srong, good in coco/ no problems at all!
MONTEL DREAM WIDOW 11/10 ANOTHER WINNER!! So much resin, AMAZING BUDS SHAPED LIKE SPIDERS...SO GREAT. My ICE t is a little small, I didnt have enough space so she stayed compact and perfect small. Bubbles, Julinan and Ricky are doing better than ever
4/14 4:09 AM I just had an idea flash for my next grow so I need to make some notes. I have a cutting I took from a gorilla gas F1 fast flower by seedsmen I did it last year. I took the cutting when she was in flower. I put her in an organic grow plug that I got from seats man as well and I tortured her and I forgot to water it and I left it in there and then I put her in 1 gallon and I haven’t tried to do anything but she survived everything so I’m gonna grow her out into a full-size plant. I’ll probably put it in a bigger pot and do a small smaller grow not so many plants next time I think she’ll really be something.
4/14 1;23pm I turned the light up to 114 W and I’m just under 120. I’m trying to feel the driver and keep it cool so it doesn’t heat the room up. I have some plants in there that I didn’t veg right so they’re kind of screwed up and I have too many of them. I’m gonna have to take some down. The extra plants are preventing the better plants from growing so my experiment making my own seeds, it actually worked, but it’s still not as good as getting it from the actual breeders. And I have a series of medical problems that disable me for several days at a time so plans not look good and then I get behind a little bit so that.


Likes
17
Share

@StonedSteve
Follow
Zdarec všichni✋
tak je to tady, dnes po 92 dnech pěstu, 13.7. proběhla sklizeň.
Co k tomuto growu říct, nebyl náročný a probíhal hladce. Tenhle strain ''Major Toke''💪 můžu jen doporučit, je hladovější na hnojky hlavně na CalMag😏, krásně voní, vyhovuje mu když se na něj minimálně šahá (kromě nutné defoliace a nějakýho toho přeložení listů nic víc nepotřebuje), na konci to všechno vrátí v podobě obrovských tvrdých palic. Nevím jestli jsem měl jen kliku na semínko, nebo je to tím že jsem na něj pražil 24/7, ale za mě tenhle mini grow 60x60 dopadl brutálně shout-out "Mephisto Genetics"
Tady je pár fotek a 1 video, zbytek přidám po usušení.
Speciální poděkování patří "Hombre_Seeds" ,kterej nám začátečníkům, ale i pokročilým growerům věnuje mrtě času na deníkách a nejen tam a taky všem na Discord skupině, kteří když je potřeba ihned a dobře poradí bez týhle berličky by to nešlo, děkuju všem a ať se vám daří.
Likes
3
Share


@SmileyMorgen
Follow
5/13/22 - 5/20/22
5/14/22
Today my Poison Zkittlez got her Zamaldaberry room mate to move out so that she would have more space. She is trying to fill this 4x4. I did some defoliation and leaf tucking today to help open up those inner branches.
5/16/22
Today my girl got some defoliation and her resivore topped off at 3 gallons needed after 3 days. She is doing great and her flowers are getting beautiful 😍
5/20/22
Today marks the last day of week 3 of flower for my Poison Zkittlez. Topped off her resivore 3 gal. Did some minor defoliation of some inner leaves.
Likes
16
Share


@Naujas
Follow
116 days!!!!! and here she is ready to reveal her inner beauty, taste, smell, and effect :)It was an amazing journey with @Weedseedsexpress, the girl was just amazing throughout her growth, she was satisfied with everything I gave her :) This is my first girl with such beautiful colors of leaves and flowers, she is simply unique :) Her smell is so strong that a day after she was cut and now, as I write this comment, I can still smell her aroma in my house, it is amazing, it reminds me of a big "party" :D So thank you @Weedseedsexpress for the opportunity, I will be open to your suggestions in the future - you are amazing :) and now I can't wait to taste her :) then I will provide her dry weight, stay tuned :) good luck to everyone :).
Likes
18
Share


@Luv2Grow
Follow
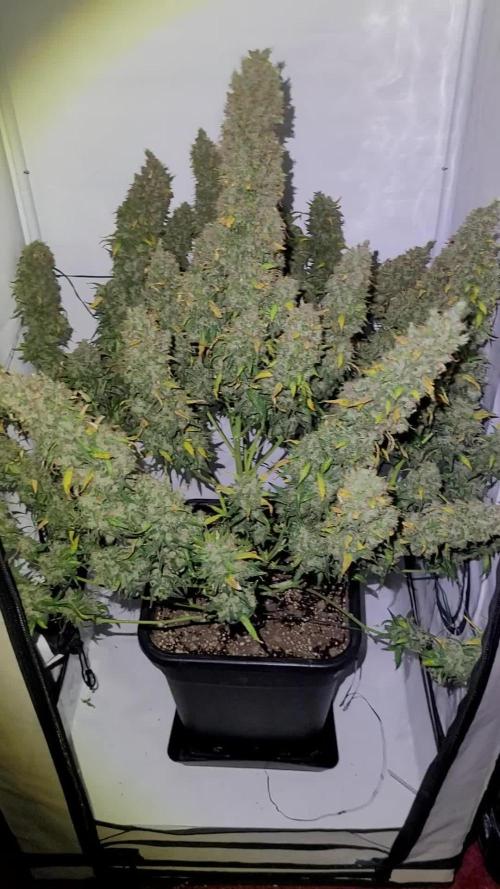
Day 65 - Starting week 10 and she’s definitely starting to fatten up a bit since lowering the lights for her. Already getting close to another round of water so most likely tomorrow, she’s drinking quite a bit lately.
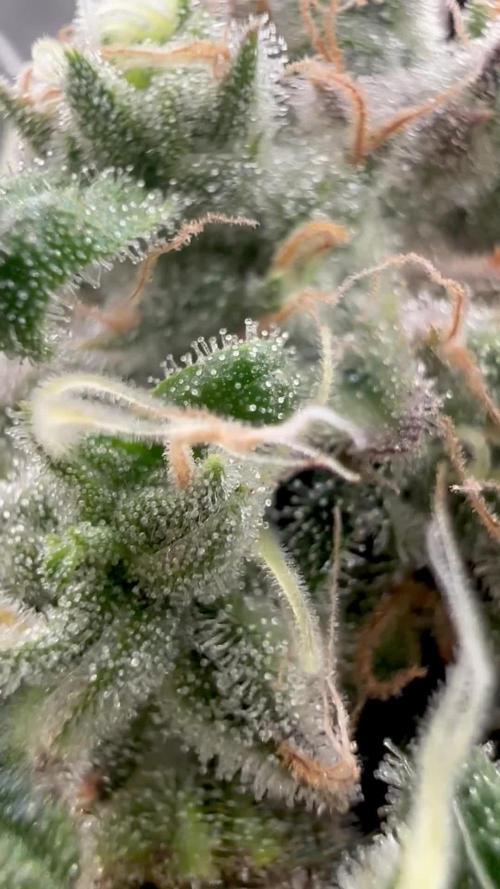
Day 66 - She was just about dried up already so gave her 2 gallons of plain pH’d water. Gonna start checking out the trichs soon, I’m thinking she’s down to about 2-3 weeks left but when the trichs tell me she’s done, I’ll chop her.
Day 67 - Not much to do with her today, just some updated pictures and checked out the trichs for the hell of it and still mostly clear with a few milky scattered throughout.
Day 68 - She’s gonna be ready for some water tomorrow, other than that, just been checking the trichs and tucking some leaves when I put her back in the tent.
Day 69 - She was ready for water today and thinking she’s got about 10-14 days left, I went ahead and started the flush according to the Technaflora schedule. So mixed 5ML of MagiCal and 80ML of Sugardaddy with 2 gallons of water.
Day 70 - Ending week 10 and she’s getting down to the wire. Still looking at about 7-10 days and everything is on track. Very few clear trichs in there, most are cloudy with a few amber scattered throughout.

Likes
14
Share


@GodZilla_Owner
Follow
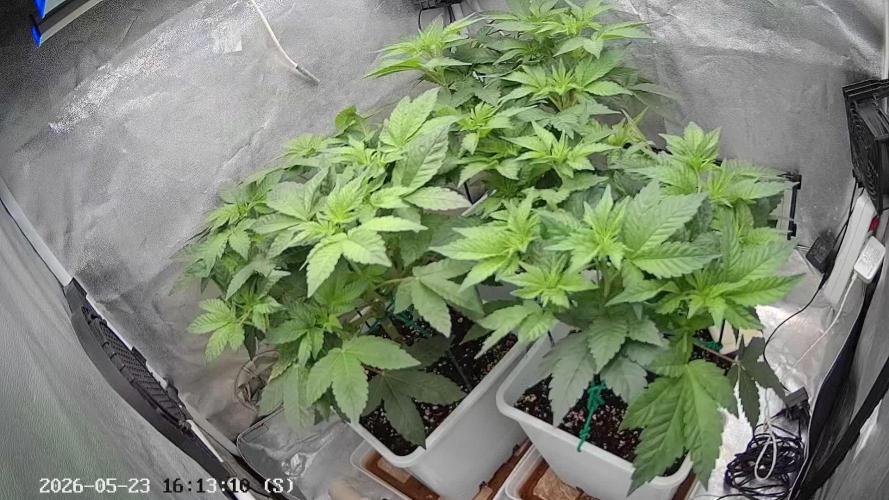
Please note that all three plants receive different fertilizers:
BioBizz#1 -- BioBizz scheme
GHF#2 -- Greenhouse Feeding Scheme
AN#4 -- Advanced Nutrients Scheme
Had let plants #1 and #2 dry out a little too much as you can see from some of the leaves.
Otherwise I am quite happy with the development so far.


Likes
69
Share


@nonick123
Follow
Día 23 (24/06) Las plantas ya van por el 6º nudo. Topping is coming! 😁
Día 24 (25/06) Topping time! Hago topping por encima del 4º nudo real. A ver como reaccionan! 🚀
Día 25 (26/06) Riego con 500 ml H20 pH 6,5
Han reaccionado bien al topping y las ramas inferiores se empiezan a estirar considerablemente
Hago LST a algunas de las ramas más largas
Día 26 (27/06) Las plantas llevan bien el topping. Pequeños ajustes de LST
Día 27 (28/06) Siguen a buen ritmo!
Día 28 (29/06) Riego con 500 ml H20 pH 6,5
Día 29 (30/06) Las dos nuevas ramas tras al topping empiezan a formarse muy rápidamente!
💦Nutrients by Lurpe Solutions - www.lurpenaturalsolutions.com
🌱Substrate PRO-MIX HP BACILLUS + MYCORRHIZAE - www.pthorticulture.com/en/products/pro-mix-hp-biostimulant-plus-mycorrhizae


Likes
13
Share


@einamio
Follow
Day 36 I guess I can call it bloom. Nice strong pistils shooting all over. She is the tallest so far making me raise my lights a little more.
Day 38 Now Californian Snow is the tallest :) Ztrawberry stopped at a perfect height, it looks like she's gonna develop into a beautiful lady. Fat white pistils all over 😻
Day 39 Happy girl got 2500ml cm bg bb bh 6.3ph ~1EC She is perfect, symmetrical, stopped stretching at about 50cm, flowers are mostly leveled, branches are strong, leaves point up unless I water. I think she's also turning purple. Beaut 😻
Day 42 I think I saw some burnt tips but she still looks super happy and healthy. The most vigorous plant I've had.
Processing
Likes
81
Share


@NugLife420
Follow
I am pretty excited. 🙂. They are coming along nicely. The ladies arms are getting more and more swollen every day. The stretch has stopped. I have done some more defoliation (can't keep my hands away from the damn scissors. Lol). I will update throughout the week. 😎

Likes
1
Share


@OldSchoolT
Follow
Been a while since updated this gyal
Just Sized her up to 20L , the previous wasn't enough
Going to let her settle in for a week or two maybe train her a little more too 👀, hopefully I will be able to afford a new light by then 🤧


Likes
132
Share


@Schnabeldino
Follow
📅 Week 8 | 🗓️ Days 50–56 – Start of week 9 | first signs of flowering 🌸
Day 56 - Papayton 🚀🏀
🔸 Very vigorous this week: broad, even canopy with lots of tops; the stem is solid with nice “knuckles” from training. Lower shoots are tidy – air and light are getting through well. Leaves are rich green, upright, and without burns. The first pistils are appearing at the nodes and tips – the transition to flowering has begun.
🔸 Setup: on 12/12 since day 50. With ~700 PPFD approx. DLI ≈ 30 mol/m²/day – ideal for stretch/transition. Maintain a distance of ~40 cm and adjust during stretch. Over the next few days, I will increase to approximately 900 PPFD.
🔸Biotabs & water only: continue as before. Keep pH at around 6.2, maintain even moisture (no hard drybacks). Only add more if there are clear signs of deficiency – otherwise, don't force anything.
🔸In week 9, small flower clusters should form; if necessary, lightly defoliate and provide support sticks/trellis so that the tops can start cleanly.
📈 Current Conditions
🌡️🔆 = 24°C
🌡️🌜 = 19°C
💨 Humidity = 60%
🔦 PPFD = 700 µmol (12/12)
🛠️ Setup (unchanged)
💡 2 x SANlight Evo 4 - 120 @ 80%
⛺ 120 x120 x 180 Spiderfarmer
🍯 Pots: 18 liter fabric pots
🌱 Soil: Bio-Bizz light mix
💊 Nutrients: BIO Tabs only water method
💧 Water: Tap Water 0,5 EC
🌱 “Easy, organic, only-water method. Save 15% with GDBT420. biotabs.nl/en/shop/”