The Grow Awards 2026 🏆 


Likes
Comments
Share


Likes
410
Share
@Rock_n_Roll_Randy
Follow
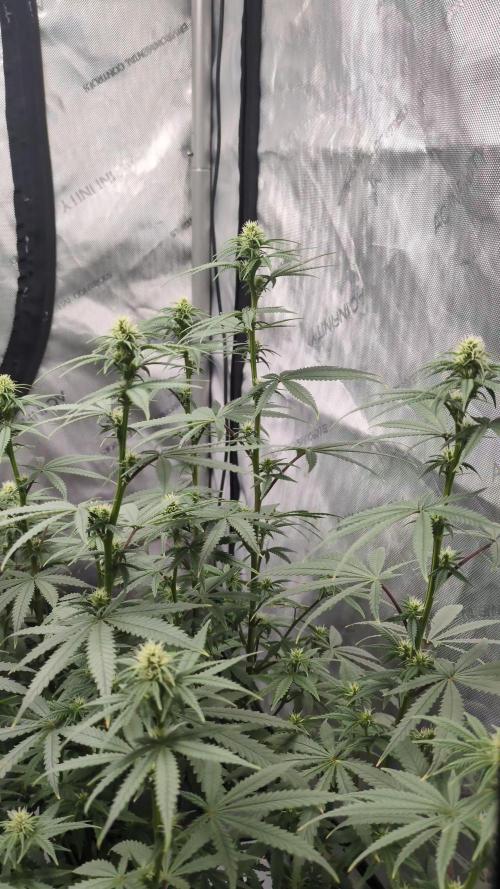
It's been 37 days of flower now and
The gals are still loving the fc4800 and their new 8x8 mars hydro grow tent as much as I do👍 leaves are sticking straight up towards the light. Love how easy the zippers are to open and close. Nice and strong and guaranteed to last. It has extra material on the backside of the zipper that helps for light leaksand enough ports and vents for anything you need in it👍. the tsw2000 is still going strong and is also a very good light. Its been going almost nonstop for 6 months and still working the same as when I got it👍. It really got my last grow extremely frosty and is doing the same so far for this grow. I'm very happy with every product I have gotten from mars hydro 👍👍There's not much heat off both lights but the fc4800 is alot cooler and the heat-sinks work extremely well. I have it daisy chained to the tsw2000 and 1 dimmer controls the other and i don't need to be reaching in too far to dim the other light, it's awesome and I can't wait to buy more lights to daisy 4 together👍. I would recommend this light to everyone that grows with leds and have trouble with temperatures getting too high. Even if you grow with HPS lights I think any mars hydro light is a MUST TRY. I like how heavy both lights are because I know it means they are built soild and strong 💪. Very good sign with the frost they are starting to get thanks to bith mars hydro lights. I can notice more frost under the fc4800 and I'm thinking it's from the UV DIODES they put on the fc4800 👍. 2 days ago they all smelt like my nuken, sweet marshmallows. But now I can smell the monkey dough and gorilla glue and skunk monkey coming through👍. I touched a bud on the gorilla and monkey fingers smelt like fruit loops👍 really pleasant smell. Lingered on my fingers for atleast 30 min. I'm glad mars hydro is under priced compared to some brands and for how popular they are. usually companies would charge more. Thanks mars you guys are awesome 🤘🥁🎸. I'm getting a new exhaust fan soon. An 8 inch that will work alot better than my 4 inch lol. Wayyy to small for a 8x8 Grow Tent. Dehumidifier is going almost non stop to try and get the humidity down. I love how both lights on 100% power only raise my temperature 2 or 3 degrees 👍. You can rest your hand on the lights and not much heat comes off them. Obviously there is some heat but for the brightness of the lights and only raising the temp that much is awesome 👌. And if I wanted to I could remove the driver from the fc4800 and run it on the outside of my tent because the cord is so long but 2 or 3 degrees is barely nothing👍. The girls are starting to bulk up abit now and only 3 weeks of flowering, these lights are awesome 👌. My last run of monkey dough and gorilla glue didn't start showing alot of crystals until week 4. These were only 2.5 weeks and I started noticing some frost. Next week I will be able to tell more about what these custom bred seeds will be like. I love how the smell is changing now. Didn't want all them to smell like nuken marshmallows lol. It's awesome that I can get right inside the tent to do any work i need👍. Even if I wanted an 4x8 tent. I'd rather this 8x8 because it's so easy to work with the plants and have so much room to move around and massive headroom when I'm in there chillin with the gals🤣🤘.
FOR EVERYTHING MARS HYDRO VISIT:
Www.mars-hydro.com
PROMO CODE: rocknroll
Instagram: @marshydropenny
https://youtube.com/channel/UChU5ZWwNi-DvnO3oWVU3ceA
Thanks for taking the time to read and check out my shit🤜🤛
GET THE MAX FROM MARS👍: Welcome one of the newest members of the Mars Hydro family🤜🤛🤘. The Mars Hydro FC 4800 480W LED Grow Light can accommodate up to a 4' x 4' area for flowering. It has OVER 2000 LED chips consisting of the best selling Samsung LM301B diodes which has a Luminous Efficacy of: 220 lm/W
0.2 W, 3 V mid power,
Osram 660nm Diodes, Infrared light and UV LIGHT👍. It boasts the incredible efficiency of 2.8 µmol/J, maximum 2.5gram yield per watt with 30% higher Average PPFD. This High-intensity spectrum is beneficial for plants at all stages - from veg to bloom, and creates Big dense Buds👍. achieve 50% higher yields & quality compared with the old lights! Only consumes 480W for 4x4ft personal grows, and 3x3ft for commerical grow. It comes with a dimmer and daisy chain function with a maximum of up to 15 lights, the master light controls the rest👍. Wide 6-bar design offers even & wide canopy coverage and can maximizes your grow space. slim 180° FOLDABLE DESIGN... YES I SAID FOLDABLE🤘🤣 , making it compact and easy to install, it's IP65 WATERPROOF and will give you no worries while growing in a humid environment and makes it a flexible high performance commercial grow light for enormous SUPER FROSTY yields.😛😛😛. MARS GETS EM FROSTY BOYS👍
AWESOME HEAT DISSIPATION: The Low energy consumption FC4800 growing light has 6 passive-cooled bars and an aluminum heat-sink a removable driver you can upgrade later or have it outside your tent. with zero noise you can save up to 50% in your electricity bill compared to HID's or HPS lights!
It also has a removable driver so you can upgrade it in the future or have it outside your grow space for better heat control in your growroom👍
UPGRADED FULL SPECTRUM: Yield Max Spectrum with enhanced red (Top-Bin Samsung 3000k-5000knm, Osram 660nm Deep Red), speed up blooming & fruiting, perfectly suited for full-cycle growing. The FC4800 LED grow lamp was born for Big Buds, perfect for commercial, grow tent, grow room, hydroponics, and all soil grows.👍
THE BEST SAMSUNG DIODES: THE FC4800 has Top Bin genuine Samsung Osram Diodes, combined with remarkable 2.8 µmol/J Efficacy, 30% higher Average PPFD, 50% less energy consumption, to maximize your yields. They give you a TRUSTED 3 years warranty 100% Satisfactory guaranteed!!!
The MARS HYDRO 8x8 Grow Tent interior is made of a unique diamond design mylar which is highly reflective. (Other companies mylar and reflective rate is as low as 50%, and it won't provide efficient light. They use thick 1680D oxford canvas, and being double stitched, it is tear proof and perfect for locking in the light. Their grow tent keeps 100% of the light inside the tent and helps your plants absorb more light. EXTRA-THICK material means No light leaks or rips at all.👍
Strong Stable metal corner adapters and poles are the trustful supporters of the tent. It's very sturdy, neither rusting or paint flaking off. quick and easy tool-free setup. They use heavy-duty metal zippers, with double layer black lining, by far the best on the market which creates a light-proof seal.
The Easy observation windows are made by double layers of cloth. Observe the growing conditions of your plants without opening the tent and avoid disturbing your plants. The observation windows also serves to dissipate heat and ventilate the air.
The tent includes 2 removable waterproof floor trays to hold soil and water. The removable tray can be taken out to wash easily.
They guarantee the grow tents are easy to install even if you've never done something like this before. Clear Instructions and no tools needed! They also offer 30-day unconditional refunds for quality problems. Just contact their friendly 24 hours customer service 👍
Track: Ethan Meixsell - Thor's Hammer [Rock]
Music promoted by BreakingCopyright
Watch: https://youtu.be/o6Gr0xn6U88
Download: https://www.youtube.com/audiolibrary_...
Likes
4
Share
@CannaWolf420
Follow
The end of another fine week of flowering has come. These ladies are working hard and seem to be in very good condition.
I've seen a lot of production in bud shape and mass over the last week with no sign of issues. Last Thursday I gave them a good heavy feeding then fallowed up with light non feeding waterings through the week, because they are bottom feeding, the non feed watering insures the plants root system doesn't get salt buildup.
As for plant structure and trichome production, these lady's have a very nice structure not to tall with a tight node stack
I've noticed some good frost production so far being early into mid flower.


Likes
20
Share
@Ohey_fu_kyu
Follow
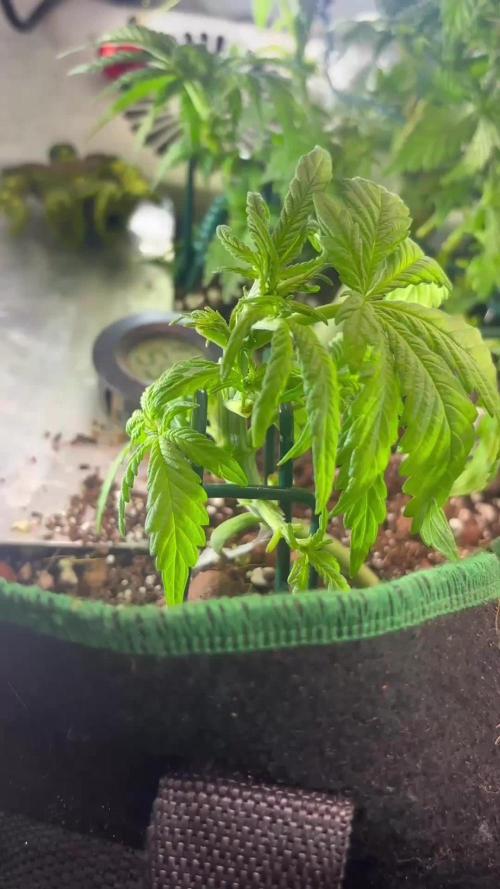
Very happy with 100% germination rate! They all popped within 36h then put into 70% happy frog soil 30% perlite


Processing
Likes
28
Share
@GrowingisFunkO
Follow
The buds are here and growing. Not much going on in the garden, everything is running smooth.
The CW's are about 30" tall and the BW's are right around 24" but the BW's nodes are super close together and seem like they may make some dense buds. All of the clones took off and are creating some beautiful buds.

Likes
10
Share
@MrJones
Follow
Original Sensible Seeds White Chrystal Meth Auto
🔸🔸🔸04.20.23🔸🔸🔸
Day 51 - Above Ground - Target 65 Days
📝Saturday 06.10.23 - As this week comes to an end, I am seeing signs that the plants need a bit of calcium, so today was a topdressing day with a 70/30 blend of Bloom to Grow, watered in with H20 PG to 6.2 with CalMag at 5ML per Gallon of H20.
📝Thursday 06.08.23 - Watering with H20 PH @ 5.8/6.5 the buds on these girls are just getting crazy fat!, the new light setting is doing very well, and the plants are praying hard, and the Medic Grow Smart 8 Flowering Setting 1.
🔸🔸🔸🔸🔸🔸🔸🔸🔸🔸
▪️Grown By: MrJones
▪️Medic Grow Smart 8 LED / Settings 60% & V1
▪️@medicgrow420
▪️@originalsensibleseeds
▪️@gaiagreenorganics
▪️Soil - ProMix HP
🔸🔸🔸🔸🔸🔸🔸🔸🔸🔸
📝The taste and aroma of White Crystal Meth Auto are equally appealing as her shining stunning looks and hard-hitting effect. The taste and aroma are a throwback to the Old School, Skunky with herbal and citric tones, and overall a great strain for making hash or rosin. These tantalizing flavors and aromas are conjured up from an exquisite formation of terpenes the earthy myrcene and the floral essence of terpinolene being the dominant, a mix of caryophyllene and pinene combine their tones to produce the musky citric scent.


Likes
4
Share
@Ctsbestsmoke
Follow
They are starting to fatten up really nice and the flush will start today July 2nd 2023 on to my next adventure with fastbuds northern lights and jack see the progresss. So today is July fifth they are starting to really gain their weight I started watering them with 55-59 degree water to help it feel like it’s the end of the season. Will be chopping on the 7th! The trichomes in them all is unbelievable can’t wait to taste them will be curing in the cannatrol for the first time see how much of a difference that makes.

Likes
28
Share
@CrystalMeph
Follow
So this was quite the week...I was looking over our set up, and making sure Grandma has everything she needs when she says "it seems to me that we need a vegetation cabinet." Turns out she had all the supplies too. Cracked me up...so I ended up building a nice little veg / drying cabinet. You'll see it in the second Meph run diary, was too busy to get some shots today. 😅
She doubled in size from last week, super happy with the progress. She's under a combo of flouro and LED in the new cabinet and LOVING it. Started ramping in nutrients slow and steady, keeping the c02 around 600-800ppm while I finish up the environmental control in the new cabinet.
I realized that Mephy, might be a flight risk...so I made her a pen. 😂 ...also removed any confusion on her breed. Yeah, I nerded out a little. #prusagang #piggydankfarms
Hope everyone had a great week, and all the competition ladies are stellar! Until next week...time to go play on the farm. ✌️🌱
Likes
17
Share
@DudeGrowsWeed
Follow
6’-4” & 5’-8” as of today, 6’-0” average height.
These ladies are beautiful! Everyone who comes by the house just stops and stares when they get near my garden. So do I 👍🤣
I had to move some plants outdoors from my indoor grow due to losing the battle to high heat and humidity. Two are super close to harvest, one might get cut over the weekend. Feel free to comment and let me know what you would do. Thanks!
Processing
Likes
10
Share
@Barcelona_Farmers710
Follow
Seguimos en fase de Vega con alguna que otra plaga... pero de momento todo bajo control, pasaremos a foliar con delta 9 para ver los resultados. Pasaremos a flora con el nuevo equipo Led para intentar reducir el calor de los focos y ahorro energético. Iremos informando farmers buenos Humos!🍁
Likes
5
Share
@Rizza78
Follow
Good week of growth. NeXT defoliation on the 11th. Will strip near 75% of the leaves. Can’t wait for the new growth! Going to start adding Bud Candy and Carboload on my next feedings.

Likes
1
Share
@psychonaut420
Follow
The autoflowers Have been been advancing at a great pace they are just starting to pre flower the first 2 in video is lemon cherry cookies auto then the last one is frozen face auto and the last one has produced sitigmas with white hairs and the lemon cherry cookies is 2days behind physically than the frozen face auto

Likes
8
Share
@Rinna
Follow
Overal I’m very happy. The weight’s looking insane. Obviously imma update you after drying and curing. Can’t say to much at this point, apart from the fact that everything is looking very nice!


Likes
16
Share
@RakonGrow
Follow
Day 71 :
sie bleibt noch im Aufbau !!!
Day 72:
+ 2L Flaschenwasser
++ Dünger mit wenig CalMag
+ final PH 6.35
Etwas sehr interressantes ist mir aufgefallen , deswegen hab ich auch ein Video davon gemacht.
Eine SideCola hat sich oben wie topping verhalten und 2 TopBuds entwickelt . Sieht echt nice aus .
Ausserdem hat sie überall da wo ich etwas abgeschnitten habe einfach neue Triebe mit neuer Blüte gebildet.
Diese Dame hat irgendwie nur ein Sinn , Blüten bilden wo es geht :)) Ich lass es einfach wachsen , dagegen arbeiten wäre eh zuviel stress.
Day 73:
Day 74:
+ 2L Flaschenwasser
++ Dünger mit wenig CalMag
+ final PH 6.10
Day 75:
Day 76:
+ 2L Flaschenwasser
++ Dünger mit wenig CalMag
+ final PH 6.10
Day 77:
Trichome sind noch nicht ganz fertig .

Likes
17
Share
@Dunk_Junk
Follow
Wow she tripled her height this week! From 20cm to 60cm!!
She has very long internodal spacing.
I note a VERY short veg period in this strain.

Likes
33
Share
@Caukygrow
Follow
I harvested 226 grams of dried and trimmed bud plus a bunch of trim and popcorn buds that I didn’t weigh. Definitely had it's ups and downs with my pet rabbit eating one of my plants in the first few weeks :( One of my girls also didn't make it to the end, I must of overfed her at one point and the stress was too much. This amount of buds though will keep me and my friends happy for a long time though!
Thank you to all those that helped with making my first grow a success!
I certainly learned a lot & can't wait to do it all again - for now I've been enjoying smoking the buds and making edibles :D
It took me a few hours to trim all the buds. I didn't measure the wet weight of the plant as I hung the whole thing up to dry as soon as the lights came off. The roots were plentiful and healthy. Even my girlfriend tried smoking with me for the first time ever and she loved it!!!
Likes
469
Share
@love_2_grow
Follow
D57 - We're heading into the fourth week of flower, and the girls are loving life. Both look healthy, vibrant, and strong, and they have started to smell.
I did some defoliation to clean up the bottom of the plants by removing leaves that didn't receive any light. I also removed a few branches with tiny buds on them. I honestly should have removed them long ago as they don't get any proper light, so they will only drain resources and result in larf with airy buds. It is better late than never to remove them, as we still have a few weeks of flower to go, and I want the plants to focus on the main buds sites.
Finally, I gave each girl 1.25-liters of compost tea @ pH 6.5.
D59 - Installed a new USB oscillating fan since my old one gave up. These cheap fans aren't made to run continuously so they break down after a while. Still works well enough in my small tents. I also raised the light as the girls were getting bit close and I was reading almost 1100 PPFD at the top of the canopy. Way too much for an auto!
D61 - There isn't much to do now when all training is done, and the watering is automatic. The girls are looking great though so I'm not complaining :D
D63 - The end of another week and the girls are killing it! I'm really happy with how they are coming along, and everything is smooth sailing at this point. I gave each girl 1.25-liters of compost tea (worm castings, neem meal, rock dust, biochar, algae lime, bentonite, molasses) @ pH 6.6.