The Grow Awards 2026 🏆 


Likes
Comments
Share
@Aedaone
Follow
The temperatures, humidity, and watering volume(if measured) in grow conditions are all averaged for the week. The pH is soil pH. Any watering done by me is well water which is 7.6 pH and 50° F. Any listed nutrients are ml/gallon of water to be fed.
Day 1 we have high temperature of 91°F with mostly sunny skies. I watered 2-3 gallons from the hose.
Day 2 we had a high temperature of 90°F with clear, sunny skies. I watered 2-3 gallons from the hose.
Day 3 we had a high temperature of 97°F with mostly sunny skies. It was a scorcher. I watered 2-3 gallons twice today from the hose.
Day 4 we had high temperature of 95°, but it felt like 102°. Skies were partly cloudy. I watered 2-3 gallons twice today.
Day 5 we had rain the previous night and early morning. We had cloudy skies, with high temperature of 81°F. I did not water today. I added 50ml blood meal to each pot spread evenly on top of the soil.
Day 6 we had a high temperature of 87°F and mostly sunny skies. I watered 2-3 gallons.
Day 7 we had partly cloudy skies and a high temperature of 86°F. I watered 2-3 gallons each pot
This week was a success. These girls really began to fill out. We've got another month ish til flower begins so I expect these to be monsters.

Likes
20
Share
@Steno
Follow
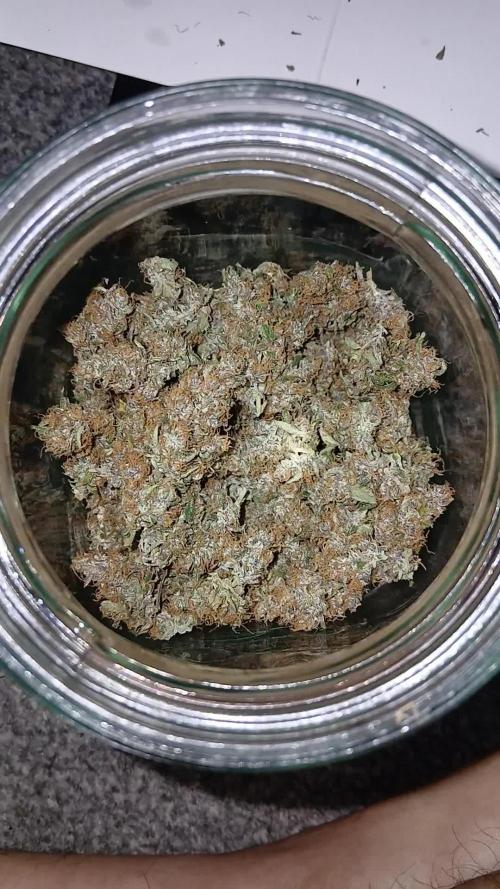
The first plant makes 20 gr. , the second one 55 gr. Now in curing with boveda 62%. The plants created a lot of smell during the end of flowering and the drying process.
Processing
Likes
Comments
Share
@MOTB666
Follow
Getting really bushy about 18 inches tall going in this week might be the last week of veg if they keep growing how they are. These girls are getting wide as hell. Will move one of them over to avoid over crowding in the middle next change out of nutrients. They're appetite is getting big

Likes
14
Share
@Trinidad
Follow
She was left to dry for 13 days. I smoked some of her buds while drying. Offical weight could of been higher if I had the patience.
She have a unique smell, very fruity and musky. I will have to wait for the cure to give more fair analysis. I smoke her in the evening when I am winding down after work and preparing for sleep. I had to weigh her in two parts. One part I took my time to trim the other I just gave a rough trim and placed in jars. I took about 3hrs to trim.
Processing
Likes
5
Share
@Bigsmokes420
Follow
Last week of veg before flip gave them a good defoliation and double feed ..... will defoliate again at day 20 of flower , but so far so good am pleased with the veg stage


Likes
6
Share


Likes
7
Share
@Dralph87
Follow
RC#1 is in her last couple days. Main stem is starting to tilt with the weight of the buds 🤣 she was flushed yesturday for the final time with around 15 litres of water. Once the pot has dried out she will be swapped into my drying tent and left in darkness for 3 days before the chop. Feel like this day will never come lol. Very excited to try as this is my first ever grow.
RC#2 is starting to swell up but I think she has another 2 weeks in her, she got stunted for a while during week 6-7 so may have set her back a little. Bud sites look great I'm expecting no less than 8oz between the 2 girls, just by what I've sized up already. Well shall see....
18.03.20 (Day64)
Rc#1 has been chopped. Only got a few pics but I'll take them next week once it's all weighed up. RC#2 is starting its flush this week as I think it's only has around a week or so left.


Likes
28
Share
@PrairieFrostGrow
Follow
*
***************** Week 3 of Growth From Seed, April 25 to May 1, 2020 - Days 15 to 21 from germination **********************
*
Started the head scratching more this week and wondering what is going on with the slower growth she has experienced the last 4 days or so. She is looking good and not dark....environment is good.....what the heck is the pH so high when been given feed well inline and below 6.0......why runoff numbers in low 7's so early in the run?? A number of heavy feedings this week so that I can read the runoff numbers for her. Going to keep staying the course with feeding but lower the pH because she is still progressing and its still pretty early in the run........not much veg time for an auto though so I need to get this figured out pretty soon.
Gave her some Epsom salts this week as well as I have been battling Magnesium deficiency the last run or two. Always just used CalMag but I don't think the girls always want as much Calcium as they are given this way though. Fed at a rate of 1tsp/gal in a two litre feed early on in the week.
Little more Detail...........
Apr 25/20, Day 15
- 500ml feed - VitaThrive and Dual Fuel @ 1.5ml
- 700ppm and 6.0pH
- small feed of base nute to try and perk her up.
- noticed the lower leaves are droopy while the upper leaves are perky still.
- Still working on dialing the light for these girls as they are happier at 30" away from canopy.
Apr 26/20 - Day 16
- 500ml feed - AN Sensi Cal @ 1.5ml, Sensyzime @ 2ml, Epsom Salt @ 1tsp/gal
- 700ppm and 6.0pH
- The Epsom Salt alone shot the ppm to 500
- Only have the veg switch on for the UnitFarm light.
- feeling some of the other girls are showing some magnesium deficiency with the yellowing perimeter of the leaves.
Apr 27/20 - Day 17
- dry out day
- Cut slits in the bottom of the bag today to let more water out, more quickly when feeding.
- Wondering if the root zone is staying too wet and therefore causing some stunted growth.
- She has been falling a sleep too early in the day so either too much light or getting root bound?
Apr 28/20 - Day 18
- needing some runoff numbers to see what the hell is going on
- fed 3L - Piranha @ 1ml, VooDoo @ 2ml, Dual Fuel @ 1ml
- going in was 575ppm and 5.3pH
- runoff numbers were 1450ppm and 6.9pH
- WTF......bring it down......next feed at only 500ppm and 5.0pH to lower her??
- leaf colour is perfect. Stems are a little immature yet, but side branching is coming out stronger.
Apr 29/20 - Day 19
- 8L feed - Dual Fuel @ 1.5ml = 325ppm and 5.0pH
- runoff after the watering was 500ppm and 7.0pH
- WTF.....expected it to be more in the 6.5pH range and not that high still?
- KK looked worse off, still droopy, after this than the other girls did. Lack of oxygen in root zone with so much water? Its coco though shouldn't be for too long.
Apr 30/20 - Day 20
- dry out day
- KK likes it a little dryer in her medium.....she perked up more today and looking a lot better.
- She has had more vertical growth the last day and she is spacing out some of her nodes.
- Her stem is thicker and she is getting stronger.
- Still a week behind though in my opinion and they should have been this size a week ago.
Apr 31/20 - Day 21
- dry out day
- she has done very well the last two days and going to keep riding that wave, didn't water today.
- She has certainly gotten taller and wider.......getting her back on track?
That will wrap up this puzzling week........pH is not staying low after being brought down......shoots back up over 7 in only 24 hours idea. Working on it Growmies. Have a great week and thanks for checking out the girls🙏👌
Likes
5
Share
@Naujas
Follow
I came back after vacation, the girl is ready for cutting, the rainy weather has started, so there is a threat of rot, you can say I managed to find just a few small pits in time and removed them and threw them away, the big and stiff flowers look fantastic:) but after a long trip I was tired, so I didn't take quality photos :( no everything else, I am very satisfied with the result I got:) its smell already lets me know that it will be good:) a lot of sugar leaves from which I will make bubble hash:) I will update the weight when it dries.
Likes
13
Share
@russrahl
Follow
These girls are looking like they are sprayed with fake snow...lol so sticky icky to play with. Took off a lower outside branch for scoping and these girls are looking close. They have signs of some amber and we are gonna let them go a bit longer to harvest closer with the alien tech hopefully. They definitely didn’t like being neglected a little bit and ph/Ec swung a bit in the middle of flowering and cause some issues a bit, nothing major though. Definitely not for the beginning grower that’s for sure, very finicky...lol got the nutrients lowered for the last week and then there getting the chop! Lol got more girls needing the room, but there looking good. Till next week, Cheers 💨

Likes
4
Share
@TheCannaHouse
Follow
6/21/22-Presoaked in water
6/22/22-Damp paper towel
6/23/22- Planted in medium and watered
6/25/22-Germination!!

Likes
21
Share
@BB_US
Follow
All the ladies are blowing up and it's the beginning of her flowering cycle. These are going to be beasts for autos. All healthy but 1 BB with a little yellow spots on her leaves. But she is still thriving. 19 HOURS ON 5 OFF!!!

Likes
3
Share
@Cookies420
Follow
07/10
Hey guys, how you doing ?
Flushed the plants with 2l of water per plant, they responded very well and are very happy.
First pistils showing up, thats a nice sign.
Both the Amnesia plants are still in veg but definitely noticed stretching.
As soon as they dry out im gonna give them some nuts, probably half the recommended dosage.

Likes
1
Share
@theVotanaGarden
Follow
Didn’t post some of the final weeks but this is the end. It was a tough grow - I don’t love 100% coco in the autopots and will be doing a 70/30 mix moving forward. Got a pound of great smoke from this one. Hadn’t gotten a pound off a plant before so it was nice to get this yield
Likes
7
Share
@CHILLING_RACOONS
Follow
Hi dear smokers and growers!! 😎
Chilling Racoons here 😏
We will show you one of the new genetics of Royal Queen Seeds, the Milky Way F1 Automatic! 🤩
F1 seeds have unparalleled uniformity, impressive resistance to disease, great productivity and flavours and effects that will inspire you to grow these seeds again and again.
So we are sure to grow big and stable plants, we have only to cure them well!!
We are excited to try the Royal Queen Fertilizers like the tablets and the easy boost! They will give a big kick to our plants 🤩 🤩 🤩
We posted some of the RQS Ferts and Merchandising, look at the stuff, I am happy like a child 🤤
Royal Queen Seeds is one of the biggest seed bank in the world, in addition to a wide variety of high quality seeds, on their site you will find many accessories for growers and smokers. Take a look to our friends! https://www.royalqueenseeds.com
✅ 🌱#1 WEEK VEGETATIVE🌱
💉🔍Fertilization schedule:🔍💉
📅 EASY BOOST MIXED TO THE SOIL 50g/pot
Both seeds germinated in 48H, after the root came out, we immediately planted the seed in the soil.
We are growing MILKY WAY AUTO #1 in a 11L Plastic Pot and the MILKY WAY AUTO #2 in 15L Smart Pot. Seeds are directly planted in the final pot to avoid transplant stress.
We planted these seeds in different pots to see if there are difference in growing and yield.
Germination rate: 100%, Royal Queen, what a pleasure to grow their seeds.
🧐 🤓 Milky Way F1 data sheet 🧐 🤓
Variety: F1 Hybrid auto
Genetic Background: Blue Mammoth x Blue Dream x Sin Tra Bajo Auto
THC: Very high
Yield: XXL
Height: 55 - 75 cm
Flowering time: 42 - 45 days
Harvest: 70 - 75 days after germination
Major terpenes: Farnesene, Myrcene, Pinene
Effect: Creative, Euphoric, Physically Relaxing
Flavor: Chocolate, Citrus, Pungent, Skunk
Climate: Short Summers
💸💸💸💸💸 Buy Milky Way F1: https://www.royalqueenseeds.com/uk/f1-hybrid-cannabis-seeds/617-milky-way-f1.html
_____________________________________________________________________
OUR GERMINATION METHOD STEP BY STEP
We germinate all seeds in cotton pads because in my opinion is the best way, I'll tell you why.
You should use cotton pads because it is one of the fastest way to germinate seeds, it is also one of the more reliable way because with these few steps, you could have a 99% of success if seeds are fresh (we store our seeds in a dark and sealed container in the fridge and they last years!).
This is a NOOB-FRIENDLY technique BUT you have to respect some little and easy steps:
1️⃣take one cotton pad, spray it 5 times with water;
2️⃣dispose seeds in the sprayed cotton pad, remember to leave minimum 1cm of space between seeds,
3️⃣take a new cotton pad, spray it 3 times with water, face the wet side down and put it on the seeds of the first cotton pad;
4️⃣spray the dry side 3 times.
5️⃣put your "sandwich/es" in a sealed dark container of a sufficient size to store them, I use a plastic container (glass or plastic are equal) with about this size: 15x30cm .It contains about 8 "sandwitches".
6️⃣store the container in a dark place with a temperature from 17°C (23/24 °C are optimal)and more. REMEMBER: More light they see and colder is the place,slower will be the germination and lower will be the germination ratio.
*(If your seeds are old, not good stored and with a low germination ratio, I suggest you to use Seed Booster. Old seeds and maybe stored in a very hot place for a long time may will be death and may will not never germinate).
Generally a normal cotton pad is good for 3 seeds.
If you follow these steps, you will hardly have problem of non-germinating seeds. I tried all methods (except rockwool cube) and in the last two years (and I germinated a lot of seeds) I can tell this is the fastest and reliable way. I loved to use paper towel but with this method is very easy to put too much water...
I really hope that this "rule" will help all growers to improve their skills.
ENJOY.
_______________________________________________________________________
🔧💡OUR SET UP💡🔧
✔️ 💲💲💲VIPARSPECTRA 🚀🚀🚀🌕🌕
ViparSpectra®️ XS2000 240W Infrared Full Spectrum LED Grow Light:
Excellent ratio between wattage and ppfd, excellent light penetraton, perfect light spectrum (it also has IR 🤩) and it has the best build quality on the market. You can touch that quality. Materials are really strong, excellent driver and the best leds on the market. Heat dissipation is perfect, the lamp is never too hot and it has a passive dissipator so you will have zero noise. It also has IP65 certification. I like that this lamp is bigger than others, so the 240w of power are well distribuited on the space. Viparspectra has an awesome customer service, and shipping was incredibly fast!
This awesome brand also offers 3 years warranty.
This lamp has no rivals.
A special thanks Viparspectra ❤️❤️❤️❤️
HERE YOU CAN BUY THIS PROFESSIONAL LIGHT: https://www.viparspectra.com/products/xs-series-xs2000 or https://amzn.to/3dyUoJl
and here you can buy other awesome stuff: https://www.viparspectra.com
✔️ 💲💲💲MARSHYDRO 🚀🚀🚀🌕🌕
💡TS 600 FULL SPECTRUM 100W LED GROW LIGHT : with this light you will achieve excellent buds, you will not need anything more. This lamp replace a 150w HPS lamp, but, with this Led Light you will smoke bigger, harder and tastier buds because Led have a complete spectrum and a powerful light penetration, so your plants will work as much as possible to make you happy. Psssssss it it extremely cheap and it is only 100w, your bills will never be too high, YOU HAVE NO EXCUSES!! Here if you want this little beast: https://www.mars-hydro.com/led-grow-light/mars-ts-series-led-grow-light/mars-tsw-600-led-full-spectrum-hydroponic-led-grow-light
Thank you Marshydro❤️❤️❤️❤️
💣Quantum board - 480w - 4x120w Boards
Samsung LM301B 288 led/board 3000K 0dB noise
+24led/board led Osram 660nm
Efficiency 2.6 umol/J 220 lm/w
Driver: Meanwell HLG-480H-36B
💣Quantum board - 240w - 2x120w Boards
Samsung LM301H 504 led 3500K 0dB noise
+24led/board led Osram 660nm
Efficiency 2.7 umol/J 220 lm/w
Driver: Meanwell HLG-240H-48B
-ESTRACTION FAN:
Blauberg 125 Turbo Pro Series
Maximum air flow: 430-560 m³ / h 50W 32-44 dBA
💊💉💊FEEDINGS
TOP CROP:
-DEEPER UNDERGROUND: to stimulate roots system
-TOP VEG: for an excellent growth in the vegetative phase
-GREEN EXPLOSION: to promote creation of bud sites and to allow a faster growth
-MICRO VITA: bacterias for equilibrate the soil and to make the plant healty
-BIG ONE: to stimulate bud sites and to stimulate resin production
-TOP BLOOM: to achieve excellent big and hard buds
-TOP CANDY: to feed the buds with molasses for a tastier smoke and to gain weight
-TOP BUD: to enlarge buds and to gain weight
PLAGRON: PK 13-14 to have big and hard buds and to feed plants with lower effort
ADVANCED NUTRIENTS: Sensi Cal-Mag Extra-> for cal mag deficiency
GROTEK: CAL MAG for cal mag deficiency
HESI: PowerZyme to clean and balance the soil. It feeds the plant cleaning the soil.
GHE: - Final Part (ex Ripen) accelerate the final flowering phase, dissolves minerals in excess
- Flash Clean to flush the plant and to be sure that all excesses are out from plant and pot
These two products improve A LOT the smoke of our babies
-PURPINATOR to stimulate flavonoids and to have a better taste and smell.
-BIOBIZZ: CAL-MAG, great product to correct deficiencies without Nitrogen!
____________________________________________________________________________________________
🙏❤️ THANK YOU FOR BEING HERE ❤️🙏
Please leave a comment with your opinions, it is very important to us to have a comparison.
If you like our job, tap the weed button and follow us. It will be really appreciated.🙏
We want to thank again everyone that help us in our project. You support us to support our dream. ❤️
SPREAD THE LOVE OF THIS PLANT ALL AROUND THE WORLD
🌿Thank you again🌿
❤️Sweet hugs❤️
👨🌾CHILLING_RACOONS👩🌾
Likes
18
Share
@Dunk_Junk
Follow
She popped up a couple of days ago (check the timelapse) so I'm calling this week 1.
I've put lots of perlite in her soil this time around, last couple of grows, as a test, did not have perlite and I noticed the soil was really firm and compact. Also it didn't drain very well at all.
Hopefully the addition of perlite will fix this.

Likes
2
Share
@regionallystoned420
Follow
Didn’t record footage of veg stage but it was in veg for just over 7 weeks and flowered at just spot on 8 weeks . Nice tight buds. Heavy stone but won’t make you too lazy to get about your day like a cheese almost
Likes
32
Share
@LapsekiliTayfur
Follow
Day in and exit fan 15 min off 15 min on Van is full on
Night in and exit fan 30 min off 15 min on Van is off
3. Haftada Topping ve Lst Eğitimleri başladı


