The Grow Awards 2026 🏆 


Likes
10
Share
@Weedbadk
Follow
Día :1 iniciamos este seguimiento de estas variedades toda germinaron en 3 días
Día 5 desde puesta en sustrato
Solo pulverizó 1 no sobrevivió pero las 2 salieron sin problemas

Likes
141
Share
@bioaccessory
Follow
На этой неделе заменил наконец уголь в фильтре, постирал предфильтр, и подключил всё это дело через новенький воздуховод - теперь, надеюсь, запах меня не побеспокоит до конца цикла.
В остальном же всё по плану: продолжаю тренировки, обрезаю всё лишнее, подгибаю основные магистрали. После незначительной неудачи на старте оба расстнения набрали отличную форму, и продолжают меня радовать. На следующей неделе буду устанавливать ScrOG, опыт для меня новый, а поэтому интересный вдвойне - заходите посмотреть👍👊
Показатели дренажа в норме.
Спасибо, что заглянули, и будьте здоровы! 🙏
Продолжение следует ...😶

Likes
19
Share
@A_Rolling_Stoner
Follow
For my first grow, I am very very happy and am looking on for the next one.


Likes
22
Share
@SkunkyDog420
Follow
Hallo zusammen 🤙.
Habe sie heute geerntet. Wir hören uns in 3 Wochen mit dem Erntebericht.

Likes
9
Share


Likes
209
Share
@Rock_n_Roll_Randy
Follow
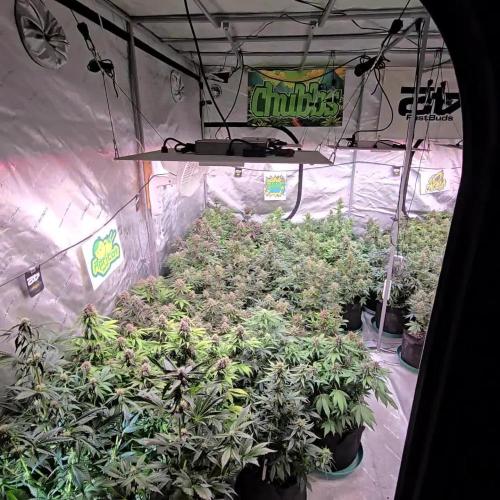
Day 100 for the 54 plant grow. 44 different strains of photoperiods and 10 different autoflower strains in the:
8X8 GROW TENT WITH THE NEW FC-E6500, FC4800 AND TSW2000 AND THE NEW 5X5 GROW TENT WITH A TSW2000 👍and they are being fed GREEN BUZZ LIQUIDS all organic/vegan fertilizers🤘.
I only pinched the tops on 2 or 3 plants but I defoliated every plant ALOT. it slowed the vertical growth alot but it's exactly what I wanted. I can keep track of the plant sizes, how they grew, how healthy they were, how easy they were to grow and how good the final product is👍 every plant was given the same strength of GREEN BUZZ LIQUIDS and I'm keeping track of which plants were happy with the suggested amounts and which plants seemed to want more or less🤘
ALL THE AUTOFLOWERS ARE NOW CHOPPED.
The girls are loving their MARS MANSION and WITH THE 5X5 INLAW SUITE and everything is doing good and looking nice and getting bigger👍 They are all starting to look like buds now and the bud sacs are swelling and they are all getting nice and frosty and starting to stink ALOT. MARS HYDRO ALWAYS GETS EM FROSTY👍.I AM NEVER DISAPPOINTED With how awesome these lights are🤘. KEEP KILLING IT MARS🤘👏👏
BREEDERS AND SEEDS:
DIVINE SEEDS:
MAZAR, OPIUM, WHITE WIDOW, OG KUSH, PABLO ESCOBAR, DIVINE INDICA.
AUTO WHITE WIDOW
AUTO PABLO ESCOBAR
AUTO WHITE RUSSIAN
AUTO FRACTAL
AUTO MONTREAL
AUTO OPIUM
AUTO KABUL
AUTO MAZAR.
WEEDSEED EXPRESS:
GREEN CRACK, GHOST TRAIN HAZE, LITHIUM OG, CHEESE.
DOCTORS CHOICE:
DC KUSH, AUTO NIAGARA, AUTO ROCK MACHINE.
EXOTIC SEEDS:
HIPPIE BERRY, MALASANA GELATO, EXOTIC ANIMAL.
GENE/MEME SEEDS:
BLACK HELL.
ORIGINAL SENSIBLE SEEDS:
PURPLE PUNCH COOKIES, WEDDING CAKE, PURE KUSH, GORILLA COOKIES.
SWEET SEEDS:
BLACK JACK, GORILLA GIRL, SWEET ZKITTLES.
EMERALD TRIANGLE SEEDS:
GORILLA GLUE, MASTODON KUSH.
SEEDSMAN SEEDS:
BLACK SUGAR, PEYOTE FORUM, PEYOTE WIFI, BADAZZ COOKIES OG, PURPLE GHOST CANDY, STRAWBERRY BANANA GRAPE, L.A. PEYOTE KUSH, PEYOTE WIFI CBD, FUEL DOG, CRITICAL PURPLE KUSH.
AMSTERDAM MARIJUANA SEEDS:
GIRL SCOUT COOKIES EXTREME, GREEN CRACK.
QUEBEC CANNABIS SEEDS:
BRUCE BANNER, GREEN CRACK, QUEBEC CBD 20:1.
I 💚 GROWING MARIJUANA:
SKYWALKER OG, BANANA KUSH, BLUEBERRY CBD.
FOR EVERYTHING MARS HYDRO VISIT:
www.mars-hydro.com
www.marshydroled.ca
PROMO CODE: rocknroll
VISIT THE ALIEXPRESS STORE:
@marshydro_aliexpress
Instagram: @marshydropenny
https://youtube.com/channel/UChU5ZWwNi-DvnO3oWVU3ceA
https://greenbuzzliquids.com/
#greenbuzzliquids
@GreenBuzzLiquids
https://greenbuzzliquids.com/en/shop/
PROMO CODE: rocknroll
https://www.youtube.com/watch?v=8hEqyS1jPpI
https://growdiaries.com/diaries/112437-grow-journal-by-rock-n-roll-randy/week/593118
Thanks for taking the time to read and check out my diary🤜🤛
FC-E6500 LED GROW LIGHT:
FC-E6500 grow light with 3978pcs OSRAM BridgeLux Diodes & Moso Driver, market-leading PPF 2.7 µmol/J, Max 2.5g yield/watt with 30% higher Average PPE, more cost-effective when compared to same style type lights. Only consumes 650W, perfectly cover 5x5ft (personal), 4x4ft (commercial) grow space. Innovative Precise Uniform Lighting-Built-in removable bars interval & dimmability enable the exact & dynamic PPFD control over each of the plant growing stages, FC-E6500 detachable bars deliverSuperior Heat Dissipation: Real Aluminum heatsink together with 6 slim profile passive cooled bars (THINNER & LARGER surface) and detachable Meanwell Driver, create less heat. save 50% hydro than other old grow lights! Driver can be mounted remotely on the side of a grow tent/rack or on an adjacent wall to remove heat from grow space. Full Spectrum UV IR LED: With Yield Max spectrum (660nm Osram enhanced Deep Red,2800k-5000k,730-740nm IR,380-410nm UV LEDs), Average PPFD the FC-E6500 LED grow lamp enables cultivators to produce BIG FAT Dense Buds, perfect for full-cycle hydroponic, soil, grow tent/grow room.
Dimmable Commercial Grow Light: Cost-efficient, easy dimming & daisy chain With a max up to 20 lights, IP65 Waterproof, master light easily controls the rest. Perfect for commercial & home horticulture.
FC4800 LED GROW LIGHT:
GET THE MAX FROM MARS👍: Welcome one of the newest members of the Mars Hydro family🤜🤛🤘. The Mars Hydro FC 4800 480W LED Grow Light can accommodate up to a 4' x 4' area for flowering. It has OVER 2000 LED chips consisting of the best selling Samsung LM301B diodes which has a Luminous Efficacy of: 220 lm/W
0.2 W, 3 V mid power,
Osram 660nm Diodes, Infrared light and UV LIGHT👍. It boasts the incredible efficiency of 2.8 µmol/J, maximum 2.5gram yield per watt with 30% higher Average PPFD. This High-intensity spectrum is beneficial for plants at all stages - from veg to bloom, and creates Big dense Buds👍. achieve 50% higher yields & quality compared with the old lights! Only consumes 480W for 4x4ft personal grows, and 3x3ft for commerical grow. It comes with a dimmer and daisy chain function with a maximum of up to 15 lights, the master light controls the rest👍. Wide 6-bar design offers even & wide canopy coverage and can maximizes your grow space. slim 180° FOLDABLE DESIGN... YES I SAID FOLDABLE🤘🤣 , making it compact and easy to install, it's IP65 WATERPROOF and will give you no worries while growing in a humid environment and makes it a flexible high performance commercial grow light for enormous SUPER FROSTY yields.😛😛😛. MARS GETS EM FROSTY BOYS👍
AWESOME HEAT DISSIPATION: The Low energy consumption FC4800 growing light has 6 passive-cooled bars and an aluminum heat-sink a removable driver you can upgrade later or have it outside your tent. with zero noise you can save up to 50% in your electricity bill compared to HID's or HPS lights!
It also has a removable driver so you can upgrade it in the future or have it outside your grow space for better heat control in your growroom👍
UPGRADED FULL SPECTRUM: Yield Max Spectrum with enhanced red (Top-Bin Samsung 3000k-5000knm, Osram 660nm Deep Red), speed up blooming & fruiting, perfectly suited for full-cycle growing. The FC4800 LED grow lamp was born for Big Buds, perfect for commercial, grow tent, grow room, hydroponics, and all soil grows.👍
THE BEST SAMSUNG DIODES: THE FC4800 has Top Bin genuine Samsung Osram Diodes, combined with remarkable 2.8 µmol/J Efficacy, 30% higher Average PPFD, 50% less energy consumption, to maximize your yields. They give you a TRUSTED 3 years warranty 100% Satisfactory guaranteed!!!
X2 TSW2000 LED GROW LIGHT:
INCREASE YIELD AND CROP QUALITY WITH MARS HYDRO LED GROW LIGHTS: NEWEST SMD LED technology provides the highest PAR/LUMEN output (1122umol@18") and can make you get 30% higher yield compared to OLD blurple led lights. Max 2.5g yield per wattage and achieve maximum quality and quantity, much better than traditional HPS grow systems
LOW ENERGY CONSUMPTION LED GROW LIGHT: Consuming only 300W true output with 684 LEDS! It saves up to 50% energy than other led grow lights. Perfect for 3.5x3.5ft bloom stage, 4x4ft veg stage. Over 90% light energy can be absorbed by plants, it will have higher intensity in a MARS HYDRO grow tent with diamond design mylar, or by crossing over using multiple TSW2000
HIGH EFFICIENCY FULL SPECTRUM INDOOR GROW: 3000K 5000K and IR 660nm 760nm RED, makes it close to natural light, highly engineered to provide improved growing performance for plants at all stages of growing, rapid plant response from seed to flower; Uniform and wide-beam light distribution for your plant's optimal growth
8x8 GROW TENT:
The MARS HYDRO 8x8 Grow Tent interior is made of a unique diamond design mylar which is highly reflective. (Other companies mylar and reflective rate is as low as 50%, and it won't provide efficient light. They use thick 1680D oxford canvas, and being double stitched, it is tear proof and perfect for locking in the light. Their grow tent keeps 100% of the light inside the tent and helps your plants absorb more light. EXTRA-THICK material means No light leaks or rips at all.👍
Strong Stable metal corner adapters and poles are the trustful supporters of the tent. It's very sturdy, neither rusting or paint flaking off. quick and easy tool-free setup. They use heavy-duty metal zippers, with double layer black lining, by far the best on the market which creates a light-proof seal.
Likes
Comments
Share
@The_Lonely_Farmer
Follow
So these girls are shorter than expected allthough the 2 girls are of decent height enough for me too flip along side my aptus fed girls.
I have defoliate all areas that covers light getting too the lowers and also removed excess branching too focus energy towards the main tops also did this via a little lst 🌱
One of each plus an extra 412 so hopefully they stick through and make it too harvest which they look too be healthy so far.
I will next defoliate on week 3 of flower and also remove excess plant matter taking up neccasary energy 🌱
Shogun is serving them well so fa!
Lights will be 12/12 tonight
Week 1 flower commences then
Stay blessed 💚
Likes
9
Share
@Chubbs
Follow
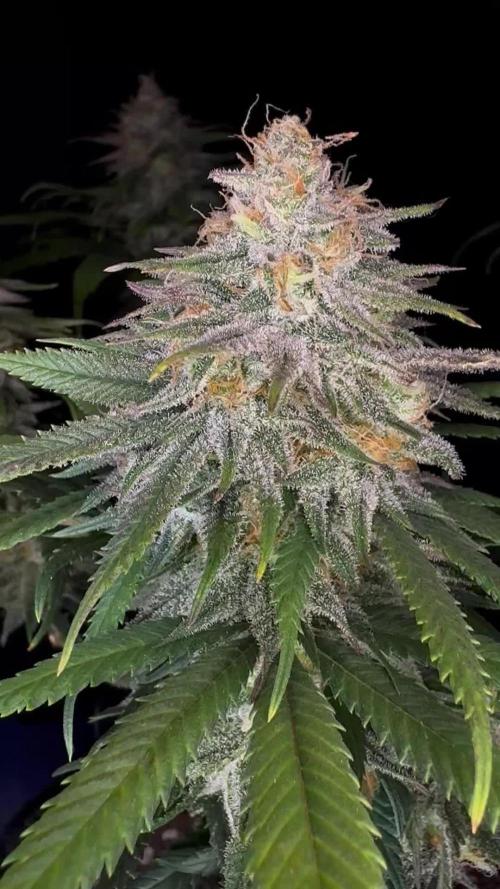
What up family, apologies for the late update. After being gone for a week and coming back to see these amazing girls they leave me shocked how much they've swelled in that time. The smell on these are wild, absolutely like a fresh can of 7-up popped open. Happy Growing
Likes
Comments
Share
@eldruida_lamota
Follow
Vamos familia, actualizamos la octava semana de floración y última de estas Forbidden Mochi fast de Seedstockers, Aplicamos varios productos de Agrobeta, que son increíbles para aportar una buena alimentación a las plantas.
Temperatura y humedad dentro de los rangos correctos en la etapa de floración.
La tierra utilizada es al mix top crop, por cambiar.
De 5 ejemplares seleccioné 4 para completar el indoor, se ven bien sanas las plantas tienen un buen color, progresan a muy buen ritmo, ya maduraron las flores y han tricomado mucho, cogieron unos tonos púrpuras rosáceos, están increíbles, ya queda el machetazo, el secado y pasarlas a bolsa TerpLoc , GROVE BAGS, para curarla algún mes.
Agrobeta:
https://www.agrobeta.com/agrobetatiendaonline/36-abonos-canamo
Hasta aquí todo, Buenos humos 💨💨💨

Likes
13
Share
@russrahl
Follow
Last week went good for the first week of flower, having trouble again with my ph meter....ughhh. Ordered 2 new ph meters this week, a decent 4 in 1 (ph/ec/ppm/temp) pen and plug in, 3 in 1 (ph/ec/temp) meter with leads to leave in my res(my second one for my second res). Also got more calibration solution, and storage solution. Sick of second guessing my crappy pens, gonna start fresh will all new ph equipment. Lol but she really started to stretch out this week, with the little amount of lst I did to her just before flip she has really bulked up and spread out. 10 days into flower now and she is still stretching and being tucked. I removed a few of the larger guard leaves up top to open up the secondary shoots to light, I have around 40000 lux at the first screen and they seem to be handling it nicely. I will be doing a major underclipping and removing everything below the first net in a few days time I think. I flipped this tent without filling the screen and I’m hoping to keep everything low and tucked until the stretch is almost finished, then let them bud up into the higher lux, hopefully keeping them less then a foot above the screen. That’s the plan anyway. Lol well that’s it for this week, Cheers💨


Likes
10
Share
@Papastroumf
Follow
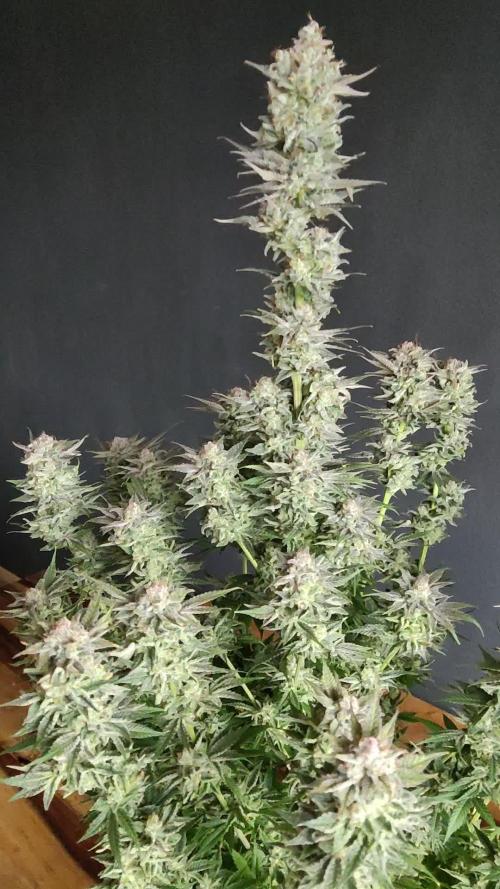
Day 66 : Her buds are full of crystals and are so dense. The smell is really strong stinky skunk like GZ , but GZ smell is more acidic. Her crystals are milky and soon will start to amber. Breeder refers that will be pretty mature in 70 days. Not in my case :D we will see in 4 days, in next watering. For now no ambers. I prefer to cut when we have 15%-20% amber and 80%-85% milky, because after the smoke is very heavy for my taste.
Edit Day 70 : She watered with juices and i continue until i see first signs of amber trichomes. Still no ambers. She has gained so much weight , side branches cant lift their self. I think she will be the heavier. You can understand her weight if u lift it.

Likes
26
Share
@pifflestikkz
Follow
Day 106
14/10/24 Monday
Their colours are really coming through now 🤩
Nearing their end now, possibly another week after this ✌️💚
Picture and video update 📸💚
Day 108
16/10/24 Wednesday
Another run through of de-chlorinated tap water and flawless finish all to pH 6.3.
Giving 0.3L again daily as there not drinking half as much now.
Picture and video update 📸💚
Day 110
18/10/24 Friday
Divine Seeds Overdose has been Harvested. Check her own diary on my page for full results.
I moved the others into my now cleaned down 1.2m x 80cm under 660w hps to finish off.
Day 111
19/10/24 Saturday
De-chlorinated tap water and flawless finish at pH 6 today.300ml
Day 112
20/10/24 Sunday
De-chlorinated tap water and flawless finish at pH 6 again 300ml.
I have had an extremely busy week. I'll upload videos and pictures tomorrow on a fresh week... Wait and see the colours 😋💚


Likes
4
Share
@TKCS_Pinoy
Follow
🌱 Woche - Week 7 Review
Heute nur ein Video
Just a quick video today
📈 Wachstum: Die Pflanze wächst weiterhin gleichmäßig, Triebe werden kräftiger 💪🌿.
💡 Licht & Energie: Sehr gute Balance im Licht, keinerlei Stress.
🌿 Blattgesundheit: Blätter wirken frisch und vital, sattgrün und gesund.
💧 Wasser & Nährstoffe: Regelmäßiges Gießen nötig, gerade an warmen Tagen ☀️💦.
🔄 Entwicklung: Weiterhin volle Konzentration auf Wachstum.
✅ Fazit: Starkes, gleichmäßiges Wachstum – alles bestens im grünen Bereich! 🍀
-------------------------------------------------------------------------------------------------------------------------
📏 Growth: Growth remains steady, stems are getting stronger 💪🌿.
💡 Light & Energy: Perfect light balance, no stress.
🌿 Leaf Health: Leaves look fresh and vital, deep green and healthy.
💧 Water & Nutrients: Regular watering needed, especially on hot days ☀️💦.
🔄 Development: Still fully focused on vegetative growth.
✅ Overall: Strong, steady growth – everything looks perfect! 🍀
Likes
19
Share
@Ganjagrandaddy
Follow
Day 77 A good week for these ladies this week with the sumo boost and especially the Dragon force , doing exactly what it says in the bottle. I decided to finish with this combo as I have had good results previously with it. It has kicked some of the buds into high gear , particularly #3 the smaller girl.She has been building on top of her initial mains and has tripled the heads in places. The Buds in the organic #1 are amazing to look at and remind me of the barneys farm cookie kush . She smells amazingly tropical up close and is fading out nicely . #2 has enjoyed the extra space from a partial harvest of others in the room and been productive with her flowering bursts too. #3 the poorly girl has continued to ripen and put some new pistils out too so she seems happy to keep on a few more days too. I dont know if they will go another week as the LOS girl is calling me with her terpenes whenever I open the flaps.
let's see after another week !.
Likes
15
Share
@Huckleberry39
Follow
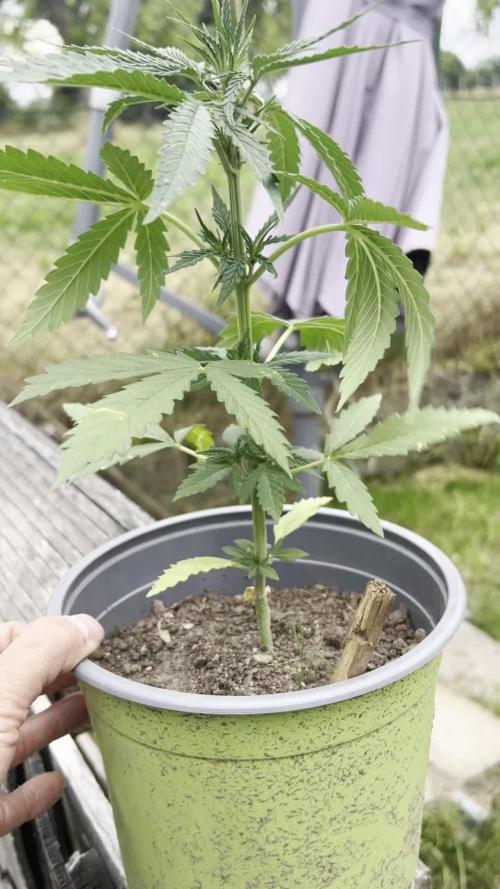
This is the start of her 3rd week. I can't believe how much she has grown in the last week. She is a beaut!!


