
Likes
Comments
Share


@AestheticGenetix
Follow
7/10/24
testing testing. can i post updates now?
beautiful buds. the leaves are changing into a blue color. it reminds me of some of the blue city diesel i got from a buddy back in the medical days.

Likes
100
Share


@ILoVeThiSpLaNt
Follow
Giorno 49
Le adoro tutte e nel frigor ho ancora 4 semi di Rainbow Belts (guai se non clono questa pianta!!!) per quando sarò un pelo più esperto.Lime appena tocchi la cima poi sfreghi pollice e indice e si sente Zkittlez e come ultima cosa uva misto a qualcosa che ricorda un bagnoschiuma.
Milk Monkey anche mi sta colpendo molto. Non sono molto bravo a volte col riconoscere vari odori ma è qualcosa di molto appiccicoso(quasi devo lavarmi le mani appena la tocco... Non oso immaginare l'hashish) e inizia a ricordarmi la gorilla glue #4. Ma c'è anche una nota cremosa quindi non vedo l'ora di fumarla per capire il suo gusto.
Le due Zombie fenotipi completamente diversi. Pianta numero #1 prende sicuramente più dalla Sideral (Amnesia x Soma's Lavander) con odore di haze e la pianta numero #2 prende più dalla Bubba Kush (OG Kush x Strain sconosciuto) con odore terroso, legnoso e speziato.
A settimana prossima per altre foto 😊🖐️


Likes
294
Share


@StarLorr
Follow
Welcome to my Ðivine ØĠ Ķush diary.
In this diary:
Seeds: sponsored by Ðivine Șeeds
Media: Promix HP
Nutrients: Advanced Nutrients, Diablo Nutrients.
Light and Weather: Şun☀️and Mother Earth.🌎
___________________________
Feeding:
Wed 29May: 4L nutrients pH'd 6.5
Fri 31May: 2L water not pH'd in bottom saucer only.
Sat 01Jun: 2L water not pH'd in bottom saucer only.
Sun 02Jun: 4L nutrients pH'd 6.5
___________________________
Smooth Sailing, spotted a spider mites nest this morning, when you see two leaves oddly stuck together that's the sign.. cut and dispose. Will keep an eye peeled and might get my arsenal and spray all 3 tonight for good measures🤨
___________________________
Thanks for stopping by, likes and comments are appreciated!👊🏻😎
Keep on growin!
Keep on tokin!!!
😙💨💨💨💨💨


Likes
5
Share


@thenotillwizard
Follow
This strain is very heterozygous. 4 seeds were started. The 4 phenos were very different. I saved 2 of those phenos for my arsenal, which is quite exceptionnal. I ususally save just one pheno from a strain.
The Pheno #1 was mainly sativa (75%). Long branches. Lots of fluffy buds. The more resistant to mold, but it has to be with the fluffiness.
The taste was cheesy and spicy, which has nothing to see with the 3 other phenos. Not a single ressemblance with ak-47 parents as well.
It shares the musky undertones of the strain, but nothing else.
That pheno is gone. Not enough potential. Terpene profile was deceiving, just as the cannabinoid content.
The Pheno #2 has more indica in it (45% indica). robust and tall plant with dense heavy buds. No mold resistance at all. Biggest producer.
The taste was earthy and musky with hints of wood.
That pheno is gone. Not enough potential.
The Pheno #3 is my favorite one. It reminded me of the good old Ak-47, with her flowery/sweet/skunky smell and taste. Pure nostalgia!
Tall and quite robust plant with huge fluffy buds coated with trichomes. She grows pretty similar to Lemon Skunk if you know the reference. Great producer of top quality buds. So sticky! In my top 3 sativa for 2 years.
The aroma is very close to the old school Ak-47: sweet, flowery and skunky.
It tastes like sweet lemon on the inhale, with a sharp touch of spicy lavender and earth on the exhale.
IMO, that is the pheno we want to save from that heterozygous strain.
Backcrossing this one would be a very good idea.
The Pheno #4 is just as interesting as my favorite #3. The only issue with this one is about mold resistance.
Crazy compact and heavy budst! One of the most productive I’ve ever seen too. More traits of the Ak-47 in the aromatic profile, but nothing like the #3.
On the structure side, we can immediately recognize the sturdy and bushy structure of Ak-47.
THC content is very high too. I suspect the CBD content to be high as well.
The effect is a mood elevation, with good focus and a deep body relaxation; a bit similar to what White widow does.
The aroma is earthy and pungent. Very skunky and musky.
It tastes very sweet and earthy on the inhale, with hints of skunk on the exhale.
That pheno #4 expresses the best traits of the Ak-47 in its structure, while pheno #3 kept the aromatic profile.

Likes
16
Share


@BlackForestGrower
Follow
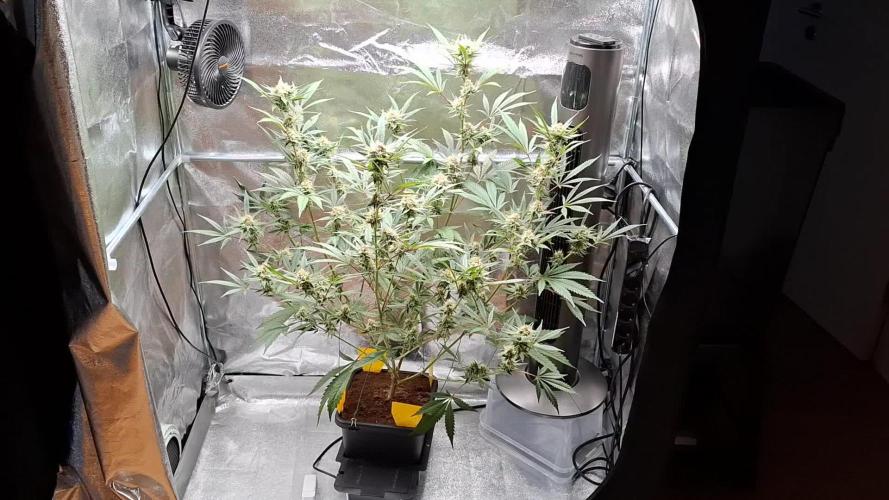
425g CO2 Supplimentiert
Last 12h light on week 8 Day 7 after this she gets 72h darkness before harvest
The smell is insane like pineapple and berries
The buds are heavy and dense
FastBuds doing a great job with the GelatoAuto I will try more !!!
Likes
3
Share


@CanarianGrow92
Follow
Week 2 under the TS1000, another week to go and the girls will start flowering 😁 excited about all these yummy fastbud strains!
The next week i will add another TS1000 to this girls as my other grow will finish!
Likes
32
Share


@Belverde
Follow
Hello everyone 🙂
Here we are finally with the Harwest report of this fantastic variety🍪
COOKIES KUSH from Barney's Farm..
GIRL SCOUT COOKIES ×ROLLEX OG KUSH..
I love this hybrid , from seed to flower, so I will try to be as partial and honest as possible, although I have very little negative to say, maybe nothing..
But let's we started..
Initially I germinated three seeds, all three born after two days at a constant temperature around 24 °, placed inside two pieces of wet paper, in turn closed between two coffee saucers..
I was unable to post the first two weeks because I was on vacation by the sea, finding the best canarian cannabis social club, while they were growing up😎: 1:
Towards the end of the third week the show started🎬..
A massive attack of thrips led me to have to use neem oil to try to counter these little ones. bastards🙄.
The oil was sprayed on the leaves using a pump sprayer..
First though mixed it with about 1/5 of potassium soap, as I have always found written to do..
As you can see in the first photos📷 the plant (and also her two sister in diari "COOKIES×KUSH") has undergone enormous stress making the leaves as if they had been bitten by some animal..
But the fault was all of neem oil or the wrong mix🤷♂️
Trying to inform me here and there, I did not find much specific information, but I really believe that the plant has undergone a phytotoxic effect as a reaction following the use of the neem oil..
The despair was great, but I tried to remain calm and understand what had happened in the hope that the effect would not extend going to compromise the health of the plant💆♂️🧘♂️..
After a couple of weeks in the Flowering cycle, this great Cookies pheno recovered great and as if nothing had tripled in size, maintaining a beautiful main top with vigor branches full of dense buds all around..
In the first week of flowering I cut the first two branches, focusing the energies on the upper ones.. After a few days I made a super Cropping on the central top, always trying to increase the vigor of the branches below💪🌲..
And the plant has always reacted very well, as if nothing had happened..
I also thought of defoliating, but then I left the idea to not stress it further..
In carrying out the final transplant I placed mycorrize in the ground, directly in contact with the roots..
In the first week of flowering I gave again once a bit of fish mix to facilitate the stretch phase..
Later during the flowering I used the slow release organic powder of the Greenhouse, plus twice the Biobloom fertilizer from Biobizz..I increased everything with biomass biomass , once / twice, more enchancers once through irrigation (always greenhouse), more than molasses..
I also gave some banana macerate made by me, but honestly I don't know if it influenced or not exactly, but I don't think bad did it..
Flowering was very quiet and without too many complications, if not some insect that I tried to fight using yellow and blue traps..
After 55 days from the transition to 12/12 I could have safely cut, but I decided to wait a ten more days, up to 65 °..
Towards the end of flowering, this beautiful girl had fantastic colors..
The yellow of most of the leaves, due to the discharge of nutrients, contrasted very well with the purple color that had taken on the other leaves and in small part also the flowers..
Unfortunately in the photo does not give a good idea of how beautiful it was..
The plant, as I usually do, was cut entirely and placed upside down in a wooden wardrobe controlled temperature and humidity, without becoming too crazy, always trying to maintain a balance..
More or less I always dried around 21/24 ° with a ur around 55/60%..
After about 7 days, when the outer leaves were dry enough to the touch, but not to crumble, I cut the branches to one by one keeping the flowers attached..
I then performed a manicure in a best art-way possible..
Nice, slow hands trimming..buds to buds..
Afterwards I put the branches with the flowers on a net for about a day and a half..
When I heard that the Popcorn Buds came off without leaving "the thread", I cut all the flowers from the branches and I have them stored inside a brown paper bag..
I left them inside for about two days until the flowers were almost completely dry as I wanted, always being careful not to let them dry out too much..
This phase is very delicate so you need to check the condition of the flowers several times a day.. Once ready I put them inside an airtight jar..
For 24 hours I didn't open, letting the humidity present in the flowers come out making them still slightly wet..
After a day, I found that the flowers had moistened to the touch, but not in an excessive way, just as I wanted..
From this moment on, I ap straight up the pot about three / four times a day at a distance of about 6h (always without getting too mad)..
For the first week I did so, then going to decrease the openings in the following two weeks..
After three weeks the perfume is came to be created in a clear, sweet and pungent way..
The first few weeks of opening the jar, for those who may not know it, it is normal to feel a fragrance of almost wet hay, which leads you to believe that you have made mistakes going to eliminate those incredible aromatic notes present during flowering..but not it is so..
The cure process, if well carried out, leads to reducing from time to time that unpleasant smell of hay until it transforms into that complex bouquet of terpenes that are cannabis can give..
It is fantastic to observe the transformation in the terpene profile during this phase♥️🤩..
I think it is a highlight, where patience and attention play a fundamental role in being able to obtain a high quality product, from connoisseur..
Just my opinion🤗
Cannabis, if well tanned, maintains and intensifies its aroma and potency in the coming months📆..
The flowers burn slowly and steadily inside lla map releasing intense aromas💐..
The smoke inhaling it remains soft and velvety without creating throat disorders..
I believe this phase is fundamental to be able to enjoy a unique product with organoleptic characteristics which it is difficult not to fall in love with👌..
In the case of this variety, specifically of this pheno, the aroma is undoubtedly mint, mint mint with some sweet earthy notes..
Very complex..
The taste in smoke is more tending to earth, but very sweet and delicate with other notes that I can't to recognize, complex to describe, but mint is not very present as in the perfume (after 40 days of care)..
Basically you are faced with a kush 2.0 , very very good and powerful..
A must have for kush lover's👌🏆..
As you can see in the video, the grass burns very well going to fill the map with oil..
The joint in question is obviously a pure without tobacco, rolled with organic papers and organic filter. If well cared for it gives off scents that potentially can hear hundreds of meters, so be careful you have neighbors (Ps, mine are the ones that nobody would like)..
I do a smoke test only to evaluate if the treatment process has been successful, otherwise in my days I usually use vaporizers ( mighty / ghostmv1 / dynavap m / vulcano sometimes )..
Thanks very much to those who created them🙏🙏🙏🔝🔝..
Anyway
In the test carried out with mighty (from 177 ° to 195 °) the aroma is pungent, much more than in smoke..
Excellent Kush flavor, sweet enough but with earthy and spicy notes..
Complex to describe and I would not add anything else to try to be as honest as possible..
Regarding the effect, I won't go too far..
In general it is a herb that acts on the body, leaving the mind calm and able to do anything (at least for me)..
As a good Kush that respects itself..
It is not not at all mentally invasive..
Wanting to be honest though, most of my friends (all daily smokers, around 30) are overwhelmed by this variety because it relaxes them too much..
I personally find myself to be god and I could use it in every moment of the day, also before intense physical activity..
something that does not always happen with sativa..
Just for this subject🤯.
In this way I cut the plant when the trichomes were roughly 10% amber and the remaining milk color..
It was a great experience to see this girl grow up..
Her strength and endurance were impressive and maybe I was lucky to have the problem of neem oil with her, because she endured great, allowing me to learn without compromising too much the final result..another plant would probably die..
I thank everyone who read the diary over the various weeks..
And thanks Grow Diaries for creating this community and connecting with it🙏🙏👌👌..
For more and more precise info I refer you to watch every single week where I tried to post everything as precisely as possible..
I hope you had Fun..
Remember to make some ClouDs☁️
And to the next story diary 😉🌱..
Thanks for the support🙏💚
Bye ✌️
Ps.
The final weight of the flowers is calculated with only the main buds, dried, cleaned from each leaflet and finally cured for more than a month.
The 205w light must be divided by three (she is the one who has used the least amount seen the position in the grow)
Hope you enjoy
Happy growing
As always, hope English will good

Likes
Comments
Share


Likes
23
Share


@gottagrowsometime
Follow
Was a pleasure to pull this lady this week.
She is 3 days into drying.
18.3c RH 57-63% in a dark bathroom
Buds are big and the plant itself you can smell from downstairs. House is filled with hints of Vanilla & fruity undertones.
Extremely high Calyx to leaf ratio.
More updates & pics coming and reports as it progresses.
20% off KANNABIAS amazing strains with code: ggst
https://kannabia.com/feminized-cannabis-seeds/candy-cream-go-fast

Likes
6
Share


@GRow_M8s
Follow
Apart of increasing the dose of topmax to 4ml/L there was no much to report for this week until the last day of the week.
There was an accident with a frozen bottle that is placed next to the fan to blow some cold air in the tent. It fell down and the fan was hitting the queen straight and made her bent a lot to the side. I hope she didnt get stressed 😒. Now she is tied to a reed.

Likes
Comments
Share


@Pablo_420
Follow
Muy contento con los resultados y estás es una de ellas las demás increíbles también

Likes
19
Share


@adam_pawloski87
Follow
Let’s Go Day 81!!!! This week went real great 2 Ogreberrys are hanging to dry and also the Bruce Banner is too after there 48 hr of darkness! The 3 other Ogreberrys began flush on Monday so finish out this week of flush and one more week of flush after that an they will get the chop too! But stay stunned for next week , we’re not done yet so keep them eyes peeled!! Y’all have an amazing productive day as well as a great week ! Peace love an positive vibes to everybody Cheers 😶🌫️💨💨💨💨💨🤙🏻

Processing
Likes
24
Share


@Cogollo_eu
Follow
**Encontrarás la traducción a español al final de la descripción**
If you like this week, please hit a like, it costs you nothing! 👊. Thanks in advance 😉!
From/Desde: 05/08/19 || To/Hasta: 11/08/19
From day/Desde día: 14 || To day/Hasta día: 20
-----IMAGES & VIDEOS-----
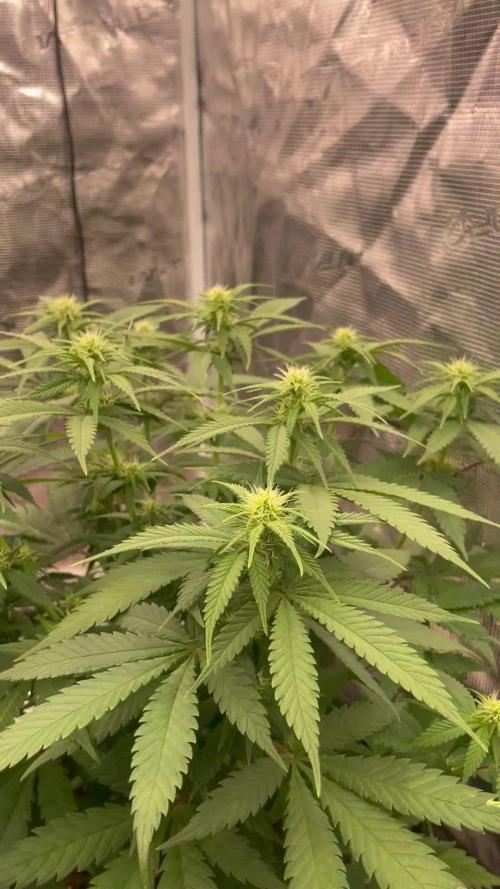
V2: From day 17 to 22 she has turned a quarter, 90º.
-----WEEK SUMMARY-----
One week more of normal and constant grow, i like the rythm she has growing as i feel she's having a good amount of time for developing the root system. I didn't noticed any weird colour, twirl or something like that, anyway this tent is not totally isolated from outdoors as is always semi-opened in my living room, and the door to my terrace is opened 24/7.
She looks very healthy and equitative, also i think she has a perfect height to keep her growing at low height, just a bit over the pot once topped. Next week i will perform the first topping and prunning.
-----WATERING CALENDAR-----
08/08/19 - 3,000 ml with all week nutrients @ 1 E.C. PH5.8
*****ESPAÑOL*****
Por favor, si te gusta esta semana dale un like, no te cuesta nada 👊. ¡Gracias por adelantado 😉!
-----IMÁGENES & VÍDEOS-----
V2: De los días 17 a 22 de crecimiento la planta ha girado un cuarto de giro, 90º.
-----SUMARIO SEMANAL-----
Una semana más de crecimiento normal y constante, me gusta el ritmo en el que crece pues me da la impresión de que está teniendo un tiempo excelente para desarrollar el sistema radicular. De momento no he notado ningún color o cosas raras en las hojas, aún así este armario de cultivo no está totalmente aislado del exterior ya que está siempre semi-abierto en mi salón, y la puerta de mi terraza está abierta 24/7.
Se la ve muy sana y equitativa, también tengo la sensación de que va a coger el tamaño perfecto para mantener el crecimiento bajito, justo un poco por encima del tiesto una vez hecho el topping. La semana que viene realizaré la primera poda y el primer topping.
-----CALENDARIO DE RIEGO-----
08/08/19 - 3.000 ml con todos los nutrientes semanales @ 1 E.C. PH5.8

Likes
2
Share

@stadtgaertner
Follow
Started using Canna Boost about a week ago. Noticeable increase in growth and dank. Using 1ml per Liter in the reservoir. I was hesitant because of the high price but this stuff is great.
After playing around with the Masterblend ratios and weights I feel pretty confident in my current mix. What I thought to be tip burn from nitrogen turned out to be the early stage of Calcium deficiency. As Nitrogen and Calcium come in the form of Calciumnitrate you can't drop the N without the Ca. To avoid this I bought Canna Mono Calcium with 11.6% Ca. Now I am able to dial the N down to 120-130ppm and keep my Calcium at about 150ppm. Anything lower than 120ppm of Calcium starts to show deficiency symptoms. Same goes for the Nitrogen, 120ppm is the absolut minimum right now. I am also going to increase the Magnesium to 50ppm with the next tank refill.
I am pretty happy with the Masterblend 4-18-38, Calnit 15,5-0-0 and Epsom Salt bundle. You don't have to buy a seperate flowering blend if you get a mono calcium fertilizer. The plant loves the Masterblend. Looks way better then when using Canna AB...

Likes
1
Share

@sunshinegroww
Follow
Welcome week 3 defo no more stretch few more days and will lolipop and let her fattens those flowers she is happy as lary indeed lets gooooooo


Likes
262
Share


@TheBudWhisperer
Follow
Oct 22 - start of week 4 and she’s strong and vigorously growing. Very god thing and think we may be topping a little early - we’ll see how it goes. Nute sched. is in overdrive - every feed right now and she seems to be loving it. Stay tuned for topping #1 and thanks for stopping by👍👊,
Oct 24 update - this thing is a beast. We’re at 5th node now but she’s lookn real strong and the stem is really thickening up. I could probably top er now and clean er up but I’m gonna give it one more day to stagger out with her next feeding. Per photos her 3rd node growth and side shutes are coming in nice so should have a solid base For the manifold. She’s been worked hard with the feedigs recently so got a plain ph’d rinse today to wash out any lingering mineral buildup. No big deal, no issues, just preventative. STAY TUNED, first topping come’n up!👍
Oct 26 update - manifold day! First topping and 6th node just poken out. No worries on this plant, she’ll recover just fine from the trim and top.😎🤞. Started 3 clones from the top and a couple shoots. Doubt they’ll take but just wana see If i can clone this early - always down to experiment😉. THANKS for stoppn by y’all!👊
Oct 28 update - she really hasn’t slowed down much post-top & trim. Super healthy and recovering very well. 👍 Larry, Curly and Moe r doing their thing - not dead yet anyway😎👌😉
Background
After the batshit nonsense with this years outdoor grows getting jacked, I need some kush and I need it fast! This girls an indoor grow in the cabinet and she'll be manifolded and defo'd for 8-10 fat ass colas. They’ll spend a first week or so under a cfl assembly while the last harvest dries out in the cabinet. This grow is going to be nute sched. heavy and will hopefully test the limits of my smaller grow space (2sq/ft). Ive had my eye on a critical & kush cross for awhile and really looking forward to seeing this one grow out. Thanks for take'n a peek, stayed tuned, and happy grow'n folks! 👊
Likes
179
Share

@StarLorr
Follow
Welcome to my Øpium diary.
In this diary:
Seeds: sponsored by Ðivine Șeeds
Media: Promix HP
Nutrients: Advanced Nutrients, Diablo Nutrients, Gaia Green Power Bloom.
Light and Weather: Şun☀️and Mother Earth.🌎
___________________________
Feeding:
Mon 26Aug: 4L water not pH'd
Tue 27Aug: 4L water not pH'd
Wed 28Aug: 4L water not pH'd
Thu 29Aug: 4L supplements Monster Blaster, Flower, K. Not pH'd
Fri 30Aug: 4L water not pH'd
Sat 31 Aug: Rain Showers🌧️
Sun 01Sep: 4L nutrients pH'd 6.5 with a micro tropical storm mid afternoon😬
___________________________
*please note that most watering are from top now since topping with Gaia Green Power Bloom*...... and since i smashed the saucers with the weed wacker🤦🏻♂️
______________________________
Øpi is "still"on autopilot. We had a warm humid week but Sunday's micro storm⛈️brought us cooler temperatures as today (sept 2nd)we maxed out a 17°C and this morning we had 12°C.
______________________________
Started using Diablo Nutrients's supplements for the blooming phase.
Monster Blaster, Monster Flower and Monster K.... for good mesures😉
______________________________
Thanks for stopping by, likes and comments are appreciated!👊🏻😎
Keep on growin!
Keep on tokin!!!
😙💨💨💨💨💨
Likes
3
Share


