
Likes
Comments
Share


Likes
31
Share


@Cultivate
Follow
Well... What a very very stressful week this has been, A few pistils started browning. I went over each girl no Nana’s definitely all female, started panicking thinking I maybe had bugs, root rot e.t.c.
Flushed for two days and all new growth showed healthy signs kicking out some serious trichomes! Smells beautiful and PH for the run off was exact.
Gave 1/2 Nutrients/Feed today for the first time just to ease the girls back in but fingers crossed I have either had some PH issues or wind burn possibly.
Had to Defoliate again today as the foliage was ridiculous😂 I hope next week isn’t so stressful 🙏🏻 Wish me luck man please I need it 🤦♂️🏻😅

Processing
Likes
19
Share


@BigBuds95
Follow
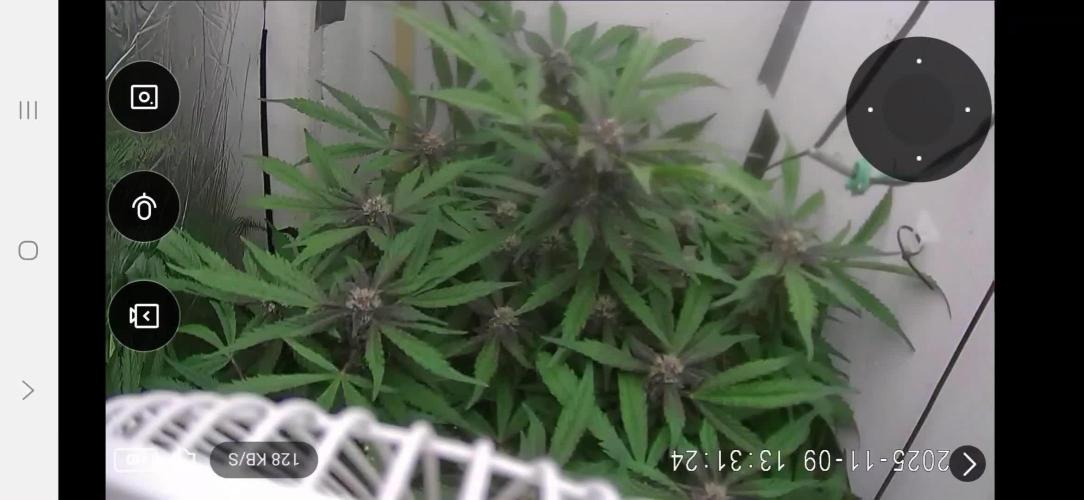
Purple really starting to come in, upgraded ventilation system has got my tent down to low 70s they seem to be living it !

Processing
Likes
7
Share


@Kushizlez
Follow
(Days 28-35)
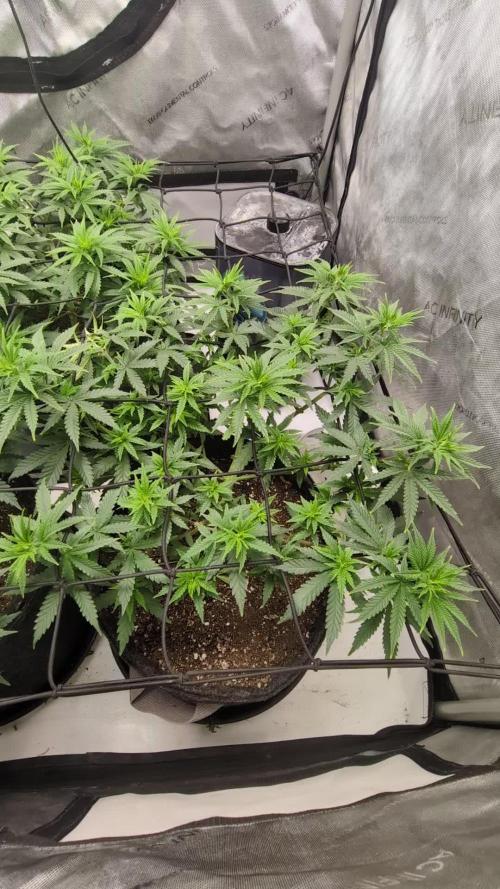
(Day 29) Everything seems to have recovered fine from topping so I transplanted into their 1.7 gallon pots. They were pretty rootbound so this should make them nice and happy. Going to start LST after recovery. Got a ton of holes poked around the rim of the bucket which should make tying down easier.
I’ve been asking around on some forums and reading some articles and I’ve decided to switch out my MH bulb for the included HPS bulb. Apparently HPS bulbs will stretch the nodes out quite a bit more and provide higher PAR value for the same amount of electricity. My plants are looking pretty small for day 29. Although, that could just be from stuffing 15 plants under one 250-400w light.
I’ve been powering the lights up to 400w at night and back down to 250 during the day. 400 just gets it too hot during the day (86-88) without ventilation. That temperature should be fine in veg once my co2 has really built up some mycelium.
(Day 32) Just got 14/15 topped. The BCTG runt is just going to be lst’d and not topped or fimmed. I decided to just fim the plants I started later so they’d have a bit more time to recover and catch up to the others. I also LST’d all 9 quite well. Almost had a stem break but she’s doing just fine now. The deformed bbb was accidentally fimmed and as a result it’s got a very trippy looking main stem that has branched off into 6 mains.
I definitely have fungus gnats. Fuckers must have got in with that coco I bought from hydro store. This has never happened to me with just promix but the benefits of coco are too much to pass up. I might order an OG BioWar/capsbennies/grubgrenade to help naturally get rid of them.
I’m getting some confirmed yellowing on bottoms of the zkittlez and WW’s. They must be heavy feeders because no other plant in the tent is getting yellow like that. I’m going to feed a compost tea, top dress everything at full strength and mulch in some worm castings to help break it down faster. Will also do a foliar spray with some insect frass, microbes and m1pps.
(Day 33) Got some more of that marine phytoplankton stuff to help stabilize my RO water. It’s got a good amount of soluble magnesium and trade minerals in it so that should help stop the yellowing on the zkittlez and WW.
(Day 34) Things are looking great so far and they’re all recovered from topping/transplant/lst and thriving. Some slight yellowing and a few of the plants are cupping from heat and high humidity. I just put in a dehumidifier to help bring the rh down. The m39/zkittlez bagseed plant is just outpacing everything in the tent by 4-6 days. No wonder organized crime used to grow it. I hear it can completely flower in 45 days with a solid yield and very little trimming or leaf matter. It’s very weak on the high and smell though. Nonetheless it should be nostalgic to try those old terps. There is still a small chance that it’s a super vigorous zkittlez plant too.
Plants should be showing sex this coming week. Hoping for 8+ fems but I can make do with just 4. 1-3 is unlikely but that would piss me off beyond belief. I’ve heard of it happening though.
Processing
Likes
8
Share


@zombikush81
Follow
###I prepared the girl to spend it in bloom, put into her new 15-liter pot last week. as for the other two girls, they are at the beginning of the 3 weeks of flowering.
###also put the fourth girl in the final bucket, I'll wait about two weeks to pass it in bloom.


Likes
4
Share


@Urunascar
Follow
Vienen muy lindas, por ahora solo estirandose sin formar mucho las preflores, al final de la semana que viene planeo hacer defoliacion y poda de bajos
Likes
10
Share


@StoneJackson
Follow
They took a long time to grow and mature 10 months in all. They produced amazing flowers with a genuine high. Left a lot to be desired in flavour profile however not awful to smoke. Would grow again for sure as they were a high yielding, ‘set and forget’ type of strain easy and resilient enough to grow and highly impressive to see grown outdoor.


Likes
22
Share


@Prilyfe13
Follow
May 12, 2024 Day 22
A new week. A new watering and some noticable size and progress differences.
Let's get to it.
Sour Diesel A:
She looks really good. About 5.5" and fairly strong. I expect her to harden off nicely.
Sour Diesel B:
By the most noticable difference in the bunch. This lady is a whole node ahead of the others. She looks amazing. I wonder if she is going to tower over the rest. I'll have to really focus on LST in the coming weeks. She already has a really stiff stem. Thick as well for her size. I'll have to be careful with the initial bend. She's also a out 6" tall. Not much taller than the others, but the ratio is noticable.
Sour Diesel C:
Just the same as Sour Diesel A. About 5.5" tall, great color and a pretty strong stem. Nothing really noticable between the two for now.
Sour Diesel D:
She is about 5" now. A bit shorter and a bit behind. However, she is about the same strength and progression as A and C. She will most likely end up small. So I'm definitely giving her her own tent.
Sour Diesel B is getting a bit wide now. She's starting to get to the edge of the container. I need that not to happen yet. I won't have space on 4 days. Eek! I'll see how things go.
The rest aren't that far behind either. They are just about at the edge of the container. Not as bad, and they won't be much of an issue for the next couple of days.
All four plants got 1/4 gallon top watering today. I don't like to flood the soil as my bottom feed system does not. So it makes sense to start low and work my way up.
Eventually they will take in about a gallon a day. But by then, they will be well off on their bottom feed systems. Anyway, 1/4 gallon plain tap water each.
I've set the DLI to 25 mol/m²/d for the week. I don't think it's going to stay like that for very long. I don't have top space left and this is not a dimming light. So if I have to I can only drop the light down.
The environment is looking excellent. I stopped using the humidifier since the watering brought the humidity up to 70% all on its own. I'll have it down to 60% by the end of the week. For now it's nearly perfect with a temp of 77° and the humidity at 71%.
The night temp is a bit low for this stage. It's 64° at night. Very low. I'd rather it be closer to 70° during lights out. As soon as they go in the 3x3, it will be fine at 70° during lights out.
Grow System Environment:
Temp: 73.9°
RH: 72.7%
VPD: 0.81 kPa
May 13, 2024
Not much to do today. No watering needed, no light changes, no pics. Just planning out LST starting in the next day or 2, especially for Sour Diesel B. She is growing quickly and is starting to grow over her container rim.
Sour Diesel A looks great! Long base stem, nodes are a bit tight, but it's not the light. It's just how she's growing for now. I expect her to stretch those nodes out in no time.
Sour Diesel B is shaping out to be a pretty vigorous plant. If she keeps this up, she may end up towering over the other plants. I'll have to work on a plan of action. Most likely more LST and maybe a SCroG net for the stretch. Just to keep things low and level with the rest of the canopy.
I plan on tying her top down at node 4. It's just starting, but it's super pliable and will be tall enough in a day or two.
Sour Diesel C is just the same as A. She is sporting shorter internodal spacing but has a nice long base stem. Much easier to get under the plant when defoliation time comes.
Sour Diesel D. Now this plant is still behind the others. She has the same tight internodal spacing like A and C, but smaller. Depending on what happens with how these plants grow, I might be able to keep her in the main tent with the rest of the plants. However, if she ends up too short or if B ends up being too tall, she's going in the 2x2. Hopefully she will end up as big as the others and I can put my 2x2 away for now.
The light is going to stay the same while in the veg tent. I can't turn it down, nor can I lift it any higher, so the plants will have to naturally grow into it for the time being. It's should be perfectly fine. Plus it's only for a few more days.
I'll be harvesting a couple of Tropicana Cookies in a couple of days and that'll open up plenty of space for these 4 smaller plants without cramming them in. That's where my only concern with Sour Diesel B comes in. She may grow faster and be too big to fit in the tent with the other 5 plants. I hope not. I have a final 2 plants almost ready for harvest in the 3x3. They aren't huge, so they shouldn't really overshadow these ladies. At least not much.
The environment is spot on. 77° and 72% humidity. Night time is fine I guess. Kind of cold in my opinion. It's at 67° on average at night with a low of 63.4° and a high of 73.7°. That's for lights out. Daytime is perfectly fine.
Grow System Environment:
Temp: 74.4°
RH: 72.8%
VPD: 0.81 kPa
May 14, 2024
Not a lot going on today. Just some pics and a water weight check. Still heavy. The solo pics will be every other day and the Veg Tent pic will be everyday with the grow day marked.
Sour Diesel A is stretching nicely now. She can start training in a couple days. Great color. Beautiful leaves.
Sour Diesel B is amazing. She's growing out now and has a strong stem. The very top is pliable. Not great for training. I might have to wait for a bit more stretch from her.
She has some excellent internodal spacing. Perfect greens and 7 finger leaves. A great sign for a healthy plant.
She's definitely going to be the star of this show. But who knows. Sometimes, another plant will shoot up out of nowhere. It's happened to me. One plant looked great while the other had some early stress. That one turned into a 21 oz monster. Insane. Anyway, there you have it. Right now any of them to could just take off, but I'm putting my money with this lady.
Sour Diesel C still has some tight internodal spacing. I need to wait for her to start stretching so she can begin training. We'll see when that will be. Great colors and super healthy, just growing differently for now.
Sour Diesel D is the definite runt of the bunch. She's not far behind though and I may actually get to keep her in the tent with the rest and put my veg tent away for the next 6 or 7 weeks.
Still, I have the option of keeping it out and using it to keep space open for all plants. 3 in a 3x3 would leave tons of room for them to bush out and fill the canopy.
Anyway, great color and very healthy regardless of size. She still may produce a good yield.
The light will stay the same as always. They all have a slight reach going on and I couldn't be happier. I'll run a DLI check before I move them to the big tent. So I know what light level to start at.
The environment is looking great! The temp is at a nice 77° and the humidity is right at 72%. That will drop when they get in the 3x3. I'll keep it at 60% for the rest of the Veg cycle.
I'd also like to note about the medium. This is super soil I think. Or it's just loaded with nutrients. Happily all of the plants too swimmingly to it with no stress. My only thing is with adding nutrients. I don't really have any veg nutrients at the moment, but as this is hot soil, I don't think I'll need any for the veg cycle anyway.
However, flowering may be a different story. I have Advanced Nutrients Big Bud, Bud Candy, Overdrive, Sensi Cal/Mag Xtra, Tasty Terpenes and B-52. I think I'll use them. I could use the B-52 during veg, but as I said, this is hot soil. So unless they show signs of deficiency during Veg, I won't add it. No sense in overdoing it. These are autoflowers and don't need a ton of nutrients.
Grow System Environment:
Temp: 75.5°
RH: 74.9%
VPD: 0.78 kPa
May 15, 2024
All 4 ladies got a quarter gallon of water today. I forgot to PH it, so that's a mistake. I will definitely remember next time. Tap water is 7.3.
Sour Diesel A looks great! Her branches are growing nicely and fast. She has nearly caught up with B, but she's still 1 node behind. This one seems to be a straight hybrid phenome.
Sour Diesel B looks amazing! She has doubled in size and her branches are about half way to the edge of the container. Very exciting. This is a sativa dominant phenome.
Sour Diesel C also looks great. She still has the tight internodal spacing, but it's getting better. She looks to be the same phenome as A is.
Sour Diesel D is a straight up indica dominant phenome. Her leaves are super wide compared to the other plants. She is still smaller, but not by a lot. Branching hasn't really started yet. Not like A and B.
All four plants are super healthy with perfectly green leaves. Their stems are pretty strong. Especially B. Her stem is very close to being unable to train. We shall see. I may be just pulling the side branches out and defoliating that one.
The light seems to still be perfect. Slight praying on the outside and perfect on the inside. I rotated B because of this. She was starting to pull towards the light. I may be able to drop it down a smidge for a bit more intensity. They should be able to handle it and maybe grow even faster. I just don't want squat plants. Not leggy either. Where they are at is just right.
The environment hasn't given me a problem yet. Temp remains in the high 70°s and the humidity stays just around 70%. I think I'm going to drop it a bit earlier than I intended. I think it's time for the humidity to be closer to 60%. The temp will definitely stay the same, if not climb to the very low 80°s. The night time environment is a bit cold running at and average of 66.8° with the humidity climbing up to 80%. Once I drop humidity, the temp should increase. And once they get in the 3x3 tent, they won't have any problems keeping it at 60% and 77°. The night temp should also increase slightly. I'm hoping for 68° to 69° average and I'd like the humidity to remain at 60%. Shouldn't be a problem.
Grow System Environment:
Temp: 73.5°
RH: 71.2%
VPD: 0.84 kPa
May 16, 2024
All 4 ladies are showing vigor. They will definitely need water tomorrow, but are all very happy plants. Huge leaves, strong stems. Beautiful color green.
Sour Diesel A is now the second best of the 4. She's a little shorter than B, but has started spreading her branches and stretching to spread that internodal spacing. She looks great!
Sour Diesel B is absolutely stunning. She has beautiful leaves of a lush green. Perfect internodal spacing ratio and a super stiff stem. The branches are nearly at the edge of the container from both nodes 1 and 2. Node 3 is about half way there with node 4 and 5 just starting out. Eventually, I'll have to tie her down, but as I said before, I may train her differently and just pull out the side branches.
Sour Diesel C still has some pretty short nodes. Tall main stem, and she is starting to stretch, but still kind of tight. Huge leaves though. Like massive for the size of the plant. And I'm pretty sure she has the biggest leaves of all the plants. Indica dominant? Or straight up hybrid? We'll find out soon enough.
Sour Diesel D is still short, but is catching up to C. And much like C, she is showing short nodes and big leaves. Beautiful color and a very nice plant, but not as nice as the other 3.
I think I'll rotate them out tomorrow. Put A and B in the back with C and D up front. My light may be unlevel. I don't think I can fix it though. It's too light and the power cord is super stiff, so it pulls the light one way.
Oh and I need to check the DLI. I have a feeling I can drop it down now. Just a few inches I think. Just to get that DLI up and make these ladies shoot up.
The environment is still really nice with a temp of 77° and the humidity at 68%. Night temps are an average of 66°. I'll leave it his way until I get into the big tent which should be tomorrow. Or even tonight depending on how I feel. I have to check trichomes on one thing plants in the main tent and if they look ready, I can swap them out.
Grow System Environment:
Temp: 74.2°
RH: 72.8%
VPD: 0.81 kPa
May 17, 2024
We have finally moved into the main tent. It's a super tight fit, but it fits nonetheless. Now things to note as we go into the main tent.
First, I'm pretty sure my light in the 2x2 wasn't level front to back. Mostly because Sour Diesel A and B are now twice as tall as Sour Diesel C and D. More developed and perfect spacing between the nodes.
To solve this issue, I changed the orientation. In the very back of the tent, behind these ladies is the last Tropicana Cookies. This plant is floppy and bendy to say the least. That being said, it's propped up by one of the Banana Purple Punch's on the right with the second one in the right front.
I placed Sour Diesel A and B in the back in front of the Tropicana Cookies. It's taller so there's less light getting to these two. In turn I put Sour Diesel C and D up front where there is more access to light. Let's hope they catch up. If not, then maybe they are different phenomes afterall.
Sour Diesel A looks great! Completely caught up with B now. Beautiful color and strong stem. Her branches aren't as long as B, but they are definitely getting there. I think I'll start training in the next day or two.
Sour Diesel B is amazing! Her nodes are perfect, her branches are spreading out to the edge of the container now and she is just begging to be trained. However, her stem is really thick and strong. So I have to wait for her to take off which should be any day. Then there is the pre-flower stretch. I'll be training just before that and a little bit during, just to position the branches accordingly.
Sour Diesel C is shorter than A and B. About half the size to be honest. Right internodal spacing and I'm pretty sure lack of light quality kept them like this. I don't think it was too much light. That would t make any sense with a 100 watt light nearly 36 inches away. No chance. Anyway, so that's what I think happened.
Sour Diesel D is still small as ever, but is now the same size as C, so that's a thing. As I said before, I put her up front with C to get a bit more light. Hopefully she catches up with A and B. If not, it's not really a big deal. All I have to do is place them on one side of the tent with risers and the taller two on the other side. I favor the taller on the left and shorter on the right. It's just the way the tent door opens and placement.
I'll check the DLI today at some point today. It should be around 20 to 25 mol/m²/d which is spot on with the stage they are in. Also a much better light, so much better light quality and more efficient intensity.
The environment in the main tent is a nightmare for the flowering plants, but for these 4 it's paradise. The Temp is hovering around 76° and the humidity is 62%. There's tons of airflow, so I'm not all that worried about the flowering plants for now. They get well taken care of. Of course I'm trying to drop the humidity down a lot for the flowering plants, but the weather here won't let me. It's been ridiculously humid out for the last week.
Grow System Environment:
Temp: 76.4°
RH: 61.4%
VPD: 1.17 kPa
Quick Update:
I had to increase the light power from 60% to 80%. I can't really move the light down yet, so I just I increased the power. Once all the other plants are out of the tent, I'll adjust accordingly
I also took the light distance measurement and we are at a whopping 40.5" away. No matter, the DLI is what matters, and it's correct.
May 18, 2024
No watering today. Just some leaf tucking and rearranging.
Sour Diesel A looks great! She is the same size as B. Maybe a tiny bit taller now, but her branches aren't all that long yet. I could only tuck 3 leaves on this one. Still looks good and grew nearly 2" last night. Super vigorous.
Sour Diesel B is the star of this show so far. Her branches are all long enough for full leaf tucking. I don't know how I plan on training her up. Maybe I'll bend the top, maybe I'll leave it alone and tie down the side branches. We shall see how things go.
Sour Diesel C is smaller with shorter branches and still tight nodes. She's definitely not going to catch up to A and B. Not with how vigorous they are growing. Unless they stop randomly. Anyway, C looks good. She has perfectly healthy leaves and big ones at that. I managed to tuck 2 leaves, but that was it.
Sour Diesel D is the same size as C. Same branch length. And no tucking available.
She does look healthy. Super healthy, just growing differently.
The light is perfectly spot on. I won't be changing it at all until all the other plants are out of the tent. Then I'll set the light to 24" from the canopy and power level down to 60% for a week. Maybe 70%, but I doubt it. We shall see
The environment is perfect for these 4 plants. Not exactly perfect for the flowering plants. Actually, it's super horrible for the flowering plants. The temp is around 77° and the humidity is around 65%. Perfect for these ladies.
Grow System Environment:
Temp: 75.4°
RH: 64.3%
VPD: 1.05 kPa

Likes
4
Share


@losgrowershermanos
Follow
Rega com fertilizante. Aproximadamente 100 ml por planta. Observando. Observando, foi usado o mesma mistura de semana passada. alterando PPFD para 380
Likes
1
Share


@ThatsmyGrow
Follow
Einfach den schönsten Wachstum den eine autoflower haben kann. Sie sieht super ausmacht. Ich liebe die strains von fastbuds.


Likes
29
Share


@BioGrowKing
Follow
Die Woche ist sehr gut verlaufen ich dachte eigentlich sie stirbt aber sie hat sich sehr gut erholt nach dem ich die Nematoden hinzugefügt habe man kann es gut erkennen da wo ich getoppt hab kommen und zwei weitere Köpfe und die neuen Blätter die wachsen sind wieder schön grün und saftig
Sie ist nun auch in der zweiten Blüte Woche beziehungsweise der elfte Tag dann schauen wir mal wie es weitergeht.

Likes
12
Share


@Metamorph
Follow
Hello again, dear growers! 🌱👋
We’ve officially stepped into Week 10 of this wild and fragrant journey! Last week ended with a little makeover for the girls—I defoliated about 30-40% of the leaves again. ✂️ The Gorilla decided to keep me on my toes by showing some nutrient deficiencies on her leaves—guess she didn’t get enough food after the flush. 🍌🌿 (Lesson learned: don’t keep a Gorilla hungry!)
Now, let’s talk about Runtz! 😍 She’s an absolute queen—so photogenic that even my struggling phone can’t capture her real beauty. 📸✨ She’s forming into one giant, luscious bud, and her fragrance is something else entirely! 🕵️♂️ The carbon filter is fighting the good fight, but if the room isn’t aired out every 8-9 hours, a little aroma starts sneaking through.
But opening the tent… oh, my friends, that’s where the magic happens! 🌬️💫 The aroma is intoxicating—imagine diving headfirst into a field of flowers while bees whisper secrets in your ears. 🌺🐝 I just sit there, enchanted, savoring the smell, and staring at these beauties like a hypnotized gardener. Honestly, it’s hard to walk away. 😂
Here’s their menu for the week:
🍵 Feed: A+B 4ml/L, Micro Chum 1ml/L, Big Bud 2ml/L
📊 PPM: 1050 | pH: 5.8
💧 Runoff: PPM 1000 | pH 6.0-6.3
Now, for the not-so-great news…
I’m struggling with humidity levels—daytime sits around 65-77%, and at night, it can climb to a stubborn 80%. 🌫️ Temperature-wise, it’s 23-25°C during the day and drops to a cool 16-18°C at night. ❄️🔥
Despite the challenges, the endgame is near, and I’m savoring every moment of this grow! 🌟 🙌 Happy growing, everyone! 🌱🔥
Likes
3
Share


@Godino
Follow
I start seeding in 17 October. 20 October all seed are germinated.The grow was so fast that i decide to start lst and topping after less 20 days( i get 5 nodes to all plants very fast ). LST will continue and i will add scrog soon! This This my first grow surprise me, the canopy grow very fast and seem thats it's all very good!!
Comments and suggestions are appreciated!


Likes
4
Share

Likes
1
Share

@CannaWolf420
Follow
Another good week for the ladies with good growth. They are strong and vibrant with many tops starting to take form. With some of the taller branches I used HST by rolling the stem untill it bends basically in half, giving the lower branches plenty of time to grow up. Once they have reached past the scrog net I begin to LST by tucking branches under also making way for new growth. One more week with minimal training and mostly defoliation of bigger fan leafs before I'll flip to flower

Likes
4
Share


@Smokiebear_og
Follow
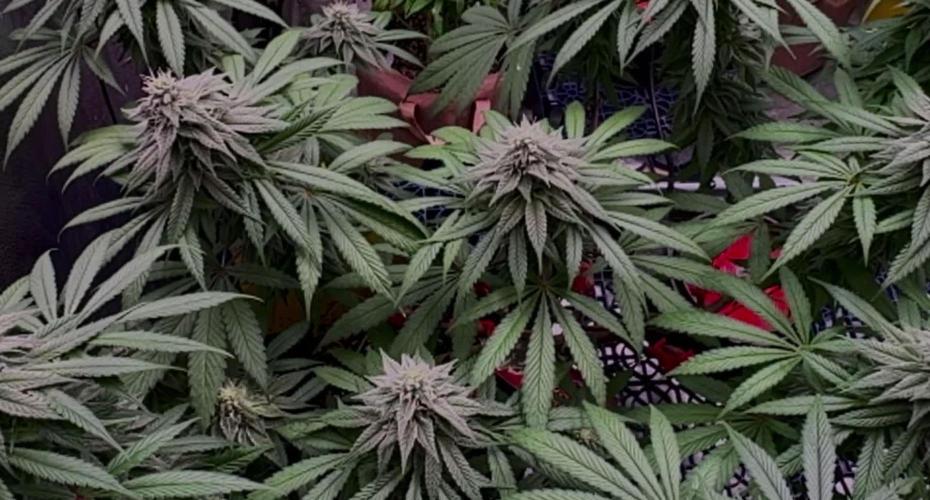
Hey y'all week 8 in 3 days and things seems to be going not half bad. There's yellowing going on and I think that's due to me not checking my runoff and not correcting but they are in ranges of 6.4 to 6.8 ehhhh I know. But won't let that happen again.
Besides that have you seen the frost on these lady's so far, especially for Pheno 1 she is super frosty and has a nice 🍇 🍋 smell that keeps getting better by the week. Pheno 2 smells like lemon citrus and Pheno 3 has a nice 🧀 🍇 smell going for her. Pheno 4 on the other hand is very subtle at the moment but I'll keep my fingers crossed.
Till next week growmies
Happpy growing y'all 🤙✌️

Likes
15
Share


@Meewin
Follow
Just a couple days old for this Blue Dream seedling. No watering needed today.