The Grow Awards 2026 🏆 


Likes
Comments
Share
@TerpTurtle
Follow
14 day dry | Curing in Grove bags, filled 7 QP bags & got 56g of keif out the trim bin from only 2 plants!
STAY FROSTY GROWMIES


Likes
9
Share
@Smokwiri
Follow
Welcome to my 2nd diary within diary.
The first diary is already harvested.
The second one has been in veg for about 20 weeks, while it was in veg, i trained it with lst and hst, now we are a in flowering for a couple of weeks.
Third diary will come within this diary too, i took a monstercrop clone, it's revegging now, curious of the outcome, since this strain already has tight internodes on the branches.
Well, this looks good, looks like shes loving the lights, gave some green sensation booster this week.
Let the buds fill up a bit...

Likes
43
Share
@Master_weeda
Follow
Bonjour à tous les padawans et les maîtres jedis
Pour cette semaine 3 au seizième jour ma plante fais 15 centimètres et son sixième noeud apparaît je décide donc de pratiquer un LST sur ma plante.
Pour ce j'utilise du fil de fer galvanisé que je plante directement dans le substrat en faisant attention de ne pas endommagé les racines car n'oublions pas que ce qui pousse dessus pousse aussi dessous.
Jour 17 je pulvérise (dessus et dessous les feuille) une solution composé d'une cuillère à café de savon noir mou dilué dans un litre d'eau en prévention d'éventuels nuisibles. Je répète l'opération une fois par semaine jusqu'à la floraison.
Je corrige mon LST suivant la pousse de ma plante ...
Pour ma par c'est la manière dont je procède mais petit rappel de la technique du LST:
Quand commencer à appliquer la technique LST
De nombreux cultivateurs commencent la manipulation dés que les plantes possèdent entre 3 et 6 nœuds ou une paire de feuilles. Durant cette première étape de la croissance, le tronc encore flexible est pliable sans risque qu’il ne se casse, même si au fur et à mesure du développement de la plante il sera de plus en plus difficile de le plier. Nous pouvons continuer à guider la croissance des branches durant toute la culture, même durant la floraison, ce qui pour cette étape représente un grand avantage face à la taille, qui n’est pas du tout recommandé une fois que la formation des têtes commence, cela stressera en effet la plante, ce qui aura pour effet de retarder la récolte.
Comment appliquer la technique de guidage LST
Si nous sommes prudents, la flexibilité naturelle des fibres du cannabis permet de plier leur tronc et branches avec une relative facilitée, même durant la floraison des plantes.
En utilisant une corde fine, nous pouvons accrocher la pointe de la plante à la base du pot par exemple ou à un tuteur que nous aurons planté dans le substrat. Nous plierons le tronc avec précaution et nous le fixerons avec la corde, à partir de là, nous pouvons augmenter progressivement la tension de la corde, chaque jour un peu plus, jusqu’à obtenir la position souhaitée. Soyez attentif à la réaction de la plante, essayez de ne pas appliquer trop de pression sur la corde et rappelez-vous que la flexibilité des branches peut varier d’une plante à l’autre.
Pour obtenir de meilleurs résultats, il suffit de suivre quelques règles simples. Pour commencer, nous devons choisir une corde fine mais pas trop pour ne pas blesser les troncs au fur et à mesure qu’ils grandissent et qu’ils deviennent plus gros.
Nous pouvons utiliser des crochets en plastique souple ou de n’importe quelle autre matière flexible pour éviter d’endommager les plantes. Spécialement en intérieur, utiliser des cordons en plastique de couleur (voir les diaries de @Silky) est très pratique pour voir facilement les accroches et faciliter le travail au milieu du réseau formés par les cordes, les tuteurs, les mailles ou les supports que nous aurons dans la culture. Bien entendu, en culture extérieure et surtout en guerilla nous ferons juste le contraire et nous utiliserons des matériaux de couleur qui n’attirent pas l’attention pour que notre jardin reste discret.
Pour stresser les plantes au minimum, la mieux est de réaliser ces manipulations le soir ou juste après que les lampes en intérieur s’éteignent, ce qui leur permettra de se remettre durant la nuit. Normalement, le jour suivant nous pourrons observer comme les pointes des branches que nous avons pliées se dressent de nouveau vers le haut à la recherche d’une source de lumière.
Que la force soit avec vous💪
Que la force soit avec vous

Likes
3
Share
@FlowerOasis420
Follow
Sie gehen gut in den Stretch und legen gut an Höhe zu. Die ersten Blüten bilden sich aus.

Likes
107
Share
@MrJones
Follow
Mr-Jones Strawberry Pie Auto by FastBuds
🍓╰⊰🍓´🍓⊱╮🍓╰⊰🍓´🍓⊱╮🍓╰⊰🍓´🍓⊱╮🍓╰⊰🍓´🍓⊱╮🍓
🌞Environment - Contenu to work on ensuring that the Humidity stays above 45%
💧 Feeding - Using "Super Coco" amended soil. compost teas, Dechlorinated H20 PH/6.5 Fish Fertilizer
🍃Training / None just keeping things defoliated.
🕷️ IPM - Will be using Green Cleaner" 1 OZ per Gallon, and CannControl from Mammoth alternating between product each month for Integrated Pest Management.
💡"960 Watts of LED's 4x8x8 Custom Grow Closet"💡
🍓╰⊰🍓´🍓⊱╮🍓╰⊰🍓´🍓⊱╮🍓╰⊰🍓´🍓⊱╮🍓╰⊰🍓´🍓⊱╮🍓
Rambling - Week 13 will be the last week before she gets chopped, looking at Saturday, she just looks amazing, and smell so much like strawberry fields!
🍓╰⊰🍓´🍓⊱╮🍓╰⊰🍓´🍓⊱╮🍓╰⊰🍓´🍓⊱╮🍓╰⊰🍓´🍓⊱╮🍓
▶️Monday 02.08.21 / Watered w/ Dechlorinated H20 PH 5.8 / 6.2
▶️Tuesday 02.09.21 / Watered w/ Dechlorinated H20 PH 5.8 / 6.2
▶️Wednesday 02.10.21 / Watered w/ Dechlorinated H20 PH 5.8 / 6.2
▶️Thursday 02.11.21 / Watered w/ Dechlorinated H20 PH 5.8 / 6.2
▶️Friday 02.12.21 / Watered w/ Dechlorinated H20 PH 5.8 / 6.2
▶️Saturday 02.13.21 / Chopped her today and put 402 GRMS into the tent to dry @ 62F/58RH should take about a week to 10 days, so back by and check out the full harvest report!
▶️Sunday 02.14.21 / Bud in the dry tent!
🍓╰⊰🍓´🍓⊱╮🍓╰⊰🍓´🍓⊱╮🍓╰⊰🍓´🍓⊱╮🍓╰⊰🍓´🍓⊱╮🍓
SOIL MIX
COCO - 70/30% Tupur Royal Gold 30 GALLON
WORM CASTINGS 5 GALLON
LOBSTER COMPOST 5 GALLON
PERLITE 6 GALLON
INSECT FRASS 2 CUP
ORGANICALLY DONE GROW 5 CUPS
BUILD A SOIL COCO MINERAL MIX 6 CUPS

Processing
Likes
9
Share
@Vega0284
Follow
Not a whole lot going on this week. Did some light trimming and removed the wires. Main stem on all 4 are nice and flat, going to let the girls veg out for a few weeks and just grow up wards.
Moved the lights up 16 inches to let them stretch out. I also switched light cycles.. read an article that mentioned a lot of benefits to having 8 hours on and 4 hours off. Specifically I've noticed a lot of benefits ik terms of cooling and environmental control. I havent had to push water bottles into my buckets ar all this week. And it seems to be growing at a normal rate.

Likes
15
Share
@DreamIT
Follow
Sponsored by:
🦎THE HIGH CHAMELEON🦎-💡VIPARSPECTRA💡-💐GREEN BUZZ LIQUIDS💐-🛠️WEDRYER🛠️
1/10 even the street T's suffered a bit from the lack of attention (and nutrients). As you will have understood and noticed, I haven't been a buin grower lately, but I will recover in bloom😁🤘
__________________________________________
Personal advertising (contains affiliate links)
__________________________________________
🦄 Check out The High Chamaleon website, their first selection criterion is the strong signature of terpenes by taking rare strains while being 100% organic and respecting nature. Safe anonymous shipping!
✅ https://bit.ly/TheHighChameleon
__________________________________________
Did you know that Green Buzz Liquids fertilizers are 100% vegan? A complete line of products ready to give the best to each of your plants! Visit the site and see my journals to see how they work 🦄
🤯 And with the code "dreamit" you will immediately receive a 15% discount on your purchases
✅https: //bit.ly/GreenBuzzLiquidsPro
__________________________________________
👀 Are you looking for a good lamp to start with? 👀
🌞Viparspectra has something more than the others, take a look at their site.
⏩ Use "GDVIP" for an extra discount or "DREAMIT3" for an extra 5 %% discount
👀 Search for it on Amazon
✅Amazon USA: https://amzn.to/30xSTVq
✅Amazon Canada: https://amzn.to/38udUVe
✅Viparspectra UE: bit.ly/ViparspectraUE
✅Viparspectra USA: bit.ly/ViparspectraUS
______________________________________________
🌈 Tired of blowing on your weed hoping it dries quickly? Check out the Wedryer website! You will find a well-made accessory that will help your weed dry in just 8-10 days without the annoying risk of finding mold or other annoyances! (no affiliate links)
✅https: //bit.ly/Wedryer_
______________________________________________
📷🥇Follow the best photos on Instagram 🥇📷
https://www.instagram.com/dreamit420/
Backup
https://www.instagram.com/dreamit4200/
🔻🔻Leave a comment with your opinion if you pass by here🔻🔻
🤟🦄💚 Thank you and good growth 💚🦄🤟

Likes
18
Share
@MrJones
Follow
Mandarin XL Auto
🔸🔸🔸04/29/23🔸🔸🔸
Day 60 - Above Ground - Target 65 Days
📝Sunday 07.02.23 - This plant is looking very good, the buds are hard and very stinky, with deep citrus funk mixed with mango, anther 2 to 3 weeks left for her.
📝Wednesday 06.28.23 - The buds continue to pack on weight and ripen, the smell in the tent is amazing, fed with a Mayan tea from Humbolt Nutrients, loved the way it looked, they have great products.
🔸🔸🔸🔸🔸🔸🔸🔸🔸🔸
Mandarin XL Auto
◾Grown By: MrJones
◾Light Source - Medic Grow Smart 8 LED
◾Light Settings - @40% and V1 (Veg-1)
◾Soil - ProMix HP
◾INSTAGRAM - @medicgrow420 - @ganjafarmerseed - @gaiagreenorganics
🔸🔸🔸🔸🔸🔸🔸🔸🔸🔸
📝 Seed Details - Ganja Farmer Cream Mandarine XL Auto is a 4th generation auto-flowering strain. A tall and very productive plant created by combining Cream Mandarine Auto and Super Tai '98. It offers delicate, spicy notes of Super Tai wood and nuts and a sweet, citrus aroma of Cream Mandarine. Produces buds and resin abundantly.
🔸🔸🔸🔸🔸🔸🔸🔸🔸🔸

Processing
Likes
12
Share
@2Stones1Bird
Follow
Checkout my Instagram @smallbudz to see the Small budget grow setup for indoor use, low watt, low heat, low noise, step by step.
17/11/2019 - Pot feels light and the is bottom dry to the touch time to water, gave her 1,5l of water PH 6.2 with 0.5ml Grow, 1ml, Bloom and 0.5ml Max Biobizz reduced the dosage from last time, watered util some runoff appeared.
18/11/2019 - Mixed another batch of Alg-a-Mic 2ml per liter to spray on lights off PH 6.2

Likes
13
Share
@kush3
Follow
La tercera fenotipo 3 creció de manera mutante, la voy a cambiar de lugar, las otras bien...😃.

Likes
17
Share
@ChopperMcOG
Follow
So that's a week n a few days of flushing done and she's looking ready for the chop! Beautiful colours in and around buds now and absolutely covered in trichomes. I can't post close up pics of trichomes unfortunately cos I don't have a camera with the magnification it needs.
Just gonna wait another few days and harvest then.
Happy days 😁


Likes
20
Share
@siLva_77
Follow
❄️❄️❄️
End of Week 5 - Buds are getting fatter and frosting up. The Tent is smelling incredible Like sweet lemon.
Ende Woche 5 - Die Buds werden immer fetter und frostiger. Beim aufmachen des Zeltes kam ein unglaublicher Geruch nach Zitrone. Beim Gießen kam ich hier und da mal an die Buds und der Geruch an den Händen war unglaublich, süß, fruchtig, Zitronig und Harzig - viel Versprechend.

Processing
Likes
2
Share
@lind1grow
Follow
In 21 i defoliated and do lst
LETS see the progress
Day 22 - recovered for lst
Day 23 - Lst adjusting
Day 26 - Niceee
Likes
51
Share
@Corwinism
Follow
WEEK 8 (04/18/2021 - 04/24/2021)
Day 59: 04/18/2021
Defoliated some growth from each plant before I installed my custom-built SCRoG net made of: pvc piping, drywall screws, and jute twine for the netting. It’s slightly smaller than the tent, 41”x41” with a second level for another net. It fits perfectly, leaving plenty of room to work around the edges and move the fan around if needed.
Immediately after defoliation and installing the net, I watered using ½ strength Botanicare Hydroguard. Watering was different. I used a battery-powered liquid transfer pump to help water the plants a little faster and more efficiently. Also helps to reach the plants I can’t access as easily in the corner.
I am unable to test/collect any of the runoff at the moment since installing the net, which wouldn’t be an issue by itself, but my saucers are just barely large enough to fit the base of the 5 gallon pots into. I have no way of sticking a pH pen or TDS meter in the runoff. They simply won't fit between the pot and the saucer.
This is extremely unfortunate, as I am now unable to monitor the ppm of the soil with each watering. Will have to pick up some larger saucers soon or think of another solution.
-------------------------------------------------------------------------------------------------------------------------------------------
Day 61: 04/20/2021
‘Tis the season to be medicated. Happy Holidaze!
-------------------------------------------------------------------------------------------------------------------------------------------
Day 62: 04/21/2021
Upping the amount of water going into the pots this watering. Previously I was doing 1 gallon of water per 5 gallon pot. I’m increasing the amount of water to 1.5 gallons. Hopefully that will produce enough runoff for taking measurements. It’s going to be a painfully difficult task to take readings but I really need to know what the condition of the soil is right now. Will not be using any nutrients this time considering the runoff was kind of high when I fed on 4/10. This seems a little risky though since it has been 11 days since a nutrient feed, but I’d rather not burn the plants by blindly adding nutrients. Will return. Hopefully with measurements.
(some amount of time later)
Tap water: 245ppm, 6.1 pH (9 gallons)
pH Down: 30ml
JB#1 - 2730ppm, 7.0 pH
JB#2 - 2290ppm, (pH pen died again on this plant)
AP#1 - 2380ppm, 6.9 pH
AP#2 - 3610ppm (seems extremely high), 7.0 pH
GC#1 - 2320ppm, 6.9 pH
GC#2 - 2340ppm, 7.1 pH
I don’t know what was up with the measurements on the AP#2. The saucers the pots are sitting in are a little small so I think the ppm might have been reading high because the bottom of the fabric pot was sitting in the runoff. Maybe I’m just saying that to reassure myself. Either way, the 3000+ ppm seemed very off.
-------------------------------------------------------------------------------------------------------------------------------------------
Day 66: 04/24/2021
Defoliation + weaving/securing branches through SCRoG.
I'm not 100% sure that the SCRoG was the most optimal technique of choice given the very limited space within the grow tent. Also, I almost feel like I installed the screen a little late. Maybe not? Either way, I have read about them and the potential of increased yields, which got me excited enough to build one to try out for myself. I was aware going into it that there would be some difficulties using a SCRoG. I can no longer move my pots around is the main thing. Not being able to move the pots around has increased the difficulty factor of watering/feeding. I now have to access 3 different sides of the tent to get all 6 plants. I've clipped all the ties holding the branches down from previous LST sessions. There was just no way I was going to spend hours weaving in and out of all the ties trying to water each plant while also dealing with the difficulties of a SCRoG obstructing the work space. That would also wreck my poor back.
From here, things are going to get real exciting. Tomorrow (04/25) I am rescheduling the light cycle to 12/12 to initiate flowering. Another 60-70 days to go, growing buds and packing on trichomes. With that said, I'm excited to have made it through my very first full vegetative cycle. I've definitely made my fair share of mistakes, as expected, but as long as I keep learning from them future harvest will only continue to increase in quality and yield. Thank you for stopping by and checking out the diary this week! All your kind words and encouragement are fuel. Until next time! 🙏


Likes
7
Share
@DogDoctorOfficial
Follow
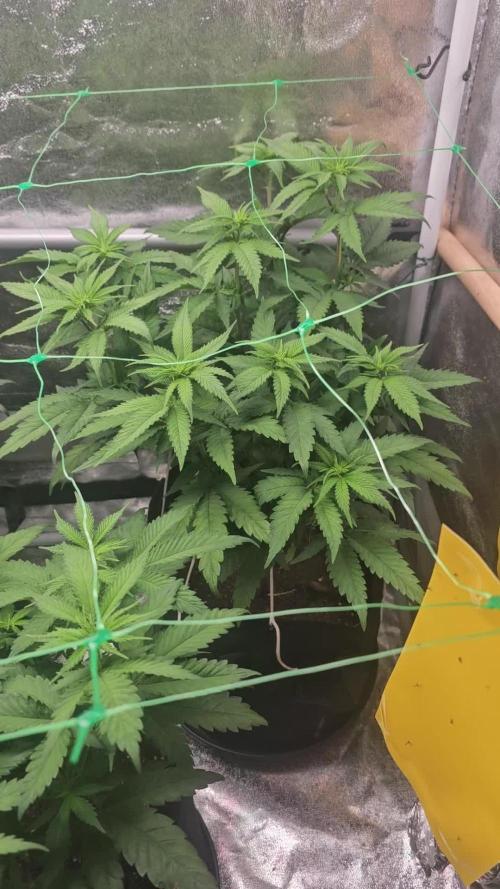
🌱 Animal Mints — Week 3 VEG Report
12/12 from seed | Vegetative phase ongoing
General Overview
Week 3 of vegetative growth closes with Animal Mints standing out for exceptional leaf detail, natural structure, and active branching behavior. Both plants are thriving, each expressing itself according to its own timeline, yet sharing the same healthy rhythm seen across the room.
This is one of those cultivars where detail becomes the story.
⸻
Growth & Structure
• Stage: Vegetative
• Flowering signs: None confirmed
• Pre-flower: Possible very early indication on one plant (not yet definitive)
Plant A — with prior vegetative period
• Veg history: ~15 days under 18h light
• Node count: ~8
• Size: Significantly larger (as expected)
• Branching: Strong and active
• Leaf size: Large, dominant, highly detailed
On this plant, light leaf bending / leaf tucking has begun.
Large fan leaves are gently tucked or repositioned underneath the canopy to:
• Improve light penetration
• Encourage lower branch development
• Balance apical dominance
• Promote a more even structure
This is not aggressive training — no topping, no tying, no stress.
It’s a soft, observational approach, simply guiding leaves out of the way so the plant can express its natural branching potential.
⸻
Plant B — 12/12 from seed
• Node count: ~4
• Size: Smaller, as expected
• Branching: Surprisingly active for its size
• Training: None
Even without any intervention, lower branches on this plant are already reaching upward naturally, showing excellent hormonal balance and structural intent.
⸻
Leaf Expression & Detail
Animal Mints truly shines in leaf morphology:
• Extremely fine serration detail
• Subtle curves along each leaf finger
• Clean edges, no deformation
• Deep, lush green coloration
The level of detail is remarkable — almost sculptural — and clearly genetic rather than environmental stress–related.
⸻
Training Status (Clarified)
• Leaf bending / tucking:
• Applied only on the larger, vegged plant
• Gentle, non-stressful
• Focused on opening the canopy
• No other training performed:
• No topping
• No LST
• No defoliation
The goal remains support, not control.
⸻
Veg vs 12/12 Comparison
This folder offers a clear and valuable comparison:
• The plant that received a veg period is larger and more developed
• The plant run 12/12 from seed is smaller, but structurally similar
• Both show strong natural branching
Notably, the vegged plant is still not flowering, despite already spending three weeks under 12/12. This suggests the plant is still prioritizing structure and energy storage.
⸻
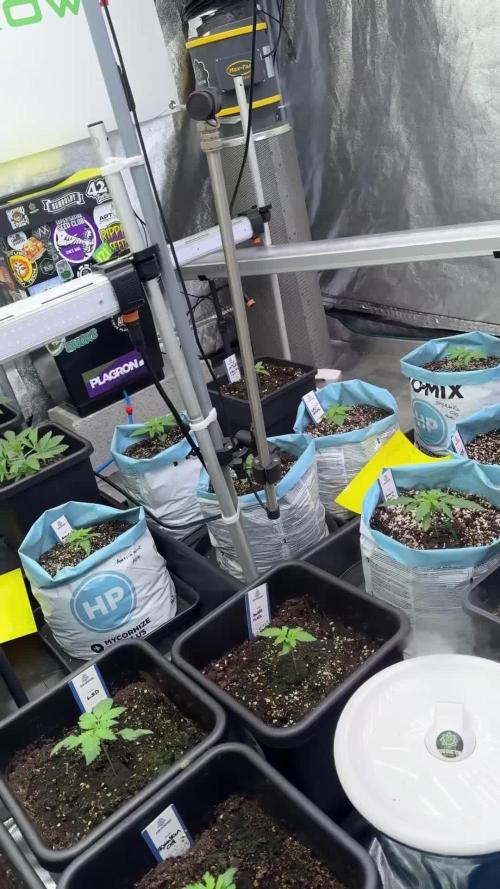
📸 Photo Documentation
This week includes studio-style photos, including images of the plants held close during documentation.
One of the photos features the Plagron jacket, included as a natural thank-you for the nutrition program and gear used throughout the grow.
⸻
Environment — Room Conditions (Week 3)
• Photoperiod: 12/12 from seed
• Day temperature: ~26 °C
• Night temperature: ~18 °C
• Relative Humidity: 60–65%
• VPD: In optimal vegetative range
• Airflow: Gentle, constant, non-stressful
• Solution temperature: ~21 °C
• Substrate temperature: ~21 °C
Environmental stability remains consistent across the room.
⸻
💡 Lighting
• PPFD: ~600–700 (plant-size dependent)
• Plants growing naturally into the light
• No stretch, no light stress
⸻
💧 Watering & Nutrition
• Watering method: Hand-watered
• pH: 6.0
• EC: 1.0
Nutrient program:
• Plagron Terra Grow
• Power Roots
• Pure Zym
• Sugar Royal
Foliar:
• Vita Race
• Used selectively and intentionally
⸻
🔍 What to Expect / What Not to Expect (Next Week)
What to expect:
• Continued vegetative expansion
• Stronger lower branch response on the vegged plant
• Possible clearer pre-flower signals
• Increased structural definition
What not to expect (yet):
• Full flowering
• Explosive stretch
• Need for aggressive training
⸻
Final Thoughts
Animal Mints closes Week 3 as expressive, detailed, and naturally structured. Leaf morphology and autonomous branching are already setting the tone, while gentle leaf tucking is helping guide the canopy without disrupting the plant’s rhythm.
No forcing.
No shortcuts.
Just support, observation, and respect for the process.
FOR DISCOUNT CODES AND MORE JUST FOLLOW THE LINK https://website.beacons.ai/dogdoctorofficial
📲 Don’t forget to Subscribe and follow me on Instagram and YouTube @DogDoctorOfficial for exclusive content, real-time updates, and behind-the-scenes magic. We’ve got so much more coming, including transplanting and all the amazing techniques that go along with it. You won’t want to miss it.
GrowDiaries Journal: https://growdiaries.com/grower/dogdoctorofficial
Instagram: https://www.instagram.com/dogdoctorofficial/
YouTube: https://www.youtube.com/@dogdoctorofficial
⸻
Explore the Gear that Powers My Grow
If you’re curious about the tech I’m using, check out these links:
🔆 Lighting & Environmental Control
• Future of Grow — Advanced LED lighting technology
https://www.futureofgrow.com/
DISCOUNT CODE: DOG20
• Lumiflora — Under-canopy LED lighting
https://lumiflorade.com/
• TrollMaster — Environmental controllers and automation gear (past collaboration)
⸻
Genetics
• Zamnesia Seeds — Genetics used in this project
https://www.zamnesia.com/
⸻
🌱 Soil, Substrates, Boosters & Root Support
• Plagron — Substrates, bio mixes, and supportive products
https://plagron.com/en/
⸻
🎒 Storage, Curing & Preservation
• Grove Bags — Curing and storage solutions
https://grovebags.com/
⸻
📸 Photography Equipment & Tools
(Not sponsors, but part of my creative toolkit)
• Sony A6700
• Sony full-frame macro lens + few more
• Stacking photography workflow - learning
• iPhone (for behind-the-scenes shots)
We’ve got much more coming as we move through the grow cycles. Trust me, you won’t want to miss the next steps, let’s push the boundaries of indoor horticulture together!
As always, this is shared for educational purposes, aiming to spread understanding and appreciation for this plant. Let’s celebrate it responsibly and continue to learn and grow together.
With true love comes happiness. Always believe in yourself, and always do things expecting nothing and with an open heart. Be a giver, and the universe will give back in ways you could never imagine.
💚 Growers love to all 💚
📸 P.S. – The Eye Behind the Lens
All photos in this diary (for now — except for the ones showing the camera, which I took with an iPhone) are taken with a Sony A6700 paired with a Sony full-frame macro lens and a few more.
Photography is part of the story — it’s how we share the fine textures, the glow, and the quiet details that words can’t always capture.
I’ve also started experimenting with photo stacking — a technique where multiple images, each taken at a slightly different focus point, are layered together to create one perfectly sharp image from front to back.
It’s not digital enhancement or AI; it’s pure photography — a way to reveal the plant’s beauty in microscopic depth, from trichome to petal.
You’ll even see a few shots of "ghost me" capturing the shots — camera, lens, setup — because every grow deserves not just to be cultivated, but documented like art.
FOR DISCOUNT CODES AND MORE JUST FOLLOW THE LINK https://website.beacons.ai/dogdoctorofficial
NEW DISCORD - Official Server Invite Link : https://discord.gg/ksjAkA5T74


Likes
17
Share
@Mr_Pgrow
Follow
Not a great to start to the week wirh this cal or cal/meg deficiency (as you can see in the pics) but ill hold my hands up, i only topped dressed last week and as this is an organic soil, i should have actually topped dressed on wk 4, 2 week previous !!!
We live and learn from 😀
I have added small quantity of tomato feed to two waterings this week, just to give her that wee boast while the organic top dress has time to break down in the soil
However, it doesnt seem to have caused much stress to this lady, maybe because she was finished her final stretch ?? Not sure.
It also doesnt seem to have affected bud growth or trichome production, so fingers crossed.
If anyone out there has any tips for me, please feel free to share.
As I've been growing plants many years, but i am relatively new to cannabis growing and always willing to learn.
✌️✌️


Processing
Likes
18
Share
@eldruida_lamota
Follow
Buenas tardes familia, actualizamos la semana de las northern light xL, e de decir que es la más lenta del proyecto, aún así se ven como se forman unas buenas flores, por lo general compactas, iremos viendo por que todavía las va quedando.
PH Muy controlado , a estas alturas por encima del 6,2.
Ya les quitamos productos y pronto lavaremos raíces.
