The Grow Awards 2026 🏆 


Likes
Comments
Share
@TheCannaProphet
Follow
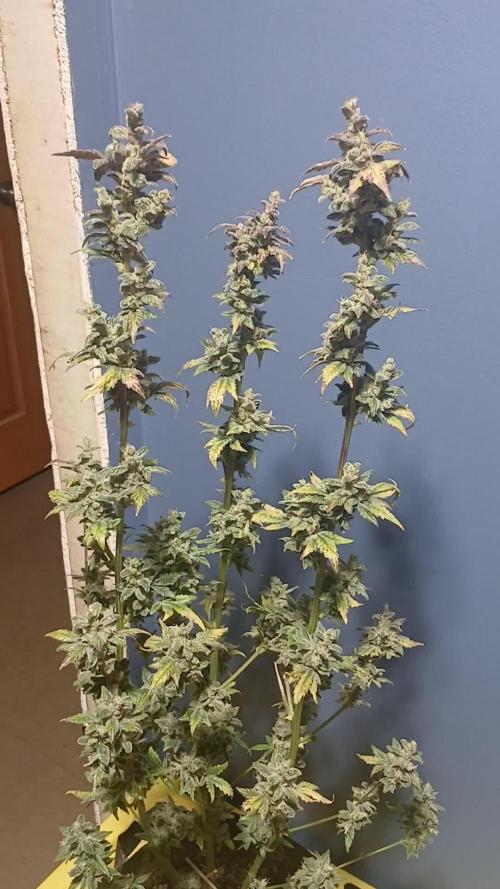
~ GG4 SHERBET FAST FLOWER by FastBuds ~
Well fam, here we go again with another epic strain from FastBuds Fast Flowering stable. After having such tremendous success growing their Gorilla Cookies Fast Flower outdoors last year, I've decided to run another of their fast flowering strains outdoors this year... GG4 Sherbet Fast Flower!
The best description of this awesome cultivar comes directly from my friends at FastBuds which is as follows:
"Bred from extremely potent and flavorful Gorilla Glue and Orange Sherbet genetics, GG4 Sherbet FF (Fast-Flowering) takes all the best traits to the next level, offering a high-yielding strain that can produce up to 600 g/m2 in a 7-week flowering time. This super resilient Indica-leaning hybrid thrives indoors and outdoors, and in all types of climates while producing mouth-watering sweet, fruity, spicy and earthy terps that translate into a delicious sugary hazelnut aroma. Expect an extremely relaxing and overall happy effect that’ll leave you with a huge smile from ear to ear. It’s the perfect strain for growers of all levels of experience seeking low-maintenance yet highly productive photoperiod varieties that deliver quality and quantity without extra effort.
GG4 Sherbet FF grows chunky buds with long dark orange hairs and spade-shaped calyxes that get encrusted with trichomes by harvest time, giving them a gorgeous silvery-white appearance. This medium-sized photoperiod can reach up to 200 cm in height and yields up to 650 g/m2 while developing that typical hybrid structure. GG4 Sherbet FF grows with a stocky, bushy appearance, developing one sturdy main cola and fat side branches that support huge yields without much effort. This super-fast variety produces distinctive light-green buds with a high bud-to-leaf ratio, making your trimming sessions a breeze. It’s a top-notch resin producer that doesn’t need much maintenance and will thrive in almost every climate, rewarding growers of all levels with extremely flavorful resin that makes for outstanding hash end extracts."
________________________________________________________________________________________________________________________________________________________________________________________________________________________________________________________________________________________________________________________
The Setup:
This is going to be an outdoor grow, but I have started the GG4 Sherbet Fast Flower indoors as our weather is still too cold to put her outside (nighttime temp's dipping regularly into the 30's℉).
The plan is simple... let her grow inside under a 19/5 light schedule until the nighttime temperatures stay above the mid 40's℉, at which point she'll be moved outside and transplanted into the soil which I have already setup and inoculated with beneficial microbes, and then let the fun begin!🤪💚
________________________________________________________________________________________________________________________________________________________________________________________________________________________________________________________________________________________________________________________
Weekly Updates:
8/18- Week 5 of flower's here for the FastBuds GG4 Sherbet Fast Flower and she has transformed into an absolutely gorgeous specimen of this strain, and hopefully it will become a good example of this strains capabilities!
Our weather continues to be cool and dry with nighttime temp's dipping into the upper 50's℉ with daytime highs in the mid to upper 70's℉, and the daylight has dropped to just over 13 hours now.
8/20- I am still watering the GG4 Sherbet FF daily but, with the cooler weather and with the plant at this stage of flower, her water requirements have dropped a bit so I'm only giving approximately 4-5g of well water after the sun goes down to allow it to soak in thoroughly throughout the soil.
8/22- Along with my daily watering, I am also constantly going through the plant and removing any dead or yellowed leaves. I'm also checking over the entire plant including the undersides of leaves looking for early signs of insect infestation or their eggs being laid, as well as looking for signs of deficiencies and as flowering progresses mold and fungus.🤢
8/24- With five weeks of flower behind her now, the FastBuds GG4 Sherbet Fast Flower has passed the halfway point and only has another 2-3 weeks to go! My only hope is that our weather continues to cooperate and at least stay dry to quell any fears of bud rot on her beautiful flowers!
Thank you for checking out my diary, your positive comments and support make it all worthwhile! 💚Growers Love!💚😎🙏


Likes
15
Share
@I_Identify_As_A_Dan
Follow
Week 12 for Peyote Zkittlez by seedsman
She seems to be bouncing back well from that hard pull apart i did to make her canopy flat. She seems to still be getting a little heat burn from the sun but that's okay.
No signs of pre flower any time soon.

Likes
5
Share
@NoProbation4Weed
Follow
Light hitting with around 850 PPFD
The stinkyness of this lady is insane! one of the loudest plants ever grown.
She takes her time but I am fine with that.
Overwatered 1 time this week but she took it like a champ.


Likes
12
Share
@GREENPHOENIX6262
Follow
*Week 4 Flower 09/24*
Both Mimosa girls appear to be running fine with Mimosa (1) running a little behind but is catching up accordingly. Small oversight in early growth resulted in a minor stunt but she is improving dramatically.
Water Feed has increased by half a gallon ( 1gallon clean - .5 gallon nute feed)
*Week 4 Flower 09/28 - Mid week update*
Both plants are flowering accordingly - Mimosa (1) is a bit taller then Mimosa (2)
Buds are becoming dense and covered in trichomes.
No deficiencies - No areas of concern - Potassium and Phosphate feeds continue
*Week 5 Flower end of week recap - 09/30*
Both Mimosa's are flowering nicely - Budsites covered in frosty trichomes.
Mimosa (2) looks shorter but that is because her COLA was tied down to expose bottom budsites.
Likes
44
Share
@Cogollo_eu
Follow
**Encontrarás la traducción a español al final de la descripción**
From/Desde: 10/05/19 || To/Hasta: 16/05/19
From day/Desde día: 78 || To day/Hasta día: 84
You can find the Money Maker Diary here:
** Podéis encontrar el diario de las Money Maker aquí:**
https://growdiaries.com/diaries/25667-gorillamakingmoney-gorilla-vs-money-m
-----IMAGES & VIDEOS-----
5 - HomeMade Organic & Cheap CO2 generator (more info in week summary)
9, 10, 11 & 12: The bud on the right is a Gorilla one, the buds in the left or/and in the middle are Money Maker ones.
15 - Same Gorilla plant buds, one affected by CO2 in the roots and the other not.
-----WEEK SUMMARY-----
The smell is more sweet and intense every day, friends that came home turned them eyes into crystals when they see this little babys. The size isn't awesome, but the high ammount of buds full of crystals plus the strong sweet aroma makes them awesome. Buds are growing and fattenning very very well.
This week i added a boost of HomeMade CO2, i never measured the results of this invention so i can't give CO2 measurements. This method is widely used in home aquariums and there is where it comes from. For those interested i'm going to write here more detailed instructions. The 4 liters i've made will last for about 2 weeks.
---NEEDINGS---
- 250 ml Bottle
- 6~10 l Bottle
- 400 g Sugar / l water
- 1 Envelope of organic baker's yeast / l water (CHEMICAL WILL NOT WORK)
- 3 mid plastic tubes 40~50 cm
- 1 short plastic tube 5~6 cm
- 4 tube adapters
- Hot glue to seal adapters
The process of creating CO2 is simple, mix water, organic yeast and sugar in a bottle, and the sugar will free CO2 in the process of fermenting to alcohol due to the yeast.
1. Make a hole in the center of the big bottle cap, insert an adapter and secure it with hot glue
2. Make 3 holes in the small bottle cap and glue the other 3 adapters
3. Link both caps with one of the mid tubes and insert the other tubes on free adapters
4. Insert a short tube in the bottom of the small cap in the adapter that came from the big cap
5. Watch the Video!!
-----WATERING CALENDAR-----
Plants are beginning to drain the pots a bit faster so from now on i will raise the water ammount on each watering day 0.25 l.
11/05/19 - 1,5 l with All week nutrients -(Nirvana & Blombastic) also Big Bud half dosed @ PH6.4 & 2 E.C.
14/05/19 - 1,5 l with Bud Candy, Big Bud, Nirvana, B52, Bud Factor-X, Sensizym & Blombastic @ PH6.4 & 1.5 E.C.
*****ESPAÑOL*****
-----IMÁGENES Y VÍDEOS-----
5: Generador de CO2 casero, barato y orgánico (más info en el sumario semanal)
9, 10, 11 & 12: El cogollo que sale a la derecha es de una Gorila, el de la izquierda y/o el de en medio son de una Money Maker
15: Dos cogollos de la misma planta, uno afectado por CO2 en las raíces y el otro no
-----SUMARIO SEMANAL-----
El olor es más dulce e intenso día a día, los amigos que vienen a casa a verlas se quedan ojipláticos al verlas. El tamaño no es una maravilla, pero la gran cantidad de cogollos llenos de cristales añadido al aroma que entra por las fosas nasales las hacen increíbles. Los cogollos crecen y engordan de maravilla.
Esta semana he añadido un boost de CO2 casero, nunca he hecho mediciones de los resultados por lo que no puedo darlas. Este método es ampliamente usado en peceras caseras y de ahí saqué la idea. Para aquellos interesados dejo aquí instrucciones más detalladas. Con los 4 litros de agua que he preparado yo da para unas 2 semanas.
---NECESITAMOS---
- Botella de 250 ml
- Botella de 5 a 10 litros
- 400 g de azúcar por litro de agua
- 1 sobre de levadura de postre orgánica (LA QUÍMICA NO FUNCIONARÁ)
- 3 tubos de plástico de tamaño medio 40~50 cm
- 1 tubo de plástico de tamaño pequeño 5~6 cm
- 4 adaptadores para los tubos
- Cola caliente para pegar y sellar los adaptadores
El proceso de generar CO2 es simple, mezcla agua, levadura orgánica y azúcar en una botella, y el azúcar liberará CO2 en el proceso de fermentación a alcohol.
1. Haz un agujero en la tapa de la botella grande, inserta un adaptador y séllalo con cola caliente
2. Haz 3 agujeros en el tapón pequeño y haz lo mismo con los otros 3 adaptadores
3. Conecta los 2 tapones con uno de los tubos y conecta los otros 2 tubos a los adaptadores restantes
4. Conecta el tubo pequeño en la parte libre del adaptador del tapón pequeño que viene del tapón grande
5. Mira el vídeo
-----CALENDARIO DE RIEGO-----
Las platas comienzan a secar los tiestos un poco más rápido, asi que de ahora en adelante incrementaré 250 ml de agua adicionales en cada riego.
11/05/19 - 1,5 l con todos los nutrientes semanales -(Nirvana & Blombastic) BigBud mitad de dosis @ PH6,4 & 2 E.C.
14/05/19 - 1,5 l con Bud Candy, Big Bud, Nirvana, B52, Bud Factor-X, Sensizym y Blombastic @ PH6,4 & 1,5 E.C.

Processing
Likes
14
Share
@SunshineBud
Follow
Man p4 is coming on strong after knocking of the longstanding p1 Queen of the crop. Crazy, I thought plant 3 was goin to be lucky to survive and she kicks booty! Another video up there 12 days in December cuts off about an hour ago.
I have to say this week went pretty uneventful other than getting everything potted into their final 3ga pots. I'm trying to get the plants up to around 12" before flipping but getting anxious about it.
If plant 3 wasn't so dang little I'd probably had flipped the ladies already... But they're still a bit short. I'm finding overcoming impatience is the biggest lesson I'm learning.
Below is the transcribed daily notes you can find in the images above:
12/24 Measurements good, 3 still looking slow.
12/25 (Fed w/) 2 tsp/ga Big Bloom / 2 tsp/ga Grow Big 1/4 tsp/ga Clean kelp. Trimmed suckers off p2 repotted #3 1225 ppm tds, 4.43 ph out.
12/26 Humidifier wonky, got soil warming up to transplant but think maybe wait as soil still a little moist. Trimmed suckers off 4, rinsed all w/ph balanced H2O.
12/27 Humidifier ran out
12/ 28 Repotted 1/2/4 fed w 2tsp ga grow big/big bloom, 1/4 tsp clean kelp. trimmed 2x suckers off 1 b4 I thought about stress f/ potting. 1295 TDS ppm
12/29 trimmed 2 browning suckers f/ P3
12/30 cut low brances/suckers messed up leaves/babvies on P2


Likes
9
Share
@TiRobotProds
Follow
4ème semaine de floraison. Cette dame ce porte a merveille ☠️☠️💀 irrigation tous les 3 jours environ 6L, 12L/Semaine.

Likes
10
Share
@UGrowGuy
Follow
01/03 Just Flipped going to leave a MH for a week pr two to counteract stretch. I will stake and turn up the lights over the next couple days. They do not all feed the same. So some I will dilute 25%.
01/05 The pics do not do justice to how big these girls have gotten, so i busted out a measuring tape lol.
Likes
10
Share
@BodyByVio
Follow
This week I Supercrop all the plants and spred them out over both lights. One more week of Veg and they are ready to explode
Check me out on Instagram @growmorestressless


Likes
Comments
Share
@BlunthumbMD
Follow
She grew easy and smells great. Chopped at day 91 after 48 hours of darkness, ended up with 37 grams of dried and cured nuggets. Very interesting bud structure, very dense, first time I saw literal dripping. The smell is sweet, skittles, tropical fruit. The flavor on the smoke hasn't tasted as pronounced, still tasty. The high is good for a sativa, still somewhat motivated. RQS has sold me some great genetics so far, and the cheapest as well.
Likes
14
Share
@Buddie
Follow
So I changed lights this week to 600 w hid
Hood is air cooled so we’ll see how this finishes! Everything is going great, buds getting bigger every day.


Processing
Likes
12
Share
@ELPIRATA
Follow
Todo parece ir bien por estos lados, Lo importante es que las raices estan haciendo una fiesta en el sustrato!!! 😎
Hoy comienza la 4ta SEMANA! Dia 22 de cultivo, y 100% motivado por este mundo maravilloso!
- Se realiza una pequeña poda en las partes bajas de las 4 plantas, por motivos de precaucion a la aparicion de algun agente perverso que pueda estropear lo avanzado.
(Se aplica folear Knactive X3 ML)
*El día de hoy 28/05/2020 se han regado 3 plantas en macetas de 11 litros:
X2 Semillas Auto Lemon Kix= 500 ml [3mlKnactive+3ml/L ATAGrowth-C+2mLTopCrop-TopAuto] PH 6.0 / EC= X Tº=22
X1 Semilla Auto Tutankhamon= 500 ml [3mlKnactive+3ml/L ATAGrowth-C+2mLTopCrop-TopAuto] PH 6.0 / EC= X Tº=22
(Proximo riego se incorporara al parecer Flower-C de ATAMI)
*El día de hoy se han regado 1 planta en macetas de 7 litros:
X1 Semillas Auto Lemon Kix#3 = 350ml [3mlKnactive+3ml/L ATAGrowth-C+2mLTopCrop-TopAuto] PH 6.0 / EC= X Tº=22
*El dia de hoy 29/05/20 se realiza de manera experimental, LST nivel novato, Me gustaría sus consejos. próximamente incorporare Red SCROG de 49 espacios.
*El día de hoy 01/06/2020 se han regado 3 plantas en macetas de 11 litros:
X2 Semillas Auto Lemon Kix= 500 ml [1mlKnactive+3ml/L ATAGrowth-C+3mL ATAFlower-C] PH 6.2 / EC= X Tº=23
X1 Semilla Auto Tutankhamon= 500 ml [1mlKnactive+3ml/L ATAGrowth-C+3mL ATAFlower-C] PH 6.2 / EC= X Tº=23
*El día de hoy se han regado 1 planta en macetas de 7 litros:
X1 Semillas Auto Lemon Kix#3 = 350 ml [1mlKnactive+3ml/L ATAGrowth-C+3mL ATAFlower-C] PH 6.2 / EC= X Tº=23
CONSEJOS ?
BUENOS HUMOS!!!

Likes
92
Share
@DogDoctorOfficial
Follow
Week 5 Veg Report: SCROG Netting, Massive Leafs & Precise Data Mastery!
🌱 Girls Growing Stronger Than Ever! 🌱
This week has been truly epic in the grow room—so much so that it’s time to bring in the SCROG net! With the canopy expanding and the younger ones still working to catch up, the SCROG net will help me achieve that perfect, even canopy. A well-placed SCROG not only ensures better light penetration but also gives the smaller plants a chance to spread out and thrive alongside their bigger sisters.
Now, let’s dive deep into the SCROG method.
The Screen of Green (SCROG) technique is a grower’s secret weapon for maximizing space, light efficiency, and yields. The concept is simple but powerful—train the plants to grow horizontally along the net, forcing them to expose multiple budding sites instead of just a single cola. This way, the canopy spreads evenly, improving light distribution and air circulation throughout the tent. As the plants grow, I’ll gently weave their branches through the screen, ensuring they fill every square inch of space. The end goal? A sea of buds all basking in equal light!
💪 Huge Leafs Everywhere! 🌿
One thing that’s really catching my eye this week is the size of the leaves—they’re HUGE! Honestly, they’re so big I couldn’t resist a little fun, so I made myself some fashion accessories: leaf earrings and a cap from the Super Sativa Seed Club Green Papaya! 😂 And, of course, I captured the moment. But seriously, large leaves at this stage are a great sign of healthy, robust plants. These “solar panels” are hard at work soaking up all the light, driving photosynthesis, and fueling growth.
So, what does it mean when your plants are showing off big, luscious leaves? It’s a clear indication that they’re happy, healthy, and thriving in their environment—big leaves mean lots of energy being produced and stored for future bud growth. Exactly what we want!
💧 Precision Feeding with Aptus Nutrients 💧
This week, I took a deep dive into my Aptus nutrient lineup and shared a video explaining how each product affects the water’s pH and TDS. Using the AMP-3 Precision Meter, I’m getting real-time water readings and keeping everything dialed in perfectly. Let’s break it down:
• pH: 5.83
• TDS in solution: 445 ppm
• Water temperature: 25.2°C
The Aptus products are incredible for balancing nutrients without throwing off the pH or TDS too much. I’m fine-tuning my feedings based on these readings to make sure the girls are getting exactly what they need. The precision I’m able to achieve with the AMP-3 is mind-blowing—I get immediate feedback on pH, temperature, and EC, allowing me to make real-time adjustments and ensure the perfect environment for nutrient uptake.
📊 Environmental Mastery Thanks to TrolMaster 📊
Speaking of control—let’s talk about the TrolMaster system! Between the DSH-2U Humidity Station and all the other sensors, I’ve created the perfect environment for my plants. Here’s where we’re at this week:
• Temperature: 26.2°C
• RH: 70.6%
• CO2 levels: 775 ppm
• VPD: 1.0 kPa
• PPFD: 423
Thanks to TrolMaster, I can monitor and adjust these metrics in real time, and the best part? I can do it all through the TM+ Pro app, even while I’m lounging in my green papaya leaf hat! 😆 Whether I’m checking the CO2 levels, adjusting the lights, or fine-tuning the humidity, it’s all in my hands with just a tap of my phone. Talk about convenience!
🌱 P.S. – Inline Sensors: Heavy-Duty Precision 🌱
Now, let’s talk about the heavy-duty players in this game—the (PCT-2) Heavy Duty Inline EC/Temp Sensor and the (PPH-2) Heavy Duty Inline pH Sensor. These bad boys are connected directly to the AMP-3 Precision Meter, and they’ve been absolutely crucial in giving me the most accurate readings on my water and nutrient solution.
The PCT-2 keeps me informed about the electrical conductivity and temperature of my solution, which is key for monitoring how well my plants are absorbing nutrients. Too high or too low, and we’re asking for trouble, but this sensor ensures I’m always in that perfect range.
The PPH-2, on the other hand, is all about maintaining the perfect pH balance. A fluctuating pH can mean nutrient lockout or deficiencies, but thanks to this sensor, I get a constant read on my pH levels, so the plants are always in their sweet spot for optimal nutrient absorption.
Together, these inline sensors allow me to run a super-tight ship—every drop of water and nutrient is dialed in to perfection, keeping the plants happy and healthy!
Shout Outs!
As always, huge thanks to TrolMaster and ThinkGrow LED for the amazing gear, to Aptus Holland for their top-notch nutrients and Pro-Mix for the best soil i have used so far. Big love to the seed banks, the amazing Grow Diaries community, and all my followers—you guys make this journey so much more exciting. Don’t forget to catch up on my social media, Instagram, and YouTube for real-time updates and exclusive content!
Stay tuned for more—next week is going to be epic!
DogDoctorOfficial Discount Codes so you can save big on your next check out 💚💚💚
Kannabia - DOGDOCTOR 30% off
SeedsmanSeeds - DOGDOCTOR 10% off
CannaKan- DOGDOCTOR 15% off
terpyz.eu - DOCTOR 15% off
The Neutralizer - PORKIT5-DOG 15% off
Growers Love to you all 💚💚💚


Likes
15
Share
@Skinnytalls420
Follow
So this was a simple going grow!!! It’s strange how the hot so big under the light! I had one blue cheese under the same light and tent and it was way smaller!! Anyway 1 of these has come out perfect very happy the other two I’m not to sure the hairs were still pointing up but I really don’t have the time to have them going another week there already over the time they was supposed to be done but yeah I’d say out of 10 I’d rate this blue cheese growing experience a 6 out of 10 hopefully this improves when it’s dry!!!