


Likes
Comments
Share


@Indy4
Follow
-Sunday September 8 switch to 12 12
-Defolition on the bottoms at F1, re-shave at F6.
-Hung up a charcoal filter and exausting via a window -RLF down @50%
-Light is up to 80% to reduce stretch and we are at around 1000 PPFD at canopy level now.
60x60cm tent used for my cuttings (I hope they survive, my cuttings have a high mortality) + a male in there that I don't want to flower while I have the Kalis flowering.
The lights are just 4x e27 at around 30W total. The idea is to keep plants in veg there. Needs a fan to stay cool but fairly cheap solution.

Likes
10
Share


@Fibro_Witch
Follow
This strain went so much better than last year. A lot more resin production which I'm putting down to my good ol' gallon of Molasses. Seriously. Worked so much better than the $40 flowering nutes that I used last year. So honestly, I spent like $250 on nutes and sprays last year, yet I only spent around $125 this year, no mineral salts, natural everything and I ended up with better bud. Didn't have to spend time flushing or worrying about burning plants and trying to remember what I fed when and which product I need to use next, etc. Keepin' it simple.
I also had less mold thanks to the tomato roof and also I was more diligent about caterpillars. And of course I really like the tomato cages. I mean some of the branches do rub, and they don't look the greatest in the photos (maybe I need to paint them green for next year?) But the convenience factor is high. It work out a lot better than the staking and tying I was doing last year.
I had about 25% better harvest, since last year was 2.8 oz per plant and this is 3.72 oz of dry bud. So that's a big improvement! Not to mention better quality and not just raw numbers. And last year I harvested everything, whereas this year I didn't deal with a lot of the little popcorns and gave them to the livestock.
But I gotta say that the pictures don't do her justice. She absolutely glittered in the sunlight. And I don't think the other strains will get nearly as frosty. Not to mention that distinct aroma of guailol. So intoxicating!
Cut down most of the colas Wednesday and finished lower colas Saturday. Washed as always with 1/4 cup each of baking soda and lemon juice in 5 gallons of warm water and rinsed in 5 gallon plain cold water. Hung up to dry in the upstairs of the barn with the oscillating fan (Do pardon the mess, my mother in-law is a hoarder and we need to downsize her clutter since she's safely thousands of miles away). Storing in mason jars in cabinet with 58% Boveda humidity packs. The 62's I used last year were a little too humid for long term storage so I'm trying the 58's this year.
For some reason Growdiaries isn't letting me review this strain at the top or the Big Bloom and I'm wondering if that's because I've already reviewed both? But anyway, I've gotta say that this bud is higher quality than what I produced last year. It's stronger and you really feel like you're wrapped in a warm blanket with this strain. I also got a little bit of a headband with what I sampled, so we'll see what she's like after she cures a bit. It's a wonderful comfort at the end of a long day. About an hour of being happy and relaxed and then after that it's all you can do to keep your eyes open.
I really enjoy making caramels with this strain. It's so easy to just grab one out of the freezer, and that way I sleep all night😴
1 cup Cannabutter
2 cups brown sugar
1 can sweetened condensed milk
Melt butter with sugar on stovetop over low heat until combined. Add milk and gradually increase heat while stirring. You want to bring the mixture to 245F or 118C but you want to do so slowly so that your don't burn the mixture, and you want to shut it off immediately once you get there. You can pour it into molds, little paper cups or I pour it onto a parchment liked cookie sheet. Feel free to sprinkle a little finishing salt on top if you like salted caramels. Then I put them into the freezer to harden before wrapping. I wrap them on squares of parchment about 4"x4" and put them in a freezer bag. If cutting, I usually get 40 caramels that weigh 20-22 grams each. The most important thing is to be gentle and stir often. Don't scorch it! Otherwise this recipe is pretty darn easy, you just need a candy thermometer.


Processing
Likes
5
Share


@Ensign420
Follow
Week 02 Introduction
This week has been a bit of a struggle. Had my first experience dealing with slime and brown algae. But I think adding enzymes and increasing the beneficial bacteria helped to fix the issue. Also experienced nutrient burn for the first time. My nutrient solution strength got as high as 671 PPMs. So backed it down to about 430 PPMs during the end-of-week reservoir change. Also cut Hydroguard (expired?), CaliMagic, and Superthrive from this grow. Now she's still stunted, but is starting to recover. Hopefully...
[START OF WEEK 02]
Day 01 - Monday - 08/10/20 - Total Days: 008
-----------------------------------
- [0830]: Still looks a bit yellow. But getting larger!
--- Solution strength was at 248 PPMs.
--- Just topped off with a bit of distilled water
--- PH went up to 6.1 so PH'd down to 5.8
--- Ran the top feed for a bit to wet the hydroton.
- [2130]: She's looking even more yellow now.
--- Even the new leaves are really yellow.
--- Decided to add more base nutes.
--- Added 4ml of Sensi A
--- Added 4ml of Sensi B
--- Now at about
--- Solution Strength went up to 304 PPM.
--- PH was at 6,
--- Also raised the water level a bit more.
--- I really hope it's a nutrient deficiency and not an over-watering issue.
--- Please live!
Day 02 - Tuesday - 08/11/20 - Total Days: 009
-----------------------------------
- [0830]: Looking less droopy. But still yellow.
--- Decided to do a reservoir change.
--- 4.5gal of distilled water
--- 8ml of Sensi Grow A
--- 8ml of Sensi Grow B
--- 8ml of Voodoo Juice
--- 4ml of B-52
--- 4ml of CaliMagic
--- 4ml of Hydroguard
--- 4 drops of Superthrive
--- PH'd down to 5.8
--- Solution strength: 302 PPM
--- Since I didn't want to risk over-watering the rockwool, I did not to do a top feed, may do one tonight after the sleep cycle (lights are still set to go off at 10am and back on at 4pm).
--- As I was doing a reservoir change, I noticed that the tubes and bucket were a bit slimy. Didn't really stink or anything. Is this normal? Maybe due to the Hydroguard and Voodoo Juice?
--- I hope she gets better soon!
- [2215]: Getting larger! But still yellow.
--- Also can see a root growing through the net pot! Tiny little thing but it's there! Will have to start dropping water once more appear.
--- After looking over a few DWC diaries using AN nutes, seems like my solution strength is still too low. Most around this stage average around 500 PPMs with about 4ml per gallon.
--- Top fed for a minute to wet the top of the hydroton.
--- Solution strength went down to 263 PPM.
--- Added 8ml more of Sensi A
--- Added 8ml more of Sensi B
--- Now base nutes are at 16ml for 4.5 gal of water.
--- PPMs went up to 411.
--- Still lower than 500 PPMs, but that's okay.
--- PH was at 6. Not sure if I should adjust PH using AN nutes. So going to not ajdust unless PH goes above 6.1.
Day 03 - Wednesday - 08/12/20 - Total Days: 010
-----------------------------------
- [0830]: Looks like more root growth!
--- She still looks yellow. But leaves are perky.
--- PH was at 6.2 so lowered down to 5.8.
--- Solution strength was at 394 PPMs
--- Since roots are still growing, I decide to lower the water level a bit. Now water level is a bit below the net pot.
- [2200]: Root is getting longer!
--- Slime is returning. Not sure why.
--- Solution strength: 357 PPMs
--- PH: 6.1
--- Decided to add an enzyme along with more beneficial bacteria to hopefully cure the slime.
--- Added 16ml of Sensizym
--- Added 5ml of Hydroguard
--- Added 8ml of Voodoo Juice
--- New solution strength: 430 PPMs
--- New PH: 6.1
--- Top fed for a minute.
--- This slimy residue is really freaking me out! I hope the added enzymes will help eliminate the slime.
--- Going to do a full reservoir sterilization/nutrient change over the weekend. Please survive until then girl!
Day 04 - Thursday - 08/13/20 - Total Days: 011
-----------------------------------
- [0930]: I think the enzymes worked! There is little to no slime now!
--- Although I think the root was also dissolved in the process. It's now just a little stub sticking just below the net pot. The enzyme is also suppose to dissolved dead roots too but guess that root was too weak? Not sure what happened there. But I think the slime is cured!
--- Solution strength went down to 395 PPMs. Decided to add more base nutrients.
--- Added 8ml of Sensi A
--- Added 8ml of Sensi B
--- Added 4ml of B-52
--- Solution strength went up to 598 PPMs.
--- PH was at 6.1
--- As long as the PH is between 5.5 and 6.3, I'm not going to use PH Up or Down. But still will monitor PH levels.
- [1715]: Checked up on her after her nap and shes looking alive but stunted. But no slime!
--- Decided to add some sugars to help maintain the enzymes and beneficial bacteria.
--- Solution strength was at 587 PPMs.
--- PH was at 6.2
--- Added 8ml of Bud Candy
--- Solution strength went up to 671 PPMs.
--- PH also went up to 6.3
--- Lowered water level a bit to hopefully promote more root growth.
--- Top fed for a minute.
--- She is getting bigger, but still looks yellow.
Day 05 - Friday - 08/14/20 - Total Days: 012
-----------------------------------
- [0915]: Leaves look a little burnt on the tips. Still no slime.
--- Going to back off on the PPMs to hopefully fix the nutrient toxicity.
--- Solution strength was at 632 PPMs
--- PH was at 6.3
--- Added/Removed water until PPMs were at 536.
--- PH was still at 6.3
--- Raised water up a bit, then top fed for a minute.
- [2200]: Looking better. Still yellow though.
--- Solution strength: 514 PPMs
--- PH: 6.5
--- Added PH down.
--- New solution strength: 518 PPMs
--- New PH: 5.2
--- PH was kind of high. So decided to PH down. Had to use quite a bit to bring it down. But eventually got it to drop down to 5.3. A little low, but so far, the PH has always gone up so wanted to start it really low.
--- Ran the top feed for a minute to re-saturate the top of the hydroton.
Day 06 - Saturday - 08/15/20 - Total Days: 013
-----------------------------------
- [0830]: She looks stunted. leaves are still yellow.
--- Solution strength: 514 PPMs
--- PH: 5.6
--- Top fed for a minute.
--- Not sure what to do at this point. Going to do another reservoir change soon. Hoping she lives until then.
- [2145]: Looking pretty much the same.
--- A bit of slime has returned. Since I've been diluting the nutrient solution, the enzyme ratio has dropped. So I guess this is expected.
--- Also noticed that slime build up was on the air-stones. Never really checked the stones so not sure how long that has been there. Looks brown too, which can't be good.
--- Going to do an H202 sterilization of the system (minus the net pot) tomorrow so did not add anything.
--- Lowered the water level to below the net pot.
--- Then top fed for a minute.
Day 07 - Sunday - 08/16/20 - Total Days: 014
-----------------------------------
- [0900]: STERILIZATION DAY!
--- Decided to skip today's night cycle for a deep clean.
--- I'm hoping that skipping a night cycle won't be too stressful.
--- Temporarily moved her to a new bucket.
--- Used about a half of gallon of straight distilled water to flush out the net pot.
--- Drained the system and wiped up all the brown sludge. Also removed the air stones and cleaned up all the goo.
--- Filled the system with 2 gallons of distilled water and at least 30ml of food grade hydrogen peroxide (35% strength).
--- Yea its a lot, but since I'm not going to sterilize the system overnight, I went with a really high doseage. Basically I kept adding until I started to see little bubbles start to form.
--- Then I ran the water pump.
- [0915]: Boiled the air stones in tap water for about 10 min. Then reconnected them to the airlines.
--- I let the air stones and hose soak in the sterilization solution for about 5 minutes so the peroxide can absorb into the stones. Then ran the air stone to help mix and agitate the solution.
--- Occasionally, I'd repeat the process of turning the air pump off for a few minutes to let the stones soak.
- [1000]: Covered the top two row of holes of the net pot with some aluminum tape. Hopefully this solves the light leaking in through the hydroton.
- [1200]: Used an old toothbrush and scrubbed the pump clean. Then drained the system.
--- Refilled with more distilled water and peroxide. Again added a lot.
--- Ran system again to sterilize even more.
- [1530]: Drained the system and refilled with distilled water to rinse.
--- Ran the system for a few minutes, then drained and rinsed again.
--- Did this a few more times over about an hour.
- [1630]: Added 4 gallons of fresh distilled water.
--- Added 15ml Sensi Grow A
--- Added 15ml Sensi Grow B
--- Added 12ml of B-52
--- Added 16ml of Voodoo Juice
--- Added 16ml Sensizym
--- Solution strength was at 430 PPMs
--- PH was at 5.6
--- I was going to add Hydroguard, but I think the bottle is expired. Since 2017 or 2018!? I think Hydroguard is good for up to 2 years from the date on the bottle or 6 months after opening. So not going to use from now on. I wonder if this could have contributed to the slime build up.
--- Also removed the CaliMagic and Superthrive too. Going to only use AN products to eliminate the chance of incompatible nutrients.
--- Placed her back in the bucket and top fed for a minute.
--- Here's hoping for the best. Going to let it ride until morning! Please feel better!
[END OF WEEK 02]

Likes
20
Share


@BABS_Babies
Follow
Starting to keep a close eye on the Trichomes. Still clear some cloudy. Stopped feeding, Starting to flush. It’s starting to smell amazing in here.
Likes
4
Share


@blaze_fpv
Follow
Started off week 2 with heavy defoliation // they took it like champs // they instantly started to fill the space again // back right corner is still a bit behind but the rest of the canopy looks crisp 👌🏼
End of week 2 // kolas starting to form up // currently 27° at 60% // gonna lower the temp to 25 very soon // also collecting the water every day and then water them daily // gonna start using green power phosphor booster in the next week

Likes
13
Share


@DogDoctorOfficial
Follow
Animal Mints — Legends of the Frozen North
Week 8 from Seed | Week 4 Flower
Another chapter unfolds in the frozen north.
For anyone joining this diary now, here is a quick recap of how we arrived here.
This run explores Animal Mints grown primarily under a 12/12 cycle from seed, allowing the plants to naturally express their structure while moving efficiently into flowering. Most of the plants followed this path from the beginning, with one small exception in the room — a plant that spent about two weeks in vegetative light before joining the 12/12 cycle.
Interestingly, that plant ended up being the smallest of the group, showing how genetics and environmental response can sometimes surprise us.
But despite those differences, the room now feels unified. The canopy is alive, vibrant, and moving together into the deeper stages of flowering.
This week has been a big one.
With more than 300 photos captured, the goal was to document every angle of development — structure, branching, flower sites, and canopy behavior — as the plants continue their journey through bloom.
⸻
Environmental Snapshot
The room is currently running with fairly aggressive parameters, but supported by strong airflow and active air exchange.
Current conditions
• Canopy temperature: ~28°C (gradually tapering toward 26°C)
• Relative humidity: ~70% (slowly reducing toward ~60%)
• CO₂: 1000+ ppm through passive enrichment
• PPFD: 800 → 1300 µmol across the canopy
These values are slightly on the upper edge of traditional recommendations, but with strong airflow and healthy transpiration, the plants are responding very well.
Air movement remains one of the most important elements in this environment.
The goal over the next weeks will be to gradually tighten the climate window as flowers develop further.
⸻
Light Strategy
The lighting across the canopy currently ranges between:
800 and 1300 PPFD
This allows the plants to maintain strong metabolic activity without excessive stress during early flower development.
Additionally, we run a 15-minute red light pulse after lights off.
This small far-red window helps accelerate the phytochrome transition between light cycles, effectively signaling nightfall to the plants and assisting the flowering rhythm.
It is a subtle adjustment, but one that helps maintain consistent flowering signals.
⸻
Under-Canopy Lighting
One of the key elements of this room is the use of under-canopy lighting.
As plants grow bushier and develop dense foliage, the lower zones of the plant often receive very little light.
Under-canopy lighting helps:
• increase light penetration to lower bud sites
• reduce excessive shading
• maintain photosynthetic activity deeper into the plant
• improve overall bud development throughout the structure
Combined with careful defoliation and strong airflow, this approach helps keep the entire plant active rather than only the top canopy.
⸻
Airflow — The Invisible Engine
Airflow is one of the most underestimated tools in indoor cultivation.
In this room we rely heavily on constant air circulation and active air exchange.
This helps:
• regulate leaf temperature
• support transpiration
• prevent humidity pockets inside the canopy
• strengthen plant structure
• reduce risk of fungal pressure
Plants are living organisms interacting with their environment, and air movement is part of that conversation.
⸻
Feeding Strategy
The plants are currently feeding very actively.
Feed EC: ~2.4
Soil EC: ~0.9
This indicates that the plants are absorbing nutrients efficiently from the medium.
As long as the plants continue eating and the runoff remains stable, the feeding program stays consistent.
If nutrient uptake slows or runoff EC begins climbing, adjustments will be made accordingly.
For now, the system remains balanced and responsive.
⸻
Nutrient Recipe
Current weekly top feed includes:
• CalMag Pro
• Terra Bloom (base nutrient)
• Power Buds
• Green Sensation
• Pure Zym
• Sugar Royal
• Vita Race (foliar where applicable)
At this stage of flowering, foliar applications are used sparingly. Once flowers begin forming, keeping the canopy dry becomes increasingly important.
⸻
Why Add Power Buds + Green Sensation
As plants transition fully into the flowering stage, the goal shifts from structural growth toward flower formation and metabolic support.
Power Buds helps stimulate the plant’s flowering response and encourages the development of early bud sites.
Green Sensation acts as a metabolic enhancer, supporting:
• bud density
• terpene production
• nutrient transport
• overall plant energy during bloom
Together, these additives help guide the plant’s resources toward productive flower development.
⸻
Mixing Order — Why It Matters
One of the small details that can make a big difference in nutrient stability is the order of mixing.
Our mixing process always follows the same structure:
1. CalMag Pro first
2. Base nutrient (Terra Bloom)
3. Additives
CalMag is added first until the base EC reaches around 0.7.
This creates a stable mineral foundation for the rest of the solution.
After that the base nutrient and additives are introduced gradually.
Proper mixing order helps prevent nutrient precipitation and instability, keeping the solution balanced and available for the plants.
In simple terms:
Chemistry matters.
⸻
Defoliation Update
This week also included selective defoliation.
Some plants had not yet received any canopy thinning, and their structure had become quite dense.
Those plants were defoliated more deeply than the others to restore:
• airflow inside the canopy
• light penetration
• structural balance
Despite the heavier pruning, the plants responded beautifully.
Leaves remain vibrant, growth continues strong, and the canopy quickly reorganizes itself.
⸻
Structural Observations
Across the room, the Animal Mints plants show distinct structural expressions.
Some lean toward tighter node spacing and compact branching, while others stretch slightly more.
These differences highlight the diversity within the genetic expression of the cultivar.
Yet despite those differences, all plants are developing healthy flower sites and strong green foliage.
⸻
What To Expect Next
Over the next weeks we expect:
• vertical stretch slowing down
• bud stacking intensifying
• resin development beginning
• stronger aroma expression
Environmental parameters will gradually shift toward slightly cooler temperatures and lower humidity as flowers continue forming.
The focus will remain on airflow, canopy balance, and metabolic stability.
⸻
Gratitude
Before closing this update, a moment of appreciation.
To the long-time followers, the OG readers, the new growers discovering this diary, the skeptics, the critics, the silent observers, and everyone who spends time following these plants.
Thank you.
Gratitude as well to:
• the platform hosting these diaries
• the sponsors supporting the work
• the genetics that make these explorations possible
• and everyone contributing to the community.
If you are here reading, learning, questioning, or simply watching quietly…
You are part of this journey.
⸻
The legends of the frozen north continue.
🌿❄️
📡 Please stay tuned they can try and take us down but we never quit https://www.youtube.com/@DOGDOGTHEDOCTOR NEW
🙏 Thank you for your patience and continued support.
FOR DISCOUNT CODES AND MORE JUST FOLLOW THE LINK https://website.beacons.ai/dogdoctorofficial
📲 Don’t forget to Subscribe and follow me on Instagram and YouTube @DogDoctorOfficial for exclusive content, real-time updates, and behind-the-scenes magic. We’ve got so much more coming, including transplanting and all the amazing techniques that go along with it. You won’t want to miss it.
GrowDiaries Journal: https://growdiaries.com/grower/dogdoctorofficial
Instagram: https://www.instagram.com/dogdoctorofficial/
YouTube: https://www.youtube.com/@dogdoctorofficial Deleted by Youtube
Vimeo : https://vimeo.com/dogdoctorofficial Under construction stay tuned ⸻
Explore the Gear that Powers My Grow
If you’re curious about the tech I’m using, check out these links:
🔆 Lighting & Environmental Control
• Future of Grow — Advanced LED lighting technology
https://www.futureofgrow.com/
DISCOUNT CODE: DOG20
• Lumiflora — Under-canopy LED lighting
https://lumiflorade.com/
• TrollMaster — Environmental controllers and automation gear (past collaboration)
⸻
Genetics
• Zamnesia Seeds — Genetics used in this project
https://www.zamnesia.com/
⸻
🌱 Soil, Substrates, Boosters & Root Support
• Plagron — Substrates, bio mixes, and supportive products
https://plagron.com/en/
⸻
🎒 Storage, Curing & Preservation
• Grove Bags — Curing and storage solutions
https://grovebags.com/
⸻
📸 Photography Equipment & Tools
(Not sponsors, but part of my creative toolkit)
• Sony A6700
• Sony full-frame macro lens + few more
• Stacking photography workflow - learning
• iPhone (for behind-the-scenes shots)
We’ve got much more coming as we move through the grow cycles. Trust me, you won’t want to miss the next steps, let’s push the boundaries of indoor horticulture together!
As always, this is shared for educational purposes, aiming to spread understanding and appreciation for this plant. Let’s celebrate it responsibly and continue to learn and grow together.
With true love comes happiness. Always believe in yourself, and always do things expecting nothing and with an open heart. Be a giver, and the universe will give back in ways you could never imagine.
💚 Growers love to all 💚
📸 P.S. – The Eye Behind the Lens
All photos in this diary (for now — except for the ones showing the camera, which I took with an iPhone) are taken with a Sony A6700 paired with a Sony full-frame macro lens and a few more.
Photography is part of the story — it’s how we share the fine textures, the glow, and the quiet details that words can’t always capture.
I’ve also started experimenting with photo stacking — a technique where multiple images, each taken at a slightly different focus point, are layered together to create one perfectly sharp image from front to back.
It’s not digital enhancement or AI; it’s pure photography — a way to reveal the plant’s beauty in microscopic depth, from trichome to petal.
You’ll even see a few shots of "ghost me" capturing the shots — camera, lens, setup — because every grow deserves not just to be cultivated, but documented like art.
FOR DISCOUNT CODES AND MORE JUST FOLLOW THE LINK https://website.beacons.ai/dogdoctorofficial
NEW DISCORD - Official Server Invite Link : https://discord.gg/ksjAkA5T74
P.S.2- not all filer were uploaded but i think enough to get the idea wore, i will try and upload them o next week update if not over crowded with files also

Likes
58
Share


@GreenHouseLab
Follow
Video quality is so so for closeups with GoPro. Both phenos are super fire 2 more watering and will be flushing for about two weeks should take me near harvest at week 9-10.
Mars Hydro FC4800 dimmed at 300w, will help lower temps and bring out those colours.
Likes
26
Share


@Ukfarmer420
Follow
So I am entering week 2 of the 12/12 flip, the ladys are showing sex so hopefully later in the week I will get actual pistils so I can start counting down flower days.
Day 9 seen pistils but I had to perform a major defoliation as under the canopy was bad and I didnt want powdery mildew due to leafs sweating ect.
Day 10 24 hours after defoliation, you could not tell I done a thing to them, im hoping its just a odd leaf now and then thru the rest of the flowering period.
Any advice is welcome guys 🙏
I will be adding more fans for airflow.
Day 12 of the flip and the girls are on there way to becoming ladys lol I think there's going to be a few nice kolas in there when done, ordered the new box fan for the floor to create more airflow to reduce the risk of pm and mold.
I need to top up soil as roots are showing so under the net I go again. Wish me luck.

Likes
19
Share


@spacecream
Follow
23Aug
This week I'm ramping up Top Max as per the feed schedule.
26Aug
Spotting some calmag looking brown rusty spot on the top leaves of one of the plants (shortest one, furthest from the fans). Discovered after watering, but still fed it with 1L water pH 6.5 with 1.2mL/L calmag.
I lowered the lights recently but they are not showing signs of light or heat stress.
29Aug
Watering all with deficiency-strength calmag today to get ahead with the three others, just in case.
Buds seem to have fattened a lot in 3 days.
One girl is still showign calmag deficiency.

Likes
120
Share


@CBD_Sweden
Follow
CBD Fast Eddy Automatic is combining Cheese x Juanita la Lagrimosa x Ruderalis, Fast Eddy is a rapid growing, flavourful, and CBD-rich auto strain that goes from seed to harvest in 8-9 weeks, produce generous yields, and induce a clear, mellow, and most importantly, functional high.
THC: 9%
CBD: High
Yield Indoor : 400 - 450 gr/m2
Yield Outdoor: 80 - 130 gr/plant
Height Indoor: 60 - 100 cm
Height Outdoor: 80 - 120 cm
Flowering: 6 - 7 weeks
Harvest month: 8-9 weeks after sprouting
Genetic Background: Cheese x Juanita la Lagrimosa x Ruderalis
Type: Sa 50% In 40% Ru 10%
Effect: Clear, Painrelief
Climate: Mild
-----------------------------------------------------------------------
2017-10-16. Week 8, 62 days from germination. She is 45 cm high and have big colas. She smells wonderfull, strong citrus smell and something like spices and cheeseballs snacks.


Likes
9
Share

@JuicyFlavours
Follow
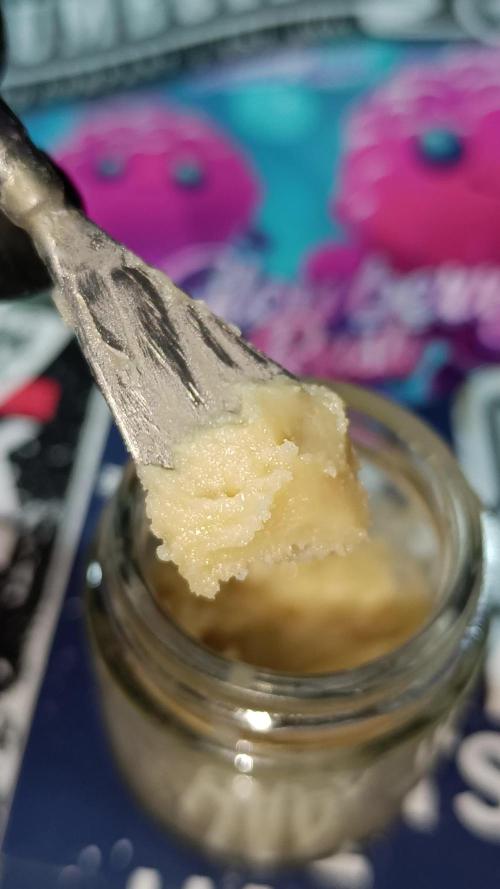
Results in rosin. Fresh frozen 4,2kg , outcome was 138g in hash And 97g in rosin.





Likes
16
Share


@valiotoro
Follow
Hello everyone week 2 has passed for this Tropicana Cookie auto by Fast Buds 😎
this plant is doing very well growing at fast pace and with a beautiful green colour on the leaves.
Topping & LST for my girl 😎
wish you all happy growing!
Likes
8
Share


@Cdn_Chronic
Follow
Pretty slow week, using about 1 gallon of water for all three every other day, I think are a little behind but they look good !
Likes
Comments
Share

@RooftopFarmer
Follow
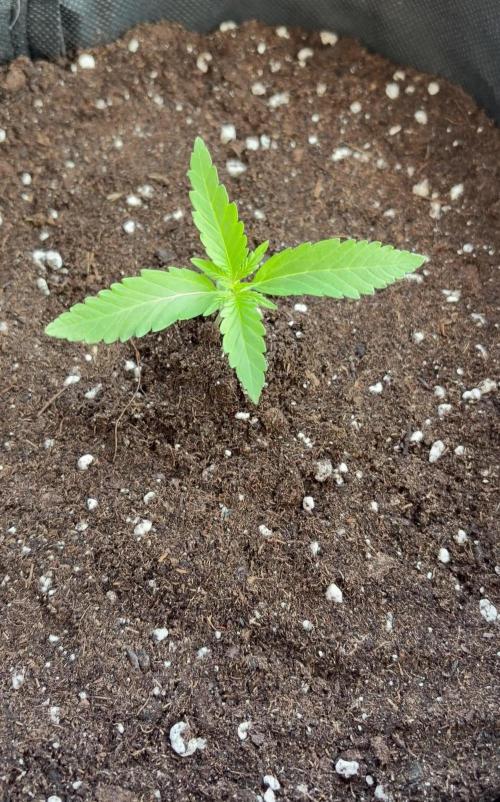
Guava Sundae – Week 3 (Fast Buds Outdoor 2026) ☀️
The weather this week has been absolutely perfect, so she’s been spending almost all her time outdoors. She really seems to thrive in the fresh air and sunlight.
It got a bit windy though, so I added some extra soil around the base to stabilize her. She’s now sitting at about 5 cm tall with a beautiful, deep green color. No complaints at all, looks super healthy and strong.
Likes
31
Share


@The_Doctor_Green
Follow
Esta semana he regado solo con flora booster 2 ml x litro de agua.
La planta de la tierra, la sigo estirando hacia los costados.
Las de las macetas se ven sanas y bien, de a poco se van
Likes
9
Share


@Johan2
Follow
Day 56 of flower cloudy trycs no amber .
Flush with just calmag this week .
Hoping she will be ready in the next few days . It looks like it may have at least a week in her.
Fattening of buds daily more frosting every day . Will water stress . Not very thirsty only 4 litres of flush in a 6 days
Likes
19
Share


@420DeepGrow
Follow
Gracias al equipo de Royal Queen Seeds, Marshydro, XpertNutrients y Trolmaster, sin ellos esto no seria posible.
💐🍁 Gelato #44:
Los criadores de Tyson 2.0 criaron Gelato 44 a partir de cepas finas. Al cruzar la Sunset Sherbet y la Thin Mint Girl Scout Cookies, crearon un híbrido de dominancia índica que asesta fuertes golpes en el cuerpo y la cabeza.
Su contenido de THC del 22% crea sinergia con terpenos colocantes para ablandar los músculos
Mantenla hidratada y con una dieta constante y pasará por la fase de floración en unas ocho semanas. Las plantas de interior alcanzan una altura máxima de 120 cm y producen 400-450 g/m², mientras que sus homólogas de exterior alcanzan los 180 cm y producen hasta 600 g por planta.
🚀 Consigue aqui tus semillas:
https://www.royalqueenseeds.es/rqs-semillas-cannabis-tyson/664-dynamite-diesel.html
💡TS-3000 + TS-1000: se usaran dos de las lámparas de la serie TS de Marshydro, para cubrir todas las necesidades de las plantas durante el ciclo de cultivo, uso las dos lámparas en floracion para llegar a toda la carpa de 1.50 x 1.50 x 1.80.
https://marshydro.eu/products/mars-hydro-ts-3000-led-grow-light/
🏠 : Marshydro 1.50 x 1.50 x 1.80, carpa 100% estanca con ventanas laterales para llegar a todos los lugares durante el grow
https://marshydro.eu/products/diy-150x150x200cm-grow-tent-kit
🌬️💨 Marshydro 6inch + filtro carbon para evitar olores indeseables.
https://marshydro.eu/products/ifresh-smart-6inch-filter-kits/
💻 Trolmaster Tent-X TCS-1 como controlador de luz, optimiza tu cultivo con la última tecnología del mercado, desde donde puedes controlar todos los parametros.
https://www.trolmaster.com/Products/Details/TCS-1
🍣🍦🌴 Xpert Nutrients es una empresa especializada en la producción y comercialización de fertilizantes líquidos y tierras, que garantizan excelentes cosechas y un crecimiento activo para sus plantas durante todas las fases de cultivo.
Consigue aqui tus Nutrientes:
https://xpertnutrients.com/es/shop/
📆 Semana 6:
Buena semana, ha habido sol agradable y buenas temperaturas, empieza q tomar fuerza.
Mantengo las dosis de nutrientes a 1/3 de lo recomendada por el fabricante al estar en suelo virgen ☘️🌲🌳.
Likes
35
Share


@bioaccessory
Follow
Hey!
I slightly bent the branches for even illumination, and also removed some of the fan leaves.
At the end of the week I rinsed with FlashClean and am getting ready to form buds 😎
Thank you for stopping by, and be healthy! 🙏
To be continued... 😶
