The Grow Awards 2026 🏆 


Likes
Comments
Share
@Zuppler
Follow
✨**Grow Report by Zuppler - Week 8 Flowering Phase** 👀🐗
Ayo, what’s good fam? Zuppler back with that Week 8 flowering update, and we’re gettin’ real close to harvest time now. Just two more weeks to go, and these girls are almost ready to shine. The buds have gotten so heavy I had to tie ‘em up to keep ‘em from toppin' over. They’re thick, dense, and full of weight – just what we’ve been workin’ for.
I’ve already started flushin’ the medium, lettin’ ‘em clear out all the leftover nutes. The plants are respondin' well, and the fade is startin' to show real nice. Right now, almost all the trichomes are milky, and I’m just waitin' for that perfect amber to start showin' up. It’s a waiting game now, lettin' ‘em ripen and hit peak potency.
The smell’s still crazy loud, and the resin is drippin’ like it’s made for the top shelf. Everything’s goin' smooth – temps, humidity, all dialed in to finish these queens off strong. We’re in the home stretch, and in two weeks, it’s choppin’ time.
Zuppler signin’ out. The harvest is almost here, fam!

Likes
11
Share
@Budhunter
Follow
Harvest on day 91 of cycle , day 54 of flowering.. I could leave it few days more for sure however my ladt harvest is nearly finishing so I need to dry this plant as soon as possible hehehe..
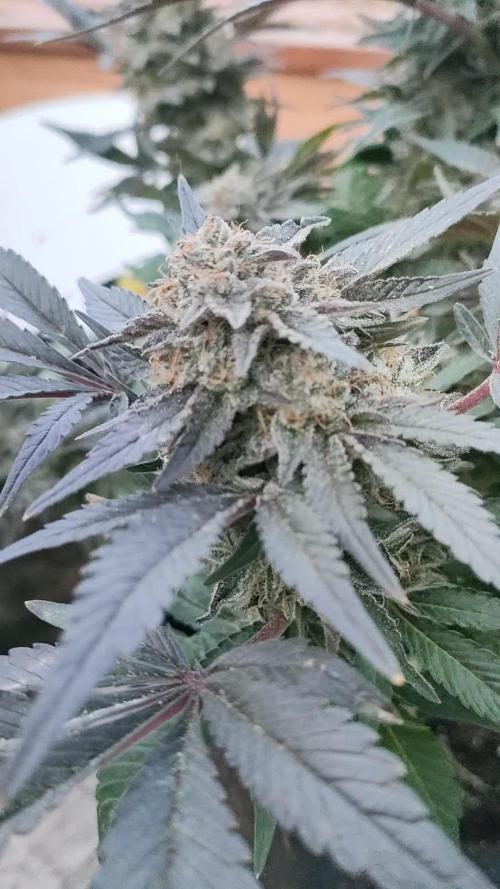
Purple punch has really frosty buds, it didn’t grow as much as I wish(I had to move the plant to the toilet with my burple light as there was no space for 3 plants in my 2x4 tent) but they are looking insanely good, with a strong flavor of grape, I am impressed with this smell/flavour, all covered in trichomes, I can’t wait to smoke it..
So my way to harvest it is I cut it down on the main branch and hang to dry out.. all the plant .. I prefer dry trim because it’s way easier to trim.. so now I am gonna hang it for 2/3 weeks and then start trimming.. I will update yield and tasty as soon as I finish trimming..
Overall I am happy with the results 🙌🏼.
Likes
17
Share
@cannaman9
Follow
Week 9 of flower. I feel this last week or two the plants really bulked up. I’ve been set back paying for this grow op and this run has really tested my patience, but this week makes up for all of that. The smell is incredible, and I’m happy to finally make it here. I’m getting a little overgrowth with the heat of the light but nothing crazy. I’m just flushing now and checking runoff ppm. Thank you to everyone staying tuned in :) we’re almost there!

Likes
19
Share
@4Haut
Follow
Hi@ALL,
it's the end of the second flowering week, unfortunately, I’m dealing with fungus gnats. As a countermeasure, I’ve used nematodes. The challenge is that during the flowering phase, I prefer to let the soil dry out completely before watering. However, nematodes require consistently moist conditions to survive. Additionally, I’ve read that nematodes can take three to four weeks to eliminate all the eggs – quite a long time. I might also try neem oil.
Also, I’ve noticed that the tips of 20%-25% of the leaves have turned brown and become crispy. This occurs both at the top and bottom of the plant. I suspect I’ve provided too much light. My biggest challenge currently is finding the right light intensity. I’m using an AC Infinity Ionframe EVO3 with 280W. According to the instructions, I should operate it at 100% intensity during the flowering phase when it’s 30 centimeters away. However, that feels like a full-blown laser show for the plant. (supposedly around 1600 PPFD). Now I’ve positioned it at 45 centimeters and 70% intensity. According to the Photone App, the upper part of the plant receives approximately 900-1000 PPFD. Unfortunately, I can’t fully trust my smartphone an the app… well, that’s what happens when you turn everything into science 😅
And one more thing caught my attention: the smell. It’s not there. I can hardly smell anything. My GG#4 is three weeks old and fills the entire room with its strong odor, but the L.A. Amnesia simply doesn’t smell like anything. Somehow, that worries me a little 😩
Overall, the plant seems "healthy" and does its thing, but I’m unsure whether to prune the lower branches. Although they receive light, they’re about 10-15 centimeters below the upper ones 😓
Wish you a nice day. 👋😀👍
GrowHard.GoPro. 💪

Likes
37
Share
@420DeepGrow
Follow
📆 Semana Final - Eternity Grow Cup 2025 📆
¡Y llegamos al final de esta increíble experiencia en la Eternity Grow Cup! La Runtz de Zamnesia ha dado lo mejor de sí misma, con cogollos densos, llenos de resina y un perfil aromático que se ha intensificado a lo largo de la competencia. La combinación de genética y Green Sensation de Plagron ha sido todo un acierto, resultando en una floración espectacular.
Los tricomas ya están en su punto máximo, y la planta no ha mostrado signos de estrés en ningún momento, lo que demuestra que el cuidado y los productos utilizados han dado sus frutos. La estructura de la planta ha sido perfecta, con cogollos consistentes en todas las zonas.
Con temperaturas controladas y un entorno bien manejado, los resultados son más que satisfactorios. Ha sido un verdadero placer participar en esta competición y ver cómo la Runtz crecía y evolucionaba con cada semana.
¡Gracias a todos por el apoyo y, sin duda, seguiré aprendiendo y mejorando para la próxima! 🍀💪

Likes
13
Share
@420DeepGrow
Follow
Gracias al equipo de AnesiaSeeds, Marshydro, XpertNutrients y Trolmaster sin ellos esto no sería posible.
💐🍁 Oracle Octane:
Oracle Octane es una cepa altamente potente y con un alto contenido de THC elaborada a partir de una Blackberry Octane seleccionada, excepcionalmente rica en THC y aromática, y de la pesada Blackberry Oracle, inédita, de nuestro propio acervo genético. El desarrollo de esta carismática e impresionante variedad abarcó 8 generaciones y un enorme esfuerzo de cría.
La variedad tiene un sabor intenso e inolvidable que recuerda a bayas dulces y limones frescos.
Las plantas a partir de semillas crecen increíblemente hermosas y sus hojas y cogollos a menudo desarrollan tonos de rojo, morado intenso e incluso casi negro.
Esta cepa vigorosa y ligeramente índica dominante tiene un tiempo de floración de unas 9 semanas, produce hojas grandes y alcanza una altura de unos 120-130 cm en el interior.
🌻🚀 Consigue aqui tus semillas:
https://anesiaseeds.com/product/oracle-octane/
💡TS-3000 + TS-1000: se usaran dos de las lámparas de la serie TS de Marshydro, para cubrir todas las necesidades de las plantas durante el ciclo de cultivo, uso las dos lámparas en floracion para llegar a toda la carpa de 1.50 x 1.50 x 1.80.
https://marshydro.eu/products/mars-hydro-ts-3000-led-grow-light/
🏠 : Marshydro 1.50 x 1.50 x 1.80, carpa 100% estanca con ventanas laterales para llegar a todos los lugares durante el grow
https://marshydro.eu/products/diy-150x150x200cm-grow-tent-kit
🌬️💨 Marshydro 6inch + filtro carbon para evitar olores indeseables.
https://marshydro.eu/products/ifresh-smart-6inch-filter-kits/
💻 Trolmaster Tent-X TCS-1 como controlador de luz, optimiza tu cultivo con la última tecnología del mercado, desde donde puedes controlar todos los parametros.
https://www.trolmaster.com/Products/Details/TCS-1
🍣🍦🌴 Xpert Nutrients es una empresa especializada en la producción y comercialización de fertilizantes líquidos y tierras, que garantizan excelentes cosechas y un crecimiento activo para sus plantas durante todas las fases de cultivo.
Consigue aqui tus Nutrientes:
https://xpertnutrients.com/es/shop/
📆 Semana 6:
Esta semana ha explotado 💣, los cogollos comienzan a tomar densidad y llenarse de resina, me hubiera gustado aplicar algo mas de nutrientes en la fase vegetativa, la próxima vez será.


Likes
229
Share
@OrganicNature420
Follow
Germination date 🌱 12/07/2021
Day 50 02/09/2021
Strain 🍁 SinCity seeds Frosted Biscotti
(Biscotti Sundae x Whitenightmare)
THC% • Unknown
💡 Mars Hydro FC4800
• Power draw 480W + 5%
• Max coverage 5 x 5
• LED 2070pcsSamsungLM30B1&Osram660nm
• Max Yield 2.5g / watt
• Noise level 0 DB
• Removable Driver +2m cable
• Daisy chain (multiple lights)
https://marshydroled.co.uk/products/mars-hydro-fc-4800-led-grow-light-samsunglm301b-commercial-greenhouse-medical-indoor-kit 🇬🇧
https://www.mars-hydro.com/buy-fc-4800-480w-4x4-energy-saving-full-spectrum-commercial-led-grow-light-mars-hydro-for-sale 🇺🇸
PROMO CODE • (ORG420) DISCOUNT 👍🏻 marshydroled.com
⛺ Mars Hydro 120 x 120 x 200cm
📤📥 AC infinity 6inch
💧 10lt dehumidifier
❄️ 3.1kw air con system
💉 Nutrients GreenBuzzLiquids
Organic Grow Liquid • 1-4ml until 2wk flower
Organic Bloom Liquid • 2-4ml flower stage
Organic More PK • 2-4ml +wk3 of flower
Organic Calmag • 1-2ml/lt whole grow
Fast Plants Spray • first 3days at night lights off
More Roots • 2-5ml veg +2wks flower
Fast Buds • 5ml +wk2 of veg until 1wk flower
Humic Acid Plus • 2-5ml whole grow
Growzyme • 2-5ml whole grow
Big Fruits • 2-5ml flower stage
Clean Fruits • 5ml flush 1wk
Ph powder
Root Gel
Living Organics
https://greenbuzzliquids.com/
PROMO CODE • organicnature420 15% off ✌️🏼
🥥 Growing Media • Coco Coir
Notes 📝
Plants have had a trim up. Not done a full job but all the undergrowth has gone. Given them a top feed of wormcastings as they are now on flower. Look forward to results with both Mars Hydro and GreenBuzzLiquids 💡💚 really can't fault these company's 🙌🏻
Happy growing fam ❤️🌱🍁👍🏻
Discount codes in bio for Mars and GreenBuzzLiquids 👍🏻

Likes
91
Share
@KanOrganics
Follow
Well week 5 of bloom is complete, and this week brought a few challenges.
Humidity in my area has been through the roof, close to 100%. My heavy-duty equipment was struggling to bring my tent to acceptable late flowering levels, sometimes reaching over 60% RH, especially at night when the plant was respirating more.
Additionally, her pale yellow color, and leathery leaves didn't excite me too much. If you remember, we had a severe heat wave a couple of weeks ago, which contributed to that. But also, since I messed up the ScrOG training, and regrettably decided not to super-crop her, a fair share of the leaf problems were due to light stress as well, as I didn't want to sacrifice lower colas, so I let it go.
My biggest mistake this grow, was not paying attention to her the one day she decided to stretch nearly a foot, and was unable to be weaved into the net the next day without being snapped in half. My second biggest mistake is NOT snapping it in half, and letting it repair itself. I wouldn't have had nearly as much bleaching of leaves I think.
This week, and I'm assuming because nearly all chlorophyll was depleted from her fan leaves, I didn't notice much of any change from last week. Her buds seemed to be about the same mass, and the stigmas still had the same ratio of red to white coloration.
I suspected she was dead, or dying, or just...done. Not all genetics will transform all of their stigmas from white, and not all genetics will have their trichomes turn amber.
So, I did a few things to confirm that suspicion.
First, I looked at her trichomes on various buds closely with a microscope. They were almost all cloudy, with very very few amber. That told me that she was at an acceptable level of ripeness, even if she could have went longer, assuming she was still alive.
Next, I removed the pea gravel mulch I was using in the raised bed, so I could get a closer look at the soil she was growing in, and more specifically, her roots. The soil, although moist a few inches deep, was not at the level I expected, and I think I have not been watering her enough. I don't think I'll be using a gravel mulch again. On the plus side, it did help prevent fungus gnats, as there was zero the whole grow, apart from an early week when I placed some solo cups to germinate on top of the bed, but after removing them, the fungus gnats disappeared with them.
Also while inspecting the soil, I carefully dug down to inspect some of her primary roots. They were actually dry, despite the surrounding soil being moist. This could explain why she wasn't drinking much if any for the better part of the week.
So, given her dry foliage, dry roots, and ripe-enough trichomes, I decided it was time to harvest her, earlier than expected. Let's also not forget that I was frightened this week with some high humidity scares, so growing longer, and possibly for no reason if she was dead or barely alive, was not in the cards. I've dealt with my fair share of bud rot before, and I would rather try what I have of her now, than to wait the extra week or so for her to be fully ripe.
So, that is what I did, on the last day of the week -- I chopped her down, cut off some larger fan leaves, and hung her upside down. This, of course, was after removing the raised bed. It took me a while to empty about 45 gallons of soil so I could move it, but in doing so, I noticed a lot of beneficial critters, and nothing bad. Such critters included small centipedes, which feed on other insects, and soil mites which eat dead organic matter.
I set the tent to dry at around 72F and 55 RH. And now we wait for about a week before trimming.
One thing is for sure -- I am very proud of this grow, despite all these flaws. She smells incredible -- like pure citrus emanating throughout my house. This is a very strong-smelling plant.
As a bonus, I've included a time-lapse video of the entire grow from start to finish in the last media above. Check it out and let me know what you think.
I'll be back for the harvest week for the dry weight in about a week or so, after we're done drying and trimming.

Likes
3
Share
@hayzerii
Follow
They are wet because it rained, and there are some windows in my growhouse,
they are growing great in my opinion, what do you think? :D

Likes
6
Share
@Huckleberry39
Follow
I am so excited to grow this Mexican Airlines from @420fast_buds. She is About twelve days out of The Dirt and is doing excellent.
But I wouldn't expect anything less from the peeps at @fast_buds. She is looking super indica early on. Can't wait to see how it goes. See you guys back here next wee for another update ( if not sooner)!!!
Peace and love

Likes
10
Share


Likes
19
Share
@Mission420
Follow
Another good week without any issues. You might notice that my wednesday closeup is showing crystals forming on the leaves.
I am trying to stay hands off as much as possible and only checking on them each morning when I take my photos. I have also given them an extra feeding a couple of times to make sure they aren't drying out. I still see in the video the leaves drooping shortly before the lights are coming on, so I think I will add another 1 min cycle in the afternoon.
On Saturday I did some defoliation on the lower part of the plant cutting out any leaves that were not getting enough like and ones that had already turned brown. I hope to see how this affected things in next week's video.
You may notice that part way through this weeks video, the camera shifted left. I was hoping to capture a single bud growing, but the lense on my camera is not correct for this purpose. I also set the frame rate to once every min from every 5 and all that did is make the clip longer, so I have switched it back to every 5. I could also go to every 10, let me know if you think that would be smoother.
Thanks for checking out my page and let me know if there is anything I can be doing better.

Likes
33
Share
@Roberts
Follow
Cali crasher is a huge girl. She is bulking strong, and just growing like a weed. 🤣. She is under the Hortibloom Solux 350. 🤞🏻 for some nice colas. Everything is going good and she might be on ph water in about 2 weeks. About 3 to 4 weeks from finish. Thank you Hortibloom, and Doctor's Choice. 🤜🏻🤛🏻💪🏻❄️🌱
Thank you grow diaries community for the 👇likes👇, follows, comments, and subscriptions on my YouTube channel👇. ❄️🌱🍻
Happy Growing 🌱🌱🌱
https://youtube.com/channel/UCAhN7yRzWLpcaRHhMIQ7X4g

Likes
15
Share
@Luckydope69
Follow
In der zweiten Woche sind die Ladys schon ein ganzes Stück grösser geworden. In dieser Woche werde ich nach und nach mit dem binden der Triebe beginnen und aus den Mädels richtige Büsche zaubern.
Likes
39
Share
@Grassland
Follow
Day 1 of week 7 in flower. Yesterday I opened the tent and for the first time thought to myself " Wow that's a big plant!". My grow tent is 1 meter by 1 meter and the plant is touching all sides. I am now wishing I had more wattage of lights. Day time Temps are 72 and humidity is around 35. My current LED wattage is 277 from the wall, let's see what it can produce. Time until harvest is 4 ish weeks and dropping. Judging by the speed at which the pistils are changing colors I am doubtful it's going to take 3.5 weeks to ripen. I am in no hurry, quality is my biggest concern.
Likes
45
Share
@masterofsmeagol
Follow
9/10 Went and shook the plants off. I don't think it rained. I think it's just dew. Plants with ailments seem to be progressing well and it looks like they'll outrun the pathogens. It may not be a banner year yield wise but the quality will be great it looks like. GMO is stacking up real nice. The ones in further flower are swelling more and more everyday. Earwigs MAY be back because I noticed a couple of plants where I left a tiny little branch on the bottom have been lollipopped on tje sherb pie and rather quickly too. I suppose it could be leaves dieing and rotting bit I doubt it. If they are here there aren't many and most plants are too far in flower for them to bother. They eat the lower newly developing shoots. Not big dense buds. Luckily. I noticed some pm on the gmo with pm. Looks like it's time for another treatment of k bicarb. I'll probably do that tonight. I'll keep this updated.
WENT BACK OVER AND DEFOLIATED A BUNCH OF STUFF. ITS TIME FOR ANOTHER APP OF K BICARB. I CHECKED THE SHERB PIE AND IT DOESNT NEED TO BE WATERED. IT WAS STILL VERY HEAVY. IM THINKING I MAY HAVE EARWIGS THAT ARE FEASTUNG ON LOWER BRANCHES THAT SHOULDVE BEEN PRUNED. I NOTICED SOME LARFY SHIT THAT KOOKS LIKE NEW SHOOTS WERE CHEWED. LUCKILY THEY DONT SEEM TO BOTHER DEVELOPED BUDS. ESPECIALLY ROCK HARD BUDS. I'LL DO SOME RESEARCH AND DO SOME FORM OF APPLICATION FOR THE PM SPOTS I SAW AND THE SEPTORIA I KNOW IS THERE. IM SUPER GRATEFUL THOUGH. THESE ARE VERY HARD TO GROW STRAINS AND I THINK ILL KNOCK IT OUT OF THE PARK. Also thinking of switching to cha ching shortly on the toasted toffy and the event horizon that's furthest along.
9/11 I Didn't water anything today because things still seemed heavy. I'm noticing the same thing that happened a few years back. Lower secondary or tertiary branches are getting stripped on a couple plants. They never touch the developed buds they want the new shoots. If IT IS ear wigs they are impossible to fight. I put poison down and d.e. around those plantscand we'll see. It could also be rot from dying leaves. I need to treatcsome of the plants with a longer flowering time with plant doctor. I'm going over today to spend a few hours working in the garden. I'll apply something I just don't know WHAT yet. One event horizon looks like it tried to reveg AGAIN which is super weird . I just see a lot of one and 3 finger leaves. It will probably turn out to be great. The other event horizon looks like its going to be incredible. The toasted toffy is getting close too. Temps only reached 62° yesterday. It took FOREVER to shake these plants off. Time to get the leaf blower out. I'm going to bring my trich scope when I go over today. I wanna look at tgat event horizon. Pistols are retracting on the top flowers. This may be a multiple stage harvest. I'll keep this updated.
UPDATE: WENT OVER AT FOUR AND WATERED. I MIGHTVE BEEN ABLE TO HOLD OFF UNTIL TOMORROW MORNING BUT I HAVE PLANS EARLY MORNING. I ALSO DEFOLIATED QUITE A BIT. BUDS ARE SWELLING CONSIDERABLY. THE SHERB PIE HAS TURNED COMPLETELY PURPLE. IT HASNT HAD ANY FLOWERS ON IT BUT NOW IT HAS FLOWERS BIGGER THAN A QUARTER! THESE PLANTS ARE VIGEROUSLY FLOWERING. I NEED TO CHECK THE TRICHS ON A COUPLE PLANTS AS THEY DONT HAVE MUCH TIME LEFT. AS I WAS DEFOLIATED I NOTICED THAT SOMWTHING HAD STRIPPED FRESH BUDSITES ON SOME LOWER BRANCHES. IN YEARS PAST THATS ALWAYS BEEN EAR WIGS WHICH ARE IMPISSIBLE TO DEAL WITH. THEY USUALLY DONT TOUCH THE BIG BUDS THOUGH. TJEY LIKE THE FRESY SHOOTS. ILL GO OUT AT NIGHT AND SEE IF THIS IS THE CASE. ITS ONLYVHAPPENING ON A COUPLE PLANTS BUT STILL. THE EVENT HORIZON IN THE MIDDLE IS GROWING DIFFERENT THAN ITS SISTER. YOU CAN TELL THE STRAIN IS THE SAME BUT THIS SEEMED TO REVEG (AGAIN) BECAUSE IM SEEING SMALL FULLY DEVELOPED BUDS THAT I DONT REALLY SEE CONNECTING. CRAZY TRICHS THOUGH. IT WILL BE INTERESTING TO SEE HOW IT COMES OUT. I TREATED THE GMO WITH WPM WITH A QTR GALLON OF K BICARBONATE FOLIAR SPRAY WITH A DROP OF DAWN FOR A SURFICANT.
9/12 Shook everything off and then used the leaf blower to try to better dry them. Weather is lookingvyo be good for the next couple weeks. Perfect finishing weather for my two that are furthest in flower. I may have to do a staged harvest. Some BOTTOM branches on e.h. are FAT and have trichs on trichs. I'll have to use my scope. I'm switching to cha ching next feed for the three furyhest in flower. Maybe four. The sherb pie had NO flowers last week but it's exploding with really compact buds. The whole plant turned purple. I need to be careful of botrytis with this weather. I've been pretty good about leaving and removing any dead or dying leaves. Even the plant in the ten is filling out nice. I have SOMETHING (behaving like earwigs) and eating "fresh" shoots. It's like lollipopping the new growth on a couple plants. I'll becstaying at the grow from now forward so I'll go out tonight and see what I found. The poison I put down seems to be gone. Anyway I'm very grateful for what I've got. I'm update as I go.
9/13 It's sprinkling a half hour trom my grow. I think it's supposed to be nice though. I found some botrytis on two plants. Two are so close to finishing that I need to closely watch them. I don't want botrytis. I applied k bicarb to the middle gmo as I saw a spot of pm. I spent a ton of time defoliating. This cold weather has brought the fade much faster. Trichs are looking good.
WENT THROUGH THE PLANTS AND DEFOLIATED A SHIT TON. APPARENTLY THIS EARLY FADE IS NORMAL THIS YEAR. AT LEAST IN ALL MY CANNABIS GROUPS. WENT THROUGH EVERYTJING! STILL HAVE THE MIDDLE EVENT HORIZON I WANT TOO TIE DOWN BUT I DID A LOT OF DEFOLIATION. THIS ALLOWED ME TO FIND A FEW PIECES OF BOTRYTIS. ON MY PLANTS THAT ARE ALMOST DONE. WE HAVE GOOD WEATHER FOR A LITTLE BIT BUT I MAY HAVE REACHED DIMINISHING RETURNS ON A COUPLE. THAT E.V. AND THE TOASTED TOFFY I DONT WANT GETTING WET. THEY ARE TOO DENSE. TRICHS ARE ALL MILKY AND THEYRE SWELLING. IM SLEEPING ON IT BUT IM ALMOST POSITIVE IM GOING TO DO A SELECTIVE HARVEST ON THOSE TWO. IM NOT LETTI G SHIT ROT AND AGTER LOOKING AT THESE UNDER A SCOPE I WOULDS TAKEN THEM YEARS AGO. GMO IS FROSTY AS HELL. EXTREMELY ARONATIC GARDEN. ILL KEEP THIS UPDATED.
Decided to hold off feeding and watering. Defoliated a shit ton throughout the day. Around five I noticed that my shittiest GMO with the yellow leaves had a couple dead interior branches. Upon closer inspection it looked like grey mold. A few tiny buds were destroyed but the branch needed to be removed. Jot any big loss but if it's in the shit that doesn't matter than it's around the shit that does. Found info on event horizon flowering time. Middle of September until middle of October. That could be why I'm seeing coke cans on the bottom branches of that phenome. I've got some decisions to make. I mixed up enough water to water in the morning. I'll mix up feed in the morning. Tje garden has gotten a lot of attention lately. I hope it pays off. I'm leaning on a multi staged harvest of the event horizon amd toasted toffy but we'll
9/14 Hurries morning. Mixed water for this morning last night. WATERED AND FED EVERYTHING (BUT TOASTED TOFFY AND EVENT HORIZON #2 DUE TO THEM BEING CHOPPED SOON.) Everything got a gallon of water and a qtr of food. I had to cut a couple small interior secondary branches on my shottiest GMO due to the appearance of grey mold. I also found some botrytis in both the event horizon and toasted toffy that I plan to take the tops of today. I scoped them and I'm planning to do a staged harvest. Trichs are milky with some amber. Everything is blowing up! I'm not sure what's happening but like it previous years there's a couple plants with leaves dieing near bud sites and an overall yellow appearance. Maybe it's late stage septoria. I cant isolate it due to local laws but if I have to I'll deal with it. Nothing else had anything like that. I hace noticed SOMETHING nocturnal that can eat a small branch and leave it bare. Also eat the small newly forming shoots at the bottom of plants. I shouldve taken off ALL the larfy stuff as it draws bugs but I did things a like different with each plant this year. I'm going to go through the plants again today and I'll update what I decide. Chances are the top half of those two plants are coming down. I'll do a video.
9/15 I'll have to add pics and videos tomorrow. Last night I did a final check of the trichs on event horizon #2 and toasted toffy. Everything looked great so I proceeded to do a "wet trim" outside (ill use the leaf blower to clean up) and cut the tops off the plant. I know this injures tje plant but it also makes them go crazy thinking they are dying and the buds and trichs swell. I had one plant last year I got two harvests off and a bunch of fresh frozen for concentrates. I looked this morning and I madecthe right decision. These plants are DONE. I've got another event horizon but it's not quite there yet. I'm going to leave it as long as I can. If the injured plants pick up pm or something (already had septoria) then the flower will be used for extracts or I'll do a Cervantes wash. I imagine concentrates though. One GMO isn't doing as good as the rest. Yesterday I had to cut three branches off due to grey mold on the stalk. If laws allowed it I'd isolate that plant. Luckily since I spend so much time going through the garden I'm able to find this kind of stuff. The GMO'S look wonderful (even the one with some yellow leaves that I cut the branches off) . K bicarb has kept pm at bay so far. This strain has TONS of trichs. It's like trich on trich on trich. I can't wait to try it. It smells amazing. Sherb pie is completely purple with rock hard buds that smell amazing. It's quality over quantity this year. The big one in the 50 (I think red runtz) is swelling more everyday. I'm going to switch to ch ching soon. The plant in the 10 had TOTALLY SUPRISED ME. I've never grown a plant lime this. It started out with dark purple in the middle now buds are swelling and calyxes are EVERYWHERE! This plant is growing extremely fast! You'll see what I mean when I put the pics and the videos up. I'm not going to do the event horizon harvest until I get both plants and all of both plants. It will be a while before I finish the toasted toffy one as well.
9/16 I'm glad I took those plants. Weather is good but plants were soaked thos morning. I need to go out at night and see what is eating new shoots. Flowers are looking great. I need to do another app of k bocarb sometime. I'm suprised the pm has pretty much stayed with that one plant. That two other GMO's flanking it are doing awesome! Purple, sticky stinky. It's got the whole package. The one in the 50 has some huge flowers that won't require much longer. The one invthe 10 has some time left. This is clearly a sativa dominant hybrid. The buds are swelling like crazy. It went from NO buds to having little purple calyxes to flowers that look like cat-tails! I can't wait to see what rhis year brings. Once I get things dry and manicured I'll give you guys a look at how the first stage of the first harvest went. I'm super happy. Spent a large part of this morning shaking plants by handcand removing any dead leaves or anything that could cause rot then I went over them with a leaf blower. I'll need to water tonight I imagine.
WATERED AROUND 3:00 PM. MY FAVORITE GMO STARTED DROPPING. WATERED EVERYTHING A GALLON EXCEPT I SPLIT ONE GALLON ON THE PLANTS THAT HAD BEEN CUT. IM EXTREMELY TIRED BUT I NEED TO GO OUT AT NIGHT AND SEE IF I CAN FIND EARWIGS CRAWLING UP THE STALKS. WEATHER STILL LOOKS GOOD. BUDS SWELLING PISTOLS RETRACTING AND MORE AND MORE LEAVES DYING. I CANT BELIEVE THE SIZE OF THAT SATIVA LEANING HYBRID IN THE TEN!

Likes
77
Share
@SooSan
Follow
Dans l'ordre:
1) Afghan Peach x Blue Monkey
2) Gelato Cake
3) Fast Critical Poison
4) Tropical Fuel
5) Hindu Kush
6) (Blueberry x Black Domina) X (Kosher Kush x Mk-Ultra)
7) Blueberry
8) Herz OG
9) (Blueberry x Black Domina) X (Kosher Kush x Mk-Ultra)


Likes
6
Share
@GrowzWithZee
Follow
She's just caked. Incredible. Followed by sweet smells around the room. Shes a small beauty!
