
Likes
Comments
Share


@HoneyBlunt42
Follow
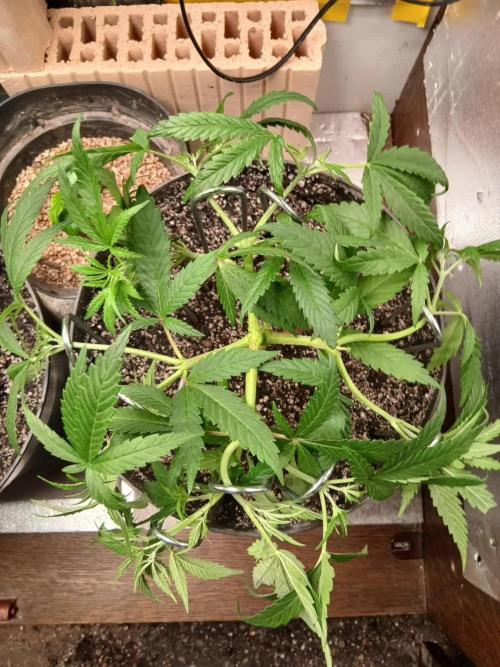
This week was the harvest of plants.
Two turned out big and powerful.
One is a short plant with a large central flower.
One could stand and bloom for another two weeks, but it is already cold outside and the flowering will slow down.
And there is no strength to wait.
So I collected. As a result, the wet weight was:
"small" - 82 grams,
"bag" - 185 grams,
"fat top" - 282 grams,
"skinny" - 252 grams.
I wait 10-14 days until drying in an awning without light and with a carbon filter. Temperature 16 degrees

Likes
4
Share


@PolezGardn
Follow
day 60 flower, ladies look very good, the blueberry has developed nanas... i cut her directly :( but the ChemDog recovered quickly in 12h light!


Likes
Comments
Share


@Ninjabuds
Follow
Not a lot to update the seedlings have came up out the soil at this point they are still to small to tell any visible differences.
I started all the seeds from all 10 packs and and I put 26 of them in soil I now have about 20 of them left I still have atleast one left if every strain. I just kept the 20 plants that all started off at the same time it’s so much easier when there is not some plants behind from the rip. In a few days I will pick out the best one from each of the 10 strains and toss the rest so sad there is a plant count here.
Likes
Comments
Share

@Kadash368
Follow
Changed into big box and bigger pots. Lets grow them 3 to 4 more weeks and then send them into flowering. Yupiduuu 🍆🌲🌞🍇
Likes
22
Share


@BB_UK
Follow
Honestly an amazing week! They’re stretching and producing so many bud sites widening their structure with some well let’s call it mid stress training lol i may if had a problem though I’ll see 😞 as my lights didn’t turn off until an hour and 15mins after their normal time due to a malfunction… sooooo hoping no problems ffs but will be switching that to a manual one tomorrow when lights are on! 🤞🏽 I hope because up til now it’s perfect no complaints!
Likes
6
Share


@valiotoro
Follow
Super easy trim✂️
The buds are super dense & sticky🤩
For the smell it’s cherry & blackcurrant with a gassy touch the Cherry Cola Diesel ⛽️🍒
Likes
20
Share


@Letsgo420
Follow
Was considering a 20/4 cycle on flowering but after snapping the stem I've brought that in now to try and aid recovery in any way I can. Spotted pistils after a trim to the Strawberry Banana on day 22, thing about to get interesting! Last bits of LST and such for her this week but the Gorilla Cookies still has a bit to go and probably even more after the stem incident 🤦♂️Speaking of which, little RAM fan gave up this week so I got a bigger one to cool things better but in the process of setting it up I took out a lower branch on the Strawberry Banana, not to bad as it was only a spindly little thing and the space has been utilised to bend some others over giving even more light access. Going to start adding a small amount of bloom to the feed for her now but the Cookies are still on a 10th of the recommended dose but doing well for it spreading out nicely! By the end of the week pistils were really coming out on both girls so a big trim was given and a probable last round of LST to really let the light in! All looks good right now!


Likes
24
Share


@nonick123
Follow
Día 44 (15/07) Wow! No hay shock de trasplante! 😍💥😁
Todas las ramas se han estirado hacia arriba tras el ajuste de LST y se están formando nuevos nodos rápidamente
Esta combinación de nutrientes de Lurpe + substrato de PRO-MIX HP es una maravilla 😍
Día 45 (16/07) Ayer tuvimos ola de calor (37 ºC) y han aguantado muy bien!
A última hora de la tarde (cuando ya no había sol directo) les apliqué H2O en spray foliarmente para refrescar los estomas
Hoy parece que vuelven las temperaturas estándar para esta época del año: 29 - 30 ºC en las horas centrales del día
Riego con 1 litro de H20 pH 6,5
Día 46 (17/07) Pequeños ajustes de LST
Hay algunas ramas inferiores que no se han formado / estirado mucho
Lo más probable es que haga una buena limpieza este domingo, 7 días después del trasplante, para dejar solo los brotes por encima del 4º nudo
Día 47 (18/07) Riego con 0,5 litro de H20 pH 6,5
Este domingo (día 50) haré limpieza de partes bajas y tal vez también de nuevo topping en las 4-6 ramas principales 😁
Día 48 (19/07) Día de muchísimo calor con 37 ºC. A ver como lo llevan!
Riego con 0,5 litro de H20 pH 6,5
Día 49 (20/07) Para ayudarles a llevar mejor el calor de las horas centrales del día, coloca una malla de sombreo (70%) sobre el invernadero
Lo cierto es que se nota que baja mucho la temperatura debajo de la malla! Van a estar más fresquitas! 😍
Riego con 0,5 litro de H20 pH 6,5
Día 50 (21/07) Training session!
Hago limpieza del tercio inferior de la planta, de todas las ramas y nudos que no superan la línea del dosel marcada por el 4º nudo (1er topping)
También hago topping (2º) a todas las ramas principales
La idea es tener 12 ó 14 colas principales para que no se hagan muy altas
De paso saco unos cuantos clones de las ramas inferiores eliminadas 😁💥
Para superar el estrés, hago las siguientes aplicaciones y riego:
- Riego con 1 Litro de Té Vegetativo de Lurpe Solutions. Preparación: 24 horas con bomba de aire (oxigenación) con ingredientes:
Green Sunrise 8 ml/L + Insect Frass 16 ml/L + Hummus Lombriz 8 ml/L + Melaza 1 ml/L + Kelp Hidrolizado 0,25 g/L
- Aplicación foliar Kelp hidrolizado de Lurpe Solutions a 0,25 ml/l
💦Nutrients by Lurpe Solutions - www.lurpenaturalsolutions.com
🌱Substrate PRO-MIX HP BACILLUS + MYCORRHIZAE - www.pthorticulture.com/en/products/pro-mix-hp-biostimulant-plus-mycorrhizae

Likes
12
Share


@That_terp_guy1685
Follow
This was the auto flower I was looking to have on the first run, but trial and error. Much happier with this run!

Likes
10
Share


@GuanoRomano
Follow
🌼 Flowering – Week 2 (Days 36–42)
10/18 (Day 36 – Start of Week 5):
Watered with the same nutrient solution as last week (2.5 ml/L CalMag + 1.4 ml/L Coco A + 1.4 ml/L Coco B).
Not adding PK yet — I’ll wait until the stretch fully ends before introducing it.
Measured heights today: tallest = 122 cm, shortest = 61 cm, average = 84 cm.
Did not measure runoff this time.
10/19 (Day 37):
Average vertical growth today: +4.66 cm, showing the stretch is slowing down.
Watered again with the same solution as yesterday.
The canopy remains uneven, with clear height differences between phenotypes — I’ll adjust pot heights soon to improve light distribution.
Plants look healthy overall, no visible stress or nutrient issues.
10/20 (Day 38):
Watered with water + CalMag + AN Micro (micronutrient maintenance day).
Adjusted the height of the shorter pots, and now PPFD across the canopy is much more uniform.
Average daily growth was +5.33 cm — the defoliation slowed them down briefly, but they’ve regained momentum.
The tallest plant is now 132 cm, and I’ve had to raise the lights to their maximum height — any further stretch could become a problem for space.
10/21 (Day 39):
Watered with the same nutrient solution as before, increasing total volume to 1.5 L per plant to achieve about 25% runoff.
Performed a massive defoliation — foliage density was too high, and the dehumidifier couldn’t keep up with transpiration.
Suspect that the excessive stretch was partially due to insufficient light intensity, since readings were only ~360 PPFD when ideal for this stage is 500–600 PPFD.
Raised light intensity to 430 PPFD to gradually correct this.
10/22 (Day 40):
Same watering as yesterday (1.5 L, ~25% runoff).
Runoff: EC 1000, pH 6.6
Plants look strong and are adapting well to the increased light.
Tomorrow I’ll introduce PK 13/14 at low dosage to initiate the first phase of bloom boosting.
10/23 (Day 41):
Watered with 1.5 L.
Introduced 0.3 ml/L PK 13/14 (first light dose) and 0.5 ml/L AN Micro after noticing one plant showing small brown spots between leaf veins (possible early micronutrient deficiency).
Runoff: EC 1000, pH 6.6
Plants look stable overall, no visible stress from new additives.
10/24 (Day 42 – End of Week 5):
Watered again with the same solution as yesterday.
Input/Runoff: EC 1000, pH 6.6
Humidity has been difficult to control — RH stays around 60%, which lowers VPD.
Planning to increase airflow and raise temperature slightly to improve VPD levels and moisture evacuation.
Week 5 Summary
🌸 Stage: End of stretch and transition to full flower development.
📈 Growth: Height stabilized around 130 cm (tallest). Stretch nearly complete.
⚙️ Feeding:
Base mix: 2.5 CalMag + 1.4 A/B (EC 1300).
Runoff steady at EC 1000 / pH 6.6, indicating perfect nutrient uptake.
Introduced PK 13/14 (0.3 ml/L) and AN Micro (0.5 ml/L) for bloom support.
💧 Watering: 1.5 L with 25–30% runoff per plant. No salt buildup detected.
💡 Lighting:
PPFD increased from 360 → 430 µmol/m²/s after noticing under-lighting.
Canopy adjusted by raising pots; more uniform distribution achieved.
✂️ Defoliation: Heavy leaf removal on Day 39 to control RH and open airflow.
🌡️ Environment: RH stable around 60%, but VPD slightly low (target ~1.2 kPa).
Working to improve air exchange and temperature for better balance.
🌿 Overall health: Strong recovery after defoliation, no new deficiencies or stress. Early bud stacking visible.
➡️ Plan for Week 6 – Flowering Week 3 (Days 43–49)
🎯 Objective: Consolidate flowering, strengthen bud sites, and maintain climate stability.
Nutrients:
Maintain base feed at EC 1300–1400 µS, pH 5.8 ± 0.1.
Increase PK 13/14 slightly to 0.4–0.5 ml/L if no stress appears.
Keep AN Micro 0.5 ml/L once per week for micronutrient balance.
Environment:
Target VPD 1.1–1.3 kPa (temp ~26–27 °C, RH 50–55%).
Improve dehumidification and circulation — consider stronger exhaust or intake fan cycles.
Lighting:
Increase PPFD to 500-600 µmol/m²/s.
Monitor for any light stress at canopy level (tallest plants close to the lamp).
Defoliation:
No more heavy pruning — just remove large leaves shading bud sites.
Observation:
Track bud swelling and trichome development.
Watch humidity closely during night cycles to avoid mold risk.
Likes
13
Share


@Medmandan420
Follow
I harvest
this strain at my other grow
this week so I'll have a preliminary smoke test
super
strong genetics
super trainable fast growing
and smelly
they also boast a 27 percent
thc content ( I normally consume 19 to 21 %) this gonna knock my socks off
Likes
2
Share


@KrudBuddysExotics
Follow
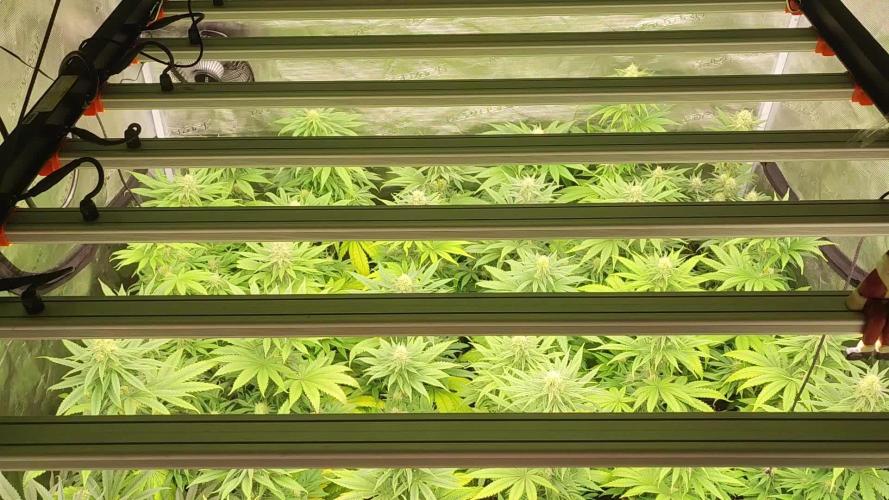
welcome to week 6 of the peanutbutter breath and gorilla cookies
I must say their fillin up nice I hit them witha heavy dose of nutes today
thinking bout giving them the full 10 weeks instead of 8-9 and start flush next week in week 7
Likes
166
Share


@Wicket
Follow
So this week happened a little bit more.
All of them got their final BioTabs Mix. Each Plant 500ml of Water with 1g Bactrex and 20ml Orgatrex.
No more fertilizer now from the BioTabs Starterset, all they get now is BioTabs Bio PK 5-8 in flowering for thicker buds. Thought it would be a good idea to buy that, will see if it makes a difference.
And as you can see i did defoliate them this week also. So much more airflow, finally i can see everything and can worry less about pest and so on.
I just hope i didn't do it wrong or did too much of it, it was really scary just cutting off things which grew for such a long time, but i think for the first time it turned out pretty good.
In flowering week 3, when i give them PK 5-8 for the first time, i will also defoliate them once more a little bit when it gets out of hand again.
Since the biggest plant is about 45cm tall now i will start flowering soon but don't know yet when exactly, maybe a few days, maybe another week, until then they also had enough time to recover from defoliating and i hope everything will work out.
Would also be good to get about 5-6cm more on the other plants, so i guess i will do it around Wednesday, but i will see.
As you can see the scrog net is installed again, so this time i will pull them through the net and let it in for better division until the end.
Really looking forward to my first flowering phase and how they will stretch out, kinda scared too :D
See you next week :)

Likes
30
Share


@RastaGrow
Follow
This strain is the best thing I've ever grown in my life. It is absolutely my favorite of all. It always was, and always will be my prime top choice. It almost seems that this particular strain was created by the weed gods and designed specially for me, considering all my preferences. I had absolutely no problems growing it. The plant was beautiful, the size was ideal, the smell and the taste were just supreme, and the harvest was tremendous! Excellence throughout all the aspects.. უპრობლემოდ გაიზარდა , და რაც მთავარია ყველა ტვინს რო ტყნავს არ იბოლებაოო , მშვენივრად იბოლება მინდა გითხრათ :) ❤️❤️❤️🔥🍀

Likes
5
Share

@HighHolidays
Follow
We’re now entering the fifth week of flowering, right at the halfway point of the stage. Some plants are showing potassium, nitrogen, and magnesium deficiencies, which can clearly be seen in the leaves. I haven’t been around these past few days and left the boss (🎅) in charge, but it seems he doesn’t really know what he’s doing… I might have to cut his commission.
I’m struggling to keep the humidity low while maintaining good temperatures, since it’s quite cold where I live. It’s nearly impossible to have both perfect at the same time: you either get proper temperature or proper humidity. Even so, the flowers are already forming nicely; now it’s time for them to start fattening up.
Likes
12
Share


@rickhaZe
Follow
debido a quemaduras que encontre en las plantas el dia 14/06, dia 29 desde germinacion, debi regar con cal max, ya que creo que hay falta de calcio - magnesio. aplique 1.2 ml por litro de agua.
no creo que sea exceso de ferti ya que todos riegos se han preparado con la dosis minima que indica.
se sigue regando con 0.4 L cada 48hrs
una tecnica que he hecho es ir acomodando o doblando las hojas hacia abajo dando prioridad a los bracitos de cada planta.
Dia 30: riego de agua 600 ml de agua
Dia 32: todas las plantas en floracion
Aplicamos solo tek groow ya que las manchas en las plantas se debian a falta de azúfre lo concluimos con un grupo de amigos todos growers y un agrónomo.
Por que queremos continuar con la tabla de grotek nutrients y el domingo dia 34 aplicar blossom blaster

Processing
Likes
45
Share


@Homegrown79
Follow
This is her 3rd week now, and I cannot believe how fast she is growing.
I am only putting in half the recommended dose of nutrients due to previous issues.
I will increase the dose in about a week.
This is becoming a real pleasure to grow.

Likes
18
Share


@Mastr
Follow
I chop her down day 70 and let her dry in temperature 17° and humidity 60 I already test her bud and its so nice for daytime stoner test like diesel and fruit i love to smoke her bud cant wait to they get dry and I guess she produce 3or 4 ounces let see next week thanks to everyone all grower happy growing friends 💚
Likes
51
Share


@Bread_n_Buds
Follow
Here we are, ready, after a week of truly fruitful germination we have 20 beautiful plants all marked with the Z of Zamnesia.
We have moved on to autoflowering, unlike many growers I have no prejudice against this type of plant, it is true that they are the easiest to make but it is also true that they have improved a lot in terms of flower quality and if once ease meant lower quality now even the most presumptuous old school flower children growers struggle to understand if a flower is from an autoflowering or a normal photoperiod plant. There are people who claim to recognize it from the flavor but then never succeed, it's funny how it works. I enjoy making them strip their heads with these magnificent new autoflowering plants. She is the Black Orchid I have never grown her but I have seen some truly phenomenal photos of this plant. I really hope they come out black. I love it.
---- New Home - The ladies have almost all been transplanted into 11-liter pots, which is my favorite size to get the best ratio of plants in the grow box / yield. Especially if you don't have to do excessive topping or you have to grow the plants straight with main cola like I do for catalog needs like I do, 11 liters guarantees you to make excellent plants. Topping with 11-liter pots is recommended up to a maximum of 16 buds (4 main crops) - The pots are square plastic and canvas branded Zamnesia - The soil used is Plagron Promix with peat and worm castings but not fertilized -
--- Start feeding program - A very serious feeding program branded Plagron has begun. We made our own personalized table based on the chosen soil (Plagron Promix 100% organic) that you can all do at the link https://plagron.com/en/tools/grow-schedule-calculator and I started giving:
- Power Roots - 1ml/l
- Alga Grow - 2 ml/l
- Pure Zym - 1 ml/l
- Sugar Royal - 1ml/l
- Vita Race - 1 ml/l
- The 100% Organic pack by Plagron can be found on Zamnesia at the link:
https://www.zamnesia.io/it/11457-plagron-easy-pack-natural.html
We are giving a lot of humidity with a humidifier and we oscillate between 65% and 70%.
// Strain Description // It is said that the orchid symbolizes love, refinement and beauty. Well, we can confirm that the Black Orchid Automatic contains all these attributes and many more. This autoflowering variety has a lot to offer: a particular but very pleasant aromatic profile, and a relaxing and carefree high. Furthermore, this plant is very productive when grown in optimal conditions.
- Get a seed of this fantastic strain --- https://www.zamnesia.io/it/9493-zamnesia-seeds-black-orchid-automatic.html
- Soil and Fertilizers entirely organic --- https://plagron.com/en buy on www.zamnesia.io
- Growbox and air sistem --- https://www.secretjardin.com/
- Light — P2000 - https://www.viparspectra.com
- Music and sound --- I made my girls listen to 432hz frequencies and music from www.radionula.com
- Z --- You can find these seeds, much more from the world of cannabis, mushrooms and an incredible series of accessories and gadgets on the reference site not only mine but of many growers ---- https://www.zamnesia.io

Likes
32
Share


@Ciocanna
Follow
From the 15th day I start adding half the norm of Hesi TNT Complex 2ml/L, we test with 210 ppm so as not to burn the roots.
On the 18th day, I moved the plant into a larger pot and watered it with half the recommended amount of nutrients and of course, transplanted the plant into a larger pot.
On the 21st day, I did LST (Low-Stress Training).
