
Likes
Comments
Share


@R_atata
Follow
Erste Gehversuche Indoor. Living Soil aus Erde, Kompost und Perlit. Gegen Trauermücken wurden Nematoden gegossen. Von der Lemon Haze sind zwei Keimlinge kaputt gegangen. Der Dritte ist standhaft.
Auf in neue Sphären. 😀


Likes
20
Share


@JohnnyBlaz3
Follow
woot woot we got flowers starting!! Been such a horrible week for weather again but we got some steady growth! shes starting to get a little stank on her as well, yum yum!!! with 5-6 weeks unitl harvest i'm optimistic that I will get enough herbs to watch pineapple express lol i wish our weather would be a little better but oh well lol

Likes
38
Share


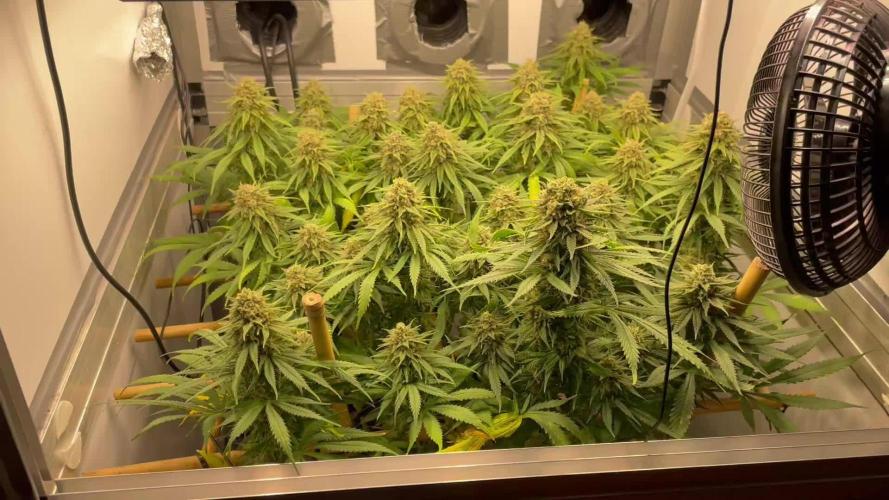
@Oyziphar
Follow
DAY49
7 Weeks
Buds are hard. Smell is extreme.
Very limited amount of spidermites under some leaves. No reason to exterminate them, because next week I'll probably harvest the plants.
The smell of the Triple G is fanastic, Big separated buds. The Cookies Gelato are more sativa style of buds than I'm use of them. There leaves are turning purple.
The Liberty Haze has a lot of small leaves in the buds, and thet got amasing blinking white flowers. Probably this will be the plants I'll harvest the last, because they need some extra flowering time.
The Wedding Gelato is creamy, lots of trichomes and is fast flowering. But some flowers got budrot. I'ts hard to get the humidity low because of the rainy and misty autumn outside.


Likes
4
Share


@Stork
Follow
Last week or maybe less then a week 🤔
Day 127 Mon
PH 6.0
EC 0.2
PPM 70
DLI
PPFD
Water 18c
Day 128 Tue
PH 5.8
EC 0.2
PPM 70
DLI
PPFD
Water 17c
Day 129 Wed
Add Ph Up
PH 5.6 - 5.9
EC 0.2
PPM 80 - 90
DLI
PPFD
Water 18c
Day 130 Thu
Add water
PH 5.6 - 5.7
EC 0.2 - 0.2
PPM 100 - 90
DLI
PPFD
Water 20

Likes
6
Share


Likes
13
Share


@EBPbyEVD
Follow
"Wow, what an amazing week in my grow room! My LSD auto is now 60 days old and in the second week of flowering. The buds are starting to take shape, and I can't wait to see them develop! I also decided to experiment and pollinate one of the plant's branches with pollen from Chronic Rider F1 by Dr. Choice. Exciting times ahead! Feeling like a true master, creating my own unique hybrids. Big plans for the future! 🌿🌸🔬💥"
Likes
29
Share


@MrRaid
Follow
This seed has been a moaning all through the grow drinks shit tons super sensitive to light nitrogen ect but still looks like its gonna pull an oz from 5l pot not bad but definitely not been fun to grow will do another seed with a different grow style but yeh hope everyone has a good Christmas 💪🍻🍾🥂🍪🍨


Likes
41
Share


@Lukush
Follow
Hey growmies all is good and mi baby girls are loving life!!
Gonna start giving them some nuts in a couple days 👍
Thanks for passing along have a good one growmies.
Check this Led out on the website 💪👍💪
https://marshydro.eu/products/mars-hydro-sp-6500-led-grow-light/
SP6500, as one of the huge single bar LED grow lights, installed with top quality Samsung LM301B diodes, designed with enhanced red in broad-spectrum light, emits the highest central PPF and has the superb penetration that its major applications are for high-wire plants and greenhouses.
Wattage – 650w
Veg Coverage – 4×5 ft
Flower Coverage – 3×5 ft
Featuring a thick aluminium passive heat sink and densely arranged chips, the SP Series provides high efficacy but low heat output while minimizing obstruction to natural LIGHT!
Likes
5
Share

@ibbzy
Follow
Top dressed for the last time. Fed some compost tea and now smooth sailing ⛵️

Likes
1
Share


@Urunascar
Follow
Mostraron las primeras señales de flora entonces arme una estructura afuera para los Led con los que había empezado el cultivo y poder darles 18hs de luz fijas todos los días además de la luz solar qué reciben
Likes
2
Share


@valiotoro
Follow
Hello everyone 😎
Week 2 for my girl it’s time for Topping & some LST
She is doing very well,growing at fast pace and with a beautiful green colour on the leaves.
Have a nice day 😎
Likes
23
Share


@Mr2toke
Follow
Day 70 - 23/11/23
Fat Banana progressing nicely!
Trichomes are 30% clear, 60% cloudy with some amber heads scattered here and there.
I think im gonna flush her today.
it's a waiting game now ⏳⌛️
Likes
8
Share


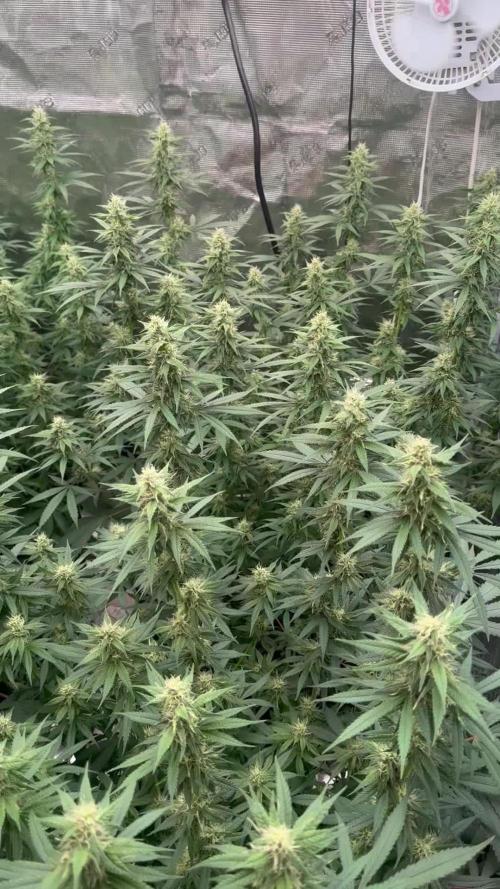
@PEAKYPLANTERS
Follow
Hello everyone, fellow growers!
welcome to peaky's gardens
I had so much fun growing this little girl in a small pot and with a frame around which I twisted my plant
I wanted to test her resistance and my experience
Likes
7
Share
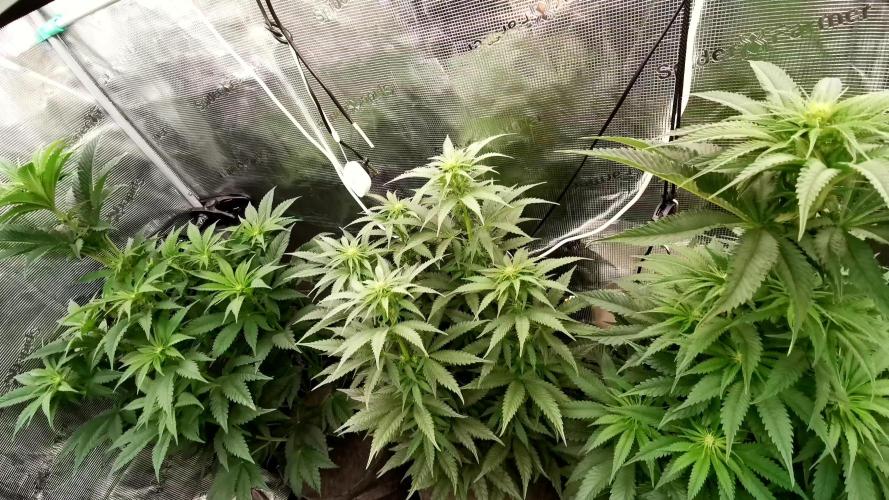

@CannaArchive
Follow
The stretch was in full swing this week 🌸 Both plants showed strong vertical growth, with the flowering transition now clearly underway.
• Height approx. ~90 cm
• Strong vertical expansion
• Stretch phase fully active
Light intensity was increased to ~850 PPFD ☀️ and the fixture had to be raised slightly as the plants continued growing closer to the light.
Clear phenotypic differences became more pronounced:
• Pheno #2 stretched significantly and developed very large fan leaves. Its structure is compact, with side branches growing close to the main stem, creating a dense canopy. To improve light penetration, around 4–6 large fan leaves were removed ✂️
• Pheno #1 continues to grow more evenly, with side branches spreading outward and staying closer in height to the main top.
Leaf posture also differs between the phenotypes:
• Pheno #2 shows strong praying, especially in the upper canopy ☀️
• Pheno #1 shows more moderate praying
Water demand increased during the stretch phase:
• ~4L per watering until runoff 💧
Feeding this week:
• 1x Orgatrex
• 1x Greenhouse Bio Enhancer
• Otherwise water + BioBizz CalMag
Environment remained stable:
• ~25°C temperature
• ~55% RH 🌡️
White pistils are now clearly visible across the plant, especially on Pheno #2, confirming the transition into early flower.
Overall this week showed strong stretch, increasing flower formation, and very clear phenotypic differences between the two plants ?🔥

Likes
13
Share


@Flowers_By_Irene
Follow
Ive been topping up with ro water since last weeks nutrient swap, which had gradually brought down the ppms from about 800 to 500. I pumped out the tank at the start of this week and replaced with ro water and final solution. Had to adjust the ph twice during the week and topped up with some more water.
Planning on leaving the lights on for a couple more days then into darkness for 2-3 days and chop these ladies down. Flush seems to have gone well and can see the plants canabilising their leaves for the remaining nutrients


Likes
19
Share


@xbabybitchx
Follow
Good week for this tent, everything looks good, seeing decent growth on these two girls.
Look at those beautiful pistils! also notice they are almost as big as GB1
Im pushing this tent into Bloom in 9 days, nervous but excited.
I fed them today, and I used tap water so let's see how this goes. my tap water tested at 8.0 PH after adding nutes it went down to 6.9/7 Which for me is high but i'm just going to trust my gut.
I have been buying RO and distilled and i'm tired of having to pick up some jugs every few days.
I'm pretty happy about this tent and excited to see how they transition. 👽
FEB6- switched timer on lights to 16/8 to ease the transition of 12/12.
FEB10 UPDATE- girls look good, happy, switching to flower once I know if GB1 is female or not, hopefully everyone will enjoy the next life stage!!! check video for update!


Likes
3
Share


@Unculti_responsable
Follow
Esta semana hicimos poda de bajos a podas las puntas y una poda de bajos a todas las ramas , se recupera muy bien de las podas la Jack está semana ya arrancamos de a poco con los fertilizantes de flora , así hacemos el último trasplante a 10 litros para pasar a flora , yo creo q ta esta más que bien para entrar en floración ya , pero quiero hacer el último trasplante antes , vamos a ir viendo como vienen las siguientes semanas


Likes
2
Share

@R_atata
Follow
Die 12. Woche ist rum. Die Euforia und die Lemon Haze habe ich geerntet. Die Dos Si Dos hat zwei Wochen im Keller trocknen dürfen und ist dabei sehr langsam bei kühler Temperatur auf 70% Feuchtigkeit gekommen. Ab jetzt liegt sie noch für einige Wochen bei regelmäßiger Lüftung mit 62%-Boveda in Tuper Ware und reift nach.