
Processing
Likes
Comments
Share


@ElegantBuds
Follow
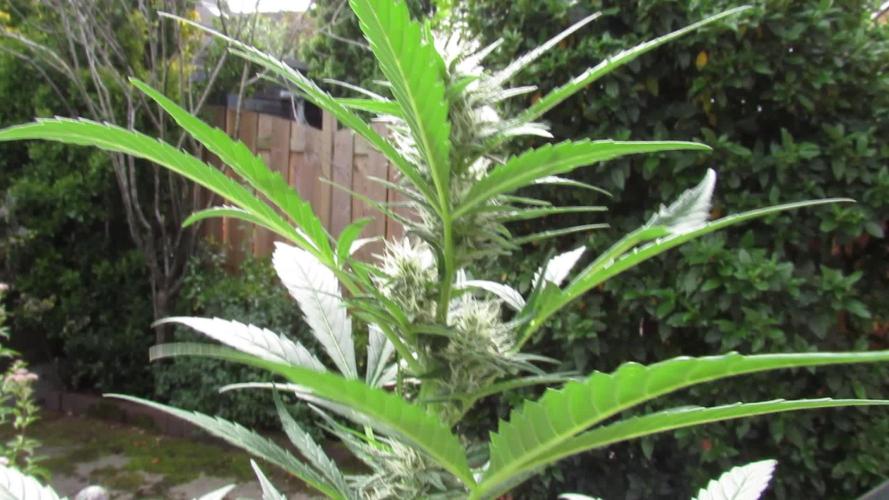
Hello growers.
Power kush is doing great!
Nice thick buds at the moment and it is still so soon. A long way to go. So i think this one will be worth it.
On the bad side Ive had some troubles with 2 herma’s in my tent. I removed them I hope on time.
So i will check every 2 days now.
See you next week!

Likes
2
Share


Likes
7
Share


@CannabisAprendiz
Follow
Esta cosecha fue muy buena con excelentes resultados de flores muy compactas y demasiado resinosas , la genética en sí es muy resinosa con olor muy característico , con sabores terrosos muy marcados .
Likes
3
Share


@Nookandplant42o
Follow
It's drinking a lot of water, obviously because of its huge size, smaller doses of nutrients to go little by little, the shape of the tall buds, they're much more resinous with this update, I'm hoping for more time with this one due to its size and little light.

Likes
4
Share


@2x2UkGrow420
Follow
Buds getting dense now, absolutely covered in thc, smells very orangey. Really happy with how it’s going so far.
Likes
7
Share


@Danger90946
Follow
Day 15 11/08/2021- Welcome to day one of flower. Just been feeding plain water PH to 6.3-6.7. Will top dress with flower mix and worm casting in about two weeks.
Day 17 11/10/2021- Just growing.
Day 19 11/12/2021- Just did a small defoliation.
Day 21 11/14/2021- End of week one of flower
Likes
25
Share


@DrGanj
Follow
This plant was a dream to grow, wish I'd taken cuts. Halfway through dry at 7 days. Drying at 55 - 60 % RH and 17 - 19 degrees C. I anticipate she'll be done between 10 - 14 days total dry time and I'll then trim and update weights on this Harvest.
133.75g total after trim. She's a nice smoke, very happy.


Likes
27
Share


@MrJones
Follow
OSS Cheese XXL
🔹⊱╮🔹╰⊰🔹 GROW Started 03.10.24 INFORMATION 🔹╰⊰´🔹⊱╮🔹
🌞Environment - Maintaining 80F and 65%Humidity
🌾Training - These ladies are Pruned and Defoliated and ready for flower.
⚱️2-Gallon 📊6.2 PH
💧 Feeding - Using Horti Grow 8-11-21, Bloom 5-15-26, Late Bloom 0-24-26, Cal 12-0-0
🌞Medic Grow Smart 8 760 Watts
🕷️ IPM - CannControl from Mammoth and Mosquito Bits as needed
🔹⊱╮🔹╰⊰🔹 GROW Started 03.10.24 INFORMATION 🔹╰⊰´🔹⊱╮🔹
🌞Environment - Maintaining 80F and 65%Humidity
🌾Training - The girls are recovering from last week's Pruning and Defoliation,
⚱️2-Gallon 📊6.2 PH
💧 Feeding - Using Horti Bloom and Horti Cal 12-0-0
🌞Medic Grow Smart 8 760 Watts
🕷️ IPM - CannControl from Mammoth and Mosquito Bits as needed
🔹⊱╮🔹╰⊰🔹 PLANT UPDATES 🔹╰⊰´🔹⊱╮🔹
📝 Notes - On 🗓️05.11.24, This week, we are on Auto-Pilot and just Fertigating as needed; the ladies are stacking up nicely, and the leaves have grown back not sure if it is the genetics or the new nutrients; I would like to see less and will evaluate if more defoliation will be needed.
📝Fertigation injects fertilizers into an irrigation system to supply dissolved nutrients to crops.
🗓️05.11.24 Just feeding daily, sometimes twice; today, fed with Hort-Bloom @ 2.7 GRMS Per Gal and Horti-Cal @ 2.5 GRMS Per Gal.
🗓️05.12.24 Just feeding daily, sometimes twice; today, fed with Hort-Bloom @ 2.7 GRMS Per Gal and Horti-Cal @ 2.5 GRMS Per Gal.
🗓️05.13.24 Just feeding daily, sometimes twice; today, fed with Hort-Bloom @ 2.7 GRMS Per Gal and Horti-Cal @ 2.5 GRMS Per Gal.
🗓️05.14.24 Just feeding daily, sometimes twice; today, fed with Hort-Bloom @ 2.7 GRMS Per Gal and Horti-Cal @ 2.5 GRMS Per Gal.
🗓️05.15.24 Just feeding daily, sometimes twice; today, fed with Hort-Bloom @ 2.7 GRMS Per Gal and Horti-Cal @ 2.5 GRMS Per Gal.
🗓️05.16.24 Just feeding daily, sometimes twice; today, fed with Hort-Bloom @ 2.7 GRMS Per Gal and Horti-Cal @ 2.5 GRMS Per Gal.
🗓️05.17.24 Just feeding daily, sometimes twice; today, fed with Hort-Bloom @ 2.7 GRMS Per Gal and Horti-Cal @ 2.5 GRMS Per Gal.
╰⊰🔹╰⊰´🔹⊱╮🔹╰⊰🔹╰⊰🔹STRAIN INFORMATION🔹⊱╮🔹╰⊰🔹╰⊰🔹╰⊰🔹⊱╮
Cheese XXL cannabis seeds are a unique blend of Afghan Kush x Super Skunk, producing the most pungent dank weed. Cheese XXL is the third commercially available edition released by Original Sensible using and developing these Afghan and Skunk genetics. The first release of these genetics was their Skunk Afghani. The second improved version was Stinkin' Bishop, which had an enhanced and more potent THC content and was more intense in terms of smell. The third and improved release on a similar theme is this Cheese XXL, which has a similar THC content but an enhanced heavier yield. The smoke is incredible, with an outstanding flavor of pungent skunk and spicy, extra strong mature cheese created by the dominant terpene myrcene with its earthy solid scent accompanied by caryophyllene and pinene, which combine to create a peppery acrid cheesy odor. THC levels are exceptionally high in this Cheese strain, and the effect is well-balanced, developing mental and body relaxation with a remarkable alleviation of stress and depression.
The intense solid aroma starts early in the flowering period; if you're growing Cheese XXL indoors, you'll need plenty of ventilation to disperse these babies' stinky "road kill" aroma! Cheese XXL is a cheese strain suited to indoor setups and thrives outdoors well. These feminized marijuana seeds are incredibly resistant to mold and disease and produce a substantial harvest that professional and amateur growers can quickly achieve. These Cheese weed seeds are outstanding. Break open the buds ready for use, and you'll see why the stench will make your eyes water!
Cheese XXL from Original Sensible Seeds is a great choice to break into the commercial market of growing cannabis, so if you're looking to buy something special with extreme yield, potency, and flavor, Cheese XXL cannabis seeds are simply the best choice.

Likes
48
Share


@xbrico
Follow
Day 15 - Fresh tank and not much new to report. pH was remaining incredibly stable through last week so skipped a fresh feed week. 300A doing its job keeping the water at a nice 19C.
As noted, girls got topped a couple of days ago. They're rebounding nicely. Will start some LST on the branches now through the week. Will be the usual balance pH at the start of the week and hopefully stabilise quickly.
Using the Botanicare kind ratios (Expert Recipe) if not the same volumes so base to grow is 2 to 3 ratio this week.
Thats about it for now (Will add some pics and last week time lapse in a bit when lights are on).
Happy growing all!!! 💪

Likes
37
Share

@Hologram
Follow
..week 8 of BlackOpium.. and she is still flowering strong💪
she has a weak,peppery smell.. love it..reminds me of the 90's..dont know why..mayb i am just being nostalgic (in 90's i smoked my first...😎👊)
She has been in safehouse all week bc of wet and cold weather but thats no problem 4 her.. she is tough!💪
Now some sunny days have arrived 🙌 so she can stand in garden again👍
..am waiting for the sun to hit her..😸 so i can make some nice pix...😍 (i hope..am having a bad'days"..its hard for me to get it nice and sharp, my hands are shaking..*MS* and have no energy😒.. doesnt matter, am used 2 it..i will get it done,no matter what!✊)
Happy growing 4 all✊
**KISS! growingtechnique: keepItSimple, Stupid!
PS i think i may have 'jinxed 'it.. it was almost impossible to make a nice pic..nothing was sharp.. so i just made a small video clip😉

Likes
16
Share


@Wizardgreen317
Follow
I feed light the first week then I bring the ppm up to about 1050 to 1200 slowly cause we all knw that these nutrients can burn and will

Likes
44
Share


@MadeInGermany
Follow
Info:
Unfortunately, I had to find out that my account is used for fake pages in social media.
I am only active here on growdiaries.
I am not on facebook instagram twitter etc All accounts except this one are fake.
Flowering day 65
since time change
to 12/12 h.
Hey guys :-)
We arrived in the last days before the harvest 😊.
The buds have swollen again the last few days.
The trichomes are 90% milky and 10% amber 👍.
This week it was poured twice with 1.2 l each time (for nutrients, see table above).
As always, it is put in the darkroom for 48 hours before it is harvested.
There is still a harvest update and a final update after fermentation 👍.
Until then, I wish you all a lot of fun with the update and stay healthy 🙏🏻
You can buy this Nutrients at :
https://greenbuzzliquids.com/en/shop/
With the discount code: Made_in_Germany you get a discount of 15% on all products from an order value of 100 euros.
You can buy this Strain at
https://www.amsterdamgenetics.com/product/super-silver-haze/
Type:
Super Silver Haze
☝️🏼
Genetics:
Haze x Skunk #1 x Northern Lights
Type:
70% Sativa – 30% Indica
👍
Vega lamp:
2 x Todogrow Led
Quantum Board 100 W
💡
Bloom Lamp :
2 x Todogrow Led
Cxb 3590 COB 3500 K 205W
💡💡☝️🏼
Soil :
Canna Coco Professional +
☝️🏼
Nutrients :
Green Buzz Liquids :
Organic Grow Liquid
Organic Bloom Liquid
Organic more PK
More Roots
Fast Buds
Humic Acid Plus
Growzyme Big Fruits
Clean Fruits
Cal / Mag
Organic Ph - Pulver
☝️🏼🌱
Water: Osmosis water mixed with normal water (24 hours stale that the chlorine evaporates) to 0.2 EC. Add Cal / Mag to 0.4 Ec Ph with Organic Ph - to 5.8 - 6.4


Likes
6
Share


@Greenline
Follow
Smell kind of strawberry champagne And sorbet. Super sweet And fruity.definitely 9 week. In week 5-7 start to put some weight on it but in 7-9 still put more and more 3 layer of trellis and they didn’t make it :))) all of them start to fall down. A little problems in veg cuz I was using organic guanokalong than I switched to mills (the best I think in the European market at least) they to great results. I was using them before, I was growing zkittlez than and same shit fucking great results,I definitely recommended mills full line. Try it and see for your self.I hope that post help you in a way other and you make an idea how that strain develops in flower. Oh yah she stretched till week 4-5 so be aware when you put them in flower. For ipm program I use atlantica full line all of them bio extracts and they make it. I was fighting with trips and you all know how hard is to fight with them. Not even 1 sign of trips after a few weeks of atlantica ipm. Anyway I definitely recommend this strain and I will grow again and again alongside with others for sure.

Likes
41
Share


@Kmikaz420
Follow
Bonjour a toutes et à tous , bon dimanche .. je passe juste vite mettre quelque photos (je n ais pas trop le temp en ce moment , je vais être opéré mercredi donc pas mal de chose à préparer)
Je passerai (si tous ce passe bien ) fin de semaine vous mettre des photos des plantes hors de la tante histoire de voir les filles plus en détails.
Je vous dit à très vite (enfin j espere:)

Likes
35
Share


@Rangaku
Follow
Girls are growing strong and first signs of flower are showing up , been defoliating and removing all lower vegetation, hopefully I won’t run out of height , it’s gonna be a big old tent full of the fruit shortly .
The little auto in the corner is looking little and chunky and is coping ok with 12-12 lights
Lost the extraction fan sometime during the night , looks like I caught it in time

Likes
12
Share


@Garythegardener
Follow
Really really cant complain with this one.
Shes beautiful to look at to smell and to taste and amazing effects she gives off...
You will be the envy of all your friends but the great thing is that you get to share!
Sublime in all areas and one that I hope never disappears from production!
Royal queen seeds have done an amazing job and I want to thank everybody that works so hard on creating these amazing products for us!


Likes
9
Share


@HeartStrong_Garden
Follow
Still just a baby. Slowly watering the soil and foliar spray plain water


