


Processing
Likes
Comments
Share


@Flydope21
Follow
Week 2 veg. Starting some LST this week. Pretty new to this so hopefully all goes well!

Likes
12
Share


@ThatoneAKguy
Follow
Now we’re talking! The ladies have taken off after a 4 degree raise in temperature. I’ve topped all three of them at the 4th node and. They responded really well with a little shove back. I’ll give them a week and it’ll be time for some LST and a bump in nutes to maximum strength. Hoping to Bush them out and get them to about 30” before I flip the switch so that could be two weeks or a little more. Ps I’m liking these powder floraflex nutrients. Almost zero salt buildup.


Likes
5
Share


@caliboyyy22
Follow
Wedding Cake, also known as Pink Cookies is a stellar Indica strain created by the result of crossing Girl Scout Cookies and Cherry Pie. Offering great yields and high THC levels, the Wedding Cake has achieved great fame and is hence a perfect addition to our all new Cali Line.
This is a medium-sized plant which can grow to a height of 110 – 140 cm and it does well both indoors and outdoors. The Wedding Cake has a flowering time of 50 – 55 days and offers indoor yields of 450 gr/m2. Outdoor yields of 550 grams can be achieved although it’s not ready for harvest until mid-October.
The Wedding Cake tastes sweet and earthy with notes of vanilla. Achieving the title of Leafly’s strain of 2019, she rightly deserves all the fame.
Overwhelmed users have reported THC levels in excess of 25 %! One can expect a deep sense of physical relaxation paired with uplifting euphoria due to her Indica qualities. Be prepared for bursts of creativity and deep belly laughter. All in all, this strain is an absolute joy ride!

Likes
3
Share


@Rabidreject
Follow
So yeh this weeks been good. This is the first flowering entry even tho they’ve been on a 12/12 cycle for about a week now because I wanted to at least see pre flowers before I started the flower entries. I now see a few but not on all plants. Not long tho I suspect.
Everything is going great. These are the tallest plants at the mo and they are just preying too the light. They look so beautiful. I did lollipop them and spread the growth nodes out quite a bit with LSTing and they’ve responded beautifully.
It’s such a relief coming from photos to know i can make a couple mistakes if I like and if I don’t make any my god do they reward you and respond well!!!
I’ll be going back in at day 42 of flower to tidy up again but they are good for now 👍

Likes
8
Share


@La_VecinaCannabica83
Follow
Han crecido ,se adaptaron bien a la nueva maceta de 3 litros.
Hoy aplicaré BioGrow y BioEnhancer al sustrato.


Likes
12
Share


@GanjaFarmerGrow
Follow
A beautifull Week 5 is behind us...
She is going FANTASTIC for an legal BIO grow...
Amazing branches and BIG size from BIG Seedbank...💪💪👌👆
Great genetics...
I hope she keeps going like this...
fingers crossed..🙏

Likes
35
Share


@Master_weeda
Follow
Bonjour à tous les padawans et les maîtres jedis
Pour cette semaine je prévoit de pratiquer comme technique spéciale le LST et juste un arrosage.
Pour cela comme à mon habitude j'attend le cinquième noeud ou que je juge la plante robuste.
Je profite que cette semaine qui va être relativement calme pour faire un LST appliqué et vous faire un rappel de ce qui est pour moi la meilleure technique pour arroser une autofloraison et la façon dont je pratique le LST.
En suivant ces quelques simples conseils vous obtiendrez un résultat optimal tout au long de votre culture :
Le cannabis est une plante qui n’aime pas recevoir un léger arrosage en continu. Il est impératif de l’arroser en grosse quantité, puis d’attendre que la terre soit bien sèche avant d’arroser à nouveau!
Pour calculer la quantité d’eau nécessaire à chaque plante, suivez cette règle :
Le volume d’eau à donner lors de chaque arrosage doit représenter au moins environ un quart du volume du pot !!
Exemples :
pour un pot d’1L, donnez 0,25L d’eau à chaque arrosage pour un pot de 4L, donnez 1L d’eau à chaque arrosage pour un pot de 12L, donnez 3L d’eau à chaque arrosage pour un pot de 30L, donnez 7,5L d’eau à chaque arrosage !etc…
Pour donner un tel volume d’eau, il est souvent nécessaire d’arroser en deux (voir trois) fois, lentement et uniformément sur toute la surface. Disposez de bonnes coupelles sous les pots, celles ci se rempliront d’eau qui remontera dans le pot par capillarité en moins d’une journée. Il est également très important d’utiliser un bon terreau de qualité, avec une bonne capacité de rétention d’eau mais qui assure également un bon drainage (celui ci doit contenir de la perlite, et/ou de la coco, etc..)
Il vous faut alors maintenant attendre quelques jours en sous-pesant régulièrement les pot avec vos bras. Quand ils seront redevenus très légers, vous pourrez arroser à nouveau !!
En effet, comme l’eau pèse beaucoup plus lourd que la terre, un pot gorgé d’eau pèse plusieurs fois le poids d’un pot d’une plante prête à être arrosée. Avec un peu d’entraînement, vous apprendrez donc très rapidement à sous-peser vos pots pour savoir quand une plante a soif.
C’est une technique à la fois très facile et très efficace, et qui peut être appliquée à toutes les plantes en pots !
En arrosant de cette façon, en général vous devrez arroser vos plantes tous les 3 à 6 jours.
Pour cette semaine 3 au jour 17 ma plante fais 12 centimètres et son cinquième noeud apparaît je décide donc de pratiquer un LST sur ma plante.
Pour ce j'utilise du fil de fer galvanisé que je plante directement dans le substrat en faisant attention de ne pas endommagé les racines car n'oublions pas que ce qui pousse dessus pousse aussi dessous.
Jour 17 je pulvérise du une solution composé d'une cuillère à café de savon noir mou dilué dans un litre d'eau en prévention d'éventuels nuisibles.
Je corrige mon LST suivant la pousse de ma plante ...
Pour ma par c'est la manière dont je procède. Comme promis petit rapel de:
Quand commencer à appliquer la technique LST
De nombreux cultivateurs commencent la manipulation dés que les plantes possèdent entre 3 et 6 nœuds ou une paire de feuilles. Durant cette première étape de la croissance, le tronc encore flexible est pliable sans risque qu’il ne se casse, même si au fur et à mesure du développement de la plante il sera de plus en plus difficile de le plier. Nous pouvons continuer à guider la croissance des branches durant toute la culture, même durant la floraison, ce qui pour cette étape représente un grand avantage face à la taille, qui n’est pas du tout recommandé une fois que la formation des têtes commence, cela stressera en effet la plante, ce qui aura pour effet de retarder la récolte.
Comment appliquer la technique de guidage LST
Si nous sommes prudents, la flexibilité naturelle des fibres du cannabis permet de plier leur tronc et branches avec une relative facilitée, même durant la floraison des plantes.
En utilisant une corde fine, nous pouvons accrocher la pointe de la plante à la base du pot par exemple ou à un tuteur que nous aurons planté dans le substrat. Nous plierons le tronc avec précaution et nous le fixerons avec la corde, à partir de là, nous pouvons augmenter progressivement la tension de la corde, chaque jour un peu plus, jusqu’à obtenir la position souhaitée. Soyez attentif à la réaction de la plante, essayez de ne pas appliquer trop de pression sur la corde et rappelez-vous que la flexibilité des branches peut varier d’une plante à l’autre.
Pour obtenir de meilleurs résultats, il suffit de suivre quelques règles simples. Pour commencer, nous devons choisir une corde fine mais pas trop pour ne pas blesser les troncs au fur et à mesure qu’ils grandissent et qu’ils deviennent plus gros.
Nous pouvons utiliser des crochets en plastique souple ou de n’importe quelle autre matière flexible pour éviter d’endommager les plantes. Spécialement en intérieur, utiliser des cordons en plastique de couleur (voir les diaries de @Silky) est très pratique pour voir facilement les accroches et faciliter le travail au milieu du réseau formés par les cordes, les tuteurs, les mailles ou les supports que nous aurons dans la culture. Bien entendu, en culture extérieure et surtout en guerilla nous ferons juste le contraire et nous utiliserons des matériaux de couleur qui n’attirent pas l’attention pour que notre jardin reste discret.
Pour stresser les plantes au minimum, la mieux est de réaliser ces manipulations le soir ou juste après que les lampes en intérieur s’éteignent, ce qui leur permettra de se remettre durant la nuit. Normalement, le jour suivant nous pourrons observer comme les pointes des branches que nous avons pliées se dressent de nouveau vers le haut à la recherche d’une source de lumière.
Que la force soit avec vous


Likes
28
Share


@ProfessorAutoflower
Follow
Week is going pretty good. Seeing more and more pistils everyday. Starting to see a little deficiency. Maybe potassium. Seeing little brown spots on some older leaves. I upped the tiger bloom a little to try and correct it. Today I’m seeing more brown spots on newer leaves. After more research I am thinking this is actually a calcium deficiency. Haven’t been giving as much calcium due to giving too much cal-mag in my last grow.
8/7 Put pot in a homemade basket with stakes to spread all the branches out to allow plenty of airflow throughout the plant.
Likes
10
Share


@Scrubbyjimbob
Follow
Gave a light defol on the 21st, mostly on the California Orange Bud. It's been a pretty bushy strain this go around. Flowers are progressing on the younger plants and the older plants are starting to fatten a little.

Likes
32
Share


@Roberts
Follow
Critical x Animal Cookies looks like she is coming out of being stunned finally. She did endure a lot of training today. Hopefully she adapts well, and starts to make a lot of progress in size . She is under the Hortibloom Solux 350. Thank you Hortibloom, and Ripper Seeds. 🤜🏻🤛🏻🌱🌱🌱
Thank you grow diaries community for the 👇likes👇, follows, comments, and subscriptions on my YouTube channel👇. ❄️🌱🍻
Happy Growing 🌱🌱🌱
https://youtube.com/channel/UCAhN7yRzWLpcaRHhMIQ7X4g

Likes
10
Share


@Elguacho420
Follow
Buenas buenas!, cómo ven en esta 3ra semana de etapa de gestación de estás lemon cookies kush están bastante bien ( a mi parecer) , las veo crecer sanas y sin problemas, D.P.M.
El transplante les ah sentado muy bien, las dejaré una semana más y luego el cambio... El alimento de la mano de la gente de advanced nutrients, eh comprado este kit q para mí está bien, ya les contaré y veremos los resultados juntos. De momento mis niñas están muy bien y promenten ser las verdaderas! 😎🔥 Buen fin de semana para tod@s, Buenos humos para tod@s.. 👍🏻

Likes
15
Share


@CG420
Follow
Tras un pequeño fallo con la iluminación (5 horas apagado cuando tenía que estar encendido ).
He decidido hacer ya el cambio a floración,espero que no sea muy tempranero y se queden muy pekeñas las niñas .
Mañana mismo empezaremos con los fertilizantes de floración controlando el pH en 6.5.
Todavía no he defoliado nada y nose si quitaré alguna hoja o solo las intentaré apartar sin que moleste a las llemas .veremos cómo prosigue la cosa 💚
Adjunto un vídeo con el tutorado y la poda de bajos realizada ..
Gracias growers!💚

Likes
13
Share


@Alpha_Green
Follow
Some of you may have wondered:
Why do I use CO2 at average 950 ppfd μmol/m2/s (moral flow)?
The answer is quite simple. Because of lack of space in some regions of my cultivation area, I simply cannot keep the ideal distance to my Sanlight high-performance lamp, due to some height growth of various strains. And so some of the main colas have ppfd values of 1250 μmol/m2/s and even more...
So this is how I manage to achieve and compensate for such high radiation levels even with a CO 2 balance. And I have to say, my strategy to avoid various light stress symptoms works just fabulously. In combination with CO 2 implementation, my babies are simply unbeatably insensitive to light. Thats it!
Beginning of 3rd week flowering:
Again feeding my babies by 36 hours fermented potions of Bio Tabs Kompost Tea PK-Booster (15 g pro Liter) and added:
5ml Orgatrex/Liter
1 Spoon of Bactrex
1 Spoon of Mycotrex
1 Spoon of Mycco-Vital
1 Spoon of Dynomyco
A little tip for those who are interested in small modifications that have a big difference or influence - on the result - effect - beauty - health - taste! Before adding microorganisms or beneficial bacteria or Mycorrizae and Trichodermas, please use oxygen-saturated water. On the one hand, unwanted chlorine gases evaporate and the small world of the microbiome becomes even faster and more rewarding in compost tea to sprout.
Last but not least for this week, I would like to introduce my reasons, why I prefer growing biologically and sustainably.
First of all, it’s something which suits very well in these times/days we are living now. Sustainability is a big need and task for our planet. 🌎 Nature means life. Our home, the air we breathe and everything that surrounds us. Not just today. Hopefully tomorrow as well.
Maybe I'm starting to protect our environment on a small scale, but maybe I can also make a big difference at all.
If you change the way you look at things, the things you look at change...
I thought about what’s the difference, between Mineral Feeding and Super Soil Feeding.
It’s very easy. Biologically Growing is a similar process than the natural soil activities out there in the lap of nature’s. So plants has to work and interact with the microorganisms and microbiomic communities in the soil. So the plants will never get lazy like the lazy ones of mineral feeding growers.
If you grow biologically, you will feed the soil first and the microorganisms will support every parameter next to your plant conditions. And that will generate an unbelievable spectrum of Terpenes and Trichomes you will never forget.
It’s the same comparison, when you daily visit McDonalds and you eat only fast food. How does your body and mind react on this shit for money?!?!
May I invite you to think about it…
See you next week dear Growmies! Have a nice Weekend and take care…
Peace out!
Addendum for Day 53:
At the moment we unfortunately have another winter onset here in Germany. This means that I am forced to take additional heating measures due to structural facts in order to be able to keep the temperatures constant. After all, just tonight the thermometer climbs again to -1 degree Celsius.
In addition, my exhaust air system runs out of my bedroom terrace and I therefore grow winter and summer with the patio door open. Well, sometimes I experience real weather-related challenges. But all in all, no problem...
"Where there's a will, there's a way."
Addendum to pouring out the fermented PK tea: I always administer half a liter of lukewarm aerated water with 3.5 ml of cannazyme per liter to each plant. This means that the "root machine" is not supplied with supplies unprepared and the nutrient solution can thus also be better distributed in the soil. Since I also work with cloth shoes, I spray them evenly moistened everywhere with water that is also warm before pouring them out from the outside. This has the advantage that the moisture stays where it should: in the pot!
... I did the math today ;-) We are still in week 7 until this Friday. And week 8 starts on Friday! OMG... still so much time yeahh!
Today my Fast Buds Sour Jealousy and Sweet Seeds Big Devil and Dark Devil Automatics arrived. I'm looking forward to it.
This time Fast Buds next Time Sweet Seeds. Love them too. Very beautiful genetics.
Today a review video of the beginning of week 3.
At the time of the pictures, I had minor signs of nitrogen excess. (Light peaks first at the crown of the roof and then slightly continuing to the middle section.) I then painstakingly racked my brains as to why this could be. I found that very slight dry spots had formed and therefore the root found small accumulations of nitrogen that caused its problems. But then, when I carefully homogeneously checked the moisture content in the substrate, the problem evaporated again. However, they had not shown any loss of growth rate during this time. Nevertheless, they developed as expected.
They Strawnanas had no problem with that.
In the end, I always have a hard time killing them. But I guess that's the way things go.
We live and die.
We come and go.
But it's not there yet. ;-)
Tomorrow is day 56.
Tomorrow’s updating day!
Can't wait to see their progress.
Have a good time and see you tomorrow… 🏽🕊️
🏽 ☮️🕊️

Likes
2
Share


@smokeycropping
Follow
- LAS PLANTAS CONSUMEN BUENA AGUA, BAJAMOS LAS DOSIS DE FERTILIZACIÓN Y YA EMPEZAMOS SOLO A REGAR CON AGUA Y PRONTO LAVADO
- NO SE VEN CARENCIAS NI EXCESOS
- el HPS de 600 MANTIENE MI AMBIENTE SIN MAYORES INCONVENIENTES
-ESTAS SATIVAS TOMARON UNA DUREZA INCREÍBLE EN SUS FLORES
- SATIVAS DE LARGA DURACIÓN MUCHA PACIENCIA PARA CULTIVARLAS
Likes
6
Share


@The_Holy_Herb
Follow
Hello everyone and welcome back to my diary.
Tomorrow marks the end of the fourth week of growth for Titan F1.
I don't think the plant is ready to flower yet and I think it needs at least another week to grow. Only time will tell if I'm right or not.
This week has been quiet, but we have two important updates.
1) At the beginning of the week, I gave it some care and removed a few leaves that I thought were unnecessary. A bit of defoliation. Like 6/7 leaves removed.
2) Today, it had some more maintenance, this time more intensive.
I removed two excess leaves and applied the LST technique for the first time.
Honestly, I enjoyed modifying the pot to accommodate the holes where the string would be attached.
To tell the truth, this low-cost adventure is becoming interesting, and I am having a lot of fun doing it and experimenting.
To tell the truth, my LST seems a bit aggressive and excessive, but we'll see in the next few days how the plant decides to respond and react to the LST. Maybe it will die, hahaha.
During this week, and reading other diaries for comparison, I determined that my plant is NOT drinking enough water.
The problem arises because I am unable to determine how much water is left in the soil/pot.
So today I decided to use a little cunning and weigh the pot when it was completely dry and then again after I watered it.
I watered it with about 1050/1100 ml of water mixed with its weekly dose of nutrients.
This time there was excess water, resulting in excess dripping.
In the final weighing after watering and after the excess water had drained away, the final weight increased by about 720/730 grams. The water I added was around 1050 grams. So 75% of the water remained in the soil. Dry it was 4400 grams, wet it reached 5120 grams. I don't know if this is good or not, I hope the plant is doing well.
In the meantime, I have ordered a device that allows me to check several parameters in the soil, such as moisture, acidity and other things that are important to us growers. I feel like a child at Christmas :).
I also bought a pH meter for the water, as mine broke and I had to buy another one, and I haven't been able to check the acidity levels for the last two waterings. I hope it doesn't bother the plant too much and that it continues to grow.
I've deduced that it drinks little because I'm forced to water it practically once a week. I expected it to consume more water, especially in its current pre-flowering phase.
The new device on its way will help me keep all the parameters under control: the soil, the plant, the temperature, the water levels, the humidity and a few other things I can't remember.
Everything should be ready next week.
The lamp is on full power all the time, at 100% with a 24/0 cycle, 7 days a week.
The plant has reached 20 centimetres in height. I wonder if this LST will keep it small. I have some space issues, so I can't let it grow too tall, which is why I'm using LST.
Otherwise, everything seems to be going well, I hope I'll be able to smoke this one.
Thanks everyone, see you next week with new updates, who knows, maybe it will start flowering :)

Likes
35
Share

@Grow4Releaf
Follow
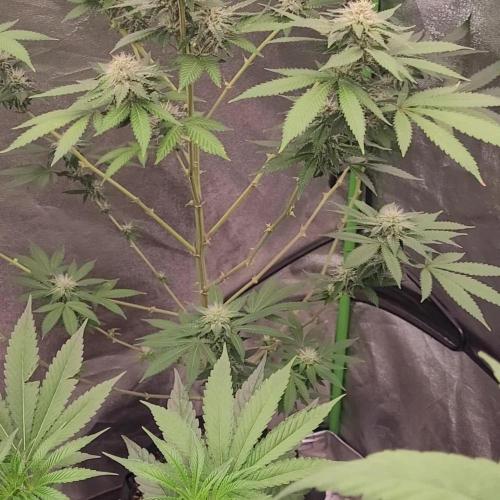
(Aug22nd added video for plant #1 and photos with and without blackout to show some other stuff and size a bit)
Aug 21st,
Sunsets are both moving great. Need photos of plant #1 but #2 is closer to finishing then the first.
Chunky buds on the shorter one hope the first fills out as well. Smells amazing, really sweet so far , candy like almost a "pez" of sort kinda candy I'm getting.
But will update alil more once I get the other plant pics up.
Looking great so far !!

Processing
Likes
27
Share


@CanadianFillmore
Follow
Week 5 begins! Mandarin dreams 1 & 2 are doing well, however MD1 stinks like shit 💩 and MD2 has a mild earthy smell.
Increased feeding to 5 liters per plant and did some defoliation of the yellowing leaves. Moved the ladies to the other side of the room for the rest of the grow.
Thanks for stopping by 👽🌳🔥