The Grow Awards 2026 🏆 


Likes
Comments
Share
@Willy_Balls
Follow
Doing great.
Bottoms cleaned, waiting for a day or two to do a major defoliation.
17.11
Vast defoliation. All the bottom leaves and mids. Left around 4 top fan leaves
On every branch.
19.11
Plants recovered perfectly, light is back to 100% . Unfortunately my Bluetooth app for mars hydro stopped working. Light cannot pair anymore with the app.
Also irrigation is changed to vegetative crop steering.


Likes
2
Share
@High_Grade_Dadli
Follow
So end up losing the first set (guess that's how you know it alive n real) never the less week was great...will do some transplanting nxt week also wanna get some more gelato cuts to get the numbers up but will see how that

Likes
20
Share
@OttomanEmpire
Follow
1st October 25
First visit to side after 2 months, had no time to feed or water this girl. Buds size not there because of lack of food and water but still survived. Could be better .Super nice colour, smell like blueberry for sure. No bud rot what's so ever. Definitely will try again next season


Likes
18
Share
@YungSmoke
Follow
Buds starting to pop out of the lower nodes. Lots of new pistals have formed this week, feeling for room where the buds will eventually fill out. Will get her out for some photos in natural lighting next week when the buds are more mature.


Likes
5
Share
@LeedsCityFarmz
Follow
So this week flushing began. Flushed with water pH 6.0 EC 0.1, I won't harvest the plants untill the run off EC is the same as the Input EC. Temps also brought down to preserve Terps as much as possible. Serious smell coming from both strains, Buds are somehow getting even frostier. Can not wait to harvest these two strains!
Likes
13
Share
@NSABND
Follow
Day 50 and a new week... the summer comes back to germany and "Hilde 2.0" goes well 🙏😀
Day 51 ... the summer is back in germany ... sun and heat 😎👍... good for the Buds 😉🙏
Likes
1
Share
@AboGrows
Follow
this is probably week three of flower. grow diaries doesnt give me the option to select week one of flower it skips automatically to week 5. glitches still persiat with this site that im not happy about. also upload times for a 30 second clip takes really long and i have good internet. i have to cut it into two 30 second clips to make it worth uploading
Likes
3
Share
@Jorgeeee
Follow
Todas the feminazed one (2si 2) is showing extrange sign like holes and colors. I dont know if it’s caused by am old ph problem or what?🤔

Likes
6
Share
@Weedzoks
Follow
La floraison a été lancé le 24 Août/Jour 88
Jour 85: Arrosage engrais complets
Flo 1: Arrosage eau seulement
Flo 7: Pulvérisation de 3ml de Vita Race

Likes
11
Share
@Acidpod
Follow
This is the last week. Getting the chop in t minus 1 day! Its been a really fun learning experience and my new grow is already looking way better from learning from my mistakes!
Likes
200
Share
@Ferenc
Follow
Day 86, 5th of December 2020:
Craziest group I have ever had...
Honestly I just want to see the end. I will be away for 2 weeks almost.
Original Sensible Seeds ladies are dope.
Gelato is very nice proper shape one of my favourite she is just nice and not problematic.... :)
Runtz Gum is amazing nice big buds are on the way really nice! The same no problem with her at all!!!!
Do-Si-Dos OG is just crazy.... She is not an easy lady... problematic... never met a plant like this one. ...
Too much strech and now I need to tie and stand her up somehow i broke one branch.... I put a tape arounf so hopefully saves that bud tho....🤣
Her flowers kill her lol
Black Ghost OG is sweet and good girl she is the easiest player from them she is good for begginners similar to Wedding Gelato even is shape haha....
Wedding Gelato from RQS is just perfect no problem with her at all... good for begginners as well... :)
So This is how it is 5th week has started I just wanna get it done really long journey :)
The lamp is now on 11 hours and off 13 hours. Every week 15 minutes was taken off and after 4 weeks here we go. Strated 12/12 and now 13/11 wanted try to imitate the nature as the light days are getting shorter.
Fertilization has changed no more epsom salt from this week and I will stop giving nitrogen as well from next week.

Likes
6
Share
@captaincondor
Follow
She's doing nicely and am fairly convinced she won't be far off ready by the end of the month

Likes
8
Share
@FarmerT
Follow
The right front lsd-25 is stacking heavy very dense nugs the other one on the left is also getting dense that bot as dense as the other. The big bud auto is starting to dense up and has multiple nice bud sites. Cherry cola is going to be small and have had multiple problems with it but she keeps bouncing back. All 4 on day 54!!!
Tony greenhand (magic kush) in the middle on day 34 started pre flower nutrient
Likes
36
Share
@AutoCrazy
Follow
I ran into a few problems with this grow as it was my first indoor organics grow but I know where I messed up so I shouldn’t repeat those mistakes. With that being said the quality of the cannabis is still there and I am excited about starting again using DWC next time.
I love Humboldt genetics and I will be growing more of their lineup in the future for sure.


Likes
66
Share
@Natrona
Follow
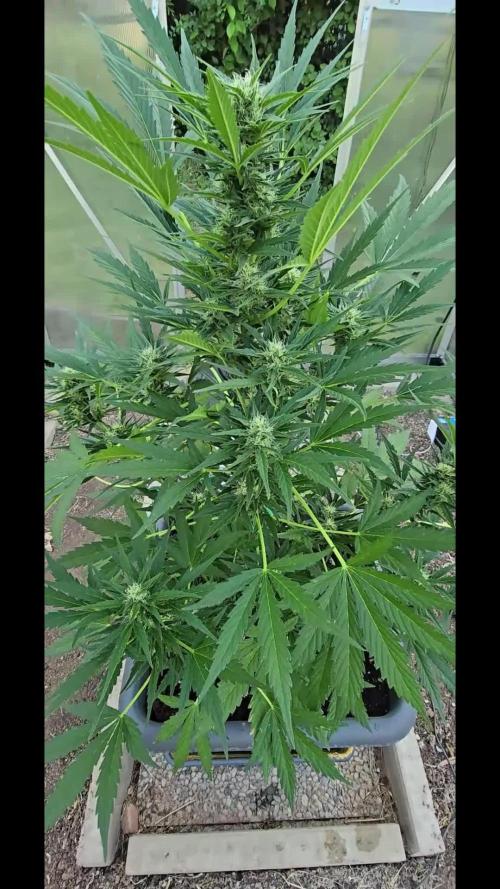
Lemon Cherry Cookies
Week 11 June 8-14 FLOWER 6
Sadly, my journey with Lemon Cherry Cookies is almost over. This week I am flushing with an anticipated harvest this weekend. I did the last plant pictures and videos and trichome shots. I did preliminary defoliation removing the remaining fan leaves.
This plant was tall and lanky and had large fast stretches giving her 7inch node spacing. Her buds are chunky and tight without a lot of hairs. She developed pretty reds and dark purples in the leaves and buds because of the air conditioner. The A/C brought the night temperatures to 65-68f.
6/9 PH 6.46 PPM 239, temp 68 2 ltr each
6/10 PH 6.6, PPM 230, temp 68 2ltr each
6/12 PH 6.4, PPM 242, temp 68.5 2ltr
Thank you for sharing this journey with me and as aways, thanks for visiting, for the likes and most of all growers’ love and support.
Stay green, growers love 💚🌿my friends.
💫Natrona💫
Likes
24
Share
@3lementa1
Follow
The colas keep filling out and getting longer and smell amazing. It's been warmer and more humid outside so RH in the tent has gone up. I added a mini air purifier I wasn't using (no ozone) as an extra precaution against mildew.
I woke up in the middle of the night on Monday and realized that the air purifier has a light on it so I got up and turned it off. I was worried that I'd messed with the dark cycle so I left them in darkness for an extra 2.5 hours.
My cool tube fan fell off the next day, onto my plants. They look undamaged. I taped it up again and set up a safety wire like the filter and fan have. I need a better solution for next cycle.
The buds are beautiful and having an even canopy is great. It's hard not thinking about the end result. The buds still look small compared to the big colas of a traditional grow shape but there's still a couple weeks left. There is some bud formation under the canopy but it's a little light. The tops of the colas are fat but short on the 7 gallon plants and taller and thinner on the 5 gallon plants.
I did leave a couple offshoots on that developed in late veg/early flower. By the time I caught them, I felt they were too mature to chop and I thought they helped fill out certain areas. But those ones have fewer bud sites and tend to be just a cola on a branch that shoots straight up which is still good. I do wonder if less crowding would have given me bigger buds, but I think it has more to do with pot size.
This is week 7 of flower. I switched to half strength nutes and started adding fancy molasses (18ml/gallon). I broke my pH tester and didn't replace my SCROG net until after I finally watered the next day so the canopy changed a bit. I took the opportunity to rearrange the plants a bit.
Crystal formation increased a crazy amount the day after I started adding molasses. I think I'll keep adding molasses even during flush.
The CBD Blue Shark has this really beautiful white glow. The pistils are very strong and white and the trichromes reflect back this silver light. The leaves are a nice semi-glossy dark green which gives great contrast. It's just a beautiful plant.
The Wedding Cake has a lot more colour with lots of red hairs and some yellow tones in the pistils. The fan leaves are more prone to yellowing and death than the leaves on the CBD BS. The buds seem more structurally dense and are really working on these pyramid shapes that look like delicious orange and green snacks. The buds on the CBD Blue Shark are more symmetrical and kind of otherworldly like some kind of sea creature.
Likes
100
Share
@AsNoriu
Follow
Day 106. Plants are okeish , A got last watering, think Saturday is last day for her. Will try to push plant C for 7-8 days after. Plant B looked almost revenging, didn't liked standing in the shade for sure ... Will feed him at least twice.
Happy Growing !!!

Likes
Comments
Share
@GrowDiaries
Follow
Lemon Cherry Cookies Auto - Best Autoflower Breeder 2025
Lemon Cherry Cookies Auto by Fast Buds - Best Autoflowering Strain 2025 Thank You So Much!