
Likes
Comments
Share


@ZalySk
Follow
This plant is still probably my favourite from all the for autos that I grew. She doesn't have a lot of Bud on her but her main cola is a footlong stick of bud. The stems are pink the leaves are yellow and the bud is green. It's such a pretty plant with nice structure, although this stems are a little weak and I ended up breaking one.
I'm going to harvest my last Northern lights this week and this plant will get the chop next Monday. She's losing all her fan leaves naturally so this looks to be the easiest trim I'll ever do.
D81, still losing leaves. Ngl I actually think I won't have to trim this one haha

Likes
41
Share


@Ganjagrandaddy
Follow
DAY 28 : Hi all , hope your past week has been a positive one with lots of love and affection.
I am at the point now where flowering should be starting to show throughout the plants usually. Their are many tiny white pistil hairs showing their female genetics across the bracts of them all now so it looks like flowering has begun !!!!
The FC3000 has really given them plenty of light on their perfect spectrum to develop those nice fat fan leaves and now will no doubt take them through a great flowering period. It doesnt produce much heat at all and you can touch it for a while and still not feel too much heat. Ideal for stealthy gardens..
The Tip Spreading has been continued up to this point and it is clear to see how it works on keeping the heights down. By using additional l.s.t that wont slow growth down like the leaf tucking and threading the growing tips above the larger fan leaves that are still being used like solar factories producing copious amounts of food for the developing growth tips. The stems on the majority are nice and thick from the close stacking of the nodes and their is very little popcorn to remove from lower down. I will be keeping them all as open as I can now that we are going into the stretch periods pre flower. The potential is there now to create very chunky bud stacks but I think the Strawberry Pie have ideas of bursting out more . !
They are certainly all a lot more happy than the bonsai Mexican that has emerged in #1. Still very short and half the size ( or less!) than her sister in the next bed. She looks happy and healthy now but her initial shock at the soils make up had a negative impact very early on.
Overall it has been a good week for their tip spreading l.s.t and setting them up for flowering and I hope that our next update will be the bud porn early stages. Be well and prosperous growmies

Likes
13
Share


@HowdyThugger
Follow
Growing like a weed. Light burn mid veg, due to ph meter broken. Quickly recovered after flush. No issues since.
Day 14, lowering nitrogen tomorrow. Slowly raising her ph a wee bit, she doesn’t seem to mind. 7 out of 8 seem to be on the same pace, one is a little slower. All plants, aside from color, look the same genetically. Rare to have a bag of seeds with the exact same plants. Good job Grower’s Choice.
Still no pollen sacs on sprayed branches.

Likes
31
Share


@Reaper
Follow
next time i wont Veg under fluorescent lights, needs more power from the start for bigger stem and root system, i cant complain by the end result lol

Likes
6
Share


@mikheil007
Follow
Vanilla Latte from Huboldt Seed Company seems to be very stron strain! others still going very well...


Likes
7
Share


@DrewbieDoobieNoobie
Follow
The home stretch week 8 of flower, Got a good look under normal light and they are really dark green. I think there is to much Nitrogen in the mix I was going to give one last feeding of Honey Chome and King Kola but I am on the fence... just water this last cycle and I think that's all I'll give until finish, maybe some Honey Chome in the next watering, I really want them to start to fade. and the dark green is freaking me out a little to much N. They are starting to frost up and they are SATIVA dominate strains looks like another 3-4 weeks before they finish. The smell is different between the two strains, The Haze is in both for sure with the earthy-sweet citrus profiles with an almost a sweet-and-sour flavor but there is a definite difference between the two, The Blue Dream Haze is frosty for sure and has a Pine/Fuel/Sweet smell and the Strawberry Ice is Way Fruity/Sweet/Pine vey complex smells and they are starting to smell need to change the carbon filter, I was hoping to do it after they come down but it might need to be changed sooner. so Enjoy the Pics and the Video Time lapse. Let me know what you think about the green in the leaves and any experienced Haze Growers please chime in on the 10-12 weeks I want to go in flower should I feed one more time or just start the flush this soon? Let me know, Stay safe. I'm waiting to get my vaccine I am so ready to share a huge doobie with fellow smokers once the pandemic is over. See ya next week.


Likes
24
Share


@Mastr
Follow
Chop her down day 87 trim hang it to dry
Update after 3 days been drying I cut all leaves and trim everything bud almost dry due low humidity so I add humidifier keep working I let her dry for 7 days atleast
Will update many more pic after been drying and after jar curing
Likes
17
Share


@HowtoBubatz
Follow
Today marks the second week of flowering, and I’m really excited about how well my cannabis plant is doing! Over the past few days, it’s really stretched out and has grown quite a bit taller.
The leaves are looking lush and vibrant, with a deep green color that shows how healthy the plant is.
I was a bit worried last week because the leaves were slightly droopy, but after adjusting the water and getting the levels just right, it’s looking much better now.
It feels like the plant has responded really well to the care I’ve been giving it.
I’m looking forward to seeing how it continues to develop in the next weeks.
The buds are starting to form, and I can’t wait to see them fill out. This is such an exciting process, and I’m really hopeful that everything will keep going smoothly from here on.
Fingers crossed for a successful grow!💚🌱
Likes
3
Share

@futew
Follow
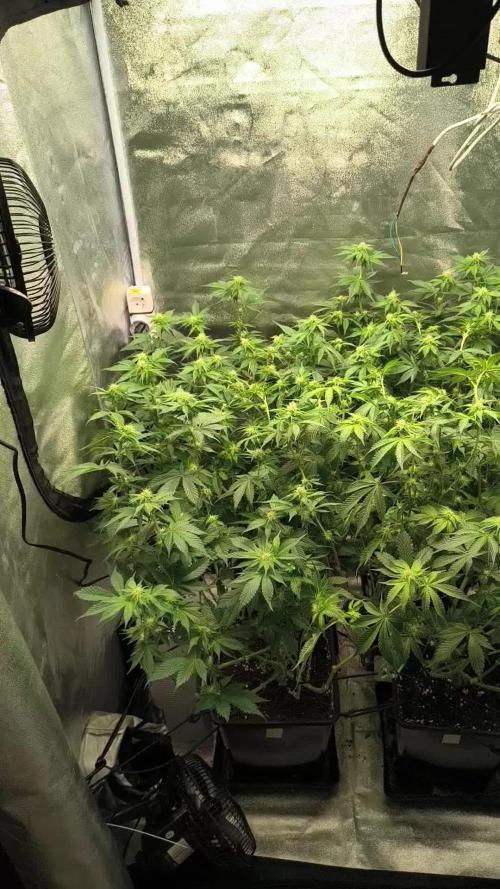
The friend of mine borrowed me an EC exhaust fan with a very nice exhaust volume capacity. As a result I managed to drop the day temperature from 29°C to very nice 24°C.
One thing which worries me a bit is the softness/fragility of branches. When I was doing a defoliation, some of the branches got almost broken. That's something I have not experienced yet. Thought, that this will be taken care of by using calmag and silic rock. And it may have gotten better a bit. Just a bit though. I am curious how this develops further, especially when buds volume increases.

Likes
37
Share


@DogDoctorOfficial
Follow
Week 4 Veg Report: Croco Girls - The Mutant Chronicles 🌱
Hello Grow Fam! Week 4 of veg is here, and what a unique and eventful week it has been for the Croco girls! These funky mutants continue to surprise and amaze with their one-of-a-kind growth patterns. While the colder weather has introduced a few challenges, we’re adapting and thriving together. Let’s dive into the details!
Environmental Updates: A Chill in the Air 🌬️
This week, temperatures in the grow room dipped to around 21-22°C, with relative humidity (RH) holding steady at 65%. While not drastic, this slight chill is enough to slow down growth a bit as the plants adapt. Cooler temps can encourage tighter node spacing, but they can also delay development slightly. Here’s how we’re addressing it:
Proactive Monitoring: Keeping a close eye on temperature and RH trends to ensure they remain within optimal ranges.
Gradual Adjustments: Slowly warming the environment with indirect heat sources if necessary, without shocking the plants.
Remember, plants are incredibly resilient—and this slight delay will only make the Croco girls’ eventual growth even more rewarding.
Feeding Updates: All in One Pellets & Organic Boost 🌾
This week marked a significant milestone: I introduced Aptus Holland’s All in One Pellets to the soil mix. Here’s how it went down:
Preparation: Added a generous dose of the pellets to each pot.
Soil Enrichment: Topped the pots with Pro Mix soil, bringing the total soil volume to 1 liter per plant.
Feeding Transition: While I did one last watering with All in One Liquid, I’ll now rely primarily on:
Regulator (0.15ml/L): To support stress resistance and strengthen cell walls.
CalMag Boost (0.25ml/L): For calcium and magnesium supplementation, essential for strong stems and vibrant growth.
Start Booster (0.25ml/L): To continue promoting robust root development.
The combination of organic pellets and the Aptus liquid lineup ensures the girls have everything they need for a slow, steady nutrient release while maintaining microbial activity in the soil.
Watering Technique: Bottom-Up Hydration 💧
This week, I switched to bottom-watering, a game-changer in preventing fungus gnats and promoting healthier root development.
How It Works: Water is added to the tray, allowing the soil to wick moisture upwards through capillary action.
Advantages:
Reduces surface moisture, deterring gnats from laying eggs.
Encourages roots to grow deeper as they seek water, resulting in a stronger root system.
To further combat gnats, I’ve also placed yellow sticky traps around the pots. This dual strategy—bottom-watering and sticky traps—is already showing promising results.
Mutant Marvels: The Funky Leaf Phenomenon 🍃
Each Croco girl is a masterpiece of mutation, with unique leaf shapes and growth patterns. No two plants are alike, and that individuality is part of what makes this grow so exciting. I’m patiently waiting for them to grow large enough to identify their sex. Here’s the plan moving forward:
Option 1: Flip to 12/12 Temporarily: A one-week light flip to identify sex, then returning to veg.
Pros: Fast and straightforward.
Cons: Slight delay in veg growth.
Option 2: Clone & Flip: Take cuttings from each plant, root them, and flip the clones to flower.
Pros: Preserves the main plants in veg.
Cons: Requires additional space and time for cloning.
I’ll decide based on how the girls progress over the next week or two. Either way, I’m excited to unlock their potential.
Photography: Capturing the Magic 📸
This week, I focused on showcasing the Croco girls’ beauty through a mix of macro photography and behind-the-scenes shots. Using both my Sony and Nikon cameras, I’ve been able to capture intricate details—from water droplet reflections to the delicate veining in their leaves.
Why Use a DSLR/Mirrorless Camera?
Greater sensor size allows for higher-quality images compared to even the latest smartphones.
The ability to swap lenses provides flexibility for macro shots, wide angles, and close-ups.
Depth of field and manual focus control ensure every shot is intentional and artistic.
Lens Choices:
Macro lenses (e.g., 90mm) for close-ups of leaf textures and water droplets.
Standard lenses (e.g., 50mm) for portrait-style plant shots.
While phone cameras like the latest iPhone can take great photos, they can’t quite match the level of detail, depth, and creative control a dedicated camera offers.
Shoutouts & Gratitude 🙌
As always, a massive thank you to:
Terpyz Mutant Genetics for these one-of-a-kind Croco seeds.
Aptus Holland for their exceptional organic-mineral nutrients.
Pro Mix for the reliable soil base.
Future of Grow for their stellar LED lights.
TrolMaster for keeping the environment dialed in.
Grow Diaries for being an amazing platform to share this journey.
The Grow Community for your endless support and love—haters and lovers alike, you’re all part of this adventure!
Join the Journey 🌱
Be sure to check out my Instagram and YouTube for more behind-the-scenes action, including videos showcasing how these photos and macro shots were taken. Let’s grow together and keep inspiring each other with creativity and positivity!
Until next week, stay green, stay growing, and remember—every mutant is a masterpiece in its own right. 🌟 Let’s grow, let’s grow, let’s grow! 💚
Grower’s Love,
💚
Genetics - Mentha De Croco
https://terpyz.eu/products/menta-de-croco-fern-type?_pos=1&_sid=e9237cbcb&_ss=r
DogDoctorOfficial Discount Codes @ terpyz.eu - DOCTOR 15% off
Nutrition - @aptusholland
https://aptus-holland.com/
Led Power @ F.O.G. Future Of Grow
https://www.thefuturofgrow.com/en/online-store/BLACK-SERIES-600-p489093171
Controls @ TrolMaster
https://www.trolmaster.eu/tent-x
As always thank you all for stopping by, for the love and for it all , this journey of mine wold just not be the same without you guys, the love and support is very much appreciloved and i fell honored with you all in my life
With true love comes happiness Always believe in your self and always do things expecting nothing and with an open heart , be a giver and the universe will give back to you in ways you could not even imagine so
As always, this is shared for educational purposes, aiming to spread understanding and appreciation for this plant. The journey with nature is one of discovery, creativity, and respect. Let’s celebrate it responsibly and continue to learn and grow together!
Growers Love To you All 💚

Likes
7
Share


@Suchy329
Follow
was soll ich sagen die Woche war gut Blüten sind gut gekommen hoffe geht weiter so

Likes
13
Share


@DeepRootsGrowTrees
Follow
DIVINE OG KUSH / DIVINE SEEDS
WEEK #17 OVERALL
WEEK #4 FLOWER
This week she's doing good no issues she's looking good buds are growing she's getting nice trichome coverage she's got a nice aroma going about her!! Stay Growing!!
Thank you for stopping by and taking a look it's much appreciated!!
THANK YOU DIVINE SEEDS!!
DIVINE OG KUSH / DIVINE SEEDS

Likes
15
Share


@tomeugironella
Follow
Hi fellas ! Last week ! Im so happy so far ! They look so nice they smell just amazing and the trichs are insane ! I had to put some tutors they get fatty 😋. Let me know ur thoughts guys ! Happy grows


Likes
31
Share


@Wicked_Stix
Follow
The bubble bomb is short and stout. She is looking happy. Gave her a flush and fresh nutrients. Pulling a couple leaves every couple days to keep light penetrating and spreading her out as she grows. Will be switching them to flower in a week.

Likes
2
Share


@ESExPincheb00f
Follow
This week was the best the buds were so fat and dense and its my first grow ever. I can say that im proud of it, I gave it big bud and voodoo juice and I can say that advanced nutrients are all about their word its worth spending every penny on those nutes. 🙏🔥🔥🍁 hapy growing everyone

Likes
19
Share


@xbabybitchx
Follow
Switched all plants in this tent to 12/12 mostly because i need to know the sex of these plants. So far nothing but it could take a bit- the GWS are autos and loving the switch. Otherwise not too much to report back on this week.
jan 12 still no sign on sex yet

Likes
2
Share


@GrowerGaz
Follow
Day 61 for the autos two on the right are Tangie monkey and the two on the left Bananangie , both test strains from Island seedbank in Sicily. Just water this week , I think the first Tangie monkey is almost finished.
Likes
58
Share


@Mosquito_Haarlem
Follow
Ze is week 14 ingegaan, maar ze is er nog niet.
De meeste haren zijn nog wit en ze zal geoogst worden wanneer ongeveer 75% van de haartjes bruin zijn.
Ze krijgt sinds vorige week alleen nog Spa Reine mineraalwater.(zie foto)
Ik zal gedurende de week nog verse foto's updaten van deze prachtige koningin.
✌️🏽


Likes
5
Share


@Mrbudgrower88
Follow
Week three the girls are doing well , getting stronger day by day, and starting to thrive


