The Grow Awards 2026 🏆 


Likes
17
Share
@EduardoLV885
Follow
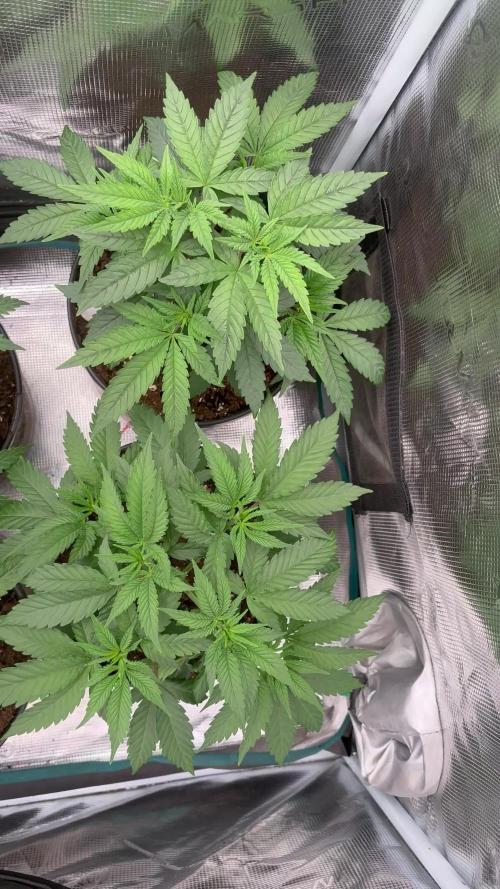
Esta sera la ultima semana en vegetativo , despues cambiaremos el fotoperiodo a 12/12 y empezaremos con la etapa de floracion, solo hemos aplicado lst


Likes
34
Share
@MrJoint
Follow
✌️🎃 Thank you for checking my cultivation.
✂️ Last defoliation and LST to receive more light on buds.

Likes
2
Share
@Ninjabuds
Follow
It’s day 33’from seed. All of the plants are really healthy. The plants have a really great root system at this point… I am currently slowly moving the light intensity up to the veg area. Now that are in a groove they are about to explode… I’m hoping I can flip the plants to flower in 1 weeks but I’m thinking I will wait to weeks and let them get a little larger. The plants are just now starting to look visually different next weeks update I will be ababoe to go into the visual differences, they are just not that extreme yet to really talk to much about.
Likes
25
Share
@Elpicor
Follow
Una settimana colma di cambiamenti, é incredibile come le piante senza nessun tipo di training si adattino perfettamente tra di loro allo spazio circostante, quanti sensori possiedono le piante? Come comunicano tra di loro? mi ha sempre affascinato...

Likes
11
Share
@NoTraceJamaica
Follow
These Photos/Videos Document 9 weeks 1 day, busy times for me so didn't get to upload as much, what led me here : i feed nutrients every watering (still)😊, defoliation on day 39-41 , removed most lower branches that weren't exposed to direct light (could have done more)😔 on day 53, lower bud sites were also removed (should have done more)😆


Likes
22
Share
@Bread_n_Buds
Follow
We have a super successful young lady. The Sweet Cherry Pie is taking color, is starting, the flowers are still swelling and we look forward to seeing the final form.
The top tops are higher but all made a nice bunch flower, the Marshydro care is fitting. We are in flush at pH 6.0 recommended to promote the absorption of all feeding residues.
LIGHT >> MARSHYDRO SP3000 AT 100% OF POWER ..
TENT >> MARSHYDRO 120x60x180
CHECK IG >> https://www.instagram.com/marshydro_aliexpress2/
Buy >> marshydroled.aliexpress.com
TENT >> MARSHYDRO 120x60x180
CHECK IG >> https://www.instagram.com/marshydro_aliexpress2/
Buy >> marshydroled.aliexpress.com
Likes
11
Share
@BoboLacetti
Follow
The pics are from begin of week 5.
Tomorrow i will add PK13/14
The Triangle Sherbert Kush S1 is a monster Plant.
The Mac N Cheese smells amazing.
The moonshine cookies habe a lot of small buds.
There is a lot of time left!


Likes
4
Share
@420Somewhere
Follow
Started the flush a few days ago. Wish I had set up a second scrog. The branches are falling over under their own weight - hence the makeshift netting.

Likes
44
Share
@DutchFarmer
Follow
Hello fellow growers! 🌱
Despite a few bumps along the way, I'm thrilled to share that my contest journey is officially underway. After some delivery hiccups with the controller, the third attempt was the charm – it finally made it to my doorstep! 🚚💨
The initial excitement hit a snag when I faced issues connecting the controller. 🤔 Thankfully, the fantastic support team guided me through the troubleshooting process, and voila! 🛠️ My controller is now up and running smoothly.
As I eagerly await the next stages, I haven't ventured into using the light adapter just yet. Stay tuned for updates on my growing adventure! 🌿

Likes
25
Share
@FriendlyNeighbor
Follow
Gave the Fruit Spirit in the back some calmag the left one likes it very much! right one not so much but both are fine and getting a nicer darker green color...
did some heavy defoliation on Fruit Spirits and Gelato.... Sweet zz is so indica dominant i dont wanna really take something from her now ..


Likes
2
Share
@MaestroBud
Follow
📍 Microgenetics meets Master Bud – Delicate but determined
The Papaya Sunrise, an exclusive selection of the very Italian Microgenetics Seed Bank, continues to amaze me. In this 7ª week of vegetative he is finally bringing out all his fruity, vigorous and surprisingly compact personality.
At first she was the most reserved among the sisters, but now - thanks to the controlled environment, the targeted defoliation and the balanced diet - she is exploding in width, opening the branches like palm trees in the sun, ready to conquer the SCROG network.
🌿 The leaves are wide, healthy, full green and vital. The structure is solid but elastic, and each knot carries with it a promise of future flowers.
💧 This week received the right attention: enriched rainwater, high-quality radical stimulators and a mix between mineral (Advanced Nutrients pH Perfect) and calibrated organic inputs. Result? Vigorous lateral growth, excellent breathability, zero deficiencies.
Despite some residual moisture in the pot that I monitored, the Papaya reacted very well, confirming its resilience.
The improved microclimate and new ventilation helped it open up like a true tropical queen.
🎯 Now everything is ready for the last sprint before the switch. The tucks are on the way. The genetic profile begins to "push", and you can already feel the aromatic potential that will come out in a few weeks.
📸 Exotic fruits on the way. This Papaya is not a plant. It's a destination.

Likes
18
Share
@Ieiogrow94
Follow
Genetica sapziale l’unica ad avere sentori viola e rossi nelle cime.
Molta resina e un odore spaziale!
L’ho assaggiata che non ho resistito e ragazzi è qualcosa di straordinario!!
Consigliata a tutti!!
❤️🔥🌲
Likes
2
Share
@EyeMKing
Follow
In less than 48 hrs of being in a room temp water bottle in a dark area tap roots already started coming out.

Likes
44
Share
@RakonGrow
Follow
Note : Jegliches Equipment aufgelistet welches ich nutze findet Ihr in der Germinations Woche !!!
Day 15 :
ich weiss noch nicht ob der mineralische dünger wirklich sofort etwas gebracht hat . schauen wir was die zeitraffer so vermitteln. ist es seit gestern schneller am wachsen ?
Day 16 :
PPFD 275 * 20h = DLI 19.8
Day 17:
+ 0.5L Flaschenwasser (EC 0.26)
+ + Canna Rizothonic
+ + Canna Terrar Vega
+ = Total EC 0.68 (PH 7.2)
+ Final PH 6.15
Day 18:
es wächst
Day 19:
es wächst immer noch
ventilation übern blätterdach angemacht. ich glaub daher kommt das ruckeln im video
Day 20:
+ 0.5L Flaschenwasser (EC 0.26)
+ + Canna Rizothonic
+ + Canna Terrar Vega
+ = Total EC 0.68 (PH 7.2)
+ Final PH 6.15
+ 0.5L Leitungswasser (PH 8.0)
Der Stamm hat sich in den letzten 3 Tagen verdreifacht vom Volumen. Jetzt hat er so Bleistift dicke erreicht.
Day 21:
die temps und relative luftfeuchte sind hier zwischen 58%-68% und 23.5°-25.5°C . reguliert sich aber immer zu den höheren werten . ist hier halt so :))


Likes
3
Share
@captaincondor
Follow
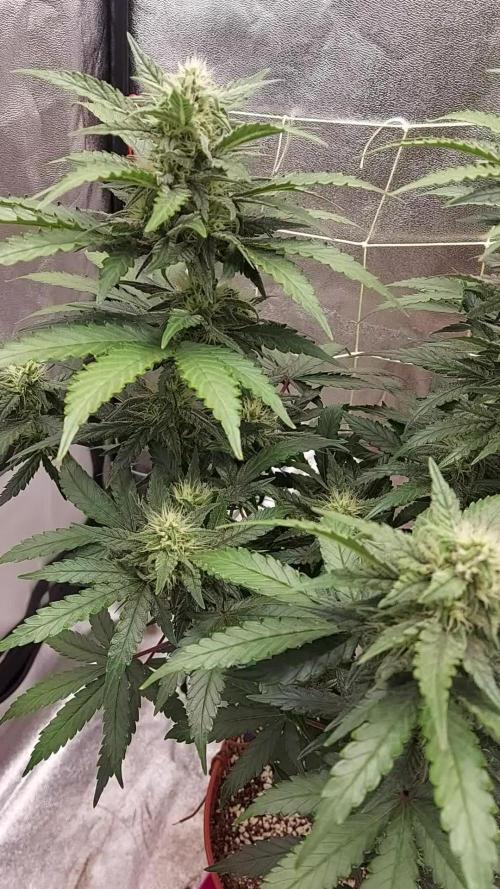
I have opened her up a bit by tying down some of the branches to expose more of the canopy and the buds are developing nicely


Processing
Likes
7
Share
@gablmo
Follow
I wish it was easier to upload media here. That's why is taking me so long. Stretching everywhere, she went from 3 feet to 6 feet in a heartbeat. She is running into the light. I raised the ppm because I'm going to turn 600 watts on. They look healthy, but too much legs.
