
Likes
Comments
Share


@ProlificGrowth410
Follow
Mad I only had one seed can't wait to grow more 420 Fast Buds

Likes
2
Share


@Onextremebuzz
Follow
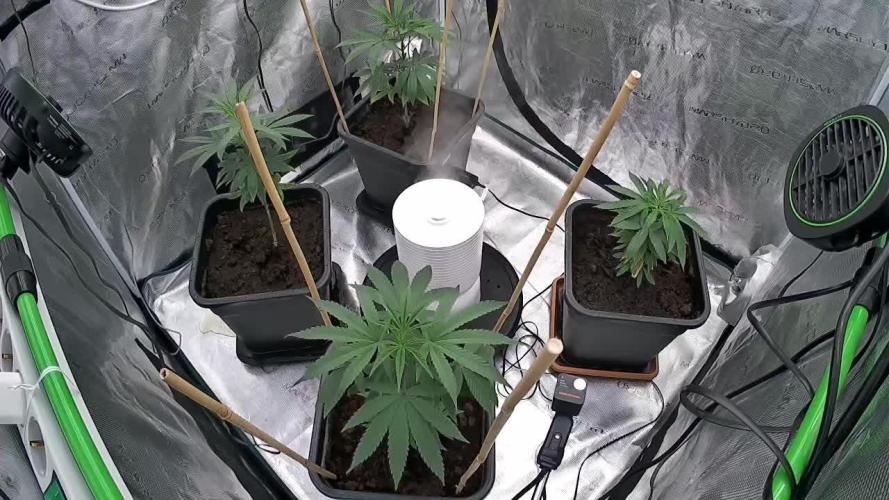
Well I configured my tent to run two 750s in air cooled hoods I have some impressive airflow using air mover fans I bought off of a hard ware store as you seen in my other video the light set up.

Likes
7
Share


@100Trillion
Follow
Transplanted from 0.25 to 1 gallon pot
This is the first transplant of two. I will let these build.a root ball for 3 to 4 week and then do the final transplant into a 7 gallon pot.
Installed blumats as well for irrigation.
Crover crop added

Likes
152
Share


@EBxAH
Follow
Hey there growmies! Week 16 and week 6 of flower has started. Although I do have to keep reminding myself that they are technically entering week 4 of flower. I was quickly reminded of that over the weekend, lol. Everything is still going good. They're all taking in plenty at the moment, very heavy eaters these ladies are! Trichomes are looking great and the smell is really starting to come out. Smells right now are very sweet, like candy. It's even more intense when I brush by watering and touching them. Weird because I thought the smell was supposed to be earthy, citrus and fuel. Still alot of time to go though. I'm definitely noticing day by day swelling and that's just cool to me, I love watching plants grow ❤️ Well that's it for now. Happy growing everyone ✌️🍀✌️

Likes
4
Share


@Big0zGrower420
Follow
Got a couple more days until day 56 (week 8) but just wanted to add a few things from this week. The flush is coming along nicely and getting some really nice colors to come out, Really excited for the finish.
Just uploaded the day 56 pictures, shes looking beautiful!

Likes
17
Share


@420DeepGrow
Follow
Gracias al equipo de Zamnesia, Marshydro, XpertNutrients y Trolmaster sin ellos esto no sería posible.
💐🍁 Frosted Guava:
La Frosted Guava es una cepa índica dominante y súper resinosa, que es un cruce de la Guava y la Frosted Skywalker. Con unas características de cultivo muy versátiles, un aroma exótico y afrutado, y un subidón relajante y lúcido, la Frosted Guava es ideal para cualquier plantación de marihuana.
🌻🚀 Consigue aqui tus semillas:
Código Descuento 20%: ZAMMIGD2023
💡TS-3000 + TS-1000: se usaran dos de las lámparas de la serie TS de Marshydro, para cubrir todas las necesidades de las plantas durante el ciclo de cultivo, uso las dos lámparas en floracion para llegar a toda la carpa de 1.50 x 1.50 x 1.80.
https://marshydro.eu/products/mars-hydro-ts-3000-led-grow-light/
🏠 : Marshydro 1.50 x 1.50 x 1.80, carpa 100% estanca con ventanas laterales para llegar a todos los lugares durante el grow
https://marshydro.eu/products/diy-150x150x200cm-grow-tent-kit
🌬️💨 Marshydro 6inch + filtro carbon para evitar olores indeseables.
https://marshydro.eu/products/ifresh-smart-6inch-filter-kits/
🍣🍦🌴 Xpert Nutrients es una empresa especializada en la producción y comercialización de fertilizantes líquidos y tierras, que garantizan excelentes cosechas y un crecimiento activo para sus plantas durante todas las fases de cultivo.
Consigue aqui tus Nutrientes:
https://xpertnutrients.com/es/shop/
💻 Trolmaster Tent-X TCS-1 como controlador de luz, optimiza tu cultivo con la última tecnología del mercado, desde donde puedes controlar todos los parametros.
https://www.trolmaster.com/Products/Details/TCS-1
📆 Semana 6:
Esta semana ha explotado 💣, los cogollos comienzan a tomar densidad y llenarse de resina, me hubiera gustado aplicar algo mas de nutrientes en la fase vegetativa, la próxima vez será.


Likes
17
Share


@Naujas
Follow
This is my second growth in a suitcase, I got 30 grams of dry flowers from the first growth, but this growth together with FastBuds is obviously much better than the first one :) although the girl's leaves burn from the light, which is only 10-15 cm from the flowers, but the girl copes with it perfectly :) good luck to everyone.
Likes
23
Share


@HomeGrownFamz
Follow
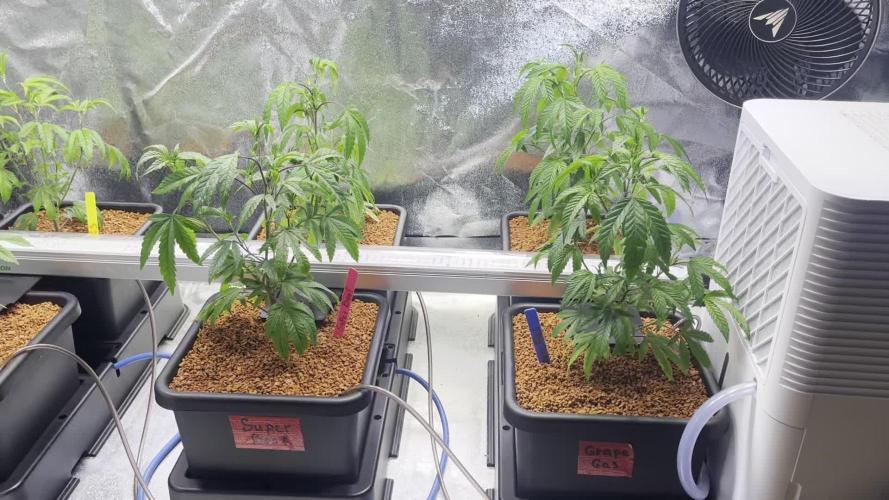
A new light has been added to the tent. I noticed a bit of a droop for several hours after adding it. After 4 hours they started picking up again.
They are quite healthy and seem to be very happy.
PH Is around 6.0. It just seems easier to keep it around 6.0. The PH seems to rise to 6 a day after correcting it down to 5.7 so I gave up.
PPM is around 1000 and cal mag is being added to help them cope with the higher light intensity during flower.
Pk13/14 has been added in a very small amount and a slightly higher does will be used in the next week.
Please feel free to comment if you have any info that may help :) please take time to like as it helps me know if this is worthwhile updating.
Microgrowery

Likes
5
Share


@CannaIGrow
Follow
This plant seems to have grown much denser and better than my first plant. I just got the ac infinity ventilation setup with controller 69 for my 2x2, still trying to learn, hopefully grow #3 goes even better. Stay tuned
Likes
3
Share


@jonnyblaze
Follow
The girls are looking healthy. Both Banana Purple Punch autos are yellow on the outer leafes and I don't know why. Maybe someone can help.
Peace, Johnny ✌️


Likes
38
Share


@PolishFarmer
Follow
Hi! Really awesome week behind us! Girls are growing soo quicke. Every day are higher and higher :) im trying be gently with nutriens and looks like its very enough for them :)will Back with some more pictures tomorrow. I thinking to do defoliation. I want to get rid of all leafs below net. From monday girls get canna booster for first time then week after i planning to start with pk 13/14. Also im order Terpinator so its its another powder for my ladies from new week :) my friend just love this product and recommend highly so i found to try :) fingers crossed i will back to you soon :) piece guys!
Day 40 i found a mutations on jack herer leaf. In the centre of the leaf is growing new bud :) look on the last picture :)
Likes
1
Share


@kauilmayel1996
Follow
Hay que rico!!! 😋
Huele bien
Todas las plantas están creciendo muy buenos cogollos
Pequeñas pero olorosas!!!
Likes
4
Share


@flakeyfood
Follow
Hey y'all! I'm back with an early update because my biggest two plants are flowering! Hindu Kush looks like she's gonna grow some really thick buds. I'm super excited to see it flower. The GSC pistils are some clear, some amber. It makes me really excited for how she's gonna look as she develops buds. I wanted to give a better tour of how the plants look so I took a video to share as well! I am super excited, and I'm starting to get impatient quite frankly! Lol! But really, I can't wait to watch my plants grow day in and day out. I need to find a way to control the humidity, as it is getting hotter in my home and when my tent is closed the humidity climbs up to 82% and some leaves that touch condensate on each other. Not good! I leave my tent open for hours at a time to tame the humidity but this is not a full time solution. if anyone has suggestions please let me know! I will be asking a question soon on it!

Likes
4
Share


@2x2UkGrow420
Follow
9weeks and 4 days seed to harvest, 125g dry weight👊🏻 Banging straight after a dry 💯 white ash, gonna be killa when had a good cure😎😤
Likes
7
Share


@Drtomb
Follow
2 weeks left on the flush. Running water with addrd Hydro Bio. Ive been noticing very nice white root growth on my vegging area... And lots of it. Hoping these look good. But they were 3 or 4 weeks on the previous bleach sterilization test. Gorrilla. Glue #4, my next grow has been on it since day one. So subscribe to that grow.


Likes
10
Share


@PottingShed
Follow
Buds are fatrending up and looking great, little bit of defoliation today
Likes
8
Share


@Hawkbo
Follow
Soaked 7.27 for 36ishhrs, into paper towel for 12 hrs then into a solo cup with greentree garden supply pro ultra (coco/perlite). First feed was a diluted leftover feed from my other auto youngins. Basically about 1 ml/g of grow, 7ml/g humid acid, 1ml/g more roots, 1ml/g orca, cannazyme, hydroguard and a sprinkle of living organics in the nutes and on the top of the coco. Usually the ppm will be higher than I want it so I just dilute with r/o water until I'm down to 200-250. It makes it so I cant be accurate on ratios so that's why I'm tellin ya, but it's how I always do it no matter what nutes I use. This seed is also 3 years old like the pineapple Express.