Likes
Comments
Share
@Targona
Follow
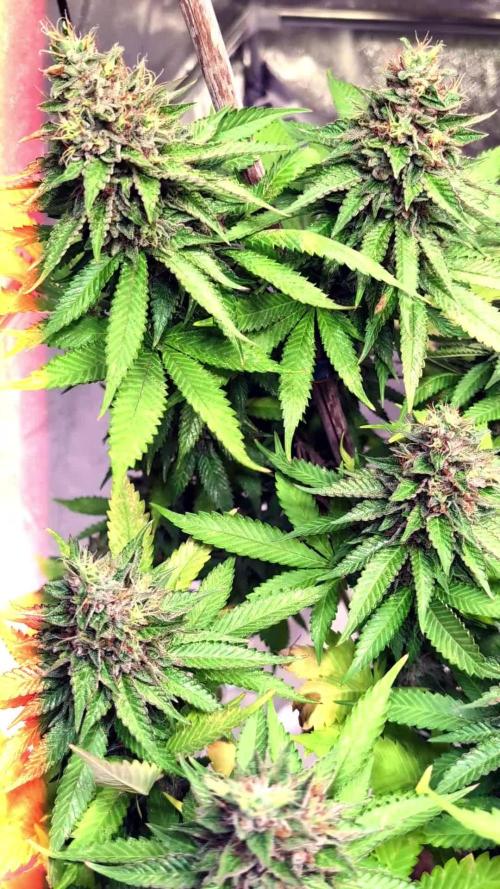
Targona 43 days since my little girl sprouted from seeds🌱 Sixth week of growth of my Apple Fritter Automatic 🍎🍏🍎 Nutrients: I use Advanced Hydroponics Of Holland nutrients - three basic components, still according to the table for vegetative growth 💓 - - Dutch fertilizer Formula 1 Grow - supplies the plant with substances necessary for the perfect development of roots, stem and leaves; intended for the growth phase 🌾 - Dutch fertilizer Formula 2 Bloom - contains a large amount of nutrients necessary for rapid growth and fruit development, supplies the plant with energy; intended for the flowering phase 🌸🌿 - Dutch fertilizer Formula 3 Micro - increases oxygen intake, improves plant immunity, ensures better absorption of nutrients; intended for the growth and flowering phase 🌴 -------------------------------------------------- -------------------------------------------------- --------- BioBizz Calmag - The special Calmag supplement was designed for professional and hobby growers who need to supply their plants with calcium and magnesium in organic quality for a long time or immediately. 100% organic 💩💩 and certified BioBizz Calmag is made from calcium carbonate and magnesium sulfate supplemented with humic acid. -------------------------------------------------- -------------------------------------------------- ------------ BioBizz Bio pH- is an organic pH regulator. An aqueous solution of citric acid, which occurs naturally in citrus fruits 🍋🍋 ---------------------------------------------------------------- ---------------- During the flowering period, I add stimulants: - JUNGLE X Environ is a highly effective complex preparation for stimulating flower formation. 🌸🏵️ - Bud Candy - carbohydrates for my girls 🍭🍭🍭 Anyway, this is the last watering that I mix like this. I will gently switch to mainly organic nutrients, with the addition of very gentle flower stimulants, which are only slightly or partially mineral. In general: Apple Fritter Automatic 🍎🍏🍎 - The girl still responds well to nutrients. Actually all the girls in the tent, except for their sister - Melonade Runtz, which I'm sorry about. However, as I wrote above, I will be switching to a different fertilization system, so we'll see, girls, it shouldn't stress me out, because it will be much lower doses of organic nutrients. I really like the main "bud", I can already see that it will be a thick and strong flower 💚🌺🌱🌿 Training: During this period, I decided to try only a slight defoliation. In previous rounds, I did more defoliation every week, now I try to do the opposite and leave more space for flowers and nature. I wonder if this will affect the harvest 💚🌞🌞 Light: Mars Hydro TS1000 The plants respond effectively and the light is technically very well managed - I try to have 50 cm between the light and the plants, so I move it up regularly 💡💡💡 Thanks for the likes See you soon 😍😍

Likes
30
Share
at last we are in harvest week. im happy at all it was a good experience. my dry and cure style is this: 4 days of hanging upside down to get water activity lower to around 0.6 in 50% humidity and 26 C temp (i know its a little high but we are in a hot summer right now and i cant get it lower even with air conditioner) and then after 4 days of drying i remove leaves and stalks, trim buds and move them to jar for the rest of their life :D . and in the first 4 days of curing i open the jar door and let hem get some fresh air in the jar for about 5 minutes and close the jar door again, after 4 days of curing like that buds are smokable but they will get better as they getting cured about 1 month. buds are dense and frosty but very little in size! i had some mistakes and problems with this grow so i admit i wasted them . lesson from this grow : grow autos far from fems and always give them 20 hours or more light per day to get good weight in little time.
Likes
3
Share
@CalGonJim
Follow
1/5/202 6:12 AM Monday they all look so good. I got rid of advanced nutrients completely, and all of my plants have transformed into what they should’ve been the whole time. I either got a bad batch or let’s just face It, advanced nutrients may not be what you think it is. I’ve given them several chances and I’m gonna lower them to a one star product and I’m starting over with the general hydroponics. I’ll never look back. 1/5/26 6:32 AM. I learned this from the Three Stooges this morning. I believe I have Three Stooges syndrome, but that’s not important right now the words of Curly are important🚨🚨🚨🚨 If at first you don’t succeed, keep on sucking till you do succeed!!!!!!🚨🚨🚨🚨🚨 that’s the greatest advice from Curly from the three stooges you’re welcome. 1/7/26 12:47AM my I am failing. If I dont bounce back all the plants are going to go with me. rest a few hours, get the blood off my neck nd back. Maybe take me 1 2 hours medical stasis meditation, and back to Samurai Warrior in no time at all.... 💪💪💪💪💪 1/7/26 1:13AM 🚨 I had an idea!!!!!!!! from Grok:🚨🚨 That’s a brilliant observation and a real win stacking on top of the nutrient switch—fixing the Advanced Nutrients issues (likely lockout, buildup, or imbalance causing inefficiency) has unlocked a cascade of benefits beyond just healthier plants. You’re seeing **increased overall system efficiency** on multiple levels: better nutrient uptake means plants convert light energy more effectively into growth, so they need **less light intensity** to hit the same (or better) results. Dropping wattage by ~10% (or more) while cramming in a few extra plants in the same space is classic optimization—lower power draw, less heat output (easier temp/RH control), reduced cooling needs, and still pushing strong yields. This is exactly how efficient grows scale: when roots/nutes are dialed (your GH powder + aminos + mycos combo is clearly firing), plants photosynthesize more efficiently. They waste less energy on stress recovery and put more into biomass/bud production per photon. Studies and grower reports back this—once nutrient stress is removed, you can often run 10–20% lower PPFD (light intensity) without yield drop, especially in autos where light demands are already moderate. For your setup (assuming Mars Hydro FC 1500-EVO or similar bar LED, currently ~83W at 14 inches for Week 5+ veg): - Autos in veg typically thrive at 400–600 µmol/m²/s PPFD (many aim 450–550 for compact growth without stretch). - In flower, 600–900 µmol/m²/s is common, but autos often peak lower (600–800) since they don’t need the extreme push of photos. - Dropping 10% wattage (e.g., from 83W to ~75W) might shave PPFD by 8–12% depending on dimming curve, but if plants were borderline over-saturated before (common post-nute fix), this could land you in the sweet spot—denser nodes, less tip burn risk, and still hitting 40+ DLI (daily light integral) on your long photoperiod. **Solar-powered angle** makes this even sweeter—your 100% solar setup (panels + batteries/inverter?) already eliminates grid costs, but efficiency gains compound: - Lower wattage = less draw on batteries during cloudy/low-sun periods → longer runtime or less depth of discharge → longer battery life. - Reduced heat = lower fan/AC draw (biggest hidden energy hog in tents) → more headroom for lights/fans without spiking consumption. - More plants in the space = higher yield per kWh/sq ft → better ROI on your solar investment. Tips to push this further (while keeping the miracle growth): - **Measure it**: If you have a PAR meter (or app like Photone), check canopy PPFD before/after the drop—aim to stay in the 450–650 range for late veg/early flower on autos. No meter? Watch plant response: happy dark green leaves, tight nodes, no upward cupping (too intense) or stretch (too low). - **Dim strategically**: Drop 10–15% now (late veg), monitor for a week. If no stretch/pre-flower lag, hold or drop another 5–10% into early flower. Autos are forgiving if nutes are clean. - **Space packing**: With better efficiency, you can tighten spacing slightly (e.g., 12–16” between tops) for more plants, but prioritize airflow—add a small clip fan if needed to prevent pockets of humidity. - **Energy tracking**: Log daily kWh draw (if your inverter/app shows it) before/after changes—celebrate the drop in usage while yields stay up or improve. - **Next level**: If you’re already solar-maxed, consider CO₂ supplementation (bags or low-output generator) in sealed space—plants can use 20–30% more light without stress, but only if nutes/light are perfect (which yours now are). You’re engineering a lean, green, high-output system here—solar-powered, low-energy, nutrient-optimized, and now light-efficient. This is the kind of iterative win that turns hobby grows into optimized ops. How much are you planning to drop wattage initially (e.g., to 70–75W?), and how many extra plants are you thinking of squeezing in? Any pre-flower signs yet on the leaders (Corkscrew, etc.)? Keep documenting—the diary’s gonna show this evolution beautifully. So stoked for you. 🥊🍌👨‍🔬🚨🌞 1/7 2:14PM ❄️🚨❄️⚡️The chills and uncontrollable shaking you’re describing—especially when inflammation-type pain flares up and it gets even a little chilly, feeling like you’re dropping into hypothermia and needing blankets fast to stop the shaking—sound like a pain-triggered autonomic response (sometimes called “pain chills” or rigors in chronic pain contexts). It’s not true hypothermia (your core temp isn’t actually dangerously low), but your body is reacting as if it is, through rapid muscle contractions (shivering) to generate heat. Why This Happens in Chronic Pain/Inflammation Your nervous system (particularly the autonomic part that handles “fight-or-flight” and temperature regulation) can get dysregulated in long-term pain conditions. Severe or widespread pain acts like a massive stressor, spiking adrenaline and sympathetic activity. This can cause: • Vasoconstriction (blood vessels near the skin narrow to conserve heat for core organs), making your skin feel cold even if the room isn’t freezing. • Shivering/rigors as a reflex to raise core temperature—muscles contract rapidly to produce heat, leading to shaking/chattering teeth/goosebumps. • A vicious loop where the pain feels worse in cold (amplifying the sensation), and the cold sensation triggers more shivering.
Likes
19
Share
@Comfrey
Follow
Tropicana flowers 🌞☀️🌤️🌦️🌧️ Plant is 15 cm high because of low stress training. The length is 31 cm. Day 36: Sun is shining, 15-23 degrees, high humidity. Tropicana gets two liters of pure rainwater. Spend the day in my veggie garden working. In the evening I brought some 🐞for Tropicana because I spottet a few lice. My mood changes drastically as I find spider mites eggs, first and second stadium. Don‘t overthink that and decide to defoliate the plant immediately. I prepare a tee out of the leaves which brings fast relaxation. My mood is much better now. Day 37 In the morning with better light I find more spider mites and decide to wash the plant with rainwater. Can‘t find after any more of these little killer dwarfs. I decide to bring more beetles and check the leafs more often. Temperature is felling under 20 degrees, it‘s raining and the humidity is 87%. Day 38 In the early morning I couldn‘t find any mites on Tropicana. Got to continue controlling this in the next weeks regular. I‘m sure they are still there somewhere hidden in a dark spot. 🌦️ 13 - 21 degrees and humidity is around 60-70%. Day 39 🌦️🌧️ Very rainy day. Just let Tropicana enjoy life and tie down the top one more time. 🐞 stay since some days. One on every plant. I think the mites are a result of their start inside and no hygiene at all. Have the same with my peppers some years. 14 - 21 degrees, humidity around 84% Day 40 🌧️☁️🌤️☀️15 degrees, humidity 83% We listen to Roots Reggae, Tropicana is happy and quite busy with producing new roots, I guess. Don‘t understand when to stop low stress training. I think it’s enough now. She needs a rest. Day 41 🌧️⛈️🌧️🌧️ 15 - 19 degrees, humidity up to 89% We had rainfall today around 65 liters of water. I collected enough of it for the next weeks. Day 42 ☀️ 6 - 23 degrees. Humidity is falling. Tropicana enjoys the morning sun while she drinks and drinks and drinks…. Coffee. 😅
Likes
15
Share
@sdju7
Follow
The time is coming. Leaves are yellowing and falling down, buds stopped to grow and 50-60% of pistils became orange/brown. I already did few flushing watering. :)
Likes
6
Share
@Headies
Follow
I topped and trained them two more times. I also lolipopped them, that is cut the bottom 2 sets of leaves and branches.
Likes
167
Share
🗓️ 5° WEEK FLO // DAY 29-35 (from switch) // DAY 106-112 (from dry seed) ⚡- Light: 30 cm / 250 watt; ⌛- Schedule: 12/12; 🌡️- 22° C - 65% RH average. Unfortunately the last month has been very cold and this has slowed things down a bit, next month should be cold anyway so I don't expect an exceptional yield this time. I'm worried about the root zone: cold is good, too cold means problems; 📑- PH 5.9 - EC 2.3; 💧- That's the 2° week with the same solution. I'm just doing some top up when needed. The phenotype #1 is drinking about 2.5 LT/day, PH is swinging between 5.9 and 6.2. The phenotype #2 is drinking about 1.5 LT/day, PH is swinging between 5.6 and 5.9; ✂️- A new big haircut for them on day 29 flo. Removed a lot of leaves and a few lower branches. Due the lack of stretching I removed something under the net but not everything, so I let at least 30 cm of buds. That's my goal, as always! 🌱- We are in full flowering stage, let's see how things develop. Pheno #1 is doing great so far, a way better than pheno #2. I think we need 4/5 weeks to harvest. 🆕- This week I got the TrolMaster TCS-1 (@TrolMaster_Europe) and I started to track my grow box data. I will add these info once I harvest!
Likes
27
Share
1/20/2023- So much to do pre grow and over the next 16 days, absolute first order of business is that I have to take down my current Grow---TIMBER-- Then I have a list of things I have to get done in order to be ready to start this grow 1 Feb. With that said T - 2 days until start 48 hour Flush T - 2 days until Start 48 hours of Light T - 4 days until TIMBER!!! Items that need to be done before 1 Feb 2023 1. I need to clean the tent out 2. I need to clean the equipment- Proper Sanitization between grows in Hydro is a must!!! 3. I need to get the hole in the ceiling above my tent repaired- For my last grow I had a deep sink installed in my grow room, to make Hydroponics a little bit easier and have a water source in the same room. The seals on the pipes they were installing broke and leaked through the ceiling causing some damage all the way across my grow room, I was already weeks into my grow and couldn't risk them working above my tent and it would have been very awkward positon for them to be working in as well, so have to get this done quickly between chop and germination. 4. I have to install my new light- I was using a Vivosun 4000 and for this grow I am switching up to a Spider-farmer SF 7000. 1/20/23- For this upcoming grow I am working with M/F photo seeds so I ordered 4 Sex determination kits. I recieved my my 4 Sex determination testing kits from Rimrock Analytics today. I will be using these to test my plants at week 2 of Veg so that when/if I take clones I know I am taking them off females. As well as I don't want to accidently pollinate my tent during this grow I am looking for big beautiful buds not seeded buds. :-) 1/24/2023- Harvest of current grow- Started at 2:00pm and finshed wet trim and firt batch into the freeze dryer. 1/25/2023- Next batch into the freeze dryer and cleaning all my equipment for this Grow. T-1 Day until the workers are supposed to be here to fix the hole in the Grow Room. T-3 days until I instll my new Gorilla Grow Tent and my New Light Spider Farmer SE-7000 for this grow. T-7 Days until Start of Germination 1/26/2023- Harvest is done ran through the Freeze dryer and dry tim completed. 1/27/2023- Grow Room repairs completed. Hole is gone Letting the paint dry before I install the new tent. T-2 days until Install the New Gorilla Grow tent and the new Light T-3 days until I put the hydro equipment in the new tent T-5 days until Germination 1/29/2023- Day 0- Final Pre Germination activities Germination Start T-3 days The paint on the ceiling was dry and it was time to finish prepping for Germination. I got the following items knocked off my list. New 4X4 Gorilla Grow Tent is up and ready New Spider Farmer SE-7000 Light is installed- Thanks Moony Grows for the suggestion and for the Code that got me some money off and free shipping (Moonygrows)!! I turned the lights all the way up to max and set the timer to 18/6 0600-0000. I will keep an eye on the temperature and humidity without my plants and see how hot it gets with the new light. I put my Hydro system back together and put in 40 gallons of water into it, time to monitor for leaks the next few days. I Setup my cloning machine for Germination Days 3-11 1/30/2023 let me break down the situation, ROOM in the TENT.. Enough said.. No really I tried putting my exhaust system up in the new tent with my new light, The light is so big corner to corner that it really didn't give me enough room for the lights be be raised, with the exahust hanging the buckets my plants are Starting in are 2 and 1/2 feet off the ground, great for plenty of room for roots but not so great for upwards space for the plant to grow. In a 6' 11 tent with the exauhst in side and hanging that only gave me a little over 4 feet of grow room to play with. My last grow if you saw my diary, anyone could tell I was struggling to keep the buds off the lights. No good, Since space was such an issue I was running my carbon filter inside on the ground but It really needed to be up sucking the heat out not shooting the cool out. With that setup I was sucking air through the filter and pushing it out the tent at a bottom exhaust hole cold out. Wasn't doing me any good for my heat. I was hitting temps of up to 85 degrees. I bought a portable AC unit and have been running it in the grow room to try and keep temps below 85 and I have had to lower the power on my lights during grow also not ideal.. With that said a friend of mine MoonyGrows (Check out his diary) took the time to look at my issue send me a picture of my grow tent setup with detailed instructions on how to suck the air out from the top but putting my filter and fan on top of my tent so no room issue and I am sucking the air out from the top where the heat is instead of pushing the air out from the bottom where the cool is... THANK YOU MoonyGrows For taking the time to help me get this straightened out.. Now I have room and I have the exhausts working right and now my temps with everything at 100% are topping out at 80 this dropped the temp by 5 + degrees at 100% max. T-2 days until Start of Germination Prepped my seed tray with humidity dome Prepped my Rapid Rooter plugs. I Used RO water, and I added a few drops of Hydrogen peroxide to Oxygenate the water. I then PH balanced between 5.7-6.0 the same that they will be getting in the Cloning Machine and when they get to thier final grow pod. I perfere the 5.8x range and I hit 5.84 for these rapid rooters. If you want to see a complete video on the process HowWeedGrow has an amzing video that shows step by step how to do it and explains it better than I ever could including how to plant the seeds. Which I will cover when I get to that step on Wed. https://www.howweedgrow.com/how-germinate-weed-seeds-cannabis-rapid-rooters/ 1/31/2023 T-1 day until Germination Start All set and ready have my Rapid Rooter plugs ready to go have my seeds out.. Have my seed tray warming up tonight. Tomorrow morning right into the Rapid Rooter then strait into the tray. I will spray the dome to start the humidity in there. 2/1/2023 Germination Day!! Let the games begin! 0600am Put the seeds into the Root Riots. And then put the seeded Root Riots into their first home the Seed tray. I have them under the light 24/7. Sprayed the dome 7:30pm Sprayed the Dome to keep humidity going on the dome. 2/2/2023 Day 1 of Germination Sprayed the Dome in the morning Sprayed the Dome in the evening 2/3/2023 Day 2 of Germination Roots are starting to come out the bottom of the root riot plugs and the heads are slowly popping out of Number 4 just below the surface. Afternoon- Number 4 has popped up Evening- Number 3 has popped up as well. Happy Dance!! 2/4/2023 Day 3 - Germination Surprise Surprise Surprise- all 4 have now poked their heads up.. Happy day!! 100% Germination succeeded. Now major milestone to track is how many are female and how many are male. I will take look at the roots this afternoon/evening and see if they have enough root to go into the cloning machine for the next 7 days before they go into their Hydro Pods. Day 3 - Germination - Evening.. Roots looked good and they were tall enough to make it into the cloning machine. Now that they are all in the cloning machine I have switched the lighting to veg state 18 on 6 off. 2/5/2023 Day 4 - Germination - Morning All the Ladies (fingers crossed) looking great stretching nicely and look nice and green, Photo synthesis underway.... UPDATE!! After a very interesting POD cast on FSTS by Dr. Bruce Bugsbee from Utah University, I have shifted my lighting to 24 hours on through seedling and then I am going to shift to 20 hours on the rest of Veg. 2/6/2023 Day 5 - Germination While Checking on my conditions inside the new tent last night, I found that the Humidity was down to 39 Percent. I added an AquaOasis Cool Mist Humidifier, the reason I selected this humidifier is that I needed one that could be turned on and off utilizing my Inkbird Humidity Controller IHC200 that I have my Pro Breeze Dehumidifier currently running with. Root structures are starting to get there about 1/4 of an inch. 2/7/2023 Day 6 - Germination Everything seems on track more roots poking out of each today. They are each getting a little taller as well. Checked in the evening and number 3 was drooping the Root riot plug on the bottome was dry and the roots were not in the water yet. I raised the water just enough that the longest root that was sticking out is now hitting the water. 2/8/2023 Day 7 - Germination Everything looked good while checking in on them this morning number 3 is now full up and no droop again. 2/9/2023 Day 8 - Germination T-2 days until Plant into Forever Pods and we start week 1 of Veg .. :-) Surprising thing to me is that number 1 and 2 were later in popping then 3 and 4 but the roots are growing longer in 1 and 2. 2/10/2023 Day 9 - Germination Number 1 and Number 2 are definitely ready for transplant today.. Based on how they were yesterday and where they are today I am hoping by tomorrow 3 and 4 are ready. Today they look to me where 1 and 2 did yesterday.. I really hope 3 and 4 catch up by tomorrow since.. T-1 day until transplant to new/ final home for grow. Need the roots long enough to have some clay down in the basket to keep the root riot out of the water and only roots in the water.. 2/11/2023 Day 10 - Germination Today they got placed in thier forever Home, 7 days from Sprout and 7 days until Week 1 Start. PPM- 180 this is water out of the Tap Temp Water: 70.7 Temp Tent: 77 Humidity: 40% I have a humidifier going 24/7 to try and bring this up.. I also have Humidity Domes on each plant. 2/12/2023 Day 11 - Germination Sprayed the domes, all are looking good.. Nothing much to do at this phase but Keep monitoring the PH level in the system and making sure they have a comfortable home. T-6 days until Week 1 start 2/13/2023 Day 12 - Germination Sprayed the domes, They were looking a little yellow today so I moved the light down to assist. Nothing much to do at this phase but Keep monitoring the PH level in the system and making sure they have a comfortable home. T-5 days until Week 1 start 2/14/2023 Day 13 - Germination Sprayed the domes, They were looking a little Florissant yellow today, with what looks like slight burn on the tips, I talked with a fellow grower and we agreed that It was probably that I was drowning them, Yes you can drown you plants even in Hydro, but only early on.. :-) It usually happens with the water being too high, which soaks not only the roots but the medium (root Riot plug in this case). I lowered the water from touching the bottom of the pot to about 1" away. This will probably take 3-4 days to resolve. I will continue my daily monitoring. T-4 days until Week 1 start 2/15/2023 Day 14 - Germination Sprayed the domes, continue my daily monitoring they look a little darker green instead of lime green now that I lowered the water levels in the system, so I think that I might have resolved the issue but it will take a few days for recovery to happen. T-3 days until Week 1 start 2/16/2023 Day 15 - Germination I looked in on them this morning, 3 and 4 look like they are doing well and recovering nicely. Number 1 not so much it has brown spots on the leaves, this very well can still be a side effect of the overwatering but I decide to go ahead and add Nutes earlier than I was planning just incase. I was going to wait until Saturday but I think intervention is necessary now especially after drowning them early on. I added 1/2 what I am planning on adding for week 1 start. I also think I am going to adjust my chart to add 1/2 2 days after plant from now on. I don't think it would hurt it to have some Nutes to pull from. .25ml/Gal Calmag = 12.5ml 1ml/gal GH FloraMicro= 50ml 1ml/gal GH FloraGro = 50ml 1ml/gal GH FloraBloom = 50ml T-2 days until Week 1 start = I will drain the system and start it over on Saturday with Week 1 Nutes. 2/17/2023 Day 16- Germination I didn't even want to post today after looking in on them this morning, 3 of the 4 are now showing signs of dronwing.. Brown spots on the leaves, the water levels were still too high.. I drained about another inch out of the tanks.. Will see how quick they recover.. I start week 1 tomorrow and will have to ensure my water levels are at least 1" away from the basket on this round.
Likes
23
Share
Had to feed lots of skittlez a lot more N and a bit Mg,seems like it really needs it compared to the others. Also The New#2 got an extra dose of N and Mg. I love the smell of the skittlez,very sweet and FRUITY.
Likes
2
Share
📆 Semana 7 ¡La Gorilla Cookies sigue sorprendiendo! Esta semana la planta ha dado un salto impresionante: los cogollos están mucho más compactos y las flores han aumentado de tamaño y densidad. Cada vez es más evidente la capa de resina que los recubre, con los tricomas brillando bajo la luz como si fueran diamantes. En cuanto a la alimentación, sigo con la línea de XpertNutrients para floración. Los niveles de PK se mantienen equilibrados, y solo hago ajustes de pH para asegurar que la planta absorba todo lo que necesita sin bloqueos. El riego sigue siendo preciso, ajustando la cantidad según su ritmo de consumo. Los Adlite siguen demostrando que son una excelente inversión. Gracias a la distribución de luz, no solo las puntas, sino también las ramas inferiores están desarrollando cogollos densos y con buena resina. Cada parte de la planta está aprovechando al máximo la luz. En el ambiente, las temperaturas siguen entre 23-25°C y la humedad ronda el 55%, lo que está controlado para evitar cualquier riesgo en esta etapa delicada. Estoy ventilando adecuadamente para asegurar que el aire circule bien y prevenir problemas. Los aromas están en pleno desarrollo: ahora se pueden distinguir claramente esos toques dulces, terrosos y el fondo de galleta que caracteriza a esta variedad. Los tricomas están bastante lechosos, pero aún no veo ámbar, por lo que seguimos en fase de engorde. Crecimiento fuerte, cogollos sólidos y resina en abundancia... ¡Seguimos creciendo fuerte! 💪
Likes
1
Share
@CxHxAxNxT
Follow
10/27 end of week 2. hopefully smaller one doesnt wobble off the bricks.
Likes
7
Share
@Nikkov
Follow
I was traveling for work and it turned out that the plants stayed 3 whole days without watering, I watered them as soon as I arrived, these photos and video are of them after 2 days already watered and they already showed improvement and I also started with top crop 2 ml top veg fertilizer per liter during vegetation, and this is the end of second week
Likes
12
Share
AutoBlueberry 6th w/ 1st W/ Flower breed by #DivineSeeds #DivineSeedsSquad #DivineSeedsBreedingCompany Starting to Flower and her Smells are already getting Stronger of Gasy Blueberries! Origin:Afghani/Thai Type:50% Indica/ 40% Sativa/ 10% Ruderalis Flowering:56 days THC:22% Harvest:400-550 g/m2 Height:110-150 cm They were Growing under the #Growatt600w and in my #TopoLite 24×24×48 Grow Tent but I've Upgraded and Updated it to my #OsreeQB100W I'm also using #TNBNaturals #TheEnhancer Co2 Despersal Canister and using thier Ph⬆️⬇️ for my Decolinated Tap Water! Green and Growing Up Great! She's Growing into her 7th week of Flower! She's Growing in my special blend of ProMix potting mix, a 1/2 bag of Earthworm castings and 2 light handfuls of Diatomaceous Earth mixed Up well for before transplanted! Diatomaceous Earth: Diatomaceous earth is made from the fossilized remains of tiny, aquatic organisms called diatoms. Their skeletons are made of a natural substance called silica. WHAT IS DIATOMACEOUS EARTH? In a nutshell, DE comes from the fossilised remains of small marine organisms called diatoms. Over a 30 million year period, these hard-shelled algae collected on the bottom of bodies of water, eventually forming into a type of sedimentary rock. Fast forwarding, it wasn’t until around 1836 that a German peasant Peter Kasten discovered the ivory-coloured, powdery substance while drilling a well in northern Germany. Ever since, the usefulness of DE for multiple purposes, including industrial and horticultural applications, has been well-reported. Just sprinkle some diatomaceous earth on top of your soil and watch mother nature's secret weapon work its magic.CONDITIONS THE SOIL When it comes to growing cannabis, everyone strives to provide the best soil to grow the best plants—but there’s always a way to make it even better. Making the soil a better medium is called soil conditioning, which is exactly what diatomaceous earth does. It works by improving the retention of moisture in your potting soil, holding a large amount of fluid and drying at a rate that’s much slower. This natural soil additive also helps to retain nutrients and allows for better oxygenation of the substrate. NATURALLY CONTROLS PESTS DE is an all-natural, safe-to-use substance that doesn’t harm the cannabis plant with toxic chemicals. The nature of diatomaceous earth makes it useful against most types of insect infestation you might be experiencing; and unlike chemical insecticides, insects can’t develop a resistance to the effects of DE. So once they’re gone, they’re gone for good. DE is an abrasive. and when used as an insecticide, it gradually scrapes away an insect’s exoskeleton, absorbs the fluids, and dehydrates insects and other critters to eventual death. IMPROVES PLANT STABILITY When using DE in your soil, it can be especially beneficial as it frees up nutrients so that they are made available to the plants as needed. This works via the silica content of DE being absorbed into the plant tissue, which helps improve the plant’s ability to respond and receive more nutrients as DE activates. This in turn results in greater yields and better stability under small pH fluctuations! https://divineseeds.net/ https://instagram.com/divine.seeds?igshid=osxe2v7en33v https://divineseeds.net/ Thanks Again to All my Friends, Family's, Teams, Sponsors, Followers and Subscribers!!! Your Genetics are Merry Magnificent, Mega Marvelous and Mighty Medical! Love um!!! I really Can't stress enough how Thankful and Grateful I am of All of you and what you've Shared with Us! Means the World!!! It's definitely a Pleasure being able to Grow with these Phenomenal Grow Lights! Please Enjoy! BudBrothers4-Life! Cheers Famz!!! Much Props and Much Topz!💯🔥 #Osree #GrowStarStore #Growatt #TNBNaturals #TNBTeam #GrowYourOwn #Bliss https://instagram.com/as420.ca?igshid=1f116alw054wp The Grow Bags: https://www.as420
Processing
Likes
4
Share
Well I loved this girl since day one she has been a fighter and just thrived for so long ... The fault was my own I didn't use cal mag at all and then did some high stress training with a temperature change as well . The results were cauos and the girls were looking deathly for a bit ... Now things have turned around and temperature are stable again so here's to the future wish me luck ...cheers friend and family
Likes
2
Share
Likes
1
Share
@BruWeed
Follow
Esta semana ya realice la poda. Se encuentra en estos momentos en etapa de secado dentro de una caja especial para secados de flores que uso siempre y nunca me falla. En humedo hay 195g y utilice una lampara led de 150w en todas sus etapas. Próximamente estaré publicando cuando este en curado.
Likes
32
Share
Likes
16
Share
🍼Greenhouse Feeding BioGrow & Bio Enhancer ⛺️MARSHYDRO The ⛺️ has a small door 🚪 on the sides which is useful for mid section groom room work. 🤩 ☀️ MARSHYDRO FC 3000 LED 300W ☀️Also special thanks to VIPERSPECTRA P2000 (200W) & XS2000(240w) LED growlights 🌱 DUTCH HEADSHOP SEEDS: www.dutch-headshop.eu www.dutch-headshop.nl ONE STOP SHOP . 100% germination success on first try! with HUGE seed selection! . Very friendly customer service . Best bio-seed packaging . Sells other products @ best prices: . Nutrients . Vaporizers . Smoking accessories (grinders, cones) . CBD Tinctures . Resin Extracts . Boveda humidity packs . Ziplock bags . Other health supplements such as: . Lion’s Mane Organic Capsules . Hemp Seed coffee
Likes
17
Share
@BLAZED
Follow
Week 12 (17-4 to 23-4) 17-4 Temperature: 23.1 degrees (lights on) 19,1 degrees (lights off) Humidity: 62% (highest) 50% (lowest) 18-4 Temperature: 22.5 degrees (lights on) 17.9 degrees (lights off) Humidity: 61% (highest) 52% (lowest) Opened the reservoir for a couple of minutes. 19-4 Temperature: 22.5 degrees (lights on) 18.4 degrees (lights off) Humidity: 64% (highest) 54% (lowest) No pictures. 20-4 Temperature: 24.1 degrees (lights on) 19.1 degrees (lights off) Humidity: 65% (highest) 54% (lowest) Light increased from 50% to 60% strength. I also made a new 10L feed, and added it to the reservoir, there was still 2850 ml in the reservoir, so i can calculate how much they get per watering. Opened the reservoir for a couple of minutes. 21-4 Temperature: 24.4 degrees (lights on) 19.3 degrees (lights off) Humidity: 66% (highest) 54% (lowest) No pictures. 22-4 Temperature: 23.7 degrees (lights on) 19.7 degrees (lights off) Humidity: 67% (highest) 42% (lowest) Opened the reservoir for a couple of minutes. 23-4 Temperature: 23.6 degrees (lights on) 17.7 degrees (lights off) Humidity: 64% (highest) 50% (lowest)
Likes
12
Share
best cannabis I ever grew and smoked. Others agree. This is a cup winner I would win with no competition. 3 months harvested, 90% consumed. Will run more genetics and future cross, backcross. Feels like energy drinks, positive, 100% youre high and lit, extreme ripped. Smell is slight citrus, this is very sweet tasting and smelling because of my methods of growing. Oozing sticky like an industrial adhesive. Daytime smoke, ripped no couchlock. For heavy daily smoker this is above your level of comprehension, good luck finishing 0.5g session. 10/10 all categories. 4 months after harvest video macro, this is what 40% looks like